Many of the muscles are no doubt already familiar to you, such as the biceps and triceps of the arm, the major chest muscles, the inner calf muscle, and so forth. We see them every time we look in the mirror, or at a health club. What’s important is to notice the length of the muscles and how they are interwoven into the surrounding muscles.
a sternomastoid
b deltoid
c pectoralis major
d biceps
e teres major
f serratus
g external oblique
h rectus abdominis
i gracilis
j sartorius
k quadriceps
l gastrocnemius
m soleus
n tibialis
o peroneus longus

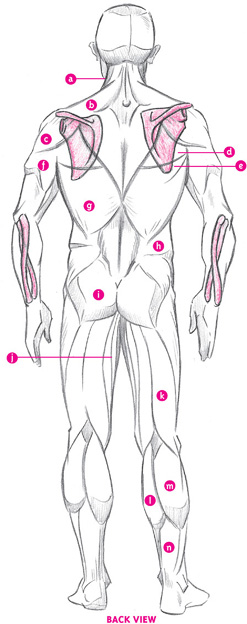
a sternomastoid
b trapezius
c deltoid
d teres minor
e teres major
f triceps
g latissimus dorsi
h external oblique
i gluteus maximus
j gracilis
k biceps femoris
l gastrocnemius (medial head)
m gastrocnemius (lateral head)
n achilles tendon
Note the position of the shoulder blades, which are attached to both the shoulder muscles and the trapezius muscle, and which are, at the bottom, partially covered by the latissimus dorsi muscles. Note that the forearm is composed of two bones twisted over each other. We will cover this in more detail in an upcoming chapter.
You might ask, why must I be familiar with all the curves of the muscles? Can’t I just draw the figure without it? Every artist has lamented this. Unfortunately, the answer is that knowledge of the contours of the muscles is essential. Let’s see why.
FIGURE DRAWN WITHOUT KNOWLEDGE OF ANATOMY
In this figure, the proportions are correct, but the musculature is not understood. The artist knows that there are some indentations on the chest, near the clavicle, and by the shoulder. The artist sees them, but can only guess their direction, because he cannot see what has formed them, that which is buried beneath the skin and fat.

FIGURE WITH MUSCULATURE
By taking a quick glance at the actual muscles, you can quickly see the mistake. Yes, indentations are placed where they should be, but the path of the muscles is all wrong.

CORRECTED FIGURE
Now we’re adding accents to the muscles in the directions that they are traveling, resulting in a more accurate rendering of the figure.
As muscles peak at various points along the body, they cast small shadows, which help to define their presence. It’s important not to be a slave to the anatomical structure of the body. You do not have to, nor should you, indicate every muscle in the body. But the major muscle groups should be recognizable.


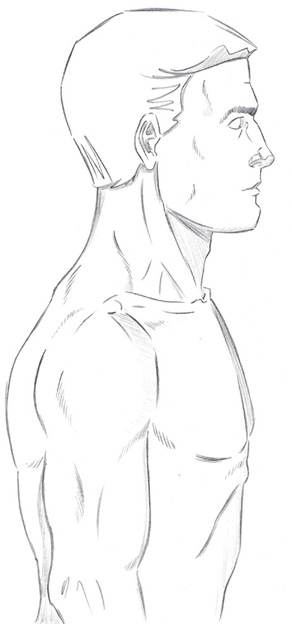
There are many muscles in the neck. We will focus only on those that are observable to the naked eye. Most people have necks that readily reveal the musculature. Furthermore, the muscles of the neck are surprisingly thick and strong, which is only natural, because it must carry a weighty skull upright for sixteen hours a day. Among the muscles of the neck are pockets of space, which help to define the muscles.
a sternohyoid (shows mainly when the head is tilted back)
b sternomastoid (most noticeable muscle of the neck)
c sternomastoid (it splits off and attaches further up the clavicle)
d trapezius (visible from the front, this muscle also travels down to the middle of the back)


TURNING, RIGHT
The neck muscles are very dynamic, twisting and turning with the rotation of the head, wrapping around the neck to attach to the clavicle.

TURNING, LEFT
When the head turns, you can see the action as the sternomastoid is stretched.

REAR VIEW
Some of the muscles that are visible from the front view remain visible in the rear view.

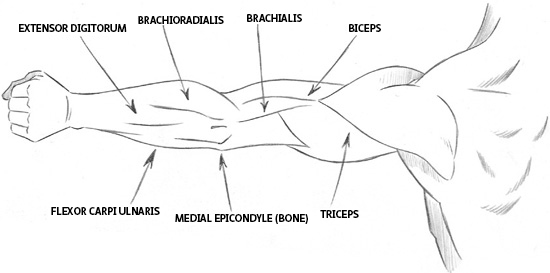
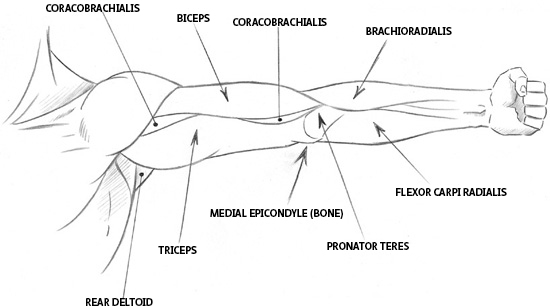
As you can see, there are more to the arms than the biceps and triceps, although they are by far the most dominant muscles of the upper arm. Of particular importance is the coracobrachialis of the inner side of the arm and the brachialis of the outer side of the arm. The forearm muscles are thinner than those of the upper arm and do not bunch when flexed to the extent that the biceps and triceps do.
DETAIL, OUTSIDE VIEW
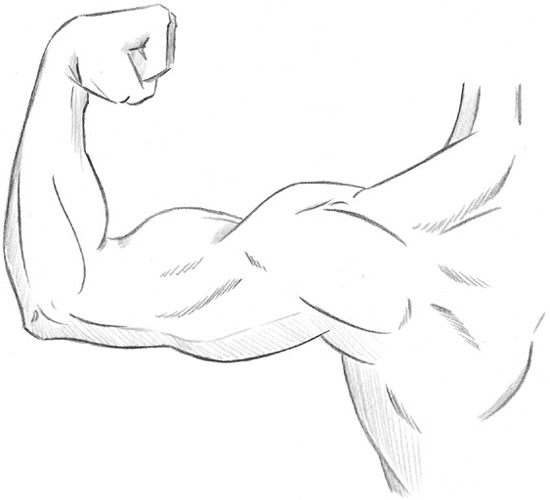
Arm muscles, being the more actively used muscles of the body, are often well developed.

The forearm has a unique ability, when rotated, to twist its two bones that were previously parallel to each other so that one (the radius) overlaps the other (the ulna). The twisting motion of the bone tugs some of the forearm muscles with it in a corkscrew fashion, as demonstrated:
SUPINATED POSITION
Supination means the palm is facing forward or upward. In this position, both bones in the forearm are parallel to each other. The muscles flow into ligaments as they approach the hand.

PRONATED POSITION
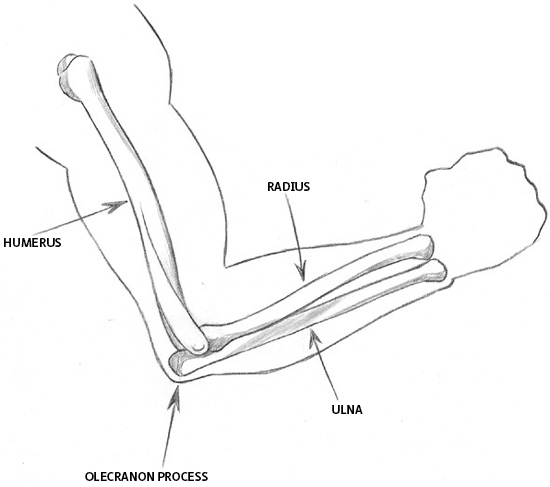
Pronation means the palm is facing downward or backward. By rotating the forearm, the radius, which is the shorter of the two bones, crosses over the ulna. Remember, the ulna is the bone that gives the elbow its familiar protruding joint, as well as the familiar protruding wrist bone. Notice the flow of the muscles.

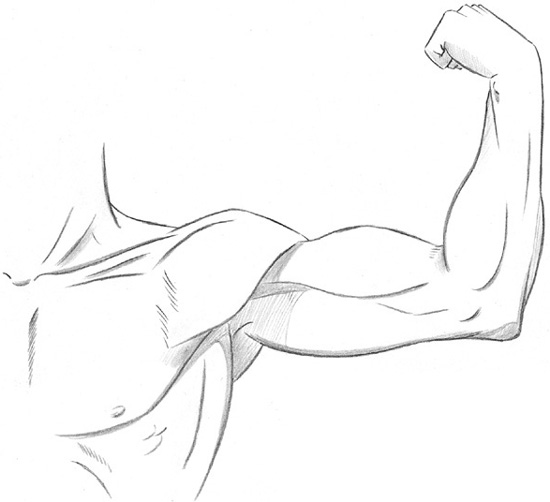
When the arm is raised, the muscle known as the teres major is apparent. It can be confusing, because at first glance, it appears to be the shoulder muscle. In fact, it is the teres major muscle, wrapping around from the shoulder blade, up and under the arm.


The shoulder muscle, known as the deltoid, is actually made up of three parts: back, middle, and front. They are not always visibly defined, except on athletic types, and when the arm sustains a certain position. For example, when the arm is raised above shoulder level, the three heads of the deltoid are more easily differentiated.
The shoulder is still visible from the side in this position.

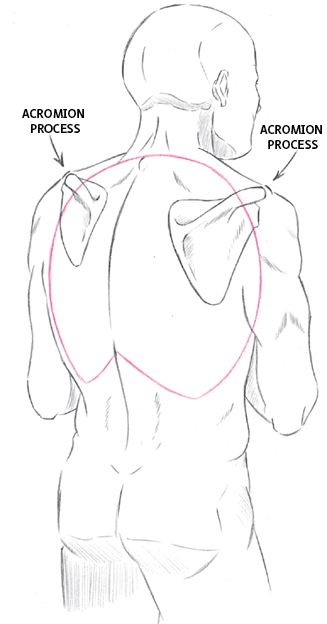
The shoulder muscles narrow and attach themselves to the spine of the scapula, which is a high ridge on the scapula. Notice how the shoulder wraps itself from the back to the front of the body.

Raised arms create a heartlike shape of the shoulders. Notice the acromion process, which is not covered with muscles and therefore forms a bump of bone on the top of the shoulder.

The shoulder is like a holster, into which the arm fits. The shoulder is a wraparound muscle. It wraps around and envelops the arm.

As you can see, the scapula has a ridge on it that extends past the scapula itself. This is the spine of the scapula, at the end of which is the acromion process. This forms a bump on the shoulder. The basic curve of the scapula is away from the spinal column.

POSITION OF THE SCAPULA
The scapula extends past the rib cage.

ATTACHING THE SCAPULAE TO THE SKELETON
The only bone that anchors the scapula to the skeleton is the clavicle.

The scapulae are not fixed in a single position on the back, and as a result, they can move with the arm across a wide section.

Scapulae can move independently of each other or together.

They can squeeze together, crushing the muscles above the spine.

They can move almost to the side of the body when the arms are pulled apart and to the front.

The scapulae can angle outward when the arms are raised.
The back is a combination of many muscles. Let’s view the major ones, as we build up the back, one muscle group at a time. To begin, let’s look at the skeletal structure.. Leaving out the rib cage so as to avoid cluttering the drawing, let’s take a look at the skeletal landmarks of the back. We are concerned with the seventh vertebra of the spine, which separates the neck from the back and protrudes, as well as the scapulae, and the pelvis, which is located at the base of the spine.

We’ll add the top half of the long trapezius, which flows without a break from the base of the skull down the middle of the back. Then we’ll add the latissimus dorsi, the largest muscles of the middle back.

Now lets add the bottom half of the trapezius. Note that the area surrounding the seventh vertebra is a depression in the muscles. The scapulae also have several important muscles attached to them. A word of caution, however: Unless the figure you are drawing is of a well-developed athlete, it is best to leave out most of the muscles of the scapulae. With their reduced muscle size, this holds especially true for women. Instead, indicate the partial outline of the scapula itself, as well as the musculature of the latissimus dorsi, the part where it overlaps the bottom of the scapula.

These are the muscles of the back as they appear on a well-defined person. Note how the deltoids tend to encroach on the area of the back. The muscles that cover the scapula are not too complicated, but you need to understand the underlying anatomy. The latissimus dorsi are the largest muscles on the back. Note how the spinal column is at least partially visible all the way up and down the back. There is a pocket of shallowness near the seventh vertebra, which begins the neck.
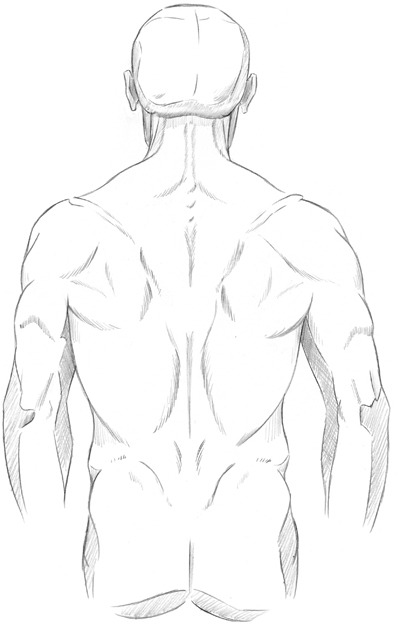
Not all people will have such developed muscles in the back. But even on bodies that are not well-defined, it is important to indicate where the lower latissimus dorsi muscles end, which is just above the small of the back. Also give some indication to the spinal column, especially near the seventh vertebra. It’s not necessary to draw all of the muscles covering the shoulder blades. Simply draw an indication of the spine of the scapula. (For clarification, please refer to the illustrations on this page.)

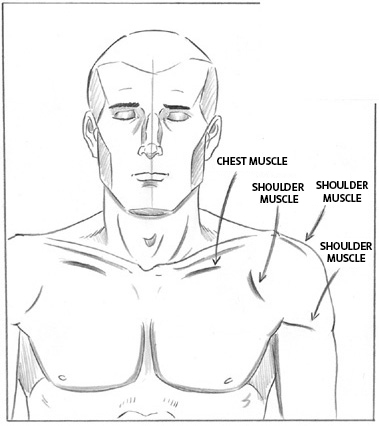
DIRECTION OF THE CHEST MUSCLES
The chest muscles spread out from the sternum and travel horizontally around the chest toward the armpits.

ARMS RAISED
In this diagram you can see how the chest muscles join the shoulder muscles. Also notice that by lifting the arms, the outer region of the man’s chest muscles lifts upward, which in turn lessens the definition of the chest muscles.

THE MUSCLES COVERING THE RIB CAGE
These muscles are called the serratus anterior. Typically, the ribs themselves show, but if the subject is athletic or powerful, these muscles are defined and should be shown. The serratus anterior are two columns of muscles that fit snugly into one another, as shown.

On women and average men, it usually suffices to simply sketch in a partial indication of ribs on either side of the rib cage. By expanding her chest and holding her breath, this subject reveals a well-defined rib cage.

The leg muscles are long and generally not as well-defined as the arms, except in athletic types. But the leg muscles are responsible for giving the overall leg its curved shape.
The muscle that’s highlighted in red is the sartorius, the longest muscle in the body. It’s what gives the inner thigh the sweeping curve from the inner knee to the hip. The calf is not completely covered with muscle. Some of the shinbone is exposed. This is what makes it so sensitive to injury.

Notice how the thigh is rounded on both sides, not straight. The calf also bulges, but the shinbone is more or less straight, although it does have a subtle sweep toward the toes. Note the fat deposit above the knee, caused by the locked-knee position. The head of the fibula is visible just below the knee.

Note how the tendons of the lower leg extend from the calf muscles to the heel. Tendons are attached to muscles, while ligaments are attached to bones. Note that there are two major muscles of the calf, the lateral and medial head of the gastrocnemius.

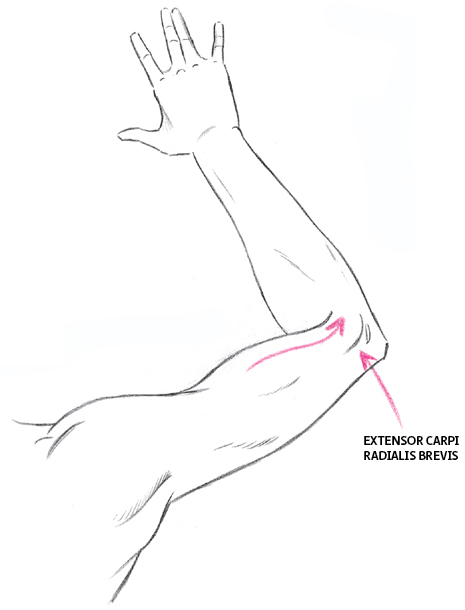
When a limb bends sharply, the compression of muscles at the joint creates a contour line that curves in one direction, and then curves back in the opposite direction, like an “S”.
COMPRESSION LINES
Note how each line curves in two directions, like an “S”.

BENT ARM
Note the curving compression line. In addition, a smaller line indicates the compression of the short extensor of the forearm (extensor carpi radialis brevis). The extensor muscles straighten the palm and open the fingers.
BENT LEG
In this position the compression line takes the form of the calf, not that of the upper leg. Note the smaller compression above the knee of the vastus medialis, one of the four muscles of the quadriceps group.

APPLICATION OF COMPRESSION LINES

To draw the knee, all you need to do is look at the skeleton. It’s that simple. The knee joint is a combination of the joint of the femur, tibia, patella, and protrusions of bone just below and on the outer side of the knee.

THE KNEES AT A 45-DEGREE ANGLE
The man is sitting with his knees at a 45-degree angle to the viewer. In this angle, it is not necessary to indicate the patella. Simply indicate the joints of the femur and tibia. Note that just below the knee, there is a small bump. This bump is part of the tibia, just below the joint.

FAT DEPOSIT ABOVE THE KNEE
When the knee is locked in a standing position, a small pad of fat is visible just above the knee. When the knee is bent, the fat pad disappears and instead there is an indentation.

Take special care, because drawing hands incorrectly will surely attract unwanted attention. There are many things that you intuitively know about your own hand, which you must bring to the fore of your consciousness when drawing it. For example, you know that your middle finger is the longest, followed by your ring finger, index finger, and pinkie. This, naturally, must be indicated, as well as the knuckles and joints that stick out.
Notice the fingertips. They are like tiny pads, rounder and softer than the rest of the fingers. Notice how weak and small the pinkie finger is in comparison to the other four. Observe the major lines that crisscross the palm, the creases between finger joints, and the backward curve of the thumb.

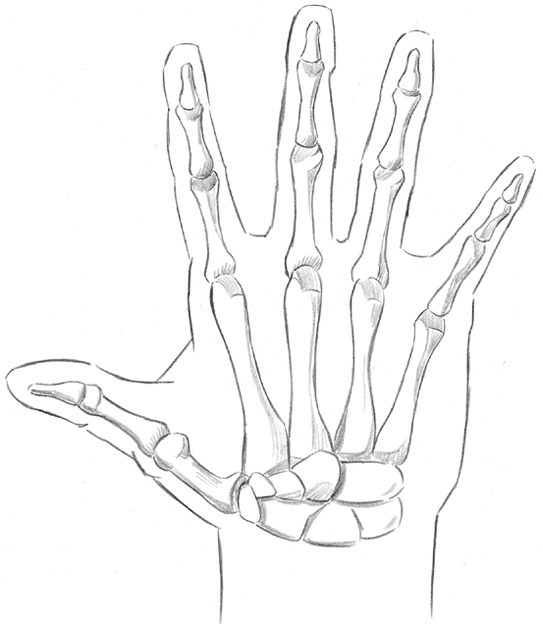
THE BONES
Notice that the hand is made up of a large number of bones and joints, that even the palm itself is basically an extension of the fingers, and that the bony base of the hand is quite small.
DETAIL OF FINGERS
The fingers are not straight as a board. As with the skeleton in general, the joints are the widest part of a bone.

APPLICATION
The index finger is turned slightly inward. There is a bit of webbing between the fingers and thumb that is more pronounced when the hand is spread. And most importantly, remember that your thumb is made up of three bones, not two, and that it is only the last bone that gives the thumb its backward curve.

THE HAND, SIDE VIEW
Not all fingers will be visible in the side view. Notice that the top of the fingers is flat and the bottom of the fingers is shaped in curved sections.

THE FIST
The fist is marked by clenched fingers lined up in a descending scale. You may wonder: Why isn’t the middle finger higher in the fist than the other fingers since it’s the tallest one? The answer is that length has little to do with the height of the fingers in a clenched fist. What gives the fingers their height is the thumb muscle that is bunched beneath. The thumb muscle peaks next to the thumb, and as the fingers travel away from the thumb, the thumb muscle gets smaller and the fingers descend.

THE FLEXIBLE HAND
The hand can bend and twist in many interesting ways. Make note of two things in this pose: The skin above the knuckles is loose and tends to wrinkle if compressed; and the second joint of the thumb is the most pronounced joint in the hand.

Drawing female hands requires a softening of the knuckles, a tapering of the fingers, fewer crease marks and lines, and of course, fingernails.
DETAIL OF NAILS
There should still be some of the finger visible at the sides of the nails.

Luckily, the feet are fairly immobile, so once you understand the shape, you’ll have it down. But the feet can appear quite different from different angles, so let’s explore them.
INSIDE VIEW OF THE FOOT
Note the five major sections: heel, ankle, bridge of foot, ball of foot, arch, toes.

There are actually two arches of the foot: the part that’s in constant contact with the ground and the part that rises up into the foot. Also notice that the second toe is longer than the “big toe.”
THE OUTER FOOT
In this view, the bottom of the foot has no arch, but nevertheless, it is not a straight line. There are several subtle curves created by padding at the heel, and the width of the bones just before the small toe.

FOOT GESTURE
In this pose, the bridge of the foot creates a hill, and slopes off to a valley just before the toes. Note how pronounced the heel becomes.
THE JOINTS OF THE TOES
With the exception of the big toe, which has two joints, the other toes have three joints, creating three planes.

SOLE OF FOOT
In the relaxed position, the middle toe, which is the longest toe, appears to be shorter than the big toe, because it curls up more. Note the sharp angle made by the arch.

ANKLE
Note the angle of the ankle: The outer ankle is farther back than the inner ankle.

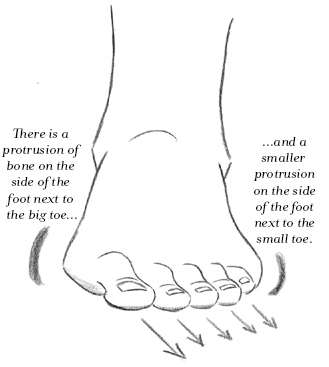
DIRECTION OF THE TOES
The toes do not exactly face forward, even when the foot is positioned directly forward, as it is here. The toes point outward in slightly less than a 45-degree angle.