
When we refer to the litter layer, this isn’t meant in a derogatory way, it’s just referring to the position that this habitat holds within the woodland. It is a deep slice of rich, dark, decaying leaves and wood, natural mulch and fertilizer for the trees above and every other plant that lives under their spreading canopy.
Get down and have a close look, and as you dig through the litter, you travel back in time. The leaf litter starts at the top with the most recently fallen leaves and as you dig deeper, you start to find small creatures that recycle the leaves by eating them. In turn, they provide food for predatory creatures that also lurk there.

Go deeper still and you will start to see the ‘tentacles’ of fungi and slime moulds and eventually you get to see the product of their recycling work. The composters have done just that – they have turned the leaves into fertilizer.
There are probably more creatures and other organisms here than anywhere else in the wood. They are always kept in employment as every hectare of deciduous woodland can drop a tonne of leaves on the soil beneath. With a meal like that, the recyclers have to have quite an appetite!
To see more of what I mean, take a white tray or piece of white paper and plonk a handful of leaf litter smack in the middle of it and watch. In a few minutes, a parade of creatures will start to leave the security of the mouldering mass. Everything from minuscule springtails to big predatory beetles will appear. Use a field guide to help you identify what it is that you are looking at.
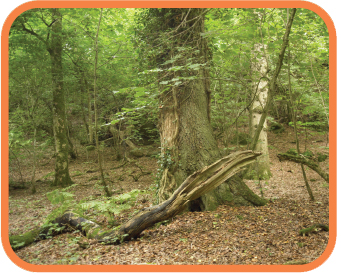
A world under your feet. We walk all over it, but rarely give it the attention it deserves.
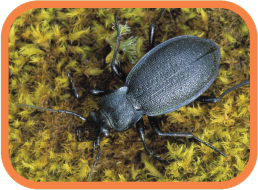
Just because they’re little, it doesn’t mean they’re not ferocious. This violet ground beetle is the lion of the leaf litter, actively running down their prey.
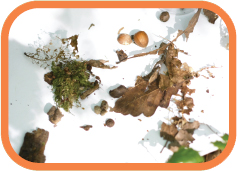
Spend some time rummaging around and you can find everything from mini-monsters to the tell-tale signs of other woodland creatures.

A world under your feet. We walk all over it, but rarely give it the attention it deserves.
Spend enough time in the woods and you will start to notice that old stumps and fallen branches are often used by animals as places to process their food. They become tables, handy spots to sit and eat at, and also lookout posts from which they can keep a wary and watchful eye on the surroundings – just in case. Even a sparrowhawk has enemies to watch for when it’s on the ground.
So, what should you be keeping an eye open for? First, there are plucking posts, which are places where a bird of prey will take its kill, – such as a sparrowhawk and a kingfisher – and, literally, pluck it. Sparrowhawks specialize in catching birds and often return to the same plucking posts. Once you have found one, you can return and find the remains of other species of bird – a good way to start a feather collection.

Or, if you find a lot of feathers in one place, it’s a sure sign that some bird somewhere got unlucky. The possible scenarios are that it died naturally and was scavenged or it was killed by either a bird or a mammal. However, just because one animal killed it, doesn’t mean that something else didn’t scavenge the remains.
Often, the best a naturalist can do is work out if the bird was eaten by a predatory bird or by a mammal, and this is actually quite easy. Birds of prey, like hawks, tend to kill birds and get straight down to business, eating from the breast area first. Small birds are often totally consumed, but larger birds can be nearly intact except for a hole in their chest. You may also notice little triangular nicks in the breast bone where the beak of the bird of prey removed chunks of meat.
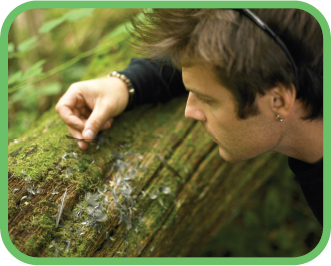
Trunks and stumps are worth checking for feeding signs. Bark with fissures is often used as an anvil by woodpeckers and nuthatches; the wedged-in nut fragments can be seen still jammed in place. Here, I’m looking at a plucking post, where a sparrowhawk has butchered a small bird.
The big feathers can also be a clue: they would have been gripped by the narrow hooked beak and torn from the unfortunate victim’s body. Look closely and you may well notice a bend or kink in the main feather shaft.
A bird that has been eaten by a mammal, on the other hand, will be a much messier job. Bundles of feathers will be stuck together by saliva or sheered off at the base.
Also, scuffle around on the woodland floor or at the base of hedges and you will not only find the recyclers but the tracks and signs left by many woodland creatures. Under the influence of gravity, everything that drops in a woodland ends up here, on the floor. Feathers, egg shells, seeds, fruit, droppings and pellets; it really is rich pickings for the clued-up naturalist. So get out there and get on your hands and knees!
Nick’s trick
As you start to ge tto know your woodland well, add these sorts of details to a map of the area.
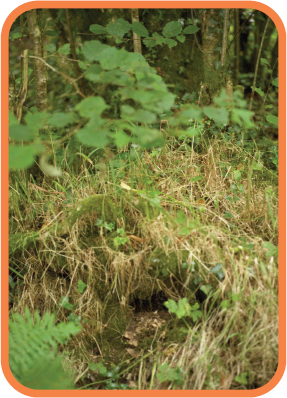
The habitat at the base of a tree can be a good starting point for seeking out signs of life. Many small animals like moving around edges next to cover and birds will sometimes leave pellets and droppings here too.
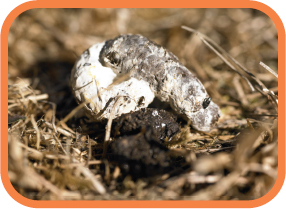
Woodpecker droppings – I’m talking about those species that feed a lot on ants. In Europe, this is the green woodpecker and its droppings look a little like cigarette ash. Crumble a dry one between your fingers and investigate with a magnifying lens. You will see the remains of the hard bits of ants’ bodies.
The majority of wild mammals are next to impossible to see; the best you can expect is a fleeting glimpse of a furry backside vanishing in to a thicket while you are out walking. But this is where mere mortals give up and good naturalists find a way. We simply become detectives and many a scientific survey has been carried out on the secret activities of the furry ones by simply looking for and at the signs they leave behind.

You might think that the smaller the mammal, the fewer traces they leave behind. Footprints and droppings can be hard to come by, of course, but those mammals that like to sink their teeth into the soft kernels of nuts and seeds – particularly those of hazel trees – leave behind some very obvious traces.
The best time of the year to look for feeding signs of our small mammals is in the autumn, when the hazelnuts tend to be fresh and any that have been ‘chiggled’ by small rodents will practically shout at you! Their white or green broken remains seem to almost glow in the dim recesses of the hedgerow. But having said that, nuts and seeds are hard and stick around for a while before they start to rot, so keep an eye out at anytime.
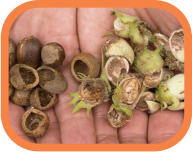
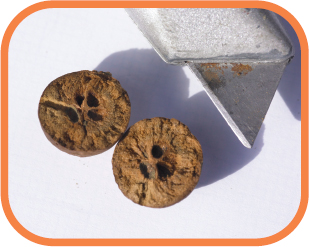
A handful of evidence. These nut cases are all eaten and chiggled by woodland mammals. Can you tell by whom? Those on the right were split down the middle by a squirrel and those on the left were worked by the smaller teeth of a wood mouse.
Take it further
Use a hand lens to have a good look at the surface around the nut’s hole. Here you will find teeth marks and these will give you some idea of how the animal opens and eats the kernel inside. Each species has its own technique. What the inside of the lip of the opening looks like is also helpful.
* Squirrels are fairly destructive. Using their incisors, they first take a notch out of one end of the nut and then split the nut into two halves.
* Mice hold the nut and use their upper teeth to grip while the lower ones gnaw.
* Voles make a hole, stick their nose in and do the opposite thing, gripping on the inside and gnawing from the outside.
* Dormice are very neat, leaving a very smooth inside edge, with a few teeth marks on the outside.
The best place to look for hazelnut remains is surprisingly nowhere near hazel trees! You have to think like a small mammal here. They like to feed and run in relative security as they are a highly desirable meal for many other creatures in the woodland. So scavenge around in the leaf litter and under roots, stones and logs near a hazel tree and you will start to uncover evidence of who lives there.
Other nuts you may find on your explorations may be jammed into the crevices in tree bark. They are usually left there by birds, especially by nuthatches (hence their name) and woodpeckers. They jam the nut into place and then hammer at it with their beak. The woodpecker almost always put the nuts in the right way up and they have favourite places to work at, so you may notice a pile of split nut shells below. Nuthatches, on the other hand, have a smaller, less powerful beak and knock a small hole in the outer shell. They also do not often re-use their sites and so leave the nut shells in position once they have taken the kernel.
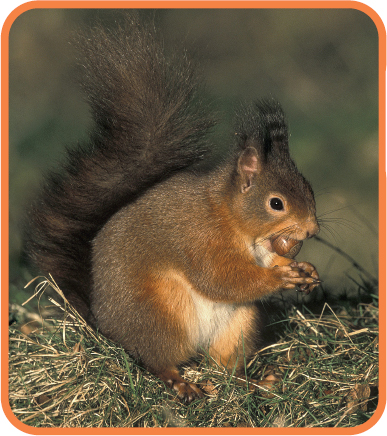
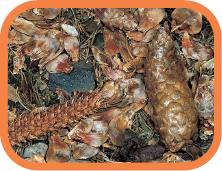
The number one cone cruncher is the squirrel – it holds the cone top down and starts at the cone’s base, gnawing off the scales and eating the energy-rich seeds as it goes. Sometimes you will find them at tree stump ‘tables’, which provide a useful perch, giving the animal a small height advantage, allowing them to see any approaching predators.
In your average deciduous woodland there may be around 200 million leaves for every hectare of land, and at the end of the year these will all come tumbling down to lie on the forest floor as leaf litter – 3 tonnes of it per hectare to be precise.
This quantity of leaf litter represents a huge pile of eating to anything that can digest cellulose; that’s the hard stuff that makes wood ‘woody’. Cellulose is also contained in leaves. Few living things can eat it, but this is where bacteria and fungi come in – and what a good job they do too. They must do, otherwise we would all be up to our necks in rotting leaves!
Bacteria are too small to see, but fungi can be found most of the year round, becoming most visible in the autumn. It is when it’s damp that those beautiful and weird structures we know as toadstools and mushrooms suddenly appear. These do the same job as the seed heads of many true plants. But instead of dispersing seeds, they send out tiny little packages of life called spores.
So now it is time to get to know them better. Start by going on a fungus foray with a field guide and see how many of these mushrooms and toadstools you can find. You can even have a go at preserving some of them and keeping a collection. But how do you keep such juicy and complex structures? Well, there are some fungi that will dissolve to mush almost as soon as you look at them, but most can be baked in a sand tray – which removes the water from the fungus (see opposite).
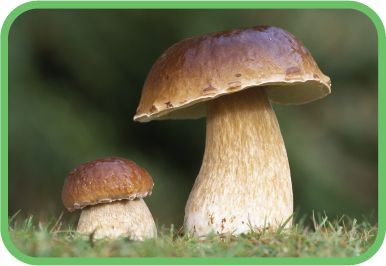
The job of that classic mushroom shape is to keep the spore-bearing surfaces – the gills and pores that can be found on the underside – in good working order. This means protecting their delicate surfaces from the weather and the rain.
Fab fact
A simple 10cm wide mushroom can have over 600 million spores inside it.
YOU WILL NEED
> a couple of baking trays
> some fine sand
> some fungus
> large serving spoon

1 Fill one of the baking trays with the sand and bake in the oven at 110°C/Gas mark ¼ for a few hours. Then carefully remove from the oven using oven gloves.

2 Carefully spoon half of the hot sand into the second baking tray and gently put your fungus on top.
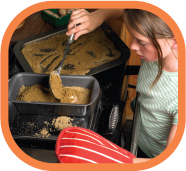
3 Spoon in the rest of the hot sand, brushing it into all crevices until your fungi are totally immersed. Leave for a day before checking your fungi. If not totally dry, repeat until all the moisture is absorbed by the sand.
Take my advice
Some fungi are poisonous. So, if you touch ANY fungus, do not rub your eyes or pick your nose afterwards. Make sure you also wash your hands thoroughly.
Take it further
The fungi are then ready for storage or presenting. To ensure your treasures last for a long time, store them in an airtight container with packets of desiccants such as silica gel. This can be bought from electrical equipment and photographic shops.
Beetles are not boring in the ‘dull’ sense of the word, but it’s a good description of the lives they lead or, rather, the lives that some of their grubs lead. Look at dead wood closely – either fallen branches or on the trunks themselves – and you will almost certainly notice holes!
Many of these are made by insects, the beetles being some of the most noticeable culprits. The most beautiful works of art are those made by the bark beetles. You may notice on dead trees, where the bark has fallen away, that there are some strange squiggles. These are the tunnels of bark beetles and there are several different kinds, each one making their own distinctive pattern.
The adult beetles, which you would be very lucky to see, meet and mate in a small chamber under the bark. The female then digs a tunnel of her own along which she lays her eggs.
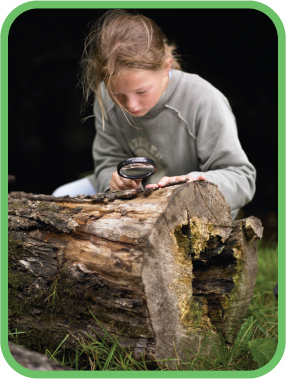
When an old fallen tree starts to rot and its bark falls off, look on the smooth wood underneath for the galleries of bark beetles.
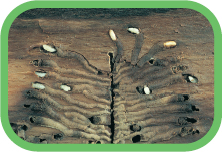
When the tree is living, this is what you would see underneath the bark. The white grubs have eaten their way out from the centre, where their mother laid her eggs.
Nick’s trick
If you want to preserve the patterns of these tiny creatures’ work, it is easy enough to make a rubbing or a cast in the same way as you cast or made rubbings of bark on pages 16 and 17.
On hatching, the larvae munch their way outwards through the relatively soft dead wood and finally pupate at the end. Their entire journey is represented by the radiating spokes of the design. If you look carefully at the bark, assuming it is still in place, you should be able to see the little exit holes by which the brand new beetles left! These beetles are quite common, so take time to hunt around beech, elm, oak and pine trees.
You may also find other holes and dents in dead wood, as many other insects, including the large stag beetles, click beetles, long-horn beetles and even the caterpillars of some moths, will also consume the wood. If you examine dead logs, you may find the larvae of these. When doing this, notice how robust and chunky their mouth parts are.

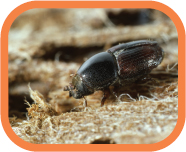
An elm bark beetle going about its work.
Oak apples, robin’s pin cushions, artichokes and spangles are all great names for galls. These are the little life-support capsules created by the ‘irritation’ caused to a plant by the presence of the egg or grub of a selection of species of tiny wasp and flies. You can find a vast number of different types in any hedgerow or tree.
Even though you probably won’t easily be able to see the adult insect in the wild, there are ways you can meet them. Having said that, the actual architecture of the galls themselves and the life cycle are probably far more interesting to the young naturalist.
Just take your average oak tree. If you were to search every centimetre of its living surface (and I mean below ground on the roots too), you could find more than 40 different species. Despite the large numbers of galls present, they don’t seem to do the tree any real harm.
Here’s an experiment you can try over the winter to hatch a gall wasp. In the autumn, you first need to collect some galls with no exit holes. (If they do have exit holes, the galls have probably fulfilled their purpose and the insect has already checked out.) The best ones to collect are the artichoke galls from the twigs of oak trees. Or use little spangle galls, which look like ‘flying saucers’ attached to the undersides of leaves of the same tree. Now follow the steps below, remembering that you won’t see the results for several months.
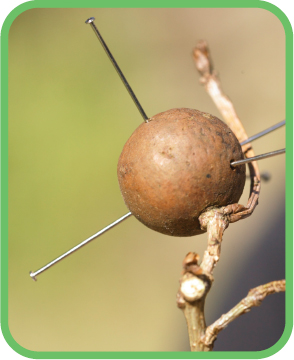
Many of these galls have been home to more than one insect. A visual way of showing just how many is by putting a pin in each hole as you count.
YOU WILL NEED
> plastic bag
> straw
> drinking straw
> string
> cotton wool
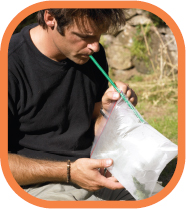
1 Place the galls in a large clear plastic bag together with some straw. Pop a drinking straw in the top, blow into it to inflate the bag and tie shut with string.

2 Sit back and wait for the little wasps, all female, to appear near the top of the bag. Some will hatch early due to temperature change, but keep them cool and most will hatch in the spring.
Take it further
If you want a more instant insight into the world of the gall wasp, look for empty marble galls and oak apples, both of which are some of the biggest around. Then use a sharp knife to cut them in half to see what goes on inside. You will notice that the grub eats its own surroundings – it lives in its dinner until it is ready to emerge as an adult insect.
Crickets and grasshoppers are familiar insects in many habitats but I include them here because it is in the bushier habitats that the aptly named bush crickets can be found. If we are going to talk about crickets, then we almost certainly have to talk about the grasshoppers that will be found chirping and chirruping in the grassy glades and at the bottom of hedgerows.
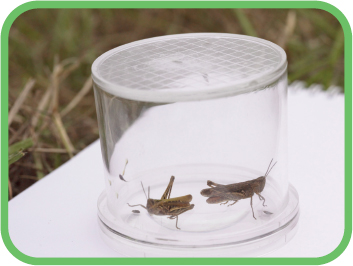
Catching and collecting crickets can be something of a sport because they really are tricky little jumpers. So, for this particular sport, I have invented cricket tongs. I call them this, but they are just as useful for catching any small animal that sits on foliage and is of a nervous disposition. Picture this: your intended subject of study, a nervous bush cricket, sits sunbathing on a leaf. You make a lunge for it, the whole bush gets snagged on your jumper and your prey detects the commotion and hops it! But armed with cricket tongs – well, success on a stick!
Take it further
What’s the difference between a cricket and a grasshopper?
* Crickets can be found in low vegetation and up high and are usually more active at nightime. So they have long and sensitive antennae; often much longer than their own bodies. They will also nibble on plants as well as hunt for smaller insects. Crickets make their noise by rubbing a rough patch on one wing against an area on the other.
* Grasshoppers have smaller antennae and spend more time down low, feeding on grasses and other soft plants. They make their song by ‘fiddling’ their legs backwards and forwards, rubbing them against rough patches on their wing ribs.
YOU WILL NEED
> gaffer tape
> two tea strainers
> two short pieces of garden cane
> a pair of barbeque tongs
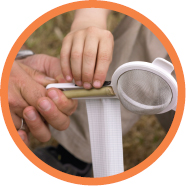
1 Using a good length of gaffer tape, attach one of the tea strainers to the end of one of the pieces of garden cane.
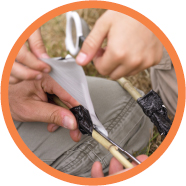
2 Using a second piece of gaffer tape, attach the other end of the stick to the end of one half of the barbeque tongs.

3 Repeat with the other strainer and stick, making sure the strainers align to create a ball-shaped insect netter. You now have the perfect device for catching your best mate or …
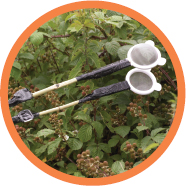
4 …with a stealthy approach and a bit of practice, you should be able to bag many a cricket, grasshopper or any other nervous insect.
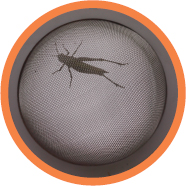
5 Carefully transfer anything you catch to a clear plastic container and then you can study it with a magnifying glass before setting it free once again.