Stage 2 isn’t much different from Stage 1, but a few raw egg yolks whisked into each bowl of soup is something. We kept it just to that: very simple, so as not to rock the boat. I remember going to my cousin’s house for our uncle’s funeral service the very day that Nick and I moved to Stage 2. My family is big and, let’s just say, likes to have a good time. It was torture. Nick and I, quite possibly, would have led the charge prior to starting GAPS, toasting (repeatedly) the life of my uncle. But we arrived with our pot of soup, tub of lard, and two pastured, organic eggs: definitely one of the more awkward moments of our GAPS journey. Endless offers for beer, a cocktail, some ham, turkey, chips, salad, a cupcake, you name it—all had to be turned down. I stood in the kitchen, carefully separating an egg yolk from its white, when my sister popped in, momentarily distracting me, and whoops! My organic, pastured yolk went right down the kitchen drain. My heart sank! I was so craving any boost in nutrition I could get, and my reward for graduating to Stage 2. And there it went! Sigh.
Later, I politely declined the egg my cousin offered, not being sure of its origin; that got me even more weird looks. You must become something of a detective and food snob during the first months on GAPS, as so much of the American food industry has veered off course. Many large-scale animal farming entities have abandoned safe and ethical practices, and as a result their products are nutritionally compromised.
It’s backward that factory-farmed anything is so readily available everywhere you turn, yet it’s practically impossible—even sometimes illegal—to find the good stuff, as is the case with enzyme-rich, nutrient-dense raw milk in much of the country. But it’s worth the effort; you’ve got to get your feelers out there for high-quality food products. It won’t be a one-stop shop to the grocery store. It will be small-scale, farm-direct, online, underground, communal, or cooperative.
The best source for eggs I’ve found is Miller’s Organic Farm. This might just be my most valuable tip in the entire book. Until you find your own local resources, these Amish farmers are doing everything they can to “do it right.” From soy-free eggs to raw milk, quarts of pastured lard to fermented sauerkraut juice, homemade bone broth to soaked, dehydrated nuts and sugar-free bacon—you name it, they have it. When I attended a Fourfold Path to Healing conference, the Amish were there displaying their goods, and they were looking for co-op leaders. I jumped at the chance. It is always nice to have a spare quart or two (or six) of bone broth in the freezer that you know was made with the best intentions and high-quality chickens, beef, or fish, full of gelatin. Local is best, though, so find your nearest resources. Surf the web! Visit the farmers’ market and neighborhood food cooperatives. With all my heart, I hope you learn some traditional cooking techniques (namely, brothing and fermenting) for yourself. But if it’s a question of your sticking to the GAPS Diet or not, seek out Miller’s Organic Farm as a food source “safety net,” while continuing to research local options and getting more and more comfortable in your own kitchen.
Foods Allowed During Stage 2
Continue with Stage 1 foods, especially homemade meat stocks with vegetables, meat, and chopped liver. In Stage 2 we add organic raw egg yolks. It is best to add them to every bowl of soup and every mug of stock. Start with just one per day and increase to at least one with every bowl of soup. The sky is the limit with egg yolks since they are so nutritious and they are easily absorbed and digested. Additionally, be sure to eat plenty of animal fats; they are the key to recovery and will help keep you satiated. Fermented vegetable juices are also a key component; keep adding them to every meal.
Stews and casseroles are a welcome addition. The stock no longer has to be the bulk of the soup. You can now round it out by adding more meats and vegetables. Once you hit Stage 4 you can start sautéing your vegetables and browning your meats when making your stews and casseroles. Right now, in Stage 2, everything must still be kept very simple and easy on the gut.
In Stage 2, you can add:
• Fermented cod liver oil: See resources for suppliers
• Fermented fish and gravlax
• Raw egg yolks: organic, pastured, and soy-free
• Stews and casseroles made with boiled meats and vegetables
• Fresh herbs
• Increased amounts of dairy products: homemade whey, yogurt, cultured/ sour cream, and kefir (if tolerated)
• Increased amounts of fermented juices, added to soups: Be sure the soups are not piping hot, which would kill off the beneficial bacteria from the fermented juices
• Homemade ghee: Start with 1 teaspoon per day and gradually increase daily
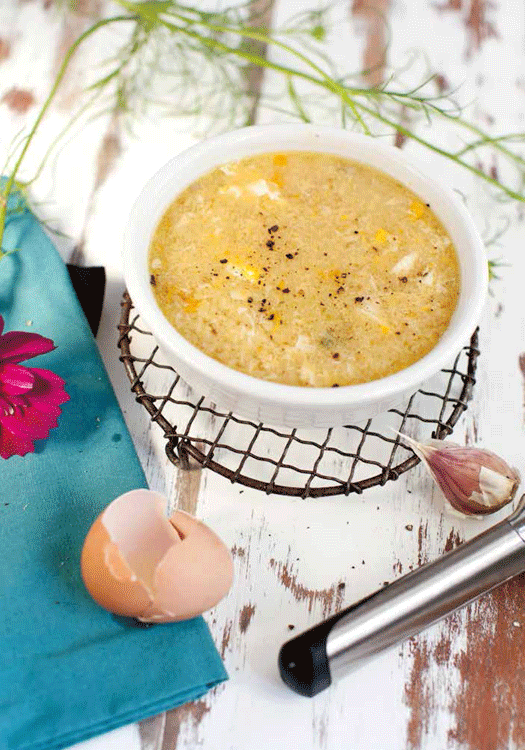
Serves 1
Monica Corrado, the amazing GAPS chef, stayed at our house last year and introduced me to this soup as an awesome breakfast, lunch, dinner, or snack. Now I practically live on it. I love that it is so quick, easy, and nutritious—my favorite words! My husband often takes it in a to-go mug to work. At Stage 3, you can use whole eggs in place of yolks.
1–2 cups homemade chicken, beef, or fish stock
Handful of spinach or other greens (optional)
1 clove garlic, pressed
1 teaspoon freshly grated gingerroot (optional)
1–2 whole pastured egg yolks
1 spoonful pastured lard, coconut oil, or ghee
Sea salt
1/2 teaspoon Hot Nicky, fermented hot sauce (optional, Full GAPS; Page 241)
Bring the broth to a boil. Skim and discard the scum. Add the spinach. Turn off the heat, press in a clove of garlic and the ginger, and whisk in an egg yolk or two. Add a healthy fat of your choice and sea salt to taste. Once on Full GAPS add Hot Nicky as a spicy condiment.
Serves 4 to 8
When I started the GAPS Diet, I was looking for a nice, simple fish soup to enjoy in the beginning months. This is a variation on an elegant Martha Stewart recipe, tweaked to make it a bit more substantial, and now “Just for the Halibutt,” as my kids call it, has become a staple in our family.
Despite having now moved beyond the Intro, we still serve this regularly. The kids add extras to their bowls like avocado and chopped tomato. Some even take the halibut out of the soup and enjoy it with homemade mayonnaise, fermented salsa, or pesto, and drink the stock in a mug on the side. If you have kids who don’t love stock, be sure to try this, since it will make a stock lover out of anyone! Let them smash the lemongrass, which adds amazing flavor to the dish; once they smell it, they will surely want to try it!
1 stalk fresh lemongrass, or 3 lemons, zested and juiced
4 cups chicken or fish stock
3–5 cloves garlic, smashed
1 bunch fresh thyme sprigs
10 peppercorns
Sea salt
2–4 halibut fillets
1 tablespoon homemade ghee (if tolerated) or animal fat
2 scallions, chopped
Cauliflower rice (optional, page 87)
Smash the lemongrass with a rolling pin or mallet. Cut it into thirds and add to a large pot. Place the stock, garlic, thyme, and peppercorns into the large pot, and bring to a boil. Salt the halibut and add it to the boiling stock. Cover and turn off the heat. Let stand for 6 to 8 minutes. Strain the broth and divide among bowls; serve each with a beautiful chunk of fish, a drizzle of ghee, chopped scallions, and a scoop of cauliflower rice, if desired.
Mexican Soup
Serves 6 to 8
This recipe is inspired by a wonderful mentor, Sally Fallon Morell, in her book Nourishing Traditions. It is such an easy go-to meal, and my whole family loves it! Once you are on the Full GAPS Diet, you can spike it with red chile flakes or fermented hot sauce.
2 quarts homemade chicken stock
1 cup tomato paste
4 cloves garlic, pressed
Shredded poached chicken (optional)
Sea salt
Cultured cream (optional)
Avocado (Stage 3)
Cilantro (Stage 5)
Bring the stock to a boil. Skim and discard the scum. Add the tomato paste and garlic. Add the shredded poached chicken, if you’re using it, and simmer for about 30 minutes. Add lime juice and season to taste. Serve with cultured cream, avocado (in Stage 3), or cilantro (Stage 5).
Creamy Cabbage “Casserole” with Chicken Thighs
Serves 4 to 6
I’ve never really known what to do with cabbage. Since I’d never been a huge fan, it simply wasn’t in my repertoire of recipes. Then I discovered Dr. Campbell-McBride’s simple “Nice Way to Cook Cabbage” recipe. I have adapted it, and I now am a cooked cabbage lover! This makes great leftovers and gets more and more flavorful each time it is heated up.
1 quart homemade chicken or beef stock
3–5 tablespoons animal fat
1/2 cabbage, finely sliced
1 large carrot, finely sliced
1/2 onion, diced
1 tomato, diced
1 tablespoon minced garlic
8 chicken thighs, preferably bone-in with skin on
Sea salt
1/2 cup cultured cream, kefir, or yogurt (optional)
Preheat the oven to 350°F. Place the stock in an ovenproof pot with the animal fat. Bring to a simmer over medium-high heat. Add the cabbage, carrot, onion, tomato, and garlic. Carefully nestle the chicken thighs into the cabbage, and sprinkle them liberally with sea salt. The skin should just be peeping out of the top of the broth. Cover and cook on medium-low heat on the stovetop for 30 minutes. Remove the cover and put into the oven for an additional 15 minutes, until the chicken skin is golden brown. Serve bowls of soup with accompanying chicken thighs. Add a dollop of cultured cream and enjoy.
Serves 8 to 10
I was initially intimidated to make this, and now I wish I had tried it sooner!
1 2- to 3-pound plank wild salmon
1 bunch fresh dill
1 bunch fresh cilantro
1/4 cup chopped chives
3/4 cups coarse sea salt
1/4 cup raw honey
Zest of 2 lemons
1 tablespoon ground peppercorns
Wash the salmon and pat it dry. Place it on a cutting board and cut into two pieces. In one mixing bowl combine the fresh herbs, and in another combine the salt, honey, lemon zest, and ground pepper.
On a clean plate, place a third of the herb mix. Place the salmon skin side down on top of the herbs, and coat the top with half the honey-and-salt mixture. Add another layer of fresh herbs followed by the second piece of salmon skin side up. Add the remainder of the salt mixture followed by the remainder of the herb mixture. Cover in plastic wrap. Top with a small cutting board or plate with a weighted pot on top to weigh down the fish. Let chill in the fridge for 16 to 24 hours.
Gently wash or rub off the salt and herbs and pat the salmon dry. Skin it, slice thinly on the diagonal, and serve. This is delicious with fresh dill, capers, chopped pickles, and diced red onion (Stage 5). This will make a salmon lover out of anyone, even kids!
Boiled Meatballs and Burgers
Serves 4 to 6
This is still not quite the burger from the past, but you are getting close.
1 quart stock or soup of any kind
1 pound ground meat: beef, lamb, pork, chicken, or turkey, including ground organs, if desired
2 egg yolks
1 clove garlic, pressed (optional)
1 teaspoon sea salt
Pour the stock (or soup) into a large skillet. Cover and bring to a simmer over medium-low heat. Meanwhile, gently mix the remaining ingredients together in a bowl. Roll into balls or form into patties and gently place them into the skillet with the broth. Simmer, covered, until cooked through or to your liking, about 5 to 15 minutes. Eat as is, with the soup, or save the soup or stock for future sipping!
Serves 8 to 10
I have always loved this recipe, and I was dying to re-create it for GAPS. This originates from Jessica Prentice’s Full Moon Feast, and it is delicious!
1/2–1 cup stock
2 tablespoons lard or other animal fat
2 leeks (or onions), sliced in half, and sliced again into half-moons
1 small head cabbage or 1/2 large head, shredded
1 bunch greens such as spinach, chard, kale, collards, mustard, turnip, or radish, sliced into ribbons
1–2 small rutabagas or turnips, diced
Sea salt
1–2 pounds whole fresh sausages in casings
1/2 cup sauerkraut
Cultured cream (optional)
Put the stock in your pot and add the animal fat. Add the leeks, shredded cabbage, greens, rutabagas, and a good pinch of sea salt. Bring to a simmer, cover, and cook over medium-low heat until the rutabagas are easily pierced with a fork, about 15 minutes. Slip the sausages from their casings into the pot and break up with a wooden spoon. Continue cooking for 15 minutes to allow the sausage to cook through. Add more stock as needed. Add plenty of sea salt to taste. Serve in individual bowls. As the soup cools, stir in the sauerkraut and a generous amount of cultured cream.
Variation (Stage 4): Heat the animal fat in a pot and sauté the leeks for 10 minutes. Add the shredded cabbage and a pinch of salt. Sauté until the cabbage starts to wilt. Add the greens, and stir to incorporate. Add the rutabagas and another pinch of salt, followed by a splash of stock. Cover the pot, reduce the heat to a simmer, and steam the rutabagas until they are easily pierced with a fork. Add more stock as needed if it gets too dry. Slip the sausages from their casings into the pot and break up with a wooden spoon. Continue cooking for 15 minutes to allow the sausage to cook through. Add plenty of salt to taste. Serve in individual bowls. As the soup cools, stir in the sauerkraut and a generous amount of cultured cream.
Serves 8 to 10
Stews are a welcome addition in Stage 2. It’s so nice to finally be able to have something a little more substantial than soup alone. If you’re purchasing cow parts in bulk, this is a great way to use the tougher cuts of meat such as roasts and chuck. At the market, you’ll often find them with the label STEWING BEEF. You can substitute chicken breast for the stew meat.
2–3 pounds cubed stew meat or a round roast
Sea salt
5 cups chopped vegetables, such as carrots and onions
Homemade chicken or beef stock, just to cover
Take the meat out of the fridge and let it come to room temperature; season generously with sea salt. Place the meat and vegetables in a pot. Add stock to almost cover everything. (If you’re short on stock, you can supplement with filtered water.) Bring to a boil, then reduce the heat to a simmer. Cover and cook for about 45 minutes, or until all the vegetables are soft. If you’re using a roast, carefully remove it from the pot to a cutting board. First slice with a chef’s knife, then shred it with two forks. Return the meat to the stew, and add sea salt to taste. For a variation try topping this with Mashed Cauliflower (recipe follows).
Note: You can also cook the round roast in a slow cooker on low for 6 to 8 hours or even roast it in the oven at a low temperature (250°F, covered, for 2 to 3 hours) with the vegetables and stock. The slow cooker is my preferred method of cooking since the meat just falls apart when finished. If you have 10 minutes in the morning to prep, dinner simply involves adding a few ferments, some cultured cream, and some chopped avocado on top!
Variation (Stage 4): Take your meat out of the fridge 1 hour before cooking, allow it to come to room temperature, and season generously with sea salt. And fresh black pepper. Melt 1/4 cup animal fat (I recommend tallow) over medium-high heat in a Dutch oven on the stovetop and brown the meat. After the meat is browned, remove it to a plate, then put your vegetables of choice into the Dutch oven.
Stir the vegetables to coat with the meat’s juices, adding 2 tablespoons fresh thyme or 2 teaspoons dried thyme (Stage 5), 2 to 3 crushed garlic cloves, 2 to 3 bay leaves, and a pinch of sea salt. Cook for about 5 minutes, then return the meat to the Dutch oven. Add stock to almost cover everything. (If you’re short on stock, you can supplement with filtered water.) Bring to a boil, then reduce the heat to a simmer. Cover and cook for about 45 minutes, or until all the vegetables are soft. Follow instructions above.
Mashed Cauliflower
Serves 6 to 8
After getting the hang of Basic Stew, you can create casseroles by transferring the stew to an ovenproof dish, adding Mashed Cauliflower on top, and cooking in the oven at 350°F for about 30 minutes. This is similar to a shepherd’s pie.
1 head cauliflower
3–4 cups filtered water or stock
3–4 tablespoons ghee, coconut oil, lard, or tallow
Sea salt
1–2 tablespoons cultured cream and/or ghee
Break up the cauliflower into little florets. Steam it or bring it to a boil in the filtered water or stock, then reduce the heat to a simmer for 10 to 15 minutes. Strain and place back into the hot pot. Add the fat of your choice and blend with a handheld blender, or transfer to a food processor and blend until soft and smooth. Add cultured cream and/or ghee and salt to taste.
Serves 8 to 10
This is a delicious variation on traditional beef stew. It’s great with a fried egg on top. For the ground beef, I use 1 pound with organs, 1 pound without. This stew can also be made with ground chicken, turkey, pork, or lamb. And it’s excellent as a casserole with Mashed Cauliflower (above) on top.
1–2 quarts beef stock
3 onions, diced
2 celery stalks, diced
2 carrots, diced
2–3 tablespoons lard, beef tallow, or other fat
2 pounds ground beef
2 sprigs fresh rosemary, chopped
2 sprigs fresh thyme
4–5 fresh sage leaves, chopped
1 bay leaf
1–2 teaspoons sea salt
Add the stock, vegetables, and animal fat to your pot. Bring to a boil, and turn the heat down to a simmer. Add the meat, breaking it apart with a wooden spoon. Add the herbs and cover. Simmer on low for 45 minutes. Add sea salt to taste, and serve it up in bowls.
Variation (Stage 4): Generously season the beef with sea salt. In a Dutch oven or stew pot, brown the beef in the fat. Remove the meat to a bowl. In the same pot, sauté the onions, celery, and carrots with a pinch of sea salt, adding more fat if needed. Add the herbs, and sauté for 20 to 25 minutes on medium-low, allowing the flavors to infuse the vegetables and caramelize slightly. Return the ground beef and its juices to the pot, and continue cooking for 5 more minutes, stirring to incorporate. Add the beef stock and turn the heat down. Simmer, covered, for 45 minutes. Serve it up in bowls.
Salted Caramels
These were another of my family’s favorites while we were on the Intro Diet. Use equal parts honey and ghee, adding a pinch of sea salt. Place in silicone ice cube trays or chocolate molds. For additional ideas, see Coconut Creams (page 51). Enjoy right out of the freezer or in a cup of tea!