
“I’m not any good at tying knots!”
I long ago lost track of how many times I have heard this particular lament from bondage novices — and even from a fair number of people who are no longer novices. Indeed, one of the more common reasons why BDSM practitioners resort to using formal bondage equipment such as leather cuffs has to do with “I’m not any good at tying knots.”
Take heart, Gentle Reader, for the truth is that you probably already know enough knots to successfully begin your bondage career. Indeed, even the humble and much-derided Granny knot can play a very worthy role in our nefarious deeds. The trick is to take a closer look at how to effectively use the knots that you already know how to tie.
Question: Why do we need to know how tie any knots at all?
We need to know how to tie at least a few knots because if we wrap our ropes around the bottom without securing them in some fashion the ropes may simply drop off. If this happens, the bottom may scamper away across the landscape, filling the air with mocking laughter as they gleefully race to tell all their fellow bottoms about what an inept top you are. OK, maybe it won’t be quite that bad, but it will probably be a problem nonetheless.
Let’s take a closer look at the first sentence in that last paragraph. Particularly that word “securing.” One definition of “to secure” is “to fix in place” (i.e., immobilize) – and that is exactly what most knots do. They immobilize at least some part of a rope. This frequently means joining the two ends of the rope together, but can also apply to joining one end of a rope to another object, or to immobilizing some inner segment of the rope.
Definition time: A knot can be defined as the arranging of part of a rope to another rope, another object, or back to itself in such a way that the specified portion of the rope is held in place by friction. The concept that “a knot is held in place by friction” is a key concept, and it will influence a great deal of how we consider knots.
Another definition: Ropes vary tremendously in how much friction they generate when they slide across a given surface. Because this friction can feel like the rope is trying to “bite into” the surface, referring to this property as its “tooth” can be useful. Thus, rope with a relatively rough outer surface, such as cotton rope, can be said to have “a lot of tooth” while ropes with very smooth outer surfaces, such as many types of nylon rope, can be described as having “very little tooth” to them. Run a few different types of rope through your hand with this in mind and the concept of “tooth” will likely be immediately clear to you.
OK, so we need to know how to tie knots so that we can hold the ropes in place (and thus, hopefully, also hold the bottom within those ropes in place). Fine. What knots do we need to know in order to accomplish this?
Just remember that there are only three basic knot-related tasks, and that almost all knots are used to accomplish one of these three tasks. The three tasks are:
1. To tie two rope ends together.
2. To tie one end of a rope to a non-rope object (such as a bedpost, a wrist, a dockside cleat, etc.).
3. To arrange a non-end part of a rope, frequently the middle, in a desired configuration such as a loop.
Now for some good news. Most of the bondage-related knots that you really need to know in order to accomplish the techniques in this book involve only end-to-end knots (known as “bends” in ropespeak), and only a very few of them. If you can tie either a Square knot or a Granny knot you know enough knots to do effective bondage without having to learn more — if you use those knots intelligently.
SOME BASIC KNOT VOCABULARY
One of the problems associated with researching and writing this book is that there is no single, unifying language associated with rope-related matters.
One problem is that a given knot may be referred to by two or more terms. For example, the knot I will be referring to as the Lark’s Head in this book is referred to in other books as the Ring hitch, the Girth hitch, the Barrel hitch, the Cow hitch (don’t tell this to the female submissive who you’re tying up with this knot until she’s very securely bound), and even the Lark’s Foot knot.
Another problem is that one term may be applied to several knots. For example, several different knots are represented as the Lover’s knot.
Nevertheless, when we start wrapping ropes around various items – limbs, bedposts, the rope itself – we need to establish a clear terminology in order to communicate what we are doing. For example, if I ask you to loop a rope around a bedpost, what have I asked you to do? Should you simply run the rope behind the post and then bring it back? Should you wrap the rope around the post and then continue to extend it in the same general direction? Should you wrap it all the way around the post? If so, how many times? As you can see, it gets confusing. Guess what? As one of my favorite teachers used to say (rather gleefully) “Don’t worry. It only gets worse.”
“It’s really interesting to talk to someone when you’re tied up and they’re not.””
In “ropespeak” we hear of bights, turns, loops, and round turns. Unfortunately, the usage of these terms is not entirely standardized. (In fact, while researching this book, I found some knot books that used some of these terms in entirely different ways than others used them. Confusion results.
By the way, “rope people” frequently refer to knots used to tie two ends of a rope together as “bends.” Knots that tie a rope to a non-rope object are frequently called “hitches.” Arrangements in an inner portion of a rope are sometimes called “loops.” (Although some “rope people” might grumble about how I’m using that last term, muttering about the differences between “bights,” “loops,” “turns,” “round turns,” and “crossing turns,” and also muttering about “authors who couldn’t be bothered to make the differences clear.”) Don’t worry, I’ll explain as necessary while we go along.
Fortunately, some terms are almost universally agreed upon. For example, virtually all authors agree that a “bight” is a section of rope in which the end of the rope is folded back alongside the rest of the rope for a relatively short distance. If the bight is extended back until the rope is effectively folded in half, this can be called “bighting the rope” – a very useful term for our purposes.
Also, virtually all authors agree that a “round turn” is a section of rope that is looped around something (such as a post) one and a half times, forming a turn of 540 degrees.
In an optimistic attempt to lend some standardization to this, I will primarily describe the rope turns, loops, and so forth in this book in terms of degrees. For example, if a length of rope is simply run behind a post and then returned back in the same direction that it came from, it seems obvious and intuitive to refer to that as a “180 turn.” (AKA a turn or a “simple turn”).
If the rope is looped once entirely around an object and then continues in its original direction, that will be called a “360 turn.” This is sometimes called a “crossing turn” in ropespeak.
If a rope is looped once entirely around an object and then brought back so that it returns in the direction it came from, that will be called a “540 turn” (AKA a “round turn”).
Thus, we could also have “90 turns,” “270 turns,” “450 turns” (360 plus 90), and so forth. Indeed, this terminology allows us to accurately describe almost any type of turn.
Locking Round Turns: In the case of a typical 540 turn, the turns made around the object lie side by side. This allows them to move somewhat freely. However, it is also possible, when applying a 540 turn to a post, to place the second turn “over the top” of the first turn before running the end of the rope back in the direction from which it came. This creates what can be thought of as a Locked Round Turn. (Note: this is a nonstandard term.) A Locked Round Turn can place substantial pressure on the first turn, particularly if both ends of the rope are then placed under tension. This pressure can virtually lock the first turn into place, greatly reducing how freely it can move. We will be making use of Locked Round Turns in some of the techniques in this book.

Turns versus loops. When people describe how to use rope, they refer to “turns” and “loops” almost as interchange-able terms. However, it can be useful to draw a distinction.
For the purposes in this book, we can think of “turns” as sections of rope that wrap around an object such as a limb, a bedpost, or another section of the rope itself. (For this reason, they can also be thought of as “wrapping turns.”)
Loops, on the other hand, can be usefully thought of, at least in this book, as turns which do not wrap around an object. Thus, a bight could be thought of as a “180 loop.” Thus there would also be “360 loops,” “540 loops,” and so forth.
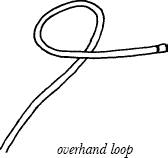
Loops can be further described in terms of “overhand loops” and “underhand loops.” In general, an “overhand loop” is a loop in which the shorter section of the rope is on top of the longer section of rope (when viewed by the tyer). In the case of an “underhand loop” the opposite is true, and the longer section of the rope is on top from the tyer’s point of view.
“She’s really good at highly immobilizing bondage.”
You can learn to appreciate the difference between overhand loops and underhand loops by attempting to tie a Bowline knot first with an overhand loop and then with an underhand loop. If you tie the Bowline with an overhand loop, it will set into place quite nicely and properly. However, if you try to tie a Bowline with an underhand loop, it will collapse into a Slip knot, or an Overhand knot, or some sort of unrecognizable mess, or it may simply come apart altogether.
There are a few more terms used specifically in relation to discussing ropes, bondage and knots that are very useful to understand. Those terms are, in chronological order, “initial application,” “dressing,” “setting,” and, if you want to be really complete, “post-setting dressing.”
“Initial application” is exactly what it sounds like. This is the phase in which the top first applies the bondage to the bottom’s body and gets it generally into its final position.
“Dressing” can be thought of as the “getting ready to pull the knot tight” phase. In this phase, you have applied the ropes so that they are generally where you want them to be, and are now working them (by moving them, taking up the slack, and so forth) into their final position. Please note that dressing is frequently done not only to the final ends of the ropes, but also to the bondage as a whole. (Experience putting on a few body harnesses and you’ll learn a lot about dressing ropes.)
“Setting” can be thought of as the final “pull it tight” maneuver. This is the final tug you give to secure a knot in place. Please note that it is usually unnecessary, and can actually be dangerous, to set a knot really, really tightly when doing bondage. I have a motto: “Don’t restrain them with the knots. Restrain them with the ropes.”
“Post-setting dressing” refers to any adjustments you make to the bondage after setting the knot but before moving on to other fun activities. This can refer to moving or smoothing out some ropes, further loosening or tightening the bondage, making final adjustments in a knot, and so forth.
In many ways, this process is very similar to putting on a pair of pants. There is the “initial application” (putting on the pants), the “dressing” (adjusting them so that they feel right), the “setting” (zipping and buttoning the pants, tightening the belt) and the “post-setting dressing” (moving the pants into their final position).
Another definition: The ends of the rope that are left over after the knot is tied can be usefully referred to as the “tails” of the rope.
MORE USEFUL KNOT TERMINOLOGY
“Initial knots” and “final knots.” In a great deal of rope bondage, particularly when using longer lengths, we often tie two different knots in a given length of rope. For example, if I am going to tie a bottom’s ankle to a corner of my bed with a twelve-foot length of rope, I will often first wrap several turns of the middle of the rope around their ankle and then secure those turns in place with a knot that I’ll call the “initial knot.”
Depending on what technique I used, I will then usually be left with two “tails” of rope, with each tail being somewhere between two and five feet long. I then often run these two tails together out to some point of attachment well out of the bottom’s reach, and tie their ends together in what I’ll call the “final knot.”
“Intermediate knots.” Sometimes, especially when I am using a relatively long length of rope, additional knots may be involved. These knots can be meaningfully referred to as “intermediate” knots. In most circumstances, only one intermediate knot is involved, but on those rare circumstances where more than one knot is involved, they can be numbered. Thus, when describing a rope that is tied in a series of four knots, you could refer to the initial knot, intermediate knot #1, intermediate knot #2, and the final knot.
KNOT CHARACTERISTICS
First of all, let’s start by listing some characteristics that bondage-related knots do not have to be:
• Bondage knots do not have to be elaborate. While bondage enthusiasts may learn how to tie a great many knots (at one point, I knew how to tie more than three dozen) the truth is that very simple knots will do nicely for almost all of our basic needs.
• Bondage knots do not have to be esoteric. While it may be enjoyable to learn how to tie uncommonly known knots such at the Turk’s Head, Spanish bowline, or Monkey’s Fist, bondage fans can almost always accomplish what they need to accomplish by using much more common knots. As I mentioned, if you’re smart about how you use it, you can get by quite nicely with only a Granny knot.
• Bondage knots do not need to be pulled really, really tight. It’s a common mistake to believe that knots used for bondage need to be pulled especially tight. Actually, pulling a knot so that it’s set really tightly can be a very bad idea. Keep in mind that the top may need to free the bottom quickly in the event of an emergency, and a knot that has been set so tightly that it jams will hinder this. Knots adequate for bondage usually really need only a firm but relatively light tug to be set with very satisfactory tightness.
• Bondage knots do not need to be tied in a rope that is under significant tension (in ropespeak: under load). It can be very difficult to properly tie a knot, particularly a two-ends-together knot (in ropespeak: a bend), in a rope that is under tension. Therefore, it’s wise to apply your bondage in such a way that the final ends are not under a great deal of tension. I’ll explain some ways to do this later in the book.
What bondage-related knots do have to be, in one word: inaccessible. As a good basic rule, assume that any knot (or unlocked buckle) which a bottom can reach with a finger, a toe, or a tooth will eventually be untied. Thus, it’s good bondage practice to simply place your final knots somewhere that the bottom cannot possibly reach them – especially with their fingers. Stay alert on this point, though. Some bottoms are very clever at figuring out how to move themselves closer to the knots, or how to move the knots closer to them.
One good way to keep the final knots inaccessible is to start your bondage with the midpoint of the rope and work your way out toward the ends as you apply the bondage. A typical example of this approach would be to use a twelve-foot length of rope in such a way that the middle two feet are used to actually tie a wrist, thus leaving the top with two tails, each roughly five feet long, that they could then run these tails out to a place where the bottom could not possibly reach them. The top would then finish off the bondage by using a firm but not overly tight knot. I will share many examples of “start at the midpoint” bondage techniques in this book.
In summary, a bondage knot should
Be relatively quick to apply.
Not be too difficult to learn.
Hold the rope(s) involved securely.
Be relatively easy to untie after the scene is over or in the event of an emergency.
The Square knot. Most adults seem to have at least heard of the Square knot (sometimes called the Reef knot) even if they’re somewhat unsure of how to tie it. Many people think of it as the classic tie-two-ends together knot.
The Square knot can be an excellent knot for bondage purposes, but it is a good idea to keep some of its major strengths and weaknesses in mind.
The strengths of the Square knot are that it is fairly widely known and fairly easy to learn. If it is set properly, it will usually hold two rope ends together satisfactorily.
The weaknesses of the Square knot include the following: It sometimes does not work well when joining ropes of significantly different thicknesses. (Many knot experts recommend using a knot called the Sheet bend in that situation.)
One of the more widely advertised properties of the Square knot is “the harder you pull on it, the tighter it gets.” There is considerable truth to this saying. Applying substantial load to a Square knot can jam it down really tightly, making it difficult or perhaps even impossible to untie. For our purposes, this is a very bad idea.
Another potentially very serious flaw in the Square knot is that it is possible to “capsize” the knot, causing it to come apart completely. This is done by applying a pull to one of the free ends (tails) in a direction roughly perpendicular to the main axis of the knot. Doing so can cause the knot to “capsize” and thus quite readily come entirely apart if the rope is under tension. (If you observe the process closely, you’ll see that the unpulled-upon section of the knot “flips over” into a type of knot often referred to as a Lark’s Head. The Lark’s Head can actually play a very useful rope in bondage – just not in this capacity. I’ll explain more about the Lark’s Head knot a bit later in this chapter.) Try this yourself with a loosely tied Square knot and you’ll see what I mean.
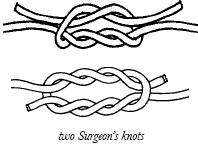
The Surgeon’s knot. The Surgeon’s knot can definitely be a handy knot for use in bondage situations. It holds even more securely than the Square knot, and is somewhat less prone to both capsizing and to jamming when pulled tight. (By the way, this knot is called the Surgeon’s knot because surgeons use it when tying sutures in place.)
The basic application of a Surgeon’s knot is quite simple. When performing the first “right over left” wrap of the traditional square knot, simply add an additional “right over left” wrap and proceed. You can finish the Surgeon’s knot by doing either one or two “left over right” wraps.
The Surgeon’s knot can be especially useful when working with ropes that have an especially smooth outer sheath, such as nylon rope.
The simplicity and additional benefits of the Surgeon’s knot make it one of those “you really should learn how to tie this” knots.
The Granny knot. Tie those Granny knots proudly!

That’s right. You heard me correctly. Tie those Granny knots proudly! (Hey, don’t stare like that. After all, you knew I was a pervert when you started reading this book.)
OK, I know that some of you are thinking something along the lines of, “Wiseman, have you lost your mind? I spent a lot of time learning how to avoid tying a Granny knot. I live in fear of being caught tying a Granny knot. Why in the world are you recommending them?” Let me explain…
In Praise of the lowly Granny knot. I, Jay Wiseman, feel that the much-derided Granny knot can play a very useful role in erotic bondage, and is in some ways even superior to the Square knot because…
• Virtually everybody already knows how to tie it.
• Under most “join two ends together” usages, it works perfectly well for our purposes.
• A Granny knot cannot be capsized, whereas a Square knot can be capsized.
• A Granny knot can be significantly less prone to jamming tightly when placed under heavy load than a Square knot. I’ve consistently been able to work loose Granny knots that have become pulled very tight with much less effort than I’ve had to use to work loose equally tight Square knots.
The Granny knot does have a few disadvantages. It can sometimes be a bit harder to dress or set than a Square knot can be. Also, it sometimes does not hold as tightly under load as a Square knot can hold. Thus, it’s commonplace for a Granny knot to slip at least a little bit more than a Square knot before it sets into place with adequate firmness. In fact, if you’re working with rope that has a very smooth outer surface (very little “tooth” to it), such as some types of nylon rope, applying a substantial load to the rope may even result in the knot pulling loose entirely.
Note: When I’m using polyester boating line, tubular webbing, rope with a braided cotton outer sheath, or other rope with a significant “tooth” to it, I do not encounter this slippage problem with significant frequency or severity.
Of course, in this book, I recommend that the top apply the ropes in such a way that the knots, particularly the final knots, not be placed under heavy load.
This “excessive slipperiness” problem that sometime occurs when a Granny Knot is tied in very smooth rope can sometimes be adequately dealt with by making a double-wrap in the first pass of the knot, thus creating what might be called a “Surgical Granny” knot.
Securing the tails to the rope with over hand knots can also mitigate the problem. This usually suffices, but might make the knot unacceptably slow to untie in the event of an emergency.

The Figure-eight Knot. The Figure-eight knot can be used in almost every situation as the simpler Overhand knot, but the Figure-eight knot is much less prone to jamming. The elegance, simplicity, and usefulness of this knot put it into the “you really should learn how to tie this” category.
To tie the knot in its most basic form, simply fold back about a six-inch bight of rope from the end and pass first in front and then behind the main rope. Now bring the free end down through the bottom loop thus created and pull it through. Pull tight and you’re done.
There are two useful variants of this knot:
First, fold the entire rope in half (bight the rope) and tie a Figure-eight knot out towards the midpoint. This is a very simple way of creating a loop of fixed size in the rope.

Second, bight the rope as before, but this time tie the Figure-eight rope out towards the tails. This has the effect of creating two opposable ends that can be used for a number of bondage purposes.
All told, this is an easy to learn and very versatile bondage knot.
What is a “Slippery” knot? “Slippery” is another ropespeak term. A “slippery” (or “slipped”) knot refers to a knot that can be mostly or entirely untied very quickly, usually even if the underlying rope is under load. Simply pulling on a free end of the knot usually does this. Such a “quick-release” factor can be provide good additional safety, and also reduce the chances that the top will have to cut the bottom free in the event of an emergency.
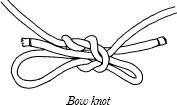
The common Bow knot, frequently used to tie shoelaces, is a good example of how a standard (unslippery) Square knot can be converted into a slippery knot. Many other knots have a “slipped” variant, and books on knots will often show examples of them.
In a bondage context, using a slippery knot is something of a trade-off. If only the top can reach it, tying the knot in its “slippery” variant can offer substantial additional safety with no significant loss of security. Also, when the bondage play is over, the players may not want to take a long time to release the bottom from their bondage. If slippery knots were used, the time necessary to release the bottom can be very greatly reduced. However, if the bottom can reach a free end of a slippery knot (and the little imps can be very cunning in devising ways to do this), they can almost instantly free themselves.
For our purposes, the common Bow knot will often work just fine as a slippery knot.
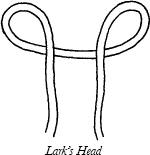
The Lark’s Head. The Lark’s Head knot, also known by a number of names including the Ring Hitch and the Cow Hitch, is my personal absolute favorite bondage knot. I use it in almost all the bondage that I do.
The Lark’s Head can be used for both the beginning and the ending of the bondage. As a beginning knot, known as the Starting Lark’s Head, it can work excellently for tying two wrists or two ankles together. As an ending knot, it can work excellently for securing the two ends of the rope around a bedpost or something similar. Thus, learning how to tie a Lark’s Head knot can add a great deal to your bondage skill.
This knot is frequently used for bondage, and is typically started at the midpoint of the rope. To tie it, fold the rope in half (thus creating what is known as a “bight” in ropespeak), then fold the loop made by this half about six inches back over the rest of the rope. Raise the top of the loop so that the two folded-back halves drape over the outside of the rope, and you’ve made your Lark’s Head.
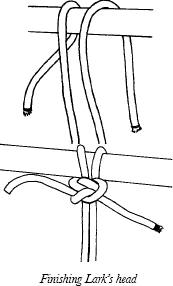
The “Finishing Lark’s Head” knot is very useful for the final securing of the two ends of a rope. For example, if you were to use the middle section of a rope to wrap around a wrist, you could then use the “Finishing Lark’s Head” knot to secure the remaining ends to a bedpost.
The knot is quite simple to tie. Simply drape both of the free ends together over the top of post, then bring the two free ends up on opposite sides of the draped rope. This creates two tails that can easily be secured together with a Square Knot, Surgeon’s knot (although this degree of extra security is usually not needed here) or Granny knot. If you wish to make the knot “slippery” for quick-release purposes, an ordinary Bow knot can work just fine here.
In summary, if you know how to tie either a Square knot or a Granny knot, you can get by just fine for most bondage purposes. However, if you know how to tie those knots, it is usually fairly simple to also learn how to tie the Surgeon’s knot, the “Surgical Granny” knot, the Figure Eight knot, and the common Bow knot. Add in the Starting Lark’s Head and the Finishing Lark’s head, both of which are relatively easy to learn, and you have a very nice “bondage knot tool kit” for your play.
If you would like some additional illustrations, please note that your household dictionary or encyclopedia probably has several knots illustrated. You may also, of course, consult some of the resources listed in this book’s Bibliography.