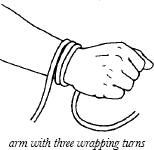
In classic single-limb rope bondage techniques, we wrap some turns of rope around the limb in question to create what can be called a “cuff.” We then use an initial knot to lock the cuff, and finally secure the tails of the rope to some relatively fixed object, such as the frame of a bed, with a final knot. The goal, of course, is to keep the limb stretched out, thus at least somewhat immobilizing that limb and exposing part of the bottom’s body.
Note: In describing the single-limb bondage techniques in this chapter, I shall assume that you are tying a bottom spread-eagled to a bed. However, the techniques I will describe can be easily adapted to other positions. Please keep in mind that a spread-eagle position involves a rather advanced degree of immobilization and vulnerability. That being the case, you should definitely think twice about letting someone tie you up in this manner. I would only permit someone to tie me up to this degree if I knew them very well, had negotiated carefully, and had previously done less immobilizing bondage sessions with them and had good results. (See the “Who? What? When? Where? Why?” chapter for more information.)
How many wrapping turns should I apply? One of the first questions that gets asked about applying erotic bondage is “how many times should I wrap the ropes around the wrists/ankles/etc. that I want to bind?”
The answer to this question depends on a number of factors, including the width of the rope, the “hardness” or “softness” of the rope, the body part in question, the condition of the bottom’s skin, how much tension the limb will be under after the bondage is applied, and so forth. However, I have encountered many fewer problems when the total width of the wrapping turns is at least 1/2” wide. In the real world, the width of restraints varies quite a bit. Police handcuffs are only about 1/8” wide at their narrowest point, while most hospital restraints are at least two inches wide.
Using the “you need at least half an inch” approach, you would thus apply at least two wrapping turns when using rope that was 1/4”-3/8” in width. For rope that is thinner than one-quarter inch, such as 3/16” ropes, you would thus need to apply at least three wrapping turns.
“Hold out your wrist!”

Note that, in order to distribute the pressure and thus reduce the probability of problems, you should lay the wrapping turns parallel to each other on the skin as much as you can, instead of “stacking” them in layers.
Most bondage using rope in the “average thickness” range (1/4”-3/8”) can be done very effectively, and with relatively few problems, if two to four wrapping turns are applied. Applying only a single turn of any rope has significant potential to concentrate the pressure of the bondage in a way that causes problems. One possible exception is tubular webbing, which lies flatter on the skin and usually comes in widths of at least one half of an inch.
Note: To help me make sure that I’ve applied at least 1/2” of wrapping turns, I’ve noted that the distance from the base of my fingernail to the tip of my left index finger is almost exactly 1/2”. Thus, as a quick “rule of finger” I can hold up my fingernail and use it to measure the width of the wrapping turns. I’ve found this trick to be surprisingly useful.
More wrapping turns can, of course, be applied (I’ve seen some tops apply more than a dozen), but these turns seem to be done more for the visual effect – “look at how tied up this bottom is!” — than for avoiding problems or increasing the degree of immobilization. It’s also worth noting that the more wrapping turns you apply, the harder it becomes to avoid “stacking” them. In general, in a monitored situation and using rope of average thickness, I’ve consistently found that using two to four wrapping turns will do the job nicely. Applying more than about six wrapping turns can start to become cumbersome, with no noticeable further reduction in problem frequency or increase in immobilization.
How tightly should the top apply the wrapping turns? The basic answer to this question, in an erotic bondage context, is that the top wants to apply the wrapping turns (and the rest of the bondage) tightly enough that the bottom will find it either very difficult or impossible to escape from the bondage, but not so tightly that the bondage damages the bottom.
Applying bondage so that it is within this narrow range of tightness can be challenging. Furthermore, there is not much readily available instruction in how to do this, because in many cases of “real world” bondage the goal is simply to make sure that the bound person stays tied. This is often done by applying the bondage as tightly as possible, with little or no regard for the person’s well-being, or even an active desire to torture them.
In many ways, erotic bondage is similar to the porridge that Goldilocks found at the house of the Three Bears. There is too-tight (too hot) bondage. There is too-loose (too cold) bondage. Finally, just like Baby Bear’s porridge, there is bondage that is “just right” in tightness. In fact, when applying bondage, the top tries to get it to the “Baby Bear” point and the bottom may aid this process by calling out “Baby Bear” when the degree of tightness has reached that “just right” point.
(For more information on tightness, refer back to the chapter on “Warning Signs and What They Mean.”)
Single-limb bondage technique #1: The Wrap-Tie-and-Tuck cuff. This is a simple, relatively easy-to-learn, bondage technique that nonetheless is very powerful and effective, and will work well in a wide variety of single-limb-bondage situations. Furthermore, in learning how to tie this technique you will learn a number of principles that will be very useful to you as you learn other bondage techniques. I therefore strongly recommend that you become very familiar with how to apply this technique. Fortunately, because it builds strongly on knowledge that you already have, this technique is relatively easy to learn.
There are literally hundreds, if not thousands, of bondage techniques. In deciding which ones to include in this book, I kept in mind that it was for beginners and thus decided to limit the techniques that were relatively easy to learn and could be used in a wide variety of situations. This technique, because it builds on knowledge that you almost undoubtedly already know, is a good example of such a technique.
OK, so let’s say that you want to tie someone spread-eagled to a bed. How might you do that? (Hint: Go get four lengths of rope, with each length being about twelve feet long.)
So now here you are, with a willing bottom, a bed, and four lengths of twelve-foot rope. What now? (Note: If you don’t have a bottom, you can learn this technique quite nicely by applying it to your leg just above your knee.)
Have the bottom lie on the bed so that they are on their back with their head located at the top center portion of the bed. Then have the bottom stretch their arms and legs out towards the four corners of the bed. (Place pillows under their head, knees and/or hips as needed for comfort.)
There are three steps to the “Wrap, tie, and tuck” technique.
• Step one — the wrap. Take a rope, find its midpoint (which, dutiful bondage fan that you are, you have already conveniently marked) and place it on the palm side of the bottom’s wrist. Then wrap the rope around their wrist in both directions and bring the ends back to their palm side (see illustration on p. 142). Wrap the rope firmly, but not really tightly. (You’ll learn the difference with practice.) You have now made two “wrapping turns” of rope around their wrist. If you are using rope of typical thickness — one-quarter inch to three-eighths thick — this has a good chance of being enough wrapping turns; however, if you wish, you can wind the rope around again to create a total of four wrapping turns. This is almost certainly enough.
• Step two — the tie. At this point, simply tie a Square knot in the rope close to the wrist. (A Granny knot will also often work just fine here.) You have now created a basic limb rope cuff.
Many people would think that you have now reached a logical stopping point regarding tying the wrist and can now use the tails to secure the limb in place. In many cases, they are indeed correct. I know of many occasions in which a limb has been effectively secured to a bed with no problems after being tied in this manner.
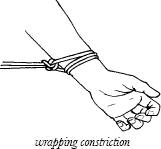
However, let’s take a moment to learn a truly major point of erotic bondage. Take both tails in your hand and pull on them in a direction perpendicular to the bottom’s wrist. Notice how the remaining wraps tighten around the bottom’s wrist while the wrap that you are pulling on can be pulled away from the wrist to a significant degree. I call this “wrapping constriction” and it is something you should learn to spot. (You may also note how the knot you tied separates somewhat. I call this “load spreading” and will discuss it later.)
Wrapping constriction is not always a bad thing. In fact, I would say that it is usually not a bad thing, but it certainly has the potential to become a bad thing. Wrapping constriction has the potential to become damaging to the bottom because it causes an increase in tightness. It also has the potential to become annoying to the top because the loosening of one turn may make it possible for the bottom to slip that turn over their wrist, thus creating enough looseness to make further escape quite easy.
Obviously, it would be a good thing if the top could apply the bondage in such a way as to either greatly reduce or even entirely eliminate wrapping constriction.
In handcuffing, there is a principle called “double-locking” the cuffs. This involves fixing the cuffs in place, usually by pressing a small pin against a certain location on each cuff, so that the cuff can neither loosen nor tighten further. This is a good safety feature and many police departments require that handcuffs always be double-locked after they are applied.
Wouldn’t it be great if we bondage fans had a way of double-locking our ropes in much the same way so as to achieve much the same benefit? Guess what? We do!
• Step three — the tuck. To “double lock” your rope cuff, take the two tails and tuck them under the wrapping turns in opposite directions, running them all the way through. This may be easier to understand if you intentionally tie a Granny knot instead of a Square knot at this point, because the tails of a Granny knot will “naturally” want to run in the desired directions.
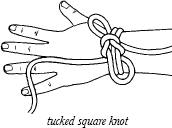
These “tucking turns” (more simply referred to as “tucks”) simultaneously accomplish five things:
• Tucks “double lock” the rope cuff, thus often entirely eliminating wrapping constriction.
• Tucks prevent “load spreading” of the rope cuff ’s knot.
• Tucks absorb much of the stress as the bottom squirms and struggles in their bondage. This means that relatively little of such stress is absorbed by the cuff ’s knot. Therefore, the knot is considerably less like to be pulled so tightly that it jams. This is a significant safety benefit.
• Tucks keep the initial knot under some tension, thus making it considerably more difficult for the bottom to untie.
• As a happy side effect, tucks also “fill in” some of the space that will be created when the bottom pulls on the cuff after it is tied in place. This can make the bondage much more secure and difficult to escape from. In fact, if the top wishes, they can use tucks to fine-tune the tightness of the bondage.
Caution #1: I call this type of tuck “the basic tuck” and it usually works very well, as long as the two tails are tied off in the same general direction such as to the same bedpost. If the tails are split and run off in different directions, problems could arise. I recommend using the basic tuck only if you plan to run the tails off in the same direction. Another tucking method, which I will describe later, can be used much more safely and effectively if you want to separate the tails and run them in different directions.
Caution #2: The “wrap, tie, and tuck” cuff can work very effectively, but it is elaborate enough that it could not be removed quickly in the event of an emergency. If such an emergency arises, the top would need to free the bottom by either releasing the final knot in the tails (this can be facilitated by tying the final knots in slipknots) or by using EMT scissors to cut through the ropes. If you must cut, then cutting the tails of the ropes close to the cuff would work well here.
Caution #3: If the basic rope cuff (or any of the other techniques described below) is tied so tightly that you cannot slip the rope ends under the wrapping turns to create the tucks, there is a good chance that the wrapping turns have been applied to a dangerously tight degree. (This is comparable to the classic bondage teaching that usually goes something like “you should always be able to slip a finger under the wrapping turns.”)

Single-limb bondage technique #2 — The Obi Knot cuff. This is a simple knot that can work very well for single-limb bondage. Like the wrap-tuck-and-tie, it is relatively easy to learn and avoids the problem of wrapping constriction. This knot is already known to a large number of people, as it is the standard knot used to tie the belts that martial artists wear around their waists. In this case, we simply tie it around a wrist or ankle instead of around a waist.
“I just go totally limp when I feel the knots pulled tight.”
To apply the Obi knot, place the midpoint of the rope on the bottom’s wrist and wind the tails around the wrist in opposite directions to create what will look like three wrapping turns, with the two news turns both on the “outside” of the initial wrapping turn. Make sure that the rope coils lay flat on the skin and are not stacked.
Next, take one of the two outside wrapping turns and lay its tail across the other two wrapping turns.
Now tuck the tail of this wrapping turn under the other two wrapping turns.
Finally, fold the two tails up so they meet, dress the cuff down to the desired tightness level, and tie them together in either a Square knot or a Granny knot.
Now grasp the two tails in one hand and lift straight up. You will see that this tie avoids wrapping constriction. (Note: Some load-spreading may also be visible. Load-spreading in this context may not be a problem, per se, but it might look unesthetic. You can eliminate load-spreading by using basic tucks to run the tails in opposite directions under the wrapping turns.)
You can now run the tails to a secure point and tie them off. Remember that if you secured the ends with basic tucks you should run both tails off in the same direction.
In summary, the Obi knot is an excellent knot for single-limb bondage. It is relatively easy to learn, both quick and simple to tie, and works very well.
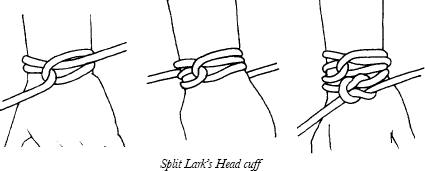
Single-limb Bondage Technique #3: The Split Lark’s Head Cuff. This technique is one that has been “discovered” by a large number of bondage fans. It can work relatively well, especially if combined with basic tucks.
To apply this technique, wrap a Lark’s Head knot around the limb, then separate the two tails and wrap them in opposite directions around the limb as well. This will create four wrapping turns of rope around the limb. At this point, tie the tails together in a Squareknot (which may result in a better-looking cuff) or Granny knot, then run the tails under the wrapping turns in opposite directions using basic tucks.
This creates a nice-looking, secure cuff with four full wrapping turns.
Single-limb Bondage Technique #4 The Tucked Lark’s Head Cuff. This technique is so simple that it is almost difficult to see it as a single-limb technique, but it can work very well, and it is another demonstration of the usefulness of the basic tuck.
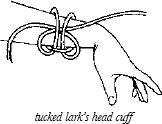
To apply this technique, simply wrap a Lark’s Head knot around the limb, as in Technique #3 above. Obviously, this is not a suitable stopping point, because at this stage the knot both tightens and loosens with ease, thus making it both dangerous and not very secure. You can make it much safer, and much more secure, by simply separating the tails and running them in opposite directions under the Lark’s Head with basic tucks.Note: The wrapping turns may try to loosen as you apply the tucks. You can prevent this by placing the finger of one hand on the tails as they cross under the arch of the Lark’s head while you work the basic tucks into place with your other hand.
This is a quick, simple single-limb tie. It might work loose somewhat if tied in a rope that has very little tooth, but when tied in a rope with a lot of tooth it secures nicely in place and can work very well. You can also increase its security by applying another basic tuck to each tail.
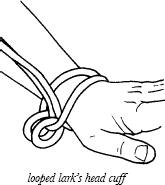
Single-limb Bondage Technique #5: The Looped Lark’s Head cuff. This is a very simple, very effective single-limb technique and is very similar to the Tucked Lark’s Head. To apply this technique, drop a Lark’s Head over the limb, tighten the tails as usual, then tuck the tails back under the arch of the Lark’s Head, being careful to run the tails “inside” the wrapping turns. Note: As with the Tucked Lark’s Head Cuff, you may need to pin the tails of the Lark’s Head in place with a finger as they pass under the arch in order to prevent loosening. You can, if necessary, increase the security of this cuff by tucking the tails back through the arch a second time.
Single-limb Bondage Technique #6: The Cat’s Paw cuff. I confess that this technique is my personal favorite when it comes to single-limb bondage. It is a very effective, very quickly applied bondage technique. Its tightness can be very easily adjusted after it is applied — much more so than is true for some of the other techniques. The Cat’s Paw is also usually significantly easier to remove after the session is over than the other techniques are. This is a “you really should learn how to tie this” technique.
By the way, the Cat’s Paw is a fairly well known “mainstream” knot and is both described and illustrated in numerous knotcraft books.
To apply the Cat’s Paw Cuff, start by making a Lark’s Head but do not (yet) apply it to the bottom’s limb.
There are a number of ways to make a Lark’s Head “in mid-air” but a simple one is as follows:
Stand up. Hold out your own left hand so that it is palm down. Bend your left elbow so that your hand is just a few inches from your chest.
Place the rope over your left hand with the midpoint lying on the back of your own wrist and the tails hanging down.
Bend your left wrist and grasp the rope with your left hand.
Reach over with your right hand and grasp the midpoint of the rope.
Pull the midpoint of the rope down over your left hand — thus creating a Lark’s Head.
Note: This technique can be accomplished very quickly, as in within two seconds, once you learn it.
Now, to create the Cat’s Paw…
Hold your newly made Lark’s Head with one loop in each hand with your thumbs pointed away from you and the arch towards your body.
Now give each loop a single inward twist so that your thumbs first point towards each other and then towards you. (At this point, you have created a Cat’s Paw.)
To ready the Cat’s Paw for use, tuck your thumbs back inside the loops so that they are touching, slide both loops over one thumb, and with draw the other hand entirely. (This may seem cumbersome at first but becomes quite simple with only a bit of practice.) You can then either pull on the tails to tighten the Cat’s Paw or pull back on the midpoint to loosen it.
The Cat’s Paw can work very well for single-limb bondage. Drop it over the limb, then slide it down to the tightness you want. Once it is set where you want it, it is very unlikely to further tighten, to loosen, or to jam.
Note: The Cat’s Paw sets very well if you’re using rope that has some tooth to it, but may slip (and dangerously tighten) if you’re using very slippery rope that has very little tooth to it. You can mitigate this danger by giving both loops an additional twist as you’re forming them. It’s my experience that, even when using very slick rope, usually only a single additional twist is necessary to accomplish this.
Note: It is possible to run the tails under the Cat’s Paw in basic tucks. This will gain you some extra security but make the knot harder to remove. I have generally found it neither necessary nor useful to use basic tucks in conjunction with the Cat’s Paw.
Caution: The tails of the basic Cat’s Paw are not suitable for being separated and dangerous tightness can result if they are separated. Be sure to run them both off in the same direction for final securing.
Single-limb Bondage Technique #7: The Pre-Fab Lark’s Head cuff. The pre-fab Lark’s Head cuff can also be thought of as “the optimist’s cuff ” because, unlike other bondage techniques, it can be mostly set up ahead of time. Thus you can put it into position on your bed or a similar location in anticipation of good times to come. This cuff can also be very useful to use if it is difficult to reach sections of the frame or bedpost of your bed.
This bondage technique has two phases, the initial set-up phase and the application phase.
To initially set up the bondage on your bed, fold the rope in half (“bight the rope” in ropespeak) and apply a Lark’s Head (or Prussick knot, which is described later) — the initial knot — around a sturdy section of the bed’s frame near a corner. Run the tails out together onto the bed, determine the approximate location of where the wrist or ankle of the bound person will likely be, and tie the two tails together at that location in a Figure-eight knot. Both tails beyond the knot should be about eighteen inches long. (Note: do not set this knot tightly because you probably will have to adjust it later.) This completes the set-up phase.
To apply the actual bondage, stretch out the bottom’s limb so that it is as extended as you want it to be, then place their limb between the two tails where they join the double-overhand knot. You may have to “slide” the overhand knot up or down the rope to get it to the proper location. (Now aren’t you glad that you didn’t set it tightly?)
Wrap the tails around the limb in opposite directions, then continue to run the tails in opposite directions between the ropes that are above the double-overhand knot. You will typically end up with two wrapping turns of rope around the limb. Now tie the tails together in a final knot. This creates a tidy looking cuff with no wrapping constriction of the limb or load-spreading of the final knot.
(This technique also provides a good review of bondage terminology, using the terms initial knot, intermediate knot, final knot, wrapping turns, load-spreading, wrapping constriction, and tails.)
Single-limb Bondage Technique #8: The Bowline on a Bight. This is a bondage-related application of a well-known knot that is described in many knotcraft books: the Bowline on a Bight. It can be a good knot for bondage because it allows the top to wrap two turns of rope that will solidly lock into place around a limb. This knot can also be significantly easier to untie after the session is over than some of the other techniques in this section are. However, it can be a bit trickier to dress this knot to the “baby bear” point than it is with other single-limb techniques, so in this respect this may be a better technique for legs than for arms. Still, once you get the hang of how to adjust it properly (and that’s usually not too difficult), it can be a very effective technique for both ankles and wrists. Note: This technique works significantly better in supple ropes than in stiff ropes.
To tie this knot, simply bight the rope, then make an overhand loop near the bight. Pass this bight around the bottom’s wrist or ankle and then through the overhand loop in the classic “snake comes out of the hole” maneuver associated with tying a Bowline. Hint: adjust the position of the overhand loop so that the arch of the bight just barely emerges from it. Finish the knot by passing the tails through the arch and setting the knot.
Single-limb Bondage Technique #9: The French Bowline on a Bight. This technique is a simple yet innovative combination (thought up by me) of two well-known knots: the French Bowline and the Bowline on a Bight. It shares many of the benefits of the Bowline on a Bight in terms of security and ease of untying, particularly if used with supple rope. Big hint: The description of how to tie this cuff may appear complicated, but if you learn how to apply the Bowline on a Bight as a rope cuff (technique #8), this technique is very quickly learned as it involves only a single change.
To tie this knot, simply bight the rope and make an overhand loop as you did with the standard Bowline on a Bight, but make this loop significantly farther away from the bight. Now wrap the bight in a 180-turn around the bottom’s wrist or ankle and pass it though the overhand loop as you did in technique # 8. (OK, here’s where it gets interesting.) Now wrap the bight once again in a 180-turn around the bottom’s wrist or ankle as you did before. Finish the knot by running the bight through the overhand loop so that it is just barely protruding, dress the knot to the baby bear point, pass the tails through the arch of the bight to lock it into place, and you’re done. You now have a limb that is bound with four wrapping turns very securely tied around it. Among other things, this distributes the pressure quite a bit — a distinct advantage if you’ve got a bottom who likes to struggle.
The Basic tuck and the Hitched tuck. In all of the techniques described above, I have mentioned using basic tucks. Basic tucks generally work well but they have one big drawback: the tails of a basic tuck are not suitable for being separated after they are tied. Given that most single-limb bondage involves tying off a given limb to a given bedpost, and that the tails are therefore usually run off towards the same post for final securing, this is generally not a problem. However, occasionally the top might want to separate the tails and secure them to different posts. The Basic tuck is not suitable for this, and may even be dangerous. Fortunately, we have a good “Plan B” for this situation. I call it “the Hitched tuck.”
A hitched tuck is very simple to create: After you have made a basic tuck, simply run the tail back under the portion of the rope that lies between the knot and the beginning of the tuck. Dress this down, and you’re done. Repeat with the other tail. It is possible to form the hitched tucks on the same side of the cuff or on opposite sides. These tails are now much more suitable for separating.
Note: It generally works better if the tails are separated in the same general axis as the rope cuff itself. If the tails are rotated more than about ninety degrees to this axis, a potentially dangerous deformity of the rope cuff may be noted. This deformity is typically quite obvious.
I’ve found that the Hitched tuck works well with the wrap, tie, and tuck technique (#1), the Obi knot (#2), and the Split Lark’s head (#3). They work adequately with the Tucked Lark’s head (#4) and the Looped Lark’s head (#5). It is possible but awkward and of questionable benefit to do with the Cat’s Paw (#6). Hitched tucks are possible but awkward and often don’t work well with the Pre-fab Lark’s head. (#7). They are possible but often not necessary with the Bowline on a Bight (#8) or the French Bowline on a Bight (#9).
In summary, if you know that you will want to separate the tails after you tie the basic rope cuff, I suggest that you go with techniques #1, #2, or #3 as described above if you want to tie Hitched tucks. If you want to separate the tails without doing Hitched tucks, try techniques #8 or #9.