Once you have applied any of the single-limb cuffs listed in the previous chapter, with the exception of the Pre-fab Lark’s Head, you will have two tails coming off of the cuff which should probably be secured somewhere — unless the sight of the bottom doing jumping jacks after you have tied rope cuffs to their wrists and ankles turns you on. (What are you, some kind of pervert?)
Logically, of course, you should secure the tails to some sturdy portion of the bed. Let’s take a closer look at that.
Beds obviously come in a very wide variety of sizes, shapes, and designs. What you are looking for as you examine the particular bed in question is a sturdy point around which two tails of a rope can be passed and then tied together. Common points for this include corners of the frame, the legs of the bed where they run from the frame to the floor, and very strong posts of the bed at its corners. (It’s come to my attention that, for reasons I’ll bet you can guess, some bed manufacturers are now discreetly selling beds with “reinforced” frames.) Some bondage aficionados of my acquaintance increase the accessibility of the bed frame and legs by adding strong loops of rope, tubular webbing, chain or other low-stretch materials to them.
For the sake of ease of explanation, I’m going to assume that the bed you’ve tied your bottom to has a sturdy vertical post at each of the corners and also has a sturdy bar running horizontally just slightly above the mattress at both the top and bottom edges. (If your bed lacks these features, the legs that hold the frame up off the floor often provide excellent alternatives.)
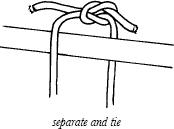
Tail-securing method #1: Separate and Tie. This is probably the easiest and simplest method of securing two tails. This technique works especially well if the tails are not under tension at the time you tie the knot. Simply run the tails out toward the securing point (which I will call a post), separate them, run them on opposite sides of the securing point, tie the tails together in an overhand knot, adjust the tension as wanted, and tie the tails together in a final knot. For a quick-release variant, tie them in a Half-bow or Bow knot.
(Note: I found that this to one of the few situations in which the Granny knot worked distinctly poorly. The Square knot, Surgeon’s knot, and Surgical Granny knot, and their slipped variants such as the Bow and Half-bow, all worked significantly better than the Granny knot in this situation.)

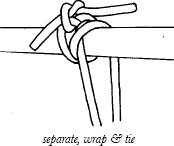
Tail-securing method #2: Separate, Wrap, and Tie. The above technique will probably work just fine in the majority of cases. It’s simple, tidy, and easy to adjust for proper tightness. However, it does have three potential drawbacks.
First, when the bottom pulls on the rope after the final knot is tied, this pulling can lead to extra pressure on the final knot. This pressure may cause the knot to become pulled so tightly that untying it could be a problem. In the event of an emergency, this could be a very serious problem.
Second, when the bottom pulls on the rope, such pressure may cause the knot to slip. This can be especially true if the ends have been tied in a Granny myself.” knot. This slippage can lead to undesired looseness in the tails which allows the bottom more movement than the top desires. (If the rope has very little tooth, and the pressure is very great, the knot may even pull completely apart.)
Third, the “separate and tie” method can be distinctly difficult to do, and possibly even somewhat dangerous to the top’s fingers, if the tails are under tension when the top attempts to tie the final knot.
“Keeping him tied up in the bedroom is al-most like having the house all to myself.”
You can solve these problems in two ways, and these ways can be used either separately or together.
Your simplest solution to both problems may be to simply wrap the tails in opposite directions all the way around the post in a 360-turn (a crossing turn) before tying them together. This simple technique keeps a great deal of tension off of the knot itself, thus making it much more difficult for the knot to loosen or to slip. Try this yourself and you’ll see what I mean. Note: one such turn is usually quite adequate to accomplish what you want, but you can wind more turns if you wish.
One very nice aspect of this “wrap before you tie” approach is that as you make your two turns (which may seem a bit of a challenge if the tails are under tension, but is actually not all that difficult) you can usually easily wrap them so that one turn will “lock” over the other one as they cross each other (in fact, doing so may be difficult to avoid), thus relieving most of the tension on the tails. This locking allows the top to finish off the final knot in an almost leisurely manner and to make sure that it sets very cleanly.
A second solution, particularly to the tightness problem, is to simply tie the tails in a Bow knot. This knot, of course, lends itself to quick release even if the knot has been pulled especially tight. There is a potential problem with the bottom being able to escape if they can reach the tails, but I’m sure that as a skillful top you’ve been careful to locate these tails someplace where the bottom cannot possibly reach them.
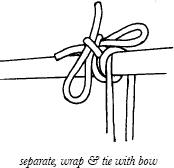
If you combine these approaches, wrapping the tails all the way around the post at least once and then tying them in a Bow or Half-bow, you will likely have a very secure, and yet very quickly released, final knot. A nice touch.
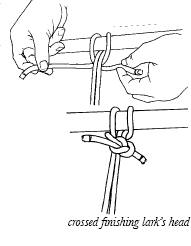
Tail-securing method #3: The Finishing Lark’s Head. This is another very easy to learn and very useful method of securing the tails, particularly if they are not under tension. We discussed it earlier in the “Basic Knots” chapter. To apply this technique, simply pass both tails together over the top of the post and back in a simple turn (a 180-turn), pull on tension as appropriate, and separate the ends. Then bring the ends over the top of the tails, tie the two ends in an overhand knot, further fine-tune the tension as needed, and tie off in a Square knot or Granny knot. Surgeon’s knots, Half-bow knots, or Bow knots can also be used here. The result is a very quickly applied technique that usually works just fine.
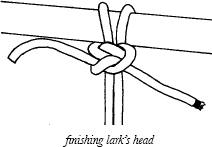
Tail-securing method #4: The Crossed Finishing Lark’s Head. When applying the Finishing Lark’s Head as described above, it can be useful to keep in mind that the tips of the tails (in which the final knot will be tied) will end up on the same side of the post that the tails were initially wrapped around. This can sometimes be a bit inconvenient; however, this inconvenience is easily remedied. Simply cross the tips of the tails, continue the crossing until the tips are where you want them, and tie them together. This can also help if you are tying the tails while they are under tension. One such crossing is usually adequate, but you can make more of them if you wish. As is true with the Finishing Lark’s Head, you can use a Square knot, Granny knot, Surgeon’s knot, or Bow as a final knot.
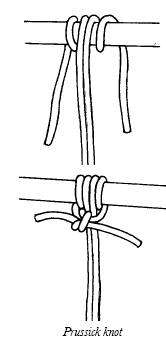
Tail-securing method #5: The Finishing Prussick Knot. This variant of a well-known climbing knot can be used as a somewhat elegant means of securing the tails. If the tails are under tension, it can be easier to secure them by using this knot than by using either of the Lark’s Head knots. The Finishing Prussick knot also “grips” the post much more firmly when under tension, and greatly restricts how much lateral motion is possible. (This is why this knot is so popular with climbers, who frequently use Prussick knots to help them on their main climbing ropes.) Finally, as is true with the “separate, wrap, and tie” technique, this technique does a lot to prevent the final knot from either becoming dangerously tight or slipping too much when the bottom pulls tension on the tails.
To apply the Finishing Prussick, wrap the tails together around the post, separate the ends, wrap them entirely around the post a second time (laying these wraps to the outside of the initial wraps), bring the tips up on opposite sides of the tails as you did with a Finishing Lark’s head, and tie them together.
As is true with the Finishing Lark’s Head, a wrapped variant of this knot can also be done.
The Prussick knot, in all of its variants, is a very useful bondage knot, and employing it can add a nice touch of sophistication to the scene.
Tail-securing method #6: The Double Half-hitch. This is a classic means of tying a rope to a post and is illustrated in numerous knotcraft books. It can be tied easily in both a single rope and a bighted (doubled) rope.
To tie this knot, simply wrap the tips around a post in a simple turn (a 180-turn), take up slack and pull tension as wanted, then run the tips back over the tails and through the space between the post and the loop. (If the tails are under tension, you may have to hold them in place with one hand.) Then once again wrap the tips over the tails and you’re done. Be advised that a small amount of tension may be lost here as the knot settles into place.
Note: As you tie this knot if, after going around the post, you first pass the tips over the tails (which you pretty much must do) and then once again pass them over the tails — in what can be called the “over and over” approach — you will have created the classic Double Half-hitch knot. Sharp-eyed, knowledgeable bondage fans will note at this point that the tips of the tails are configured in a Clove Hitch position.
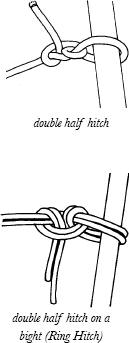
An alternative approach is to tie the knot using an “over and then under” approach. This results in the tails forming a Lark’s Head knot, and helps make it clear why the Lark’s Head is also widely known as the Ring Hitch.
Caution #1: Please note that the Double Half-hitch, in either variant, is a slip knot and cannot be double-locked. If placed under tension, it can constrict very tightly and may not loosen significantly once the tension is removed. For this reason, I recommend that you avoid tying this knot around tissue. It can work well when used on bedposts or other inanimate objects, but keep it away from living flesh.
Caution #2: A Double Half-hitch can be very difficult to untie if the tails are under tension. In the event of an emergency, you would have to cut this rope. Alternatively, you can tie a Slipped Double Half-hitch that comes apart very easily even under tension. Be advised that it may come apart more slowly in a bighted rope than in a single rope. (See the safety advisory at the end of this section.)
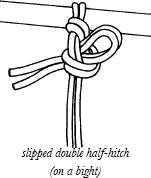
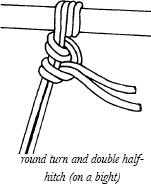
Tail-securing method #7: The Round Turn and Double Half-hitch. This is a simple variant on method #6. The only difference is that the tips are wrapped around the post in a 540-turn (aka a Round turn) before the Double Half-hitch is tied.
As is generally true with using 540-turns, the extra turn puts more of the tension on the rope and less on the knot itself. This both makes it easier to tie the knot if the tails are under tension and lessens the chances that the knot will jam — two nice advantages.
Tail-securing method #8: The Taut-line Hitch. This is a well-known knot in camping circles (particularly among those people whose who still use low-tech tents that require tent pegs). It is illustrated in many knotcraft books. The Taut-line hitch is used on a tent guy line to keep the line tight. This knot is a good knot to use to adjust the tightness of a spread-eagle tie once you have it in place. It works significantly better in ropes that have some tooth to them.
This knot can be tied in either a single rope or a bighted rope. I will describe how to tie it in a bighted rope. To tie this knot, make a 180-turn around the post and tie a single half-hitch, just as you did to start tail-securing method #6. Now run another 360-turn around the tail inside of the half-hitch. Run the tail up above the initial turn, make another half-hitch, and you’re done. This knot can also be tied by making the original turn around the post a Round turn (540 turn) instead of a Simple turn (180 turn). It can also be tied in a slipped variant but this doesn’t qualify as a quick-release variant.
Tail-securing method #9: The Clove Hitch. The Clove hitch is another well known knot, illustrated in almost every book on knotcraft, that can function well as a final knot in securing the tails. It can be tied in either a single rope or a bighted rope. This knot can work particularly well if the tails are not under tension as you tie it.
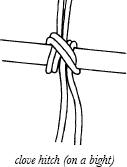
To tie it in a bighted rope, run the tails around the post in a Crossing turn (360 turn), passing the tails over themselves as you complete it. Continue wrapping the tails around the post in a second 360-turn (Crossing turn), passing the tails under the crossing section. (Try this mnemonic: First wrap it over, then wrap it under.”) Set the knot, and you’re done.
Note that the knot may “unwind” about one-quarter turn when tension is applied to the tails. This is usually not a significant problem. If it does become a problem, you can usually mitigate or eliminate the problem by adding an additional half hitch around the post.
An excellent variant of this technique is to tie the Clove hitch in a slipped version. This combines the features of a knot that sets up very well, withstands both constant strain and intermittent yanking very well, and yet almost always functions as a true quick-release knot. I highly recommend this variant.
Safety advisory regarding “quick-release” knots. A number of knots can be tied in what is often called a “slippery” or “slipped” version that supposedly enables them to be released very quickly even when under tension. Example of such “slipped” knots include the Half-bow (sometimes also called the Slipped Square knot), the Bow knot, the Slippery Sheet bend (not shown in this book but commonly described in the knot books in the Bibliography), and the Slipped Double Half-hitch.
One of the more eyebrow-raising facts that I discovered while researching this book was that these knots did indeed usually function quite well as “quick-release” knots, provided that they were tied in a single rope. When they were tied in a bighted rope, these knots often jammed after slipping part of the way loose when I attempted to quick-release them. I strongly invite you to discover the truth of this for yourself. The one major exception to this was the Slipped Clove hitch tied in a bighted rope.
“I thought of this really neat bondage technique!”
Also, adding a Crossing turn or a Round turn to a knot consistently seemed to increase the probability of a jam occurring when I attempted to release it under quick-release conditions. Again, please check this for yourself. For example, compare the quick-release performance of the Slipped Double Half-hitch versus the Slipped Double Half-hitch with a Round turn when they are tied in a bighted rope.
I think the take-home message regarding this is “a quick-release knot may not.” Therefore, it only makes sense that the top should not automatically assume or presume that a quick-release knot will function as planned. Watch it to make sure that it has indeed released itself as wanted. If this didn’t happen, work it completely loose. (Caution: remember that the tails may be under tension and may spin around and hit you or the bottom when they are released.) If the knot fails to completely release in a real emergency, grab your EMT scissors and cut the ropes.
Remember: “A quick-release knot may not.”