ARM HARNESSES. In tying the bottom’s wrists together behind their back, it is often very wise to further immobilize their arms. As is sometimes all-too-obvious, a bottom whose wrists are only tied together behind their back may still have a very great deal of movement available to their bound arms. It’s my experience that if a bottom has only their wrists tied together with rope behind their back, they will almost undoubtedly be able to free themselves within a relatively small number of minutes, provided that:
• The bondage is not tied so tightly that it is dangerously tight.
• The bottom has a fair amount of movement possible in their elbow and shoulder joints. (Slender, flexible submissives whose wrists are tied together behind them but whose arms are not otherwise restrained may even be able to do things like check their e-mail and fix a meal.)
• The bottom is willing to lose a little bit of epidermis in their squirming to get loose.
In the process of researching this book, I bound a fairly large number of people and then watched them carefully as they attempted to free themselves. The results were illuminating (and the process was fun).
My basic conclusion was that the more movement a bound body part was capable of, the more likely it was to free itself from the bondage. In the case of young, strong, flexible bottoms who had their wrists bound together behind their back but whose arms were not otherwise restrained, they could often free themselves relatively quickly. (This was particularly true if they had gained some practice and experience in this regard.)
So, after a fair amount of experimentation, I came up with the saying “If you want their wrists to stay tied together behind their back, you’re going to have to do something about their elbows.”
Basically, the more you can limit the range of motion of their elbow joints (and shoulder joints), the more likely their wrists are to remain tied together behind their back.
The simplest way to immobilize their elbows is, of course, to simply tie them together behind their back. This is an elegant solution because it is an especially secure bondage technique. There is no way that they are going to reach the rope binding their elbows together with a finger, toe, or tooth. (OK, maybe a toe if they are really flexible, but I wish them lots of luck.)
However, as we already discussed, binding their elbows together is rarely a viable option. Many bottoms can’t have their elbows brought together behind their back at all. Usually it’s only very slender, flexible bottoms who can endure having their elbows tied together behind their back for any significant length of time without dangerously compressing both the nerves and blood vessels in their upper arms and also causing them severe pain.
Furthermore, even if the bottom can handle having their elbows tied together behind their back, this bondage position can be very limiting. It often seriously interferes with access to their buttocks for activities such as spanking, and only a very small percentage of bottoms can endure lying on their back while their elbows are tied together. We clearly need a different approach.
Listed below are eight different “arm harnesses” with their applications and characteristics. In the first seven of the eight cases, it is assumed that the top has started the bondage by binding the bottom’s wrists together behind their back starting at the midpoint of the rope and working outward towards the tails.
Note: given that bottoms vary considerably, it is probable that some of the harnesses listed below will work relatively well and some will work relatively poorly on a particular bottom. It is important to experiment.
Arm harness #1: The Simple Waist Loop Harness. This technique typically uses a twelve-foot length of rope. It is perhaps the simplest arm harness of all, and yet is often both very effective and very comfortable. To apply it, the top ties the bottom’s wrists together (usually in the anti-parallel position in the small of their back) and then simply brings the tails around to the front of the bottom’s torso and ties them together there.
It is very important that this waist loop be tied fairly snugly. (Tying the tails together with a Surgeon’s knot can work particularly well here.) In particular, the waist loop must be pulled tightly enough so that it is narrower than the bottom’s pelvis. This will prevent the bottom from simply sliding the waist loop off as if it were a pair of pants.
Caution: Because the waist loop is tied relatively tightly around the bottom’s lower torso, there is at least the hypothetical possibility that it could interfere with their breathing. I have never actually encountered this problem, nor have I ever heard of it actually happening but, at least in theory, the risk is there. If it does occur, the top should be able to correct it long before it becomes a serious problem.
If this technique is applied using a twelve-foot length of rope, typically two tails of somewhere between two to four feet in length will be left over after the technique is applied. A number of things can be done with such tails:
• They can be simply left in place, either dangling freely or tucked under the waist loop.
• If the bottom is male, they can be used to bind his genitals.
• If the tails are long enough, they can be used to bind the bottom’s ankles.
• They can be brought back to the wrists and cinch-looped between the bottom’s wrists and their back, thus further immobilizing their wrists. (This may leave the final knot in a position where the bottom can reach it, which may or may not be a problem. Of course, even if they can untie this knot, doing so does not affect the basic security of this tie.)
• The tails can be brought up behind the bottom’s neck and tied in place there. (Again, even if they can reach and untie this knot, the overall security of the bondage is not seriously affected.)
As an alternative to all of the above, this might be one of the few situations in which using a nine-foot rope, or an even shorter rope, would result in a “cleaner” tie.
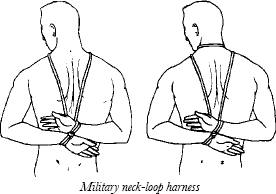
Arm harness #2: The “Military” Neck-loop Harness. This technique typically uses about a twelve-foot length of rope. I call it the “military” arm harness because it is a variant on a technique widely taught to military personnel (and to martial artists) as a method of tying enemy prisoners. This is definitely an increased risk technique, but I have found that its actual degree of risk seems to be significantly lower than frequently believed. Still, it does call for alertness and communication on the part of both the top and the bottom. (I know that a number of my readers have been taught, as a standard, basic BDSM teaching, never to tie anything across the front of a bottom’s throat. Therefore they may be wondering, and may even feel a bit alarmed, that I have included such a very “politically incorrect” technique in this book, particularly given that I have a reputation within the BDSM community as something of an ultra-safety-conscious person. Let me assure these readers that I haven’t lost my mind, and that this inclusion is an intentional, considered action on my part. For more information, please see my essay “The Military Hogtie” on p. 266.)
To apply the technique, the top ties the bottom’s wrists behind them using the midsection of the rope, lifts the bottom’s wrists so that they are as bent at the elbows as they can be without heavy straining, then runs the tails up and around to the front of the bottom’s neck and ties them in place there.

To help avoid cinching constriction, it usually works better to finish the knot, then thread the tails between the wrists so that the tails are between the bottom’s wrists and their back. This is a good approach for all hands-behind-the-back arm harnesses.
Provided that the rope running from the bottom’s wrists to their neck is not under significant tension (which the bottom will be able to determine almost immediately), and there is no significant pressure applied around the bottom’s neck, and provided that there are no sudden, strong tugs on this rope, I have not found this to be a particularly uncomfortable or dangerous tie. This can be especially true if the bottom’s wrists are left free, with no rope running down towards their ankles. However, it is a position that discourages struggling because such struggles can cause uncomfortable pressure on the bottom’s throat (thus making it a form of what is sometimes called “predicament bondage”). Obviously, any severe struggling could cause an uncomfortable or even dangerous amount of pressure on the bottom’s throat.
Because some flexible bottoms can lift their wrists and thus cause the neck loop to slip down across one shoulder, or perhaps even down over both shoulders, and thus defeat the basic construction of this harness, some tops will wind the tails a few times around the bottom’s neck until they “run out of rope” and then tie off the ends. The ends are usually much less accessible to the bottom if they are tied off in front of the bottom’s neck. (As a refinement, a variant of the Obi knot cuff – see the section on single-limb bondage for more information on that knot – is sometimes used as the final knot here.) An alternative approach, for those who wish only a single neck loop while increasing the security of the tie, is to wind the tails running from the wrists to the neck around each other as the bondage is applied.
“I love the feel of nylon rope.”
Arm harness #3: The Politically Correct Arm Harness. For those of you who want most of the security of the Military Neck-loop harness without the potential risks of that tie, this technique, which I’ve named the “Politically Correct Arm Harness,” can work almost as well. It typically takes about an 18-foot length of rope.
To apply this technique, tie the wrists as desired (the anti-parallel position is strongly recommend here) with the mid section, then lift the bottom’s wrists as high as you can on their back without causing heavy straining. Thread the tails to prevent cinching constriction, then run the tails up to either side of the bottom’s neck and drape them over their shoulders. Cross the tails as high as you can on the bottom’s chest, then run the tails back under their arms and over the ropes running from their wrists to their shoulders. Bring the tails back to the front. Tie the tails together at that point, and you’re done. This is a symmetrical arm harness that avoids putting pressure anywhere on the bottom’s neck.
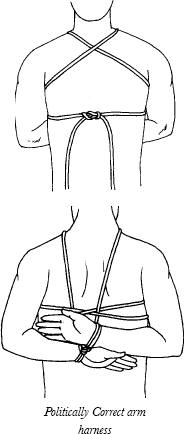
Make sure that the final knot is “eel-proof ” and that the bottom can’t reach it with their teeth. If they can, tuck the tails out of reach or follow some similar precaution.
Arm harness#4:TheBreast-CrossHarness. This is an elegant arm harness that I invented while researching this book. It takes about an 18-foot length of rope.
To apply this harness, tie the hands in the anti-parallel position with the midsection of the rope, lift their wrists up as high on the back as you can without causing heavy straining, then run the tails under the bottom’s armpits, up over their collarbones, and cross them low at the back of the bottom’s neck. Be sure to run the tails between the wrists after tying so as to avoid cinching constriction.
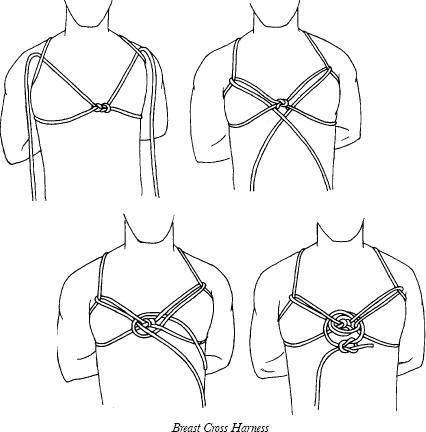
Continue to wrap the tails under the bottom’s armpits and bring them together at the front of the bottom’s upper chest, over their breasts. Tie the ends together here. (A Surgeon’s knot may work especially well.) Now here’s the interesting part: to prevent the bottom from simply being able to shrug off the ropes running across their collarbones, run a tail up and around this rope, then bring the tails back down to the chest knot and pass them through the angle thus created. This creates two opposable ends, which you can then tie off in a final knot. As with the Politically Correct Arm Harness, make sure that the bottom can’t reach the final knot with their teeth, or take precautions if they can.
One interesting feature of this arm harness is the “X” formed by the ropes as they cross in the center of the bottom’s upper back. This makes for a natural attachment point (which can be used for such matters as helping to secure the bottom’s ankles in place).
Arm harness#5:TheJapaneseArm-wrapHarness.This arm harness is a “kinder, gentler” variant of a hojo-jitsu prisoner-tying technique. It can be an especially good harness when dealing with “escape artist” bottoms. The basic idea of this arm harness is that if the bottom pulls their wrists down towards their buttocks in an attempt to escape, the arm wraps are tied in such a way that they become tighter as long as such a pull is being applied, but loosen once the pull is stopped. Depending on the size of the bottom and how the harness is applied, this harness will require an 18-foot to 24-foot length of rope.
To apply the harness, bind the wrists as usual with the midsection of the rope and take the normal precaution to prevent cinching constriction. Run the tails together up across the back to one of the bottom’s arms. (This tie may be more secure if you run the tails across the back of the uppermost arm. In this case, we’ll say that it’s their right arm.) Wrap both tails firmly but not really tightly around their right arm by running the tails between the side of their chest and their arm and then in the natural narrowing point just above the bottom’s biceps muscle in a front-to-back direction, with the tail coming back around under the initial wrapping. (If the bottom is an “eel,” do a second such wrapping.) Now (key point) run the tails under the first wrapping and then through the bottom’s armpit to the front of their chest. If the bottom is female, run the tails across her chest just slightly above her breasts.
When you get to their left arm, wrap the tails all the way around their upper arm by running them first between the side of the bottom’s chest and their upper arm in a back-to-front direction (again, if the bottom is an “eel” do a second wrapping) and then bring the tails back over the wrapping turns. Now wrap the tails over the section of rope that runs between the bottom’s chest and the wrapping turns and run it back down towards their wrists.
Wrap the tails twice around the ropes running to the bottom’s right arm as close as you can to their wrists (a round turn). Finish the harness by separating the tails and running them in opposite directions around the bottom’s upper arms to the front of their chest and tying the ends together in a Square knot or Surgeon’s knot.
Another alternative ending to this tie (there are several, depending on, among other things, how much rope the top has left over after wrapping the tails off in the final round turn) is to have the bottom bend their ankles back toward their wrists and finish off in a hogtie.

Arm harness #6: The Japanese Single-chest-wrap Harness. This is a basic arm harness that is simple to apply, and very effective in its basic form. As a bonus, it lends itself to a number of variants. Depending on the size of the bottom and the variant that the top wishes to apply, this harness calls for an 18-foot to a 24-foot length of rope.
To apply the Japanese single-chest-wrap harness, use the midsection of the rope to tie the bottom’s hands behind them (as before, the anti-parallel position will probably work best). Position the tails to avoid cinching constriction, and run the tails together over one of the bottom’s upper arms (let’s say the right arm) at about the junction point of the top third and middle third of the arm. Run the tails across the bottom’s chest, usually just above their breasts. (As a variant, you can separate the tails and run one end just above their breasts and the other end just below their breasts.) Continue running the tails across the bottom’s chest and run them around the bottom’s left arm. As before, run the ropes across their arm at about the junction of the upper third and middle third of their arm.

Run the tails back down towards the bottom’s wrists and wrap them together in a simple turn (a 180-turn) around the ropes running from the bottom’s wrists to their right arm. Cinch the arm harness down to “baby bear” tightness, then continue to wrap the tails around until you’ve completed a round turn (a 540-turn). You are now ready to finish tying this arm harness, and you have several options at this point. The simplest option is to simply separate the tails and run them in opposite directions up over the bottom’s arms until they meet at the center of the bottom’s chest and tie them together.
A somewhat more secure option is to separate the tails and run them under each armpit, then tie them together at the center of the bottom’s chest.
An even more secure option is to separate the tails and run them under the bottom’s armpits, running them in a crossing turn over both the front and rear sections of the chest wrapping turns. Thus, when the two tails meet at the front of the bottom’s chest, the top can cinch the chest wrapping turns even more securely before tying off the tails. (Be careful to avoid pinching skin when you do this.)
Finally, regarding tying off the tails, if the top separated the initial chest wrapping turns so that one tail was above the bottom’s breasts and the other was below it, a breast bondage variant may be possible. To create this variant, simply tie the two tails together (a Surgeon’s knot is recommended), then use any remaining rope left in the tails to join the two chest wrapping turns together. This creates a very secure, very symmetrical arm harness.
Arm harness #7: The Japanese Double-chest-wrap Harness. This is a slightly more elaborate version of the Japanese Single-chest-wrap Harness. Depending on the size of the bottom and the variant that the top wishes to apply, this harness typically calls for a 24-foot, or even a 30-foot, length of rope. (If the top doesn’t have a 30-foot length of rope, it’s usually a simple matter to tie a 12-foot rope and an 18-foot rope together, although you may have to experiment a bit to make sure the connecting knot isn’t in an awkward place.)
To apply this arm harness, tie the bottom’s wrists behind them with the midsection and take the standard precaution against cinching constriction. Then run the tails together up over one of the bottom’s arms at the top-third to middle-third junction and across their chest just above their breasts. Then run the tails over their opposite arm and loop them under the ropes running to their right arm. Take a moment to cinch this section fairly snug. Now run the tails together back over their arms, this time passing slightly below the original wrapping turns, and run the tails just under the bottom’s breasts. Continue to run the tail across the bottom’s right arm, again passing just below the original wrapping turns, and run them back down to the loop. Run the tails down through the loop, cinch them up a bit, and wrap the tails around the rope. The top is now ready to complete this arm harness. As before, they have a number of options.
One option especially worth exploring at this point is to run the tails up the bottom’s back and across their shoulders on opposite sides of their neck. To finish this harness in a not-politically-correct fashion, tie the tails together at the front of the bottom’s throat. To finish the harness in a politically-correct fashion, run the tails down on opposite sides of the bottom’s neck, down over (or under) their upper chest wrapping turns, and then loop the tails around the lower chest wraps in either an in-to-out or an out-to-indirection. Finish the tie by bringing the tails back up to the upper chest wrappings and running them behind the ropes coming down from their shoulders to create to opposable ends. Tie the ends together, take anti-biting precautions as needed, and you’re done. The end result is a very secure, fairly elaborate arm harness that can be very sexy-looking… if you’re into this sort of thing.
“Let’s try looping that rope under your breasts.”

Arm harness #8: The Split Lark’s Head. This is exactly the same technique that was presented in the section on single-limb bondage techniques (p. 148), except in this case the technique is applied around the bottom’s entire upper body instead of a single limb. This is a good technique for immobilizing the bottom’s upper arms tightly against the sides of their body, thus often making it considerably easier to immobilize their elbows and wrists. This technique typically calls for at least a 12-foot length of rope.

To apply this technique in its most basic form, take the 12-foot rope and make a Lark’s Head knot with the midpoint of the rope at the center of the knot. Now drape the entire double-loop over the bottom’s upper body so that the wrapping turns go over the bottom’s upper arms at about the top-third to middle-third junction, or perhaps at the midpoint of the upper arm. Make sure the arch of the Lark’s Head is centered behind them on their spine. (If the top wishes, they can separate these wrapping turns so that one goes over the bottom’s breasts and the other goes under the bottom’s breasts.) Cinch this tightly, and perhaps lock it in place as described for the Looped Lark’s Head cuff. To complete the tie, simply separate the tails, run them back around the bottom’s upper arms and tie the ends off in front of them. (At this point, the bottom’s forearms and wrists will still be free, so the top will have to apply additional bond-age to immobilize those parts of the bottom’s body.)
If the top is using a longer rope (for ex-ample, a 24-foot rope), they can go on to bind the bottom’s wrists behind them and perhaps bind them even further. This can be done by tying a Figure Eight knot in the tails just after finishing locking the Separated Lark’s Head in place, then binding the bottom’s wrists behind them, and perhaps binding their ankles with any extra left over.
Thus, we have several arm harnesses, ranging widely from the very simple to the fairly complex, and from the very politically correct to the very politically incorrect. Given the variety to choose from, the top should be able to find at least one that works very well for both the top and the bottom.
LEG HARNESSES
Binding the bottom’s legs is usually significantly simpler. Among other things, because the relatively prominent heels form a natural widening point, it is usually much easier to bind ankles than it is to bind wrists.
To bind the bottom’s ankles when doing a hogtie, the top has several options. In all the techniques described below, I shall assume that the top has already tied the bottom’s wrists behind them by using one of the techniques described above.
Leg harness #1: The Two-rope harness. This is a very simple, and yet very effective technique that calls for two ropes, each about six feet long.
To apply this, first use one of the six-foot ropes to bind the bottom’s ankles together. While the parallel, crossed, or perpendicular positions can be used, in practice the anti-parallel position often works best as it provides both a high degree of immobility and a high degree of accessibility.
Note: this is one of the few bondage techniques that often works better, in terms of rendering the bottom’s legs immobile, if cinch loops are omitted after applying the wrapping turns. However, the top can certainly add them if they want the bottom to have a greater range of motion possible at their ankle joints. In particular, the bottom will often only be able to lie on either their front or their back if their ankles are bound without cinch loops, but will often also be able to kneel if their ankles are bound with cinch loops.
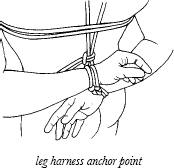
Once the bottom’s ankles are bound in the desired fashion, take the second rope and drape its midpoint around the arm harness using either a simple turn, a round turn, a Lark’s Head, or an Overhand Knot. (In practice, I usually prefer using the Lark’s Head.) It often works best to place the midpoint of the leg harness rope around the section of the rope just after where the wrists are tied together. While you can also place the midpoint between the bottom’s wrists, this may lead to an unwanted further tightening of the wrist bondage. In the Breast Cross arm harness, you can attach the ankle rope at the rear “X” formed by the arm harness.
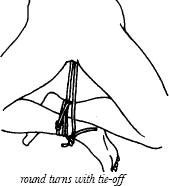
Now that the midpoint of the rope is secured to the arm harness, bend the bottom’s bound ankles up as close as desired to their wrists, then use the tails running down from their wrists to their ankles to secure their wrists in place.
There are several ways to use the tails to secure the ankles in place. The simplest way is to merely run one tail over the ankles and the other tail under the ankles and tie them together.
As a somewhat more stringent alternative, you can wind the tails around the ankles in opposite directions using round turns and then tie them together.
If you wind the tails around the ankles together in the same direction, you can complete the bondage by tying the tails together in a Finishing Lark’s Head.
In all of these ankle harnesses, you should try to tie the final knot as far away as possible from the bottom’s fingers. This typically will mean tying the knot on the “toe sides” of their feet instead of the “heel sides” of their feet. Proper positioning of the knot often becomes obvious with practice.
Safety note: The large quadriceps muscles on the front of the bottom’s upper legs will develop a significant amount of tension if they are highly flexed (such as when some one kneels so that they are sitting on their heels). This is, in my experience, not usually a problem if the bottom is lying on their back, but it can be a problem if the bottom is either lying on their stomach or moves from lying on their back to lying on either their side or their stomach. In such cases, the amount of tension on the rope running from the bottom’s wrists to their ankles can dramatically increase.
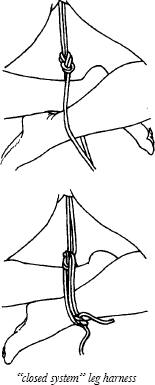
Leg harness #2: The One-rope Harness. This harness is often both very simple and very effective. It typically calls for a single length of rope that is about twelve feet long.
To apply this harness, attach the midpoint of the rope just as you would for the wrist-to-ankle rope (I usually use a Lark’s Head), then run the tails down to the drawn-back ankles and tie them off. As always, there are a number of ways to do this.
The most direct way is simply to wind the tails around the crossed ankles in opposite directions until you reach the ends, then tie the tails together. While this creates a sort of “open system” that could possibly loosen if the bottom worked at it a bit, in practice it usually works just fine.
You can also wind the tails around the crossed ankles together in the same direction and tie them off in a Finishing Lark’s Head knot.
One fairly elegant, and very secure, way to bind the bottom’s ankles is to draw their ankles up as close to their body as desired, and then tie the tail together in a Figure-eight knot just slightly above that point, thus creating two opposable ends. The top can then wind these ends around the bottom’s ankles and tie them off, thus creating a much more secure “closed system” which the bottom is much less likely to be able to escape. As a refinement, the top can run the tails above the Figure-eight knot as is done for the Prefab Lark’s Head wrist cuff to avoid wrapping constriction. This last technique especially shows skill and elegance.
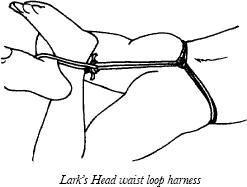
Leg Harness #3: The Lark’s Head Waist Loop. In this leg harness, the wrists and ankles are not connected at all. Such an arrangement will permit the bottom to have a significantly increased amount of movement, particularly at the waist. Thus the bottom may find it easier to stay in a sitting or kneeling position when tied this way. This leg harness typically calls for about a 12-foot length of rope.
To apply this leg harness, the top applies a Lark’s Head loop around the bottom’s waist so that the arch of the knot is located in the small of the bottom’s back, making sure to pull it tightly enough that it is significantly narrower than the bottom’s pelvis. The Lark’s Head can then either be left free or “locked” in place as is done with the Looped Lark’s Head. (While I have not had significant problems leaving the Lark’s Head free, I would recommend, as a general measure, that the Lark’s Head be locked. Among other things, doing so may prevent the waist loop from further tightening to a dangerous degree.)
Note: There is a slight possibility that such a waist loop could interfere somewhat with the bottom’s ability to breathe, but this will typically become apparent fairly readily, and the top should be able to correct this well before it becomes a serious problem.
Once the Lark’s Head loop is in place around the bottom’s waist, their ankles can be drawn back towards their body and tied in place using the techniques previously described.
Note: A simple variant of this harness could be applied by simply applying the midpoint of the rope to the front of the bottom’s lower abdomen, then running the tails around to the small of their back, pulling the tails snug, tying them together (a Surgeon’s knot works well here) and proceeding as above.
Leg harness #4: Male Genitals Anchor Point. In this variant, the midsection of the rope is tied securely to the male bottom’s genitals, then their ankles are drawn up and tied in place with the tails. This technique typically calls for a 12-foot length of rope, although sometimes a six-foot length can be substituted.
Note: This is obviously a somewhat riskier technique than some of the other leg harnesses, but I have never heard of an actual injury resulting from its use. Also, I have had this harness applied to me on many different occasions and, other than it being a very effective reminder for me to keep my ankles “where they belong,” I have never experienced any damage or undue amount of pain from having it used on me.
To apply this technique, the top loops the midsection of the rope around the bottom’s genitals (either around both the penis and scrotum or simply around the scrotum by itself) much as they might when applying a single-limb cuff, secures the loops in place, then uses the tails to tie the legs in position.
Interestingly enough, this position is often both more immobilizing and actually safer if the bottom’s ankles are pulled back as closely to their scrotum as possible without causing heavy straining in their legs. It’s safer because the more the legs are flexed at the knee joint, the less force the bottom will be able to generate as they try to straighten out their legs. Fully flexed legs may be able to generate only a relatively weak pull, while legs flexed only about halfway may be able to generate a very strong pull.
The scrotum and testicles can often withstand even a fairly strong pull without damage provided that such a pull is not applied very suddenly. Thus even bottoms who are thrashing about “in the throes of passion” can usually self-regulate the amount of tension in this ankle harness without hurting themselves.
However, please keep two particular cautions in mind:
Caution #1: As I mentioned, I have heard of no reports of injuries if the tension on the scrotum-to-ankles ropes is increased gradually and can be eased off readily if it becomes unduly painful. However, a sudden, sharp increase in the tension on this rope would be much more likely to cause serious injury. In particular, if a bottom tied in this way were to do something like fall off of the bed, they could be at risk for very severe injury. Make sure this doesn’t happen. Caution #2: I do not recommend tying the penis alone in this manner. While I have had no reports of damage if both the scrotum and penis, or the scrotum alone was bound in this way, I have heard reports of lasting damage to the penis if it was subjected by itself to either a sudden, sharp pull or to a lasting, gradual pull. In the first case, the bottom might suffer lasting stretching of the penile tissue, and/or damage to the ligament that helps elevate the penis during erection. In the either case, permanent stretching of the penile tissue may result, leading to long-term difficulty in maintaining a firm erection.
“Would this work better if I ran the ropes through there?”
A “female” variant of this technique can be applied by applying clamps to the bottom’s outer labia, attaching the midsection of the rope to them, and they proceeding as above. I put “female” in quotes because, of course, the same thing could also be done to the skin of the scrotum or penis.. (Caution: While I have heard no reports of lasting stretching of the genital skin from this technique, it is a possibility, so please be appropriately cautious.)
Note: Given that this book does not cover how to use clamps, the top should receive instruction in that aspect of BDSM before trying this. Please consult “SM 101” or some other good source of information before attempting this variant.
Leg Harness #5: Bind each ankle separately. In this technique, as described, each ankle is bound separately instead of being bound together. This technique typically calls for a 12-foot length of rope.
To apply this technique, attach the midpoint of the rope as described with any of the above leg harnesses, then run a tail out to each ankle and tie it in place. I suggest that you use a technique that avoids wrapping constriction for this tie. (I’d particularly recommend the French Bowline as it allows for more wrapping turns and doesn’t further tighten when under tension.)
Leg Harness #6: “Frogtie” the Legs. This is an interesting variant in which each ankle is bound closely to the rear, upper thigh of the same leg. This technique typically calls for a 6-foot length of rope for each leg, although a 12-foot length can also sometimes be used. This can be a very good bondage technique as it can combine a high degree of leg immobility with a fairly good amount of access to the bottom’s genitals and anal area.
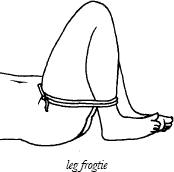
One way to apply this technique is to have the bottom kneel so that they are “sitting on their heels” and place the midpoint of the rope on the center of their upper thigh, then wrap the tails around the lower leg, bring them back to the top of the thigh, and tie them together. (Try to position these wrapping turns so they are not putting painful pressure on the bottom’s shinbone.) It is not usually necessary to use cinch loops with this technique, but they can be applied.
Once the bottom’s legs are secured, the bottom may be able to kneel, or lie on their side, back, or stomach. A variant on this technique is to have the bottom kneel with their legs closely together and wrap the tails around both upper and lower legs, binding both legs together in a flexed position. Obviously, this can limit access to their genitals or anal area.