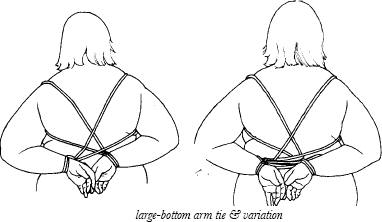
WRISTS-BEHIND-THE-BACK TIE FOR LARGER BOTTOMS
Many bottoms are so large that they cannot bring their wrists together behind their back, yet they would very much like to be tied in this position. There are several ways to deal with this problem.
One solution is to use handcuffs. This can work reasonably well; however, a frequent problem with this approach is that the bottom is often not able to lie comfortably on their back if their wrists are in metal cuffs. An interesting variant on this approach is that two or more pairs of handcuffs can be linked together if a single pair does not provide enough reach. On a recent TV broadcast, it was mentioned that five pairs of cuffs needed such linking to secure the wrists on one especially large suspect.
Another solution is the use of leather cuffs, particularly locking leather cuffs such as the Humane Restraints. This approach, which often solves the problem very well indeed, can work better than using handcuffs. The wrist cuffs are usually wide enough, and clear enough of sharp points or edges, that the bottom can lie comfortably on their back if their wrists are cuffed behind them with these devices. (They may need some extra padding over the cuffs and, as is true with essentially every bottom who is lying on their back with their wrists secured behind them, they may need pillows or towels under their buttocks and/or back to take their body weight off their wrists.) The cuffs can be joined together by a series of quick-links, or by a short length of chain perhaps with quick-links at each end. Such an arrangement allows for the bondage to be adjusted with a good degree of flexibility.
The bottom’s wrists can also be secured behind their back with rope, but a somewhat unorthodox approach is often needed. The technique I will describe calls for two six- to 12-foot lengths of rope, and possibly for a third six-foot to 12-foot length as well.
To apply the basic tie, take one of the bottom’s wrists and apply one of the single-limb bondage cuffs to it. While different rope cuffs can be used here, I recommend the basic obi knot cuff. Apply the cuff to the bottom’s left wrist, then bring their arm back behind their back, bending their elbow as far upwards as they can reasonably tolerate. Separate the two tails, then run one tail over the bottom’s right shoulder and the other under their right armpit. Dress the tails and tie them together. Repeat this process for the bottom’s right wrist. This completes the basic tie.
This tie often works very well in its “basic” version; however, a number of refinements are possible. For example, to prevent the bottom from “shrugging” the wrist cuffs from their shoulders, you can tie the free tails of one cuff to the shoulder-loop of the other cuff. (I recommend using a Finishing Lark’s Head knot for this.) This can usually be done in a way that puts no pressure at all on any part of the bottom’s neck.
If that is still not enough, the top can use the third rope to help limit the motion of the bottom’s arms. This is done by looping the midpoint of the rope through both cuffs and drawing the cuffs as closely together as the bottom can tolerate. Then tie the tails together and finish by running the rope around the bottom’s sides and securing it in place at the front of their waist.
When this tie is employed, it may be possible for the bottom to reach the cuff on one hand with the fingers of their other hand. However, if the cuff has been properly tied they will usually not be able to loosen it. This can be particularly true if a few extra tucks were done when the cuff was applied.

HIP CONTROL ROPE
This is a very simple but often very powerful and effective bondage technique. It typically calls for a six-foot length of rope, and wider rope or tubular webbing often works better than narrower rope for this purpose.
This technique is used during doggie-style intercourse and similar rear-entry positions. The top simply bights the rope, and perhaps ties the ends together. They then pass the rope in front of the bottom’s hips and grasp the “handles” thus created in either hand, usually with either handle protruding from the bottom of their fist. This very simple technique can allow the top a powerful degree of control over the bottom’s hips.
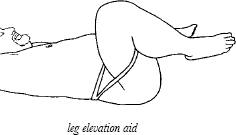
LEG ELEVATION AID
This bondage technique is used when the bottom is lying on their back and they need to keep their legs elevated for a prolonged period of time. It can be of real assistance when the top desires access to the bottom’s genital and/or anal area. Depending on the size of the bottom and the desired position, either a six-foot length or a twelve-foot length of rope can be used. (The twelve-foot length typically works better.) As with the Hip Control Rope, wider rope or tubular webbing often works better.
In a very simple example of this tie, the bottom is lying on their back with their knees closely drawn up to the sides of their chest. The rope is bighted and the midpoint is looped over the bottom’s left lower thigh, just above their knee joint. Both ends are then passed under the bottom (this process may be assisted by having the bottom first roll slightly to their right, and then to their left) and then looped just above the bottom’s right knee joint and tied in place.

Caution: This can result in a fairly strong pressure being applied to the back of the bottom’s upper legs. Pad as necessary.
There are a number of variants possible with this technique.
One variant is to simply tie more wrapping turns around the bottom’s lower thighs. This can distribute the pressure and make the tie more comfortable. Taking measures to prevent wrapping constriction can also be useful here. In such a case, the top might use the “wrap, tie, and tuck” cuff knot for the first thigh and the “pre-fab Lark’s Head” cuff knot for the second thigh.
Another variant is to pass the tails behind the bottom’s neck instead of their back. This approach can help eliminate the possible risk of having the rope slip down the bottom’s back, but it can also apply a very strong amount of pressure to their neck. This problem can be mitigated by applying the rope as low as possible on the back of their neck and by padding this area. Hint: There’s probably a pillow handy.
A third variant of this technique is to run one tail (the “innermost“ one) under the bottom’s back and the other tail (the “outermost” one) around the lower portion of their neck. The tails are then joined behind the bottom’s opposite thigh in the usual manner.
ONE LONG ROPE – STARTING AND STOPPING
Throughout this book, I have pretty much described bondage techniques that start at the midpoint of the rope and work outwards. Truth be told, my experience is that this is the approach that usually works best. Still, just for the sake of completeness, let me describe a method of starting at one end of a rope and working your way out to the other end.
Before I go too much further, let me mention in passing that bondage generally works better when you use several shorter lengths of rope than one long length. Further more, the more extensive the bondage, the truer this tends to be.
“Did you mark the midpoints on that new rope yet?”
Still, it can be great fun to use a single, relatively long, length of rope, particularly for double-limb bondage techniques. This can be especially true when applying the various types of hogties or other bondage that involves arm harnesses and/or leg harnesses. There is a sort of “spinning the web” energy associated with applying bondage of this type that can be intense.
Note: As I mentioned, this type of bondage often works best for relatively elaborate bondage that involves double-limb techniques. For a single-limb technique, particularly something like a Spread-eagle bondage, I recommend the French Bowline knot with at least two wrapping turns around the limb for use as a single-limb cuff. This can be secured in place by using something like a Round turn with a slipped double half-hitch located someplace where the bottom cannot reach it.
Starting a long rope. Bondage that begins with one end of a rope can be effectively begun by creating what’s called a running loop in one end. While there are a number of ways to do this, a simple and quite effective method is as follows: Take one end of the rope and fold back a bight. When using bondage rope of average thickness, folding back about six inches should work fine. Create a loop in the end by tying this bight into an Overhand knot or a Figure-eight knot. Dress the knot so that only a very little tail is left over. For security purposes, pull this knot fairly tight. (Remember that a Figure-eight knot is usually the easier of the two knots to untie afterwards.)

Now that your loop is created, either thread the free end of the rope through the loop or fold the loop back over the knot and pull the rope through the loop. This latter approach can be particularly useful if you’re using a very long rope.
Caution: There is a potential hazard regarding cinching constriction when using this technique to apply double-limb bondage, such as when tying two wrists together. This potential hazard can be dealt with relatively simply by merely applying the bondage so that when the cinching turns are applied they reduce the space between the wrists to zero. If for some reason this cannot be done, you can also greatly mitigate the cinching constriction by winding the last cinching turn around only one of the wrapping turns before moving the rope on to tie another body area.
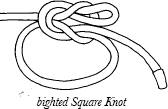
Finishing a Long Rope –The Square knot on a Bight. A very good technique for tying off “the single free end” of a long rope can be called the Square knot on a bight. This knot is often taught as a bandaging technique and works very well for that. It is usually tied as a final knot in the last cinching turns of the bondage.

To apply this knot, you create two opposable ends by bending back the last six inches or so of the rope to form a bight. One good way to do this if you’re applying the rope mainly with your right hand is to fold the rope back towards you over your left index finger. You then leave the arch of this bight where you want the finishing knot to be, and fold the remaining few inches of the rope around the area in question. (This will typically be over the cinch loops just created by the rope.) Bring the free end up to the bighted end and tie them together. You can use any of the common finishing knots here, including the Square knot, Granny knot, Surgeon’s knot, or Bow knot.

TELL-TALE BONDAGE
This is not a technique so much as it is an idea. The basic idea here is to tie the bottom in some way, or to include something in the bondage, that will indicate that the bottom has moved when they are not supposed to while in a loosely monitored situation.
Examples of telltale bondage include the following:
• Placing the bottom in a face-down hogtie position and then stacking plates on their upper back.
• Placing a glass or cup of water on the part of the bottom’s body that the top wants the bottom to keep still.
• Incorporating toilet paper into the bondage, the idea being that the line of toilet paper sheets is not to be broken.
• Having the bottom touch the fingertips of their left hand and of their right hand together, holding a coin in place between each pair of fingertips.
There could obviously be many more variants on this concept. Again, the basic idea is that the bottom is tied in such a way that as long as they hold still, nothing is disturbed, but if they do move something is disturbed in a way that cannot be fixed before the top returns.