Is your pantry ready for an emergency? Judging by how quick the store shelves are stripped bare before an approaching storm, I’d go out on a limb and say, probably not. A backup water and food supply in your pantry will keep your family at home rather than in line after a major disaster. It can even be handy for those months when your grocery budget comes up short.
According to the Environmental Protection Agency, in 2008, the average American family of four used up to 400 gallons of water per day. Today, by some estimates, that number is believed to be closer to 600 gallons. Regardless of the number, there’s one thing we can all agree on—water is a necessity in our daily lives.
As we discussed in the last chapter, the official emergency management advice for how much water to store is one gallon per person, per day. This amount should be enough for drinking and for some basic cooking, but when you figure in cleaning, bathing, and flushing toilets one gallon doesn’t seem like enough. Then you have to factor in these considerations: Do you have pets? Are you a nursing mom or do you use water in order to prepare formula? Do you have an elderly or sick family member who needs water to take medicine or for personal care? Keep in mind pets, children, nursing moms, and chronically ill family members can increase the amount of water you need. Also, if you live in a hot climate your water requirement doubles. Once you look at the whole picture, you’ll understand why I suggest you try to store closer to two gallons of water per person, per day instead.
Now, how many days worth of water should you set aside? An emergency kit is packed with a minimal three-day supply because it needs to be portable. In your home, a three-day supply is probably not enough. Looking at past disasters, you see it can take a lot longer than three days for things to get sorted out. For example, six weeks after the 2014 Elk River chemical spill—a disaster affecting up to 300,000 West Virginians—some residents were still not using water from their taps. That’s why I urge you to store no less than a two-week supply in your home.
If the average family of four stored the minimum of one gallon per person, per day, a two-week water supply would amount to 56 gallons. That’s a lot of water! Luckily, there are several options for amassing your water storage—store-bought bottled water, empty soda bottles, WaterBricks and water barrels to name a few.
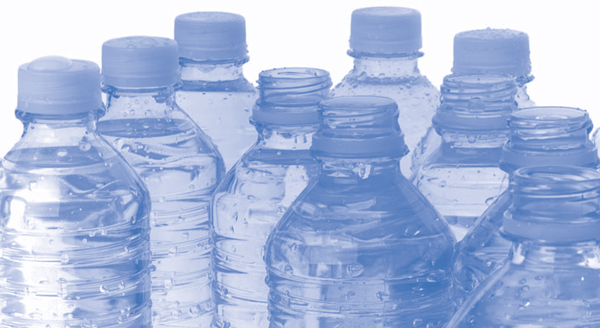
Store-bought bottled water wins the votes for the safest and most reliable way to secure an emergency water supply for your family. And for busy parents, it’s hard to beat the convenience. One case of 24 bottles totals just over three gallons. Pick up a case or two of Dasani every time you go to the grocery store and before you know it you will have a sizeable supply. Bring home five cases and you’ll have one family member’s drinking needs covered for two weeks. Here’s another reason to like store-bought water bottles: they are easy to store. You can stack them three-feet high in the back of a closet or tuck a two-week supply under everyone’s bed.
So, what’s the biggest downside to building your supply this way? Definitely, the expense. My family tries to get around it by stocking up during the Buy-One-Get-One-Free sales that run approximately every six weeks at our local grocery store. And then of course there’s the waste. Water bottles are meant to be used once and recycled. If they are refilled, they lose their safe status.
Empty soda bottles make a great container for storing water. Made of food safe polyethylene terephthalate (PETE) plastic, these bottles are durable, portable, easy to tuck into smaller storage spaces and best of all, free! We all know free is the way to go, but before you enlist on a bottle collecting mission there’s a few things you should know. Empty soda bottles aren’t stackable so if you amass a lot of them you will need to be creative with your storage space. Also, empty soda bottles require a lot of effort on your part to clean, sanitize and fill. They also need to be rotated frequently as their shelf life isn’t as long as commercially bottled water.
What kind of effort are we talking about? Before you fill a soda bottle with water, it needs to be sanitized. First, wash the inside of the bottle with hot, soapy water. Be sure to rinse it completely, taking care not to leave any residual soap inside. Next, fill the bottle with one quart tap water. Add one teaspoon of unscented household bleach and cap the bottle. Swish the mixture around inside so it touches all surfaces then pour the solution out. Give the bottle a good rinse with clean water and you are ready to fill it to the top with water from the tap.
Once the bottle is filled, you may or may not have to take one more step. If your tap water comes from an utility company that treats it with chlorine, then it doesn’t need any additional treatment. If not, or if your tap water comes from a well, you will need to add two drops of bleach before you cap the bottle.
Lastly, it’s a good practice to label your bottles as drinking water and don’t forget to write the fill date. This will make it easier to stay organized when it comes time to rotate.
One more thing, if you are a milk or juice drinker rather than a soda fan, you may be tempted to use milk or juice jugs instead. Unfortunately, these jugs are not suitable for storing water. Left-over milk protein and juice sugars are embedded in the plastic. When you add water you create the perfect breeding ground for bacteria. A two-liter soda bottle is always the better choice for free fill-your-own water storage.
WaterBricks are large, rectangular shape containers that hold up to 3.5 gallons of water. They are made of a food-safe plastic called high-density polyethylene (HDPE), which is more durable than PETE soda bottles. Also, WaterBricks are opaque, making it more difficult for algae to take up residence inside. Some of my family’s water supply is stored in Waterbricks and I like them for two reasons: They have handles for easy toting (a big plus since one water-filled brick weighs 28 pounds) and they are stackable. Each brick has an interlocking system, similar to Legos, allowing you to stack them up to four feet high. If you’d rather not stack them, the individual containers are small enough to slide under a bed.
Like store-bought bottled water, the only downside to WaterBricks is the upfront expense. Each container from WaterBricks.com costs a little more than $17, so buying enough for a family’s water supply will add up quick. But unlike store-bought bottled water, WaterBrick containers are more of an investment. The containers are reusable and have a bio-degradable shelf life of up to 15 years.
If you decide to use WaterBricks for your container, they will require the same sanitization and filling process as empty soda bottles.
If you are lucky enough to have a large storage area, water barrels may be for you. Like WaterBricks, water barrels are made of durable, opaque HDPE plastic. Each barrel can hold up to 55 gallons of water. The downside is once the barrel is filled, it’s difficult to move: one barrel weighs more than 400 pounds. And then there’s the expense. Shop various emergency supply retailers, and you will see the price range from $75 to over $100 per barrel. In addition to barrel, you will also need to purchase a siphon to get water out and several smaller containers to transport water.
A consistently cool location out of direct sunlight is the best place to store your water supply so that it remains safe to drink for the entire duration of its shelf life. Don’t store water near gasoline, kerosene, pesticides or strong smelling cleaning solutions, especially if you are using PETE plastic, as the vapors will permeate the bottles. If your chosen location has a concrete floor, put a layer of cardboard or wood between your container and the floor. This will prevent the concrete from leeching chemicals into the containers, contaminating the water or degrading the plastic enough to cause a leak. Speaking of leaks...unfortunately, they can happen so be sure your valuables aren’t stored nearby.
 BE READY QUICK TIP!
If the water you are about to treat is cloudy or has particles floating in it, you will need to filter it first. Pour it through a coffee filter or a clean cloth like a bandana and into a container. Then proceed with the treatment process of your choice.
Yes, it’s true, water never goes bad, but there’s always the chance that disease causing critters may sneak in during the filling process. Over time they will contaminate your water. To ensure your family has safe, drinkable water in an emergency, it’s a good idea to rotate your water supply every six to 12 months. Some emergency supply retailers sell a chemical water preserver you can add to your container before capping it and then you will only have to rotate every 5 years. The product is made to treat one gallon of water or more so it will work if you are using WaterBricks or water barrels.
If you think stocking up on store-bought bottled water is the way to avoid rotating, think again. Although, commercially bottled water doesn’t expire, each bottle is stamped with a Best By date of approximately two years from the day it was bottled. After that date, the water may have a funky taste.
What do you do if you’re in the middle of a crisis and you’ve gone through all of your water storage? Here’s some good news for a bad situation. Every home has a built-in supply of water that is safe for drinking and a supply that is unsafe for drinking but can be used for other purposes. Plus there may be a water source outside your home.
The largest source of emergency water inside your home is your hot water heater, unless you have replaced it with the newer tank-less version. If you still have the old style water heater, and it hasn’t been damaged in the disaster, you can drain the tank and use the water for drinking, cooking, cleaning dishes and brushing teeth. To drain the tank, you must make sure the electricity or gas is turned off and allow time for the water inside the heater to cool. Attach a short food-safe hose to the drain at the bottom of the tank. Then shut off the valve that supplies water to the tank and open the hot water faucet in one of your sinks. When you open the drain at the bottom of the tank, you will be able to collect water. Be sure to use a clean container.
Your plumbing pipes are another source of drinkable water. After the main water supply to your home has been shut off, you can drain the remaining little bit of water out of your pipes by opening a faucet located on the highest level of your house. Then let the water flow out of another faucet in the lowest level of your home and into a container.
Don’t forget the ice cubes in your refrigerator. They can be melted for clean water. Also, the liquid from any canned vegetables in your pantry can be consumed. Just note this liquid will contain a lot of sodium so you may want to cook with it rather than drink it outright.
Outside of your home, look for moving bodies of water: natural springs, rivers, streams and creeks. Ponds and lakes are also options and of course you can always collect rainwater. Remember, water from these sources will need to be treated before it’s safe to drink.
There are a few sources in your home providing water that’s unsafe to drink but still is useable. Water from a swimming pool can be used to wash clothes and flush toilets. If you have a water bed, you have even more water for flushing toilets. Some sources are completely off limits. Do not use water from toilet tanks and car radiators.
Most importantly, never drink flood water. Flood water often contains raw sewage, chemicals and other toxic substances. No matter how you treat flood water it will never be clean.
If there is any chance the water you are about to drink could be contaminated with germs or bacteria, you’ll want to disinfect it or purify it to keep from getting sick. There are several ways to treat contaminated water. No way is perfect but it’s most effective to use a combination of different methods to make potable water.
Boiling is the oldest method of making water safe to drink. When you boil water you kill most, if not all, of the pathogens or bugs that make us ill. Simply put the water in a pot over a heat source, cover it with a lid and bring it to a rolling boil for a full minute. Remove the pot from your heat source and keep it covered until it cools. Sometimes after boiling, the water will taste flat. Pour it back and forth between two containers a few times for an easy aerating process that improves the taste.
Bleach is commonly used to treat contaminated water because it kills most of the nasty organisms. I know you’re thinking, Seriously? You want me to drink bleach? And my answer is yes. Unless you drink bleach straight from the bottle or use an obscene amount to disinfect your water, it’s a perfectly safe treatment method.
Not all bleach is the same, though, so be sure to use only unscented, regular household bleach containing 5.25 to 6.0 percent sodium hypochlorite. Bleach also becomes less potent starting at 6 months from the manufacture date, so use a recently purchased bottle, rather than one that’s been sitting under your kitchen sink for the past two years. In fact, it’s not a bad idea to replace your bottles of bleach, unopened or not, every year. This will guarantee you always have a fresh supply on hand.
To disinfect water, use an eyedropper to add eight drops of bleach per one gallon of clear water. If the water is murky or cloudy, double the amount of bleach. Cap the container and give it a shake. Let it sit for 30 minutes, then open it up and smell. If the water doesn’t have a slight chlorine scent, repeat the dosage and let it stand for fifteen more minutes. If you still don’t smell bleach in the water, throw it away and find water from another source.
In the last chapter, I recommended adding a water filtration system to your emergency kit. If you followed my advice you will have one in your Go-Bag. Pull it out of your kit and use it or purchase a freestanding unit, like a Berkey system or the Katadyn Ceredyn Drip Filter made for home use. These systems are capable of filtering larger quantities of water. Keep in mind the filter elements inside all systems eventually need to be replaced so it’s a good idea to have a few on hand.
The days of overstocked storerooms are gone. In an effort to reduce waste and keep costs as low as possible, many grocery stores use a just-in-time (JIT) inventory system. A steady stream of small deliveries, arriving “just in time” replenishes their stock when supplies start to dwindle. From a business perspective, limited inventories make sense and normally, it works fine. We hop in the car, arrive at Whole Foods and find all the ingredients we need for dinner there waiting.
Now imagine for a minute something – hurricane, winter storm – prevents the trucks from making deliveries and the store shelves weren’t restocked? Would it cause you to panic? Not if you had plenty of food in your pantry.
Your Go-Bag should be stocked with three days worth of food. Your home, however, should be stocked with more. In the last several years, we’ve actually seen some large scale disasters cause significant damage and disrupt the normal supply systems we take for granted. In these cases, three days went by and residents were still relying on outside assistance. You can prevent this from happening to your family if you have at the very minimum, a two week supply of food for your family in the house at all times. An even better goal would be enough for one month. And if storing more than that gives you peace of mind, go for it!
No two pantries will be the same because there’s no one-size-fits-all food storage plan. You will need to customize your pantry to your family’s tastes and nutritional needs; however there are some basic guidelines to help you get started.
Choose foods that are simple to prepare. Emergency food should require little to no cooking in case you are without power. Also, you should select foods that require no refrigeration for the same reason. Some examples are beans, pasta, rice, peanut butter, crackers, cereals, nuts, and trail mix. Meal replacement bars, protein powder for shakes, dried soup mixes and canned goods like meats, vegetables, fruits and soups are also good options.
Keep it simple and don’t go overboard. Emergencies are not the time to be preparing a five course extravaganza for every meal. In fact, you don’t even need to have a different meal every night of the week. Remember, you will only be eating this way until the disaster sorts itself out. You want just enough of a variety to meet your family’s nutritional needs. Once every thing gets back to normal, by all means prepare that five course meal.
Most importantly, stock up on the foods your family likes and will eat. If no one eats SPAM in good times, they won’t be eager to eat it during a crisis. On the same note, an emergency isn’t the best time to introduce a new food to your loved ones. Be sure to test out your latest and greatest culinary creation on your troops beforehand.
Don’t rush off to go grocery shopping without taking some time to get organized first. Go through your pantry and take stock of what you already have.
Think about the meals your family eats regularly. What breakfasts, lunches and dinners are easy to prepare and only require a few simple ingredients? Is there a meal you normally make with fresh ingredients that could just as easily be made with canned substitutions? If you’re hard pressed for ideas, now’s the time to experiment with different “emergency” recipes. Once you find a recipe everyone likes, incorporate it into your regular menu planning.
Choose three or four dishes for each of the three meal times—breakfast, lunch and dinner—and don’t forget to include snacks. Make a list of all the ingredients in each dish. Next, figure out how many times your family will eat each meal over a two week period. Then multiply each ingredient by that number. This will tell you how much of each ingredient you need to store in your pantry.
For example, a pancake breakfast for my family requires two cups of pancake mix. If I plan on serving pancakes for breakfast six times over a two week period, I need to multiply two cups times six for a total of 12 cups. And since I know that a 32-ounce box of Aunt Jemima Original Pancake Mix contains six cups of mix, and six times two equals 12, I realize I’d better keep two boxes of Aunt Jemima in my pantry at all times.

Compare the quantities of ingredients you need with the quantities you already have in your newly organized pantry, and then make a shopping list. Buy everything all at once during your next shopping trip or add a few items at a time over a period of several weeks. Do whatever works best for your budget!
Once you have accumulated your two-week food supply, use it. A common mistake people make is thinking of it as emergency food. They pack the food, tuck it in the back of a bedroom closet and forget it’s there. Taking this approach is risky. Do you want to risk ending up with expired, unusable food when you need it most?
The best way to prevent that from happening is to add your food to your everyday pantry. Then develop a rotation system. The easiest one is known as “First in, first out”. Even though most foods are stamped with an expiration date, get in the habit of re-writing the expiration dates in a more visible spot on the package. When you need an item, compare the dates, grab the oldest from the shelf first and buy a replacement the next time you’re at the store.
Back to the Aunt Jemima example, I mentioned I always need two boxes of pancake mix in my pantry but I actually store three. This way I never come up short. The first and oldest box is opened and the other two sit on standby. When the first box is empty, I open the second. The third moves to the front of the shelf. Once I purchase a replacement, I mark it with the expiration date and place toward the back of the shelf.
Freeze-dried meals are a busy parents’ dream come true! Entrees like pasta primavera, chili mac, beef stroganoff and chicken and rice are created from fresh food that goes through a flash freeze process. The ice is evaporated then the meal is vacuum sealed in a pouch or can. When you are ready to eat one, just add hot water to rehydrate it. Voila! You have a meal that has almost the exact same taste, smell and texture as the fresh food version. I say almost because some freeze-dried food companies offer better tasting meals than others. Always try each entree to be sure it suits every family member’s taste buds before you invest in a large supply. In my family, meals from Mountain House and Legacy Foods win the taste tests every single time.
In addition to convenience, freeze-dried meals are favorable because of their extended shelf-life. Depending on the brand and packaging, entrees can last up to twenty five years. When stored at room temperature in a dry location, these meals retain their flavor and nutritional quality the entire time.
The biggest downside to freeze-dried meals is the upfront expense. Whether you purchase entrees in a #10 can or individual pouches packaged in a one-month supply kit, you are paying in advance for several servings of meals you may not eat for a long time. This can be tougher on your monthly food budget than weekly grocery shopping.
So why would I suggest you consider buying food that lasts for 25 years when you only need a supply to hold you over for two weeks minimum? There’s a certain peace of mind that comes with knowing there’s always a few meals tucked away in the back of your pantry that you don’t need to keep track of or replenish as often.
Your family’s taste buds will determine which foods go on your grocery list, but don’t forget to stock up on these non-food essentials:
Just because fresh fruit and veggies won’t be at your disposal during a disaster doesn’t mean you have to resort to feeding your little ones junk food. Here are ten healthier pre-packaged snacks for your pantry that are both kid and parent-approved.