4
box in a box

WHEN I WAS WORKING ON THIS BOOK, people kept asking me what I put in this box or that box. Sometimes a box is just a box — or in this case, a box in a box.
You'll learn how to install runners for the inner box, drill countersunk holes and use wooden plugs to hide the screw heads.
The bigger box is held together with eight screws and it's strong. I use screws whenever I can — according to famous woodworker Sam Maloof, they're like metal dowels, and I agree. I prefer sheet-metal screws because they have threads the entire length of their shaft, which gives them holding power from top to bottom. Also, their threads aren't as steep as drywall screws, so they pull things together quite nicely.
The design of this box can be adapted to the making of a toolbox or hope chest. The sliding box makes smaller things accessible while larger items are stored below.


Tools needed
hand saw with miter box
60-, 100-, 120-, 150- and 220-grit sandpapers
No. 0000 steel wool
sanding block (see sanding block sidebar page 11)
block plane (optional)
bench plane (optional)
random-orbit electric sander (optional)
stationary sander (optional)
Hardware & Supplies
spray or wipe-on lacquer

Cut the box sides and ends, then rout the groove for the bottom. Note the stopped groove in the sides. If you made a through-cut on the sides, the end of the groove would show when the box was assembled.

Cut the rabbet to create the lip on the bottom. Make the first cut holding the bottom vertically against the saw fence. This sets the thickness of the lip. Be sure to make test cuts before cutting the piece from your walnut stock!

Make the second cut to complete the rabbet, which creates the lip on the bottom.

Sand the insides of the box prior to assembly.

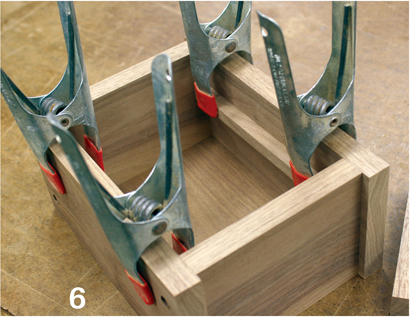
Clamp the sides to the ends. Be sure to install the bottom too! Mark the hole locations so they are evenly spaced. Then drill a pilot hole using a drill bit with a combination twist drill and countersink (this bit is shown below the drill in the photo). Make the countersunk holes about ¼″ (6mm) deep.
Cut the runners to length and glue them to the inside of the box. See the illustration for location details.

Using a plug cutter, make the plugs to fill the countersunk holes. Don't drill completely through the wood blank. This saves you the trouble of having to remove each plug from the inside of the cutter.

Cut the plugs free from the wood blank using your band saw.

Put glue in the countersunk holes.

Install the plugs and gently tap them home.

While the glue is still wet, sand the plugs level with the side. Sanding while the glue is wet lets the sanding dust mix with the glue and fills in any slight gaps around the plugs.

The plugs are almost undetectable after sanding. If you want to spice things up a bit, make the plugs from a contrasting-color wood. This tells folks that you are unafraid to proclaim that you used screws to assemble your box.

After the box is assembled, cut the lid to size and cut shallow rabbets on each side, that is a small offset that will nestle into the box just a little. It's a built-in lid keeper.

You've seen this step before. Glue the ends to the bottom of the small box.

Glue the sides to complete the small box.