Avocado-Vanilla Bean Pot de Crème
makes 4 dessert or 2 snack servings
dairy-free, gluten-free
This is one of the most decadent recipes in the book. But it also offers the health benefits of raw avocado. Raw avocado is a great source of vitamin E, also known as “the sex vitamin.” And to layer up the aphrodisiac experience, we added vanilla. Vanilla is historically considered aphrodisiac. In this recipe, we’re using it for the seduction of its aroma. (In a scientific study, the scent of vanilla proved to be arousing to men.)
As you probably already know, the flavor and color of avocados change quickly after they’ve been peeled so we recommend eating the pot de crème the day it’s made. The recipe makes 4 perfect little servings of sweet, creamy goodness as a dessert. But if you’re feeling truly indulgent, it also works well as 2, pure comfort, snack servings.
1 ripe, medium avocado
1/2 cup coconut cream
1/3 cup brown sugar
1/2 tsp pure vanilla extract
2 large egg yolks at room temperature
1. Rinse avocado with hot water to prevent browning. Halve the fruit and scoop the flesh into a blender. Set aside.
2. In a double boiler or metal mixing bowl, set on top of a pot of simmering water (make sure the water level is below the bottom of the bowl), combine the coconut cream, brown sugar and vanilla. Slowly, lovingly stir together with a wire whisk until the brown sugar is completely dissolved. As you stir, heat the mixture until it is too hot to touch but not hot enough to simmer.
3. While continuing to stir, slowly add the egg yolks one at a time, whisking until thoroughly incorporated. Heat for 10 minutes, continuously whisking. Make sure the custard does not get hot enough to simmer. As it cooks, the mixture will thicken.
4. Pour the egg mixture into the blender with the avocado. Purée until it creates a smooth, creamy pudding.
5. Divide the pudding between 4 espresso cups or 2 ramekins, martini glasses or your favorite small serving bowls, glasses or cups.
6. Chill in the refrigerator for at least 4 hours before serving. Serve topped with a dollop of your favorite non-dairy whipped topping. (We also recommend it with whipped cream if you’re into dairy!)
Stress-Free Summer Pudding
makes 6 servings
dairy-free, diabetic-friendly
Summer pudding is a kind of quirky dessert. It’s big in Britain but rarely seen elsewhere, although we can’t understand why! It’s a no-bake dessert, perfect for hot summer days. It was created in England in the 19th century to satisfy the craving for richness without using any rich ingredients at all. (Why? We have no idea, but we love the results!) For our version, we use 3 aphrodisiacs to give our pudding complex flavor; peaches, raspberries and rosewater. It is one of the easiest, most flavorful summer desserts you could ever make. Just one warning: do not, no matter how tempted, no matter how great of a craving, make this dessert when raspberries and peaches are out of season. The results are potentially sour-tasting, ill-textured and anything but seductive.
3 medium peaches
6 oz fresh raspberries, divided
2 tbsp water
1 tbsp sugar
1-2 drops rosewater
8 slices wheat bread, crusts removed*
whipped cream or vanilla ice cream for serving, (optional)
* We’re talking about the kind of bread that says “wheat” not “whole wheat” on the package. It has slightly more nutrition than white bread but doesn’t impart any bready flavor. Avoid multigrain or oat breads with seeds, nuts or flakes. A plain, smooth bread works the best for creating a silky pudding.
1. Peel and thinly slice the peaches, then cut each slice into thirds.
2. Wash the raspberries and divide in half.
3. Combine the peaches, half the raspberries, water and sugar in a small saucepan. Bring to a simmer and simmer for 10 minutes or until your peaches soften.
4. Remove from heat and stir in the reserved raspberries and the rosewater.
5. Spoon an even layer of the fruit syrup (no chunks of fruit) into the bottom of a loaf pan.
6. Top with a layer of 2 slices of bread. (If the bread slices are too small to fill the entire bottom of the pan, center them and make sure they are touching each other.) Add a layer of the hot fruit in syrup, trying to spread it fairly evenly in the dish—but don’t go OCD trying. Repeat with another layer of bread, then fruit, then a third layer of bread, then the last of the fruit and syrup and end with two slices of bread.
7. When your pudding has cooled to room temperature, cover the top with plastic wrap.
8. Place a weight on top of the plastic-wrapped pudding. (A slightly smaller loaf pan set on top of the pudding and weighted down with canned foods works well.) Make sure that the plastic wrap is loose enough for the weight to press down on the pudding.
9. Refrigerate for at least 6 hours or overnight.
10. To serve, run a knife around the sides of the pudding. Place a serving plate large enough to cover the entire loaf pan on top. Invert the loaf pan so that the pudding slides out onto the plate. Serve in slices with whipped cream or vanilla ice cream.
Cherry Vanilla Chia Pudding Parfait
makes 4 servings
dairy-free, gluten-free, vegan
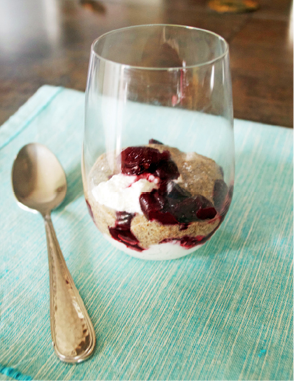
Chia pudding is the kind of dessert with a cult-like following. But for those who haven’t joined the cult, it’s a strange and foreign substitute for something rich and creamy. We’ve tried to find a way to do chia pudding to appeal to those who aren’t yet converted. (We’d have to put ourselves in that category if pressed for an opinion on the stuff.) By pureeing the chia mixture in the blender, we’ve transformed that sort of thick, sticky texture into something creamier--closer to a traditional pudding. Then we layered it with the seductive scent of vanilla and the sweet and tart pop of half cherries. The results, although not quite like a typical pudding, are definitely sensual.
1 cup almond milk (substitute soy, rice or coconut if preferred)
1/4 cup chia seeds
1 tbsp agave nectar (for a vegan version) or honey
1 tsp vanilla extract
1 batch leftover cooked, halved cherries from Cherry Coulis
1. Combine the milk, chia seeds, agave or honey and vanilla in a blender. Blend on high for 1 minute.
2. Transfer to a sealed container and refrigerate for a minimum of 2 hours before serving. Stir after 1 hour to ensure that all the chia is incorporated into the liquid.
To make the Parfait:
1. Put 1/8 of the chia pudding into the bottom of each of 4 parfait cups (or mason jars, Martini glasses or your favorite serving dishes).
2. Top each with cherries, dividing all the cherries evenly between the 4 cups, leaving a couple of teaspoons worth of cherries for garnish.
3. Finish with a layer of chia pudding, dividing the remaining pudding between the 4 cups. Top with the reserved cherries.
4. Serve chilled.