Let's start our journey. This process should be straightforward and I hope you have some Linux experience. We are going to use CLI. We can choose from Ubuntu, Red Hat Enterprise Linux (RHEL), CentOS 7, Amazon Linux 2, and Oracle Linux. You should check with the documentation before installing in order to use the last available version of Linux that supports Tableau.
For our purpose we will use RHEL, but you can choose any other Linux distribution. Let's do it:
- Log in to AWS and go to the EC2 dashboard. In the previous recipe, we created VPC and a security group that we will use for this recipe as well.
- Now, we need to launch EC2 with RHEL 7. Go to the Amazon EC2 Console and under Create Instance, click on Launch Instance.
- Select an Amazon Machine Image (AMI) that will meet your performance requirements. In our case, I will use m4.xlarge. It has 16 GB RAM and it should be enough for learning purposes. You can refer to Tableau recommendation documentation at https://onlinehelp.tableau.com/current/server-linux/en-us/ts_aws_virtual_machine_selection.htm.
- Then we should configure the instance details, as follows:
|
Network |
My_First_VPC |
|
Storage Size |
100 GiB |
|
Security Group |
my_security_group |
- Then click on Launch. It will allow you to create a key pair or use an existing one. We need this for SSH to our Linux box, where we can download and install Tableau Server.
- Let's create a static Elastic IP for our EC2 instance. We should navigate to the Amazon VPC console, go to Elastic IP, and click Allocate new address. Use all settings by default. Then, we need to associate our new Elastic IP with our EC2 instance. As a result, our EC2 instance got new IPs that we will use for connection to the host. You can refer to the following screenshot for clarity:
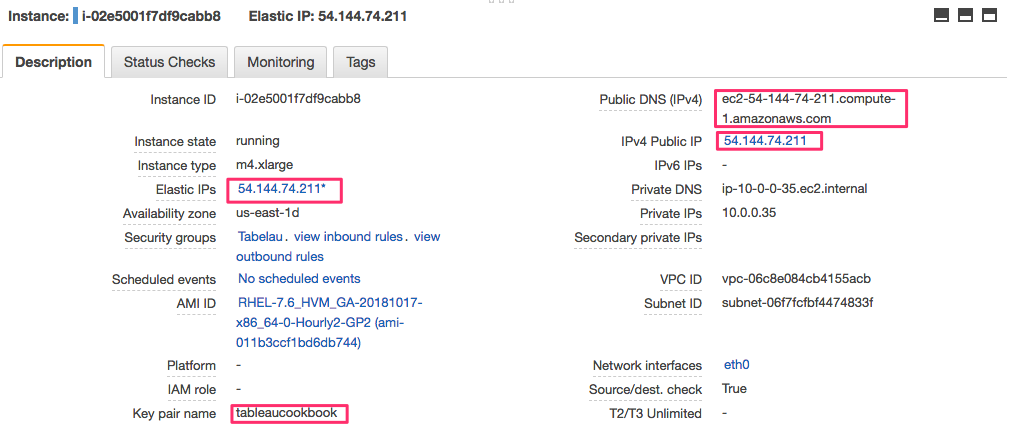
- Next, we should SSH to our Linux box. If you are using macOS or Linux, then you can use CLI, but if you are using Windows, you should use Putty. In our case, we are using macOS and will open Terminal. We need to use our private key and execute the following commands:
cd ~/.ssh
chmod 400 tableaucookbook.pem
ssh -i ~/.ssh/tableaucookbook.pem ec2-user@ec2-54-144-74-211.compute-1.amazonaws.com
Here the following commands are elaborated as follows:
- ec2-user: This represents the default user
- tableaucookbook.pem: This is from our key pair
- ec2-54-144-74-211.compute-1.amazonaws.com: This represents the public DNS of our EC2 instance
Now, we can install Tableau Server.
- Let's download the installation file from Tableau Server. We could use the last available version of Tableau Server 2019.x. From the CLI, execute the following commands:
sudo yum update
sudo yum install wget
wget "https://downloads.tableau.com/esdalt/2018.3.2/tableau-server-<tableau version>.x86_64.rpm"
Here, you replace <tableau version> in order to specify the version of Tableau Server, for example 2019-1-1.
- Then we can install Tableau Server. Execute the following command:
sudo yum install tableau-server-<tableau version>.x86_64.rpm
This will install you server very fast, much faster and easier than on the Windows platform!
- The next step is the same as usual. We should initialize tsm and accepteula, as follows:
cd /opt/tableau/tableau_server/packages/scripts.<code version>/
sudo ./initialize-tsm --accepteula
It will create the tsmadmin group for admin authorization, create a Tableau user account, and set permissions. In addition, it will add our Linux ec2-user to the Tableau security groups tableau and tsmadmin. In addition, it initializes a web interface for the GUI and a REST API, and will provide a link to it. But this link will have private IP and we won't be able access it from the internet. We should use a public DNS instead.
- In addition, we should create password for our ec2-user, as follows:
sudo passwd ec2-user
The preceding command will prompt us to enter a new password for the user. If you don't know what the admin user is, you can run the following command:
grep tsmadmin /etc/group
tsmadmin:x:994:ec2-user
We’ve created a password for this user and may use it for authentication.
- Let's activate Tableau Server Trial and log in to TSM. Before you should re-log in to the EC2, as follows:
tsm login -u ec2-user
tsm licenses activate -t
- Next we should register Tableau Server by generating JSON and send it to Tableau. In addition, we will add text editor for Linux: nano, as follows:
sudo yum install nano
tsm register --template > /tmp/tableaucookbook.json
Fill the file with your information, as follows:
{
 "zip" : "V1R2P5",
 "country" : "Canada",
 "city" : "Victoria",
 "last_name" : "Anoshin",
 "industry" : "Dmitry",
 "eula" : "yes",
 "title" : "Boss",
 "phone" : "2508919300",
 "company" : "Amazon",
 "state" : "BC",
 "department" : "Engineering",
 "first_name" : "Dmitry",
 "email" : "dmitry.anoshin@example.com"
 }
- Then execute the following command:
tsm register --file /tmp/tableaucookbook.json
You should get the message: Registration Complete.
- Then we will configure Identity Store in order to specify the authentication method. We will use the local authentication. Let's create the script with config, as follows:
sudo nano /tmp/auth.json
{
"configEntities":{
"identityStore": {
  "_type": "identityStoreType",
  "type": "local"
  }
 }
}
- Then we will import setting to Tableau, as follows:
tsm settings import -f /tmp/auth.json
If you need any other option, you can check templates here:
https://onlinehelp.tableau.com/current/server-linux/en-us/entity_identity_store.htm
In addition we can configure SMTP (mail server), SSL, and so on. Moreover, we can use the TSM GUI and enter all these settings much more simply.
- Let's apply changes, as follows:
tsm pending-changes apply
Starting deployments asynchronous job.
Job id is '1', timeout is 10 minutes.
6% - Retrieving the topology to deploy.
13% - Retrieving the configuration to deploy.
20% - Validating the new topology.
26% - Determining if server needs to be started.
33% - Disabling all services.
40% - Waiting for the services to stop.
46% - Updating nodes to new topology.
53% - Waiting for topology to be applied.
60% - Updating nodes to new configuration.
66% - Disabling all services.
73% - Waiting for the services to stop.
80% - Reconfiguring services.
86% - Waiting for services to reconfigure.
93% - Enabling all services.
100% - Waiting for the services to start.
Successfully deployed nodes with updated configuration and topology version.
- Then initialize the server by executing the following command line:
tsm initialize --start-server --request-timeout 1800
This process will take a while.
- The final step is to add initial Administrator account. We will use tabmcd for this purpose, as follows:
tabcmd initialuser --server localhost:80 --username 'Administrator'
It will ask for passwords. We should get the following output:
===== redirecting to http://localhost/auth
===== Signed out
===== Creating new session
===== Server: http://localhost:80
===== Username: Administrator
===== Connecting to the server...
===== Signing in...
===== Succeeded
As a result, we've got the Administrator account for Tableau Server and we can access it through the web.
- Before moving to another topic, I want to highlight internal system reports for Tableau Server. Click on Status and scroll down.
This list of reports is created on top of Tableau Repository based on PostgreSQL. You can learn more about reports here: https://onlinehelp.tableau.com/current/server/en-us/adminview_bucket.htm