“Hit it Low, Collect the Dough.”
—Golfer’s proverb
Just as you need to know how to work the ball in both directions in order to get the most out of your game, you also need to know how to control the trajectory of your shots. Most beginners make the mistake of believing that higher shots are better shots. It’s fun to hit those long, towering shots, and high shots can be very useful, as I’ll show you later in this chapter. But what many golfers don’t realize is the value of hitting the ball low. In Hawaii, where the trade winds blow every day, golfers say, “Hit it low, collect the dough.” Wind, of course, was a central element of early golf in Scotland and remains so today.
Tiger Woods spent most of 1998 working to develop a swing that would produce a lower, more consistent trajectory with his irons. The results have been startling. With his newfound control, he rarely has the lapses in short-iron play that marked his early career. Tom Watson learned to shape the trajectory of his shots by playing year-round golf in often-windy Kansas City, Missouri. He went on to use his bump-and-run skills to win five British Open titles.
The bump-and-run is golf’s original specialty shot, and today it is still one of the most valuable shots you can have in your bag. Knowing how to control the trajectory of your shots gives you a great advantage and helps you adapt your game to different courses and conditions. Adaptability helps you develop a game that travels well and is not dependent on course familiarity. And that is a game that will stand up under pressure.
Golf grew from the Scottish links—treeless, seaside courses that feature numerous dunes, swales and undulations. And, of course, coastal winds. The imperfections of the terrain combined with the unpredictability of the breeze made it very difficult to play high approaches into the green. Instead, the early Scottish players perfected a shot known as the bump-and-run.
I consider a bump-and-run to be any low shot in which the ball flies only part of the way to the target and then runs along the ground the rest of the way. This can be very useful if you have a shot into a green that has a wide opening in front, a green that is elevated or that slopes from back to front with a center or rear pin position.
You can play the bump-and-run with almost any club in your bag. The key to club selection is having a good feel for the carry-to-roll ratio you’ll get from each club. In general, you want to play the bump-and-run using a club with as little loft as possible. This shot is designed to do most of its work on the ground.

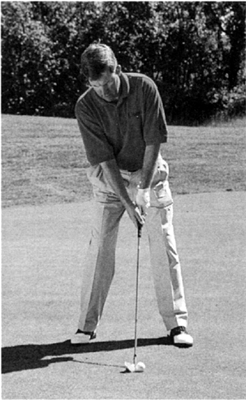
To bump the ball low to the ground, you need to play the ball back in your stance, with your hands set slightly ahead.
After you’ve selected your club, grip down two or three inches to create a shorter lever that is easier to control, since this is just a partial swing. Stand two or three inches closer to the ball. This will set the shaft in a more vertical position and will encourage a swing that works more down into the ball at impact.
Play the ball back in your stance, about an inch right of center. Not only will this ball position help make sure that you strike the ball first on the forward swing, it will also move your hands ahead of the ball, de-lofting the club slightly. Distribute your weight evenly between the left and right feet, with your upper body set directly on top of your lower body so that your shoulders feel almost parallel to the ground.

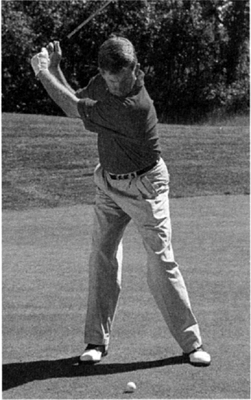
On the backswing, the clubhead swings to about waist high.

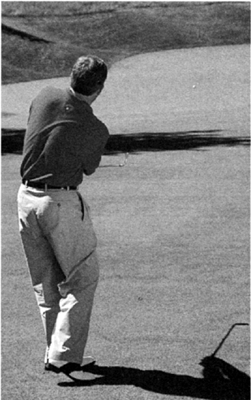
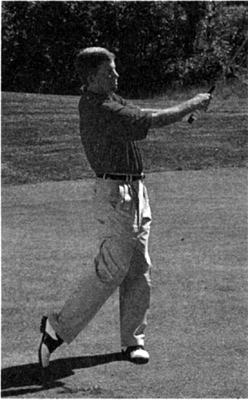
The low clubhead position at the finish is crucial to the bump-and-run, but notice how the body rotates through to face the target.
The bump-and-run swing is a one-lever motion with minimal wrist hinge. Swing back with very little upper-body rotation. The backswing for this shot is longer than the follow-through. Depending on the distance of the shot, your backswing will be from waist high to shoulder high. Make a smooth transition into the forward swing, leading with your hands, and hit down into the ball. The follow-through is very abbreviated to help keep the ball down, although you should allow your body to rotate through the shot so that you end up facing the target with the golf club in front of you, no higher than waist high. Different clubs will produce different types of shots—pay attention to the carry-and-roll you get as you work on this shot with the various clubs in your bag.
With links-style golf courses cropping up all over the United States, the bump-and-run will be a valuable tool to have in your shotmaking repertoire.
Low shots are useful from full-shot distances as well, and the knockdown approach is one of the most useful you can learn. Not only will the knockdown shot help you get out of trouble by punching under limbs and branches, but you can use it in all types of wind conditions and allow it to be the basis of any number of creative shots on the course.

For a knockdown, play the hall in the center of your stance, with your hands ahead of the ball.

To keep the ball down, the backswing should be three-quarters with limited upper-body rotation and minimal wrist break.
To craft a knockdown, you’re simply going to extend the bump-and-run’s swing technique and allow for a little hand action on the backswing to increase distance. Remember, less is more when it comes to loft. The knockdown swing is a partial swing, so you’ll want to use more club than you normally would for the same distance. In other words, if your standard 150-yard club is a 7-iron, but you are playing a knockdown shot, drop down to a 6-iron or even a 5-iron.
Grip down one or two inches on the handle of the golf club. The knockdown is a control shot, so you want to shorten the lever you’re swinging. Stand an inch or two closer to the ball to compensate for the shorter lever. Grip the club with a firm grip pressure in both hands. Overactive hands at impact will cause inconsistency with direction.
As you address the ball, stand tall, with your upper body directly on top of your lower body and your shoulders almost level, and move the ball back to the center of your stance to ensure that you’ll strike the ball first as you swing through. Set your hands slightly ahead of the ball. A forward hand position will naturally de-loft the clubface, again helping to start the ball on a low trajectory.
The distance of the shot determines the length of the backswing. Concentrate on making a smooth, rhythmic swing with an even transition between the backswing and the forward swing. Stay level through the hitting area, maintaining the tall position you established at address.

Finish the knockdown shot standing tall, with your body rotated toward the target and the clubhead about waist high.
You want to lead with your hands on this shot. Focus on returning your hands and the shaft of the club to the same position they were in at address—ahead of the ball. Resist the release. The best tip I can give you for this shot is: A low shot means a low finish. The lower you want to hit it, the more you need to resist the release. Rotate fully with your body on the forward swing so the hands can stay ahead of the clubhead. Finish with the golf club in a low position but with your belt buckle facing the target.
No matter where you play golf, you will surely encounter times when you need to hit the ball high. A high shot can help you get to a difficult pin position or clear bothersome trees. Now that you are familiar with how to hit curving shots and low shots, it’s not much of a stretch to learn how to hit one that rises quickly and flies high.

For a high shot, move the ball up in your stance, drop the right shoulder and set your hands even with the ball.

This reverse-C finish position results from hanging back on the right side during the forward swing.
Depending on how high you plan to hit the ball, you’ll need at least one extra club, possibly two. Play the ball about an inch forward of your normal ball position. The key to hitting the ball high is staying behind it from start to finish. Increase your spine tilt by lowering your right shoulder at address. Increasing the spine tilt will position more weight on your right side and will also open the clubface slightly, helping you add loft. Remember, a high shot requires a high finish.
Make a long, smooth swing, concentrating on a full shoulder and body turn. As you begin the forward swing, make a conscious effort to stay behind the ball and swing along the shoulder tilt you established at address. It should feel as though your weight is lagging back on the right side. Let your hands release fully through the impact area, and swing into a high finish.
Controlling trajectory off the tee is just as important as it is on approach shots, especially on par-3 holes. You can give yourself a great start on producing the shot trajectory you want simply by adjusting how you tee the ball. If you’re going for a high shot, tee the ball slightly higher than you normally would. Assuming you make a good swing, you’ll hit the ball a little higher on the clubface, with most of the mass of the golf club below the equator of the golf ball. Likewise, when you want to hit the ball low, tee it down so that the ball is just barely above the grass of the tee box.

You can use the height of the tee to “program” the height of your shots on par-3 holes.
These slight variations do more than physically assist you in creating the shot you need. They send a message to your brain, letting it know the desired result. If you’ve practiced the techniques described in this chapter, something as simple as adjusting the height of the tee will help trigger your brain to make the necessary adjustments.
DON’T LET THE WIND BLOW YOU AWAY
I don’t know any golfer who doesn’t have to deal with windy conditions from time to time. I’ve always felt that you could tell a lot about a player’s abilities by how he or she responds to difficult conditions, and there is nothing tougher on the golf course than a stiff breeze. While you may be able to get away with some shotmaking inconsistencies in perfect weather, the wind will exaggerate and expose most any flaw. To conquer it, you have to strike the ball cleanly and understand how to affect its flight.
In a moment we’ll take a look at how to play different types of wind shots, but there are a few common setup elements that all wind shots require.
Widen your stance by two to four inches, depending on the wind, for additional stability during the swing, and flex your knees a little more than usual to lower your center of gravity.
Grip down on the club an inch or two to give yourself better control of the golf club.
Play the ball back in your stance one or two inches to encourage a hitting position in which your hands are in front of the clubhead at impact.
Now just make sure you stay relaxed as you play the shot.
Downwind With the possible exception of the tee shot, I believe it’s best to play low shots when the wind is behind you. With short iron shots, the wind can knock the ball down or take away backspin. You don’t need to make any special swing adjustments when playing downwind—but make sure you’ve modified your setup as described above. Club down, taking about one less club for every ten miles per hour of wind. Concentrate on good tempo. Then just play your own game without trying to overpower the ball. The wind will add the extra yards.
Into the Wind When playing into the wind, it’s important to hit shots with low, boring trajectories, avoiding the rising shot that tends to balloon as the wind gets underneath it. Apply the ten miles per hour rule, this time taking more club according to the wind speed. As you prepare to play the shot, visualize a low trajectory. If the wind is gusting strongly, exaggerate the knockdown shot. Move the ball another inch or two back in your stance and position your hands a little farther ahead of the ball. Firm up your grip pressure slightly. This will help you keep the ball down by inhibiting a full arm and wrist release through the hitting area. The swing should be smooth, with a three-quarters backswing and a low, three-quarters follow-through. Make sure you use enough club and have a smooth, slower forward swing tempo to keep the ball from spinning. Lower clubhead speed produces less spin.
Crosswind While tour professionals will often try to work the ball into a crosswind, most golfers would have more success with a different method. Simply play the wind to your advantage. Hit the ball into the wind and let it work back on its own. Be sure to align yourself to allow for the wind to move the ball back toward the target. Once more, tempo is the key to keeping the shot from getting away from you, and as we’ve discussed, a low shot has more control than a high one. The idea is to use the wind, not fight it. Don’t think about getting the shot close unless the pin position naturally allows it. Now make a smooth swing and rely on the wind to shape the shot.
By making these slight adjustments to your setup, swing and game plan, you’ll stay more relaxed and comfortable in windy conditions. The biggest key to success in the wind is to stay composed and not get anxious. Rarely will you find a perfectly calm day on the golf course, and wind is difficult for all players. However, with a good attitude and a little knowledge of shotmaking, you can prevent it from blowing your golf game away.
Use one more club (e.g., if the distance calls for a 6-iron, use a 5-iron to hit a low shot)
Grip down one to two inches, move one to two inches closer to the ball
Firm up grip pressure
Shoulders almost level at address—upper body on top of lower body
Ball position in center of stance
Set hands slightly ahead of ball
Three-quarters backswing
Stay level through the hitting area
Lead with your hands, resisting release
Rotate body fully to the target
Low finish with hands, arms and golf club
Setup and swing decreases the effective loft of the club you’re using
Plan for more roll than normal
Great shot in windy conditions
Visualize the low trajectory of the shot
A low shot requires a low finish
Focus on keeping the hands ahead of the ball through the hitting area
Use one more club (e.g., if the distance calls for a 6-iron, use a 5- iron to hit a high shot)
Position ball one inch forward of normal
Increase your spine tilt by lowering the right shoulder at address
Weight favors the right side slightly
Setup adjustments open clubface slightly, adding loft
Long, smooth swing with full shoulder turn and body pivot on the backswing
Allow the forward swing to work along the shoulder tilt established at address
Feel as though your weight is staying back on the right side
Let hands release fully through the hitting area
High finish with hands, arms and golf club
Examine the lie; this shot may not work if ball is sitting down or on hardpan
Setup and swing adjustments increase the effective loft of the club you’re using
Won’t roll as much as a normal shot
A must shot for hitting over trees or other obstacles
Rehearse the shot imaging the trajectory and ball flight
Stay behind the ball
A high shot requires a high finish
Allow the right shoulder to “work under” to add loft and height to the shot
The golden rule of shotmaking: You should only attempt to pull off a shot in competition that you have experience with in practice. Use the following practice ideas to help you build confidence when it comes to going over or under an obstacle on the golf course.
Use the range setting to practice controlling the trajectory of your shots. Use your imagination to set up shots that require a high trajectory or a low one. Perhaps you may envision a tall tree you need to fly the ball over, or low branches you need to punch under. Use the setup adjustments and swing keys provided in this chapter to help you create these shots on the range. Use different clubs to explore your limitations. For example, just how high can you hit a 4-iron?
When possible, use situations on the golf course to practice negotiating obstacles by hitting over and then under them. Which strategy works best for your style of play? Be sure to hit high and low shots from different lies. How much does the lie affect your ability to pull off the shot?
Use the five-ball drill to master trajectory control. Start with either your odd or even clubs for the first practice session, then switch it up the next time on the range. Choose four clubs that represent the different amounts of loft in your bag (e.g., the even clubs: PW, 8-iron, 4-iron, and 4-wood). Select a target on the range and hit three of five acceptable high shots and three of five acceptable low shots with each club in the series to the same target. Like all the shots in this book, it’s important to be able to dial in the right distance and be fairly accurate as you learn to control trajectory. Keep score and a running tally of your personal best.