
“Start each hole with an awareness that there may
be subtle or mysterious elements waiting
to sabotage your game.”
—Robert Trent Jones, Jr.
Each spring, the best golfers in the world converge on Augusta National Golf Club for the Masters. If you’re a golf fan, you’re very familiar with the fast, undulating greens, the water hazards and the nerves that a Masters champion has to conquer. But unless you’ve ever attended the tournament in person, you have no idea how hilly the course is. Competitors are forced to play shots from uphill, downhill and sidehill lies on virtually every hole.
Sure, golf would be a much easier game if you could play every shot off of a flat lie. But since the world is round and covered with hills, valleys and mountains, it’s unrealistic to expect much of a break from the effects of terrain when you’re on the course. And you shouldn’t. One of the great pleasures of golf is gaining the skills that let you handle all types of terrain.
Uneven lies require modifications to both the setup and the golf swing. A sloping lie changes launch conditions and affects the distance, direction and trajectory of the shot. But none of that will matter if you don’t make solid contact. In this chapter you’ll learn everything you need to know about the ups and downs you’ll encounter on the golf course and how they affect your game.
No shot in golf is tougher than the hanging lie, where the ball is significantly below your feet at address. Even the touring professionals have trouble with this shot. Still, there’s no reason you can’t play this shot consistently well.
The first thing you need to know is how the ball is going to react. A good rule of thumb is that the ball tends to go in the direction of the slope. In this case, expect the ball to slide to the right.
Also, the slope of the ground effectively increases your spine tilt, which causes your swing plane to become more upright and vertical. The slope changes the effective lie angle, making it more flat. These factors combine to encourage a left-to-right shot.

The hanging lie is a tough one. You need to stand closer to the ball, with more bend in your knees. This shot tends to slide to the right. Aim accordingly.
Start by using more club to account for the more vertical plane and the left-to-right shape that the hanging lie will generally produce. Hold the club at the very end of the handle. You’ll need all the length you’ve got to swing down and through the ball.
Balance is the key to consistency from the hanging lie, so you need to pay extra attention to your stance. It’s the foundation on which everything else is built. Widen your stance to shoulder width. A wider stance lowers your body’s center of gravity to help you stay balanced throughout the swing and brings you down to the ball. Get even closer to the ball by increasing your knee flex. Your weight should be positioned on the balls of your feet.
Align the clubface along the line on which you want the ball to start, and then align your body along a line parallel left to the clubface. As for ball position, it should be just the same as for a normal shot.
The most important factor in playing a good shot from a hanging lie is to hit the ball solidly. It’s very easy to come out of this shot and top it. It’s also easy to lose your balance and fall forward during the swing, hitting the ball on the hosel. The bottom line: If you try to get too much out of this shot, things can go from bad to worse in a hurry.
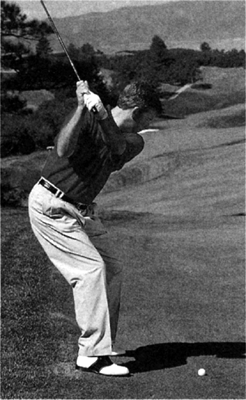
The slope of the hanging lie creates a more vertical backswing, as you can see here.
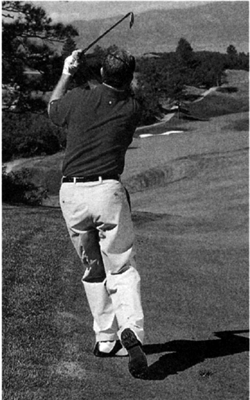
Maintain your knee flex throughout the swing—you need to stay down after this one.
I recommend using a three-quarters backswing for this shot. The arms and shoulders control the backswing, with very little lower-body rotation. By shortening the swing and letting the arms take control, you’ll naturally eliminate a lot of unnecessary motion. It’s absolutely essential that you stay down and through the shot. Focus on maintaining your knee flex throughout the entire swing. This will help you stay down. Make a nice, controlled swing, allowing the body to follow the arms on the forward swing.
Take a couple of practice swings before you hit the shot. Be sure to find an area where the slope is similar to the situation you’ll have when you address the ball. Concentrate on tempo, rhythm, length of the swing and the bottom point, where the club hits the ground. Now you’re ready to play.
By far the most important part of any shot is your familiarity with it. It’s very difficult to play a shot you’ve never practiced. Incorporate the hanging lie into your practice sessions, especially if you plan to play on courses in hilly areas. As you get a feel for the tendencies of your shots from the hanging lie, experiment with factors such as club selection, swing length and pace, and clubface position at address. Some of my professional students, for instance, simply close the clubface slightly from a hanging lie and then align square to the target line rather than playing for a slight fade.
This is a difficult lie to master, but working on it brings a lot of benefits. Anyone who can consistently hit the ball well from a hanging lie is likely to be an overall good striker of the ball. With a little bit of effort, you won’t feel as if you’ve been hung when you find the ball below your feet.
Most golfers feel much more comfortable when the ball is above their feet than they do when it is below. Don’t be lulled to sleep, however. The ball above your feet can be a very troublesome lie because it sets you up to hit a “hot” shot that has the potential to fly or roll past your target and into trouble. So it’s very important to know what adjustments to make prior to attempting the shot.
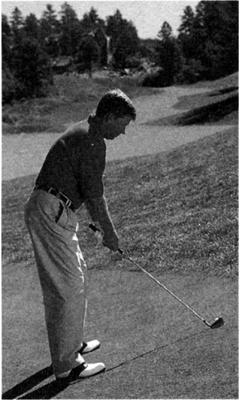
When the ball is above your feet, stand taller and grip down to compensate. This shot may fly to the left. Protect against it by aiming right.
When you play a shot with the ball above your feet, the club will naturally swing more around your body, on a flatter plane. The result is that you’ll tend to approach impact from the inside, closing the clubface down as you swing through the hitting area. A closed clubface decreases the effective loft of the club, causing the ball to fly lower than normal and work to the left. In general, you should be able to use one club less. Since the swing and impact position resulting from this lie create a lower, hotter shot, make sure you choose a club with enough loft.
Start by gripping down on the club between one and three inches. The more severe the slope, the more you should grip down on the club. Since the ball is above your feet, it is closer to your body than a shot from a flat lie. Gripping down accommodates the effect of the slope. Position the ball in your stance just as you would for a shot from a flat lie. Don’t play it too far forward, or you run the risk of hitting the ground first.
Keep in mind that the ball being above your feet will create right-to-left spin. Align the clubface to the right, on the line on which you want the ball to start. Adjust your body alignment accordingly.
Some players actually open the clubface slightly at address to add a little bit of loft and to resist the tendency to pull the shot. Experiment with this to see if it works for you.
Set your weight in the middle of your feet and stand slightly taller. Now you’re set up to play the shot.
When the ball is above your feet, it’s best to “sweep” it, just as though it were on a tee. Make a controlled, three-quarters backswing. A good image to use here is a baseball swing. Your upper body and lower body must remain level as you swing more around your body on a flatter plane. Solid contact will deliver plenty of power.
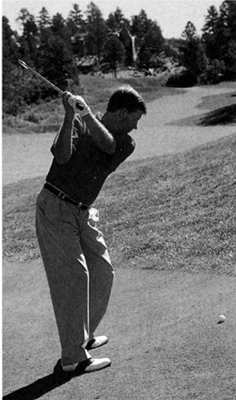
A ball above your feet will result in a backswing that works more around your body.
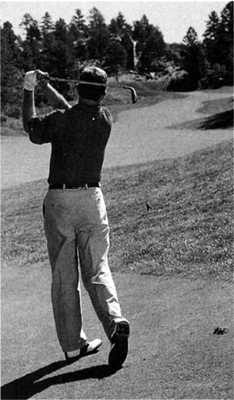
Maintain your “tall” setup all the way through the shot.
Downhill lies are quite common on golf courses, since many architects enjoy designing holes that play down to their targets. A downhill shot from a flat lie is a fairly easy one, but when the fairway itself slopes down, things get a little trickier.
Applying your knowledge of how the slope affects the flight of the ball, you should be able to determine that a downhill lie decreases the loft of the club, resulting in a lower trajectory. Take this into account as you select your club.
Set up with your spine perpendicular to the slope and your shoulders parallel to the ground so that the club swings up the slope going back and down the slope coming through. Distribute about 60 percent of your weight on your left side and position the ball slightly back in your stance. These adjustments will give you the proper amount of upper-body tilt so that you work with the slope. The hill will make it more difficult to turn and pivot around your right leg on the backswing. Close your stance slightly to give your body a little more room.
While the slope will de-loft the club, it will also tend to produce a shot that moves from the left to the right, because your swing plane will be more vertical than usual, and swinging down along the slope tends to hinder the release of the hands.
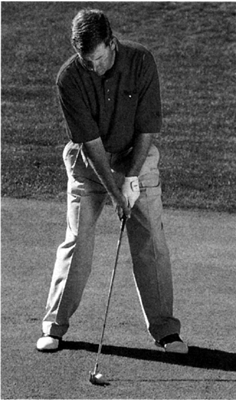
You need the proper amount of body tilt so that you work with the slope. Set your shoulders parallel to the ground with 60 percent of your weight on the left and ball positioned slightly back.
The common mistake among most golfers is to try to help the ball up into the air. Instead, concentrate on hitting down and through the ball, following the slope of the hill. You’re not trying to pick the ball off the hill but instead to strike the ball just before hitting the ground.
An uphill lie adds loft to your shot and results in a higher trajectory and shorter carry. Take at least one club more than you would normally hit, possibly two. Set up with your spine perpendicular to the slope and your weight positioned slightly on the right side. This positions your shoulders parallel to the ground and allows you to swing down the slope going back and up the slope going through.
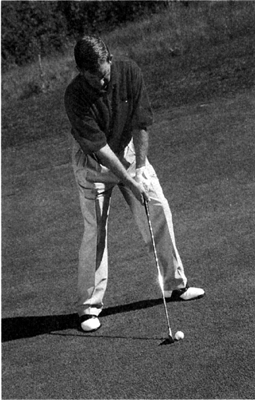
Set up to play an uphill shot by tilting your right shoulder until your shoulders are parallel to the slope. Play the ball forward.
Play the ball toward the front of your stance, opposite your left heel. Since your forward swing will be working against the slope of the hill, flare your left foot out about a quarter turn toward the target to encourage weight transfer. Because your weight will naturally lag a little bit, it’s easy to let the arms get ahead of the body. The result is a pull, a shot that flies straight but slightly left of the target line. Align your clubface and body slightly to the right of the end target to compensate for the tendency to pull the shot.
During the forward swing, concentrate on swinging along the slope. Stay with the shot all the way into a good, high follow-through. It’s okay to allow your weight to lag on the right side, but be sure you rotate your body all the way through to face the target.
SEEING THE WAY OUT OF BLIND SHOTS
Uneven lies aren’t the only difficulties you’ll find on hilly courses. Architects often take advantage of the terrain to challenge golfers with blind shots to fairways and greens. You can have uphill or downhill blind shots, but in both cases, you must remember that the effect is intended to be psychological. The actual shot usually has ample margin for error as long as you make reasonably solid contact and have good direction.
On uphill blind shots, the only real mistake is to leave the ball short. Make sure you add enough club to cover the uphill portion of the shot. If the target is well above the fairway, you’ll need at least one extra club and possibly two. For shots played to a target below you, you’ll need to back off a club or two.
After selecting the club, pick an intermediate target. This could be a divot, a twig or any distinct mark between three to five yards in front of you, on the intended line of the shot. The intermediate target allows you to commit to a line for the shot. And trust and commitment are what blind shots boil down to.
Blind shots are mental traps. Don’t fall into them.
Use one more club (e.g., if the distance calls for a 6-iron, use a 5-iron for this shot)
Hold the club at the end of the grip
Widen stance to shoulder width
Increase knee flex to get down to the ball
Ball position same as normal shot
Aim clubface where you want to start the ball (left of the end target)
Align body along a line perpendicular to the clubface
Three-quarters backswing and forward swing
Arms and shoulders control the backswing—little body rotation
Allow body to follow arms on the forward swing
Balance is key!
Maintain knee flex throughout the swing
The ball tends to go in the direction of the slope
Setup and swing adjustments produce a left-to-right ball flight
Don’t try to get too much out of this shot
Rehearse the shot from a similar part of the slope—pay attention to the low point of the swing, the tempo and length of swing that allows you to stay balanced
Some players may prefer to close the clubface slightly and align squarely to the target line rather than play for a slight fade
Stay down with the shot
Maintain knee flex on the forward swing
Make solid contact
Use one less club (e.g., if the distance calls for a 6-iron, use a 7-iron for this shot)
Grip down on the club one to three inches, depending on the severity of the slope
Gripping down requires you to stand closer to the ball
Ball position same as normal shot
Set weight in the middle of your feet and stand slightly taller
Aim clubface where you want to start the ball (right of the end target)
Align body along a line perpendicular to the clubface
Controlled three-quarters backswing
Upper body and lower body must remain level as you swing more around your body
Sweep the ball as if it were on a tee
Balance and solid contact will deliver plenty of power
Low finish
The ball tends to go in the direction of the slope
Setup and swing adjustments produce a shot that flies left
Don’t try to get too much out of this shot
A ball position that’s too far forward may cause you to hit behind the ball
Rehearse the shot from a similar part of the slope—pay attention to the low point, the tempo and length of swing that allows you to stay balanced
Some golfers may prefer to open the clubface slightly to add loft and resist the temptation to pull the shot to the left
Sweep the ball
Baseball swing
Stay tall; level shoulder-turn in both directions
Low finish
Use at least one less club, depending on the severity of the downhill lie (e.g., if the distance calls for a 6-iron, use a 7-iron for this shot)
Set your shoulders parallel to the slope
Sixty percent of your weight on the left side
Aim slightly left of the end target
Drop your right foot back slightly
Ball position slightly back of normal
Swing the club up the slope going back and down the slope on the forward swing
Dropping the right foot back gives arms room to swing and helps you to pivot around the right leg going back
Resist the temptation to help the ball up in the air by swinging up at the ball
A downhill lie decreases the effective loft of the club you’re using
This shot becomes more difficult with a club that doesn’t have much loft
Plan for a low trajectory shot that will roll more than normal once it hits the ground
The ball will start straight, then may cut a little to the right—more so with a less lofted club
Rehearse the shot from a similar part of the slope—note the low point of the swing
Swing along the slope
Swing down and through the shot—some golfers even take a step toward the target after hitting the ball
Use at least one more club, possibly two, depending on the amount of slope (e.g., if the distance calls for a 6-iron, use a 5- or even a 4-iron for this shot)
Set your shoulders parallel to the slope
Sixty percent of your weight on the right side
Aim slightly right of the end target
Flare your left foot open a quarter turn to encourage weight transfer
Ball position opposite the left heel
Swing the club down the slope going back and up the slope on the forward swing
Stay with the shot all the way to a complete, high follow-through
It’s okay to allow weight to lag on the right side, but rotate body fully to the target at the finish
An uphill lie increases the effective loft of the club you’re using
Because the slope makes your weight lag behind the arm swing, play for a pulled left shot
Plan for a high trajectory shot that won’t roll much once it hits the ground
Plan for a ball flight that will fly straight, then finish left
Rehearse the shot from a similar part of the slope—note the low point of the swing
Swing along the slope
Swing through to a high, complete finish
Make a smooth transition to the forward swing and finish in balance
Course designers either use the mounds, swales or other topography provided by nature or they build them in to make their golf courses challenging and esthetically pleasing. That’s the beauty of the game of golf: not only do you need to master the mechanics of the swing, but you need to know how you use your imagination, inventiveness and course management to get around the course in as few strokes as possible. You also need to know when to take your lumps and play the shot that puts you in the best position for the next one. If, for example, you have to hit a 3-wood from a severe slope to reach the green, a golfer who manages the course well would opt for the best layup position. Use the following drills to discover your capabilities so you can successfully weigh the risks and rewards when faced with uneven lies on the course.
Since most good practice ranges are relatively flat, you’ll really need to look for opportunities to practice uneven lies. Some of the best specialty shot practice is done on the course in the early evening when you have the place to yourself. However, there’s no reason you can’t practice the setup and swing fundamentals described in this chapter anywhere you can find sloping territory—even if you can’t hit balls.
If you can find a place to practice hitting balls from uneven lies, you can use the five-ball drill to chart your progress. Use four clubs, from either the odd or even set, that represent short-, mid-and longirons and woods. Hit from the four situations described in this chapter: ball below and above your feet, and downhill and uphill lies. Score at least three of five acceptable shots with each club before moving to the next situation. From your practice will come a knowledge of how you tend to hit the ball on each of the different lies. Notice how much you tend to curve the ball, the trajectory of each shot and how well you are able to control distance.