
German Army troops man a defensive trench network at an unknown location, and wait for the inevitable enemy attack. Note the zig-zig configuration of the trench – this prevented enemies from delivering enfilading fire along a long, straight trench, and it also helped minimize casualties from artillery strikes. (Cody)
While the German Army is perhaps best known for elaborate, massive concrete and steel fortifications, such as the West Wall and Atlantic Wall, the fortifications that a German soldier was most familiar with were the ones he dug himself. Whether built on the sprawling steppes of Russia, in the deserts of North Africa, in the mountains of Italy, in European hills and forests, or among the rubble of countless battered cities, these were the fortifications that truly defined the boundaries of the Third Reich.
Building on the previous chapter’s study of the Italian defensive lines, the focus of this chapter is the field fortifications constructed by combat troops defending the frontline. The core focus will be temporary and semi-permanent crew-served weapon positions and individual and small-unit fighting positions, built with local materials and occasionally construction matériel. Little engineer support was provided: pioneer troops may have provided advice, but the infantry mostly built these positions and obstacles. However, Pionier (pioneer) and Baupionier (construction) units and OT civilian labourers did sometimes prepare defences behind the front for units to fall back to.
While wartime intelligence studies and reports provide detailed information on German field defences, only limited post-war study has been undertaken. This is largely due to their temporary nature, and the fact that little survives of them today. The Wehrmacht used the same basic doctrine and manuals for positioning and construction purposes as did the Waffen-SS. With the exception of local improvisation, a factor common to all armies in the field, all branches of the German armed forces employed these field fortifications and obstacles.

Field fortifications were necessary during offensive movements too. Here infantrymen dig in for the night on a Russian steppe to provide protection to 7.5cm StuG III Ausf. F assault guns. These would be shallow slit trenches more suited to the role of a soldier’s bed than a fighting position. (Gordon Rottman)
Regardless of the unique aspects of any given front, at all unit levels (defined by the German Army as regimental level and below) common principles for the establishment and conduct of defence were employed down to the squad. Space, distances, density of forces and support would vary, though, as would construction materials, types of fortifications, obstacles and how they were deployed and manned.
High ground was always desirable for defensive positions for its observation advantages, extended fields of fire and the fact that it is harder to fight uphill. In the desert even an elevation of a couple of metres would be an advantage. Natural terrain obstacles were integrated into the defence as much as possible. The routes and directions of possible enemy attacks were determined and infantry and supporting weapons were designated to cover these approaches. The goal was to destroy or disrupt the attackers by concentrating all available weapons before the enemy reached the main battle position. Effective employment of the different weapons organic to an infantry regiment was an art in itself, as each had capabilities and limitations: the weapons comprised light and heavy machine guns, anti-armour rifles, mortars, infantry guns, anti-armour guns and supporting artillery to include anti-aircraft guns employed in a ground role.
A commander preparing a defence (and an attack) needed to identify the main effort point or Schwerpunkt. In attack, this was the point at which he would concentrate effort and firepower to break through the enemy defences. In defence, it was the point (assessed by the defending commander) where the enemy would attempt to break through: he would concentrate his offensive forces and supporting weapons there. The defence would be established in depth, but not just using the four zones: each zone in itself would be organized in depth with the weapons providing mutual cover for each other. The employment of obstacles and minefields was critical, as it was fully understood that anti-armour weapons alone could not halt attacking tanks. Tank-hunting detachments with anti-armour rifles and hand mines were organized. In 1943 Panzerfaust and Panzerschreck shoulder-fired anti-armour rocket launchers began to replace these.
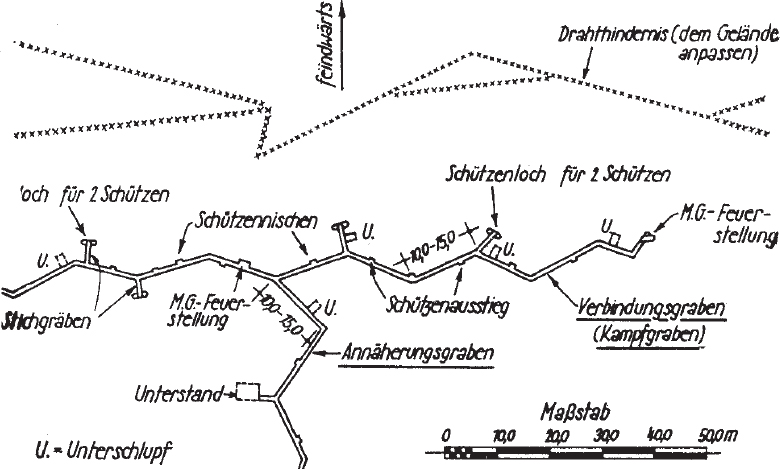
This Kampfgraben (squad battle trench) and Annäherungsgraben (approach trench) depicts the different positions incorporated into it: Schützenloch für 2 Schützen (rifle position for two riflemen), Stichgraben (slit trench), Schützennischen (fire steps), MG-Feuerstellung (machine-gun firing position), Unterstand (squad bunker), Schützenaussteig (exit ladder or steps), Unterschlupf (dugout). Note that the arrow points in the direction of the enemy. (Gordon Rottman)

Defence of a village, north-west Europe. Villages were extremely irregular in pattern and layout, making the organization of the defence, the selection of strongpoints, the positioning of crew-served weapons and the placement of obstacles as difficult for the defender to determine as for the attacker to predict. The reserve platoon is located at A. Strongpoints are shown enclosed within red lines. (Ian Palmer © Osprey Publishing)
As the war progressed, anti-armour guns were increasingly employed in the main battle positions as well as in forward and outpost positions. Armoured fighting vehicles (AFVs – tanks and assault guns) tended to be held as mobile reserves to counter-attack breakthroughs. There were many instances, though, where AFVs were employed as mobile pillboxes. As Germany lost ever more AFVs and infantry units were reduced in strength, the availability of mobile reserves dwindled. Rather than large units conducting major counter-attacks, they became increasingly localized and smaller, greatly reducing the German ability to regain lost ground.
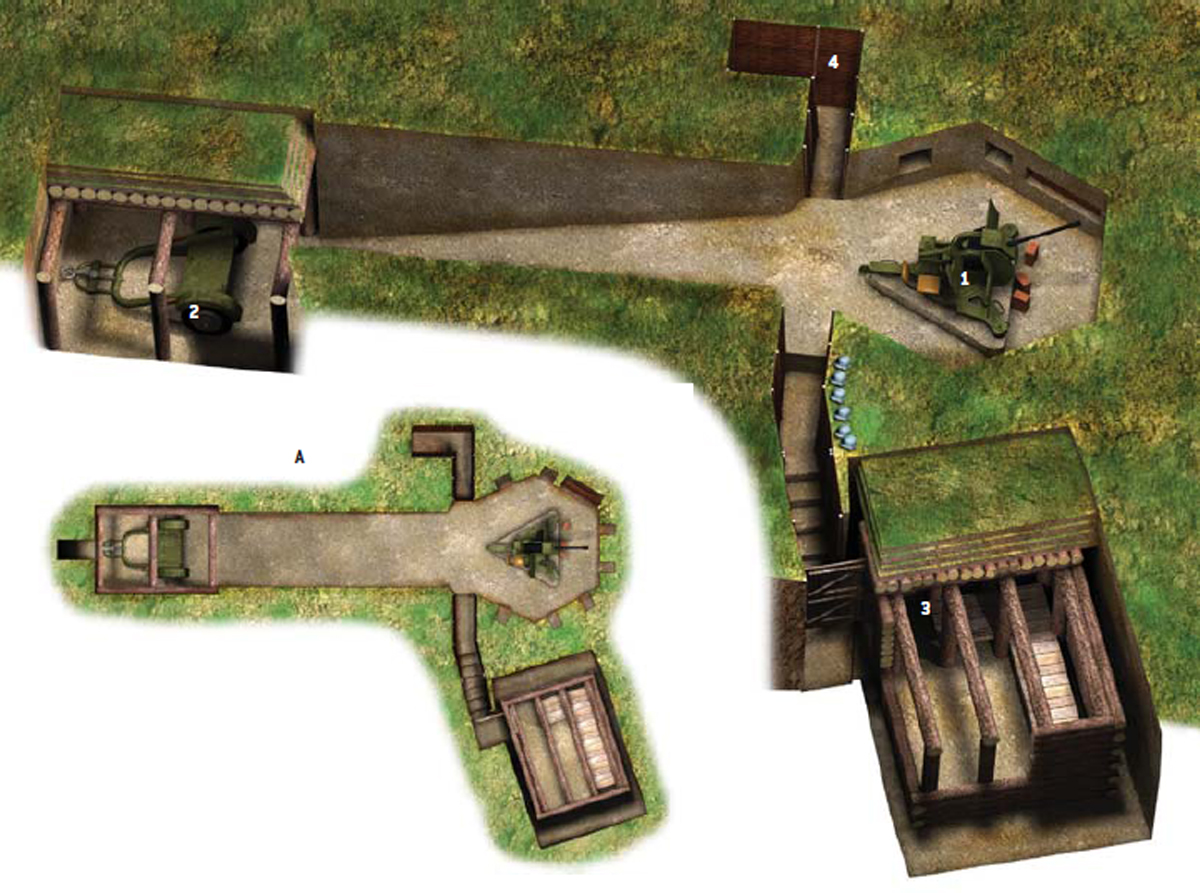
2cm Flak gun position. Although emplaced in positions optimised for ground fire, they could still engage ground attack aircraft. This well-developed position consists of four components: the gun position (1, Feuerstellung für 2cm Flak), gun shelter (2, Untersellraum), half-squad living quarters bunker (3, Halbgruppenunterstand) and an armour protection trench (4). The inset (A) shows the position in plan view. (Ian Palmer © Osprey Publishing)
Because of the extensive defensive frontages often required, ‘strongpoint’ defence was adopted on many fronts. There were no continuous frontlines, and the gaps between mutually supporting strongpoints were extensive, to be covered by outposts, patrols and observation, backed up by long-range fire. This reduced the numbers of troops necessary to defend an area, but not necessarily the number of weapons. Strongpoints had to be well armed with the full range of weapons, and significant mobile reserves were a necessity. Still, the basic German doctrine of four defensive zones was retained to provide depth to the defence.
Camouflage efforts and all-round local security were continuous during the development of defensive positions. Camouflage served to prevent the enemy from detecting positions from the ground and the air, and reconnaissance forward of the defensive zones was essential to warn of the enemy’s approach and his activities. The German soldiers developed a dependable capability for determining when and where the enemy might attack by closely watching for signs of offensive action.
A wide variety of anti-personnel and anti-armour obstacles were employed in defensive systems. Maximum use was made of local and impounded materials. While it was difficult to conceal obstacles, the German soldiers would emplace barbed-wire barriers along natural contour lines, on low ground, on reverse slopes (Hinterhang), along the edge of fields and within vegetation. Terrain was important: swamps, marshes, forests, rivers, streams, gullies, ravines, broken and extremely rocky ground, all halted or slowed tanks. The Germans fully understood that to be effective an obstacle had to be covered by both observation and fire.
Manuals provided standardized designs for field fortifications, but there were many variations and exceptions in the field. This divergence was caused by assorted factors: the need to blend the fortification into the terrain, thus modifying its size, shape and profile; locally standardized designs induced by material shortages; types of material available; terrain conditions; weather; time constraints; preferences and concepts of local commanders; and the ingenuity and imagination of the officers and NCOs supervising construction. A common basic design can be seen in many examples, however.
Infantry unit frontages could vary greatly. A major factor affecting the width of a division’s sector was its internal organization. Standard German infantry divisions had three infantry/grenadier regiments with three battalions each. (On 15 October 1942 all regiments and smaller units designated Infanterie were redesignated Grenadier for ‘morale’ purposes.) This structure allowed for the standard ‘two up and one back’ formation: that is, two sub-units of any given unit were deployed in the main battle line with one behind them in reserve. From late 1943, due to manpower shortages, most infantry divisions were reorganized with only two battalions per regiment, and the Aufklärungs-Abteilung (Reconnaissance Battalion) was converted to a Füsilier-Bataillon as a mobile reserve. (The Germans employed two terms for ‘battalion’: Bataillon was used by infantry and pioneer battalions, and Abteilung or ‘subdivision’ was used by armour, artillery, smoke, cavalry and other branches.) This required regiments to place both battalions in the line without a reserve, although a company might be retained as a regimental reserve. However, this also meant that one of the battalions was without a reserve. Often all three regiments had to be in the line with only the fusilier battalion as the divisional reserve.
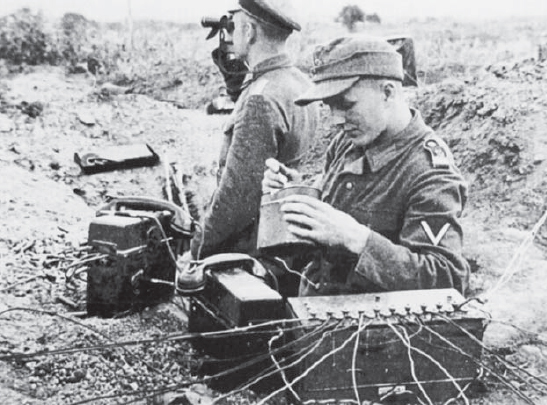
A Panzergrenadier-Division ‘Grossdeutschland’ command post. The Germans relied heavily on telephones when defending. The equipment includes two Feldfernsprecher 33 field telephones and a Feldklappenschrank 20-line field switchboard. (Gordon Rottman)
In 1942 combat-depleted divisions consolidated the remnants of their reconnaissance and anti-armour battalions into a single unit to serve as a mobile reserve (Panzerjäger und Aufklärungs-Abteilung). The separate battalions were later reconstituted. It was common for the only effective mobile reserve to be found at corps or army level. Gebirgs (mountain) and Jäger (light infantry) divisions had only two regiments with three battalions, because they were expected to fight on rough terrain with narrow frontages. The 700-series occupation divisions raised in 1941 also had only two regiments and a single artillery battalion. Both of these divisional structures, three two-battalion regiments and two three-battalion regiments, greatly reduced a division’s ability to defend in depth and field a viable reserve.
The depth of each of the positions depended much on the terrain and likely avenues of enemy approach: there was no specified depth. Depth would be achieved not only by positioning the two sub-units forward and the reserve sub-unit to the rear for each unit, but possibly by deploying elements of each sub-unit within the position providing mutual support and protecting the flanks. Various crew-served weapons attached from higher formations added to the width and depth of positions as well.
The Hauptkampflinie, analogous to the US ‘main line of resistance’, was determined by the commander using map reconnaissance. Subordinate unit commanders then reconnoitred the ground and moved their units into position. Commanders were cautioned not to spend too much time on reconnaissance so as not to delay construction of defences. They designated their sub-unit’s area, primary sectors of fire, locations of support weapons, obstacles, minefields, command posts, aid stations, ammunition and supply points and so on. The higher commander might specify the locations and sectors of fire of crew-served weapons allocated from higher formations in order to ensure their integration into the overall defence plan. Artillery, infantry gun and mortar fire-support plans were developed. Reserve positions were established and counter-attack plans made.
The Vorgeschobene Stellung (advanced position) was established 4,500–6,500m forward of the main defence line. It would be manned by reconnaissance troops, detachments from reserve units, and anti-armour and machine-gun sub-units. Artillery forward observers would be located there, and the approaches forward of the position were within range of medium artillery (15cm): these could be employed to break up any attack. The forces were widely scattered and in shallow depth. Small troop elements covered the roads, trails and railways approaching the position, plus crossroads, river crossings and key terrain such as high ground. They warned of enemy attack, prevented patrols from penetrating into the main defences, attempted to force the enemy to deploy early and called for fire on the enemy. The troops manning the advanced position would withdraw using concealed routes before they became too committed. The advanced position was not employed if the front was stabilized: that is, if enemy forces were in established positions or in close proximity to the German line.
The Gefechtsvorposten (combat outposts) were 2,000–4,500m forward of the main battle line. While similar in concept to the US combat outpost line, they were often better manned. This sector had much the same mission as the advanced position, but might be more heavily armed and manned in stronger positions. It could mislead the enemy as to the location of the main battle line: dummy positions might be constructed for this purpose. Obstacles and minefields were placed on avenues of approach and covered by fire. The combat outposts were within light artillery (10.5cm) range and forward observers from the howitzer batteries were located in these positions. Villages, tree lines and clumps, and hills covering the avenues of approach were developed as strongpoints. The German Army fully realized that enemy infantry would more than likely advance through woods and other terrain offering concealment rather than in the open, and so such areas were covered by Spähtruppen (reconnaissance patrols), Vorposten (outposts), Feldwachen (lookouts), Beobachtungstellen (observation posts), Horchstellen (listening posts) and fire positions. The same types of units manning the advanced position, especially if it was not employed, and also manned the combat outpost position – platoons and companies from the reserve regiment held the strongpoints here. They could also execute small-scale, limited-objective attacks to delay any enemy advance. The outposts were abandoned on order or when in danger of being overrun. Concealed withdrawal routes were selected so as not to interfere with covering artillery fire. Artillery and mortar fire was often registered on the forward positions to delay the enemy and cover the withdrawal. Artillery was usually emplaced approximately one-third of its maximum effective range behind the main battle line.

An MG34 machine gun in the embrasure of an Eastern Front bunker. The firing port is made from boards and snow-filled wicker ammunition containers. (Gordon Rottman)
The Hauptkampffeld (main battlefield) concentrated the bulk of the infantry and their supporting weapons on dominating terrain features or terrain that blocked or covered avenues of advance. Prior to 1942, the main battle position comprised mutually supporting platoon positions. Each company deployed two platoons forward and one in reserve. The reserve company of each battalion was similarly deployed to provide depth to the position. Light machine guns were deployed forward with riflemen, while heavy machine guns could be placed well forward, often slightly to the rear, covering gaps between units, possible enemy attack positions, and the flanks. Anti-armour rifles and light mortars (5cm) were located within the platoon positions to allow the gunners direct observation of targets. Heavy mortars (8cm) were placed on reverse slopes, as were infantry guns. Anti-armour guns were usually to the rear of forward positions and covering avenues of armour advance. Some anti-armour guns were emplaced in forward positions, though. Mines were laid and obstacles constructed to the extent allowed by limits of time and matériel. These could be continuous belts laid in depth in well-developed positions.
A division with three three-battalion regiments would normally have two regiments in the main battle position with a total of four battalions forward. This meant that eight of the division’s 27 rifle companies were in the division’s main battle line, each with two platoons forward. To all intents and purposes, the reserve platoons were in the battle line, as they were within sight of the forward platoons and supported them with direct fire. This meant that 24 of the division’s 81 platoons were on the 6,000–10,000m frontline. The combat outpost position was manned by the forward regiments’ reserve battalion and the advanced position, if established, was manned by detachments from the reserve regiment, reconnaissance and anti-tank troops.
In December 1941, the German leadership adopted a new defensive concept to deal with the desperate situation on the Eastern Front. The initial plan for the winter of 1941/42 was to drive the Red Army towards the Ural mountains, seize the main population and industrial centres and withdraw two-thirds of the German forces, leaving the rest to establish a line of strongpoints to defend the Third Reich’s new frontier. The strongpoint defence was an economy-of-force effort to employ the smallest possible number of troops to cover the widest possible front. German losses had been tremendous and replacements could not be trained fast enough. Understrength units could not man the required wide fronts in the traditional manner – a near-continuous linear defence. On 16 December Hitler issued his ‘no retreat’ order, putting a halt to local withdrawals then underway as units sought more easily defendable terrain in which to sit out the winter. The official term for a strongpoint was Stützpunkt, but Hitler preferred Igelstellung (‘hedgehog position’): Stützpunkt generally remained in use in official publications, however.
The ‘no retreat’ order denied commanders a proven, effective counter-measure to massed Soviet attacks. Regardless of the order, it was still carried out in some instances. When a Soviet attack was imminent the forward troops were pulled back prior to the artillery barrages striking the strongpoints. Depending on the terrain, a withdrawal of 800–2,000m back to second-line positions was all that was required. The barrages fell on empty positions and obstacles, as Russian infantrymen rushed forward supported by tanks. The German soldiers would then open fire with artillery, mortars and machine guns from long range and wait for the assault’s momentum to slow, and for formations to become disorganized and disorientated and then to either withdraw or stumble piecemeal into the prepared defences. The forward positions could usually be reoccupied following German counter-attacks.
Heeresgruppe Mitte had successfully employed the elastic defence in August and September, but by December German units were so severely under strength that such a defence could not be established other than as a thin screen. Sufficient troops were simply not available to man the multiple-zone, in-depth defence over such broad fronts, and the necessary mobile reserves did not exist. Panzer divisions fielded only a dozen tanks and the remaining crews were serving as infantrymen. Rear service units were stripped to provide infantry replacements. Infantry battalions were at less than company strength, and companies had 25–70 men. The infantry strength of entire corps was less than 2,000 troops with a 250-man battalion deemed well manned. Many units possessed only a quarter of their heavy weapons. Rather than the doctrinal 6–10km sectors, the hollow divisions were assigned 30–60km fronts against the unexpected Soviet counter-offensive. All three regiments had to be placed in the main battle line, often with all nine battalions as well, allowing no regimental reserves other than the battalions’ reserve companies, which were also manning deeper strongpoints. The Germans called it ‘putting everything in the shop window’. Scattered squads and platoons would be held in reserve by battalions and companies to conduct immediate, local counter-attacks. An under-strength reconnaissance battalion served as the division’s only mobile reserve, although if possible divisions retained one infantry battalion in reserve. To make matters worse, the strained German logistics system was on the verge of collapse.

Three Fallschirmjäger (paratroopers) fire an 8cm Gr.W.34 mortar from a standard mortar firing position. (Gordon Rottman)
Under-strength companies might organize into two platoons with three 6–10-man squads, each with a machine gun and positioned in a cluster of 3–5 two-man firing positions. Additional machine guns were often provided from service units as a substitute for riflemen. Remaining 5cm mortars were concentrated 50m to the rear under company control. Anti-armour guns were held in the rear to deal with tank breakthroughs. In some instances anti-armour guns were placed in strongpoints, making few available to block breakthroughs in the rear.
Strongpoints were established around villages to control roads and provide shelter from the brutal weather until fighting positions and bunkers could be built. Other strongpoints were built on the little available high ground. Weapons were positioned to engage the enemy at maximum range, provide mutual support to adjacent strongpoints, and cover the gaps between strongpoints.
The little remaining artillery was positioned further forward than normal (increasing the danger of its being overrun) to cover the different strongpoints. Many divisions fielded only an under-strength artillery battalion, rather than four, causing the few batteries to be widely dispersed to cover all the strongpoints. This prevented artillery fire from being concentrated en masse on main attacks, as not all batteries could range the wide division front. Mortars were distributed among strongpoints rather than being concentrated behind the forward units, meaning they were unable to range all the strongpoints. They could usually cover adjacent strongpoints though. Light air-defence units positioned their 2cm Flak guns in strongpoints, which proved ideal for breaking up mass infantry attacks.
The strongpoint defence remained into mid-1943/1944 in some areas. After that the German forces were in steady retreat. Defences consisted of hastily established lines in scattered sectors without continuous frontlines, little depth, and few if any reserves. As relentless Allied assaults hammered at the German units on all fronts, time and resources rarely allowed anything close to a doctrinal defence to be established. Pioneer units often built defensive positions and obstacles to await withdrawing infantry. Defences were built on rivers to provide major obstacles; villages and towns were turned into strongpoints and cities into Festungen. Some of these, however, were well defended with multiple rings of strongpoints protected by anti-armour ditches and minefields. In-depth defences were prepared on the roads leading into the fortress city. Switch positions were constructed between the fortified lines to protect against breakthroughs.

A cross-section of a typical Normandy hedgerow (the precise dimensions would vary). The core of the hedgerows comprised rocks gathered by previous generations and piled in lines along the edges of fields. Thick hedges then grew over these berms. The dense roots and rock core made the hedgerows formidable anti-armour and anti-personnel obstacles. They also provided ideal fighting positions. (Gordon Rottman)
In Normandy the Germans forces encountered a compartmented maze of cultivated fields, orchards and pastures atop the Collines de Normandie plateau 10–15km inland (the Bocage country). These fields were separated by earth and rock berms 0.5–1.5m thick and up to 1.5m high. They were topped with dense hedges and small trees from 1m to 5m in height. Ditch-lined roads and wagon tracks, often sunken, ran throughout the area bounded on both sides by hedgerows with small, gated openings into the fields. The enclosed fields could be relatively small, up to a few hundred metres to a side. They could be square, rectangular or triangular and were laid out in irregular patterns.
The German troops dug weapon positions and riflemen holes, often with an attached dugout, into the hedgerows as well as dugouts and positions for command posts, telephone exchanges, ammunition points, medical stations and others. Well camouflaged, they were difficult to detect from the ground or air. Observation between fields was impossible and an attacking force had no idea what was behind the next or adjacent hedgerows. The only way to approach a hedgerow was by crossing the open fields. The German soldiers would dig positions along the far side of the hedgerow and those on the flanks in the defended sectors. There were no continuous straight lines, resulting in more of a chequerboard pattern. Allied tactics evolved with alternating fields attacked with tank support while mortars and artillery suppressed the intervening fields’ hedgerows. Hedgerow-cutter ploughs were fabricated for attachment to tanks, allowing them to burst through the berms. The compartmented nature of the hedgerows allowed the German troops to break contact easily, however, and withdraw to the next hedgerow.

An M4 Sherman tank passes through a vertical log armour barrier inside a German village. The logs were buried as deep as 2m, and angled logs were sometimes set on the enemy’s side to deflect any tank aiming to ram the German barriers. They required large quantities of demolition charges to breach them, as has been accomplished here. (Gordon Rottman)
The German troops made extensive use of local materials to build fortifications and obstacles. Concrete was always prized for any fortification. Its value was realized after the Allies began bombing the Atlantic Wall defences in 1943: field positions and trenches were destroyed while reinforced concrete positions were virtually unscathed. However, concrete and reinforcing bar were rarely available in the field, as these were being diverted to the construction of other major defensive works. Other available construction materials were insufficient, and were diverted to priority installations. The available local materials were dependent on the area of operations, with some offering abundant supplies (as in north-west Europe, Italy and parts of the USSR) and others (such as North Africa and the steppes of Russia) barren.
Timber was abundant in Europe and parts of Russia. Many of the plans for field fortifications, shelters and obstacles provided in German manuals called for the extensive use of logs; 20–25cm-diameter logs or 16 × 16cm cured timbers were recommended for overhead cover, horizontal support beams (stringers) and vertical support posts. Dimensioned wooden planks were used sparingly for revetting, flooring, doors, shutters, duckboards, ammunition niches, ladders and steps. Pioneer and construction units operated portable sawmills to cut lumber. Bunks, tables, benches and other furniture were also made from this and from discarded ammunition boxes. Nails, especially the large type required for timber construction, were often scarce.
The exterior of timber fortifications was banked with earth or buried below ground level. However, large-calibre penetrating projectiles could create deadly wood splinters. To reduce the risk of this, branches and saplings were woven horizontally like wicker through 10cm vertical stakes or bundled brushwood fascines to create supporting revetments. The vertical stakes could be reinforced by securing anchor wires near the top and fastening them to shorter driven stakes a metre or so from the trench’s edge.
Like all other armies, the German Army shipped munitions, rations and other matériel in robust wooden boxes and crates of all sizes. Wicker basket containers were also used, especially for artillery ammunition and propellant charges. These were often filled with earth and stacked like bricks to form interior walls of fortifications and for parapet revetting. They were braced by logs or timber or bound together by wire to prevent their collapse when the fortification was struck by artillery. Boxes were also disassembled and the boards used to construct firing ports, doors, shelves and the like. Nails removed from these boxes became a valuable commodity. German munitions (including grenades, mines and mortar rounds) were often transported in comparatively expensive metal containers (Muntionsbehälter). While they were supposed to be returned to the factories for reuse, they were sometimes filled with earth and used for shoring up parapets. Steel fuel and oil drums were available, although they too were supposed to be returned. British three-gallon petrol tins were much used in North Africa, being filled with earth and used to revet parapets.
Purpose-made cloth sandbags were scarce at the front as most production remained in Germany and in other rear areas. They were usually burlap tan, brown or grey. Other cloth shipping bags were used instead. Two layers of sandbags were sufficient to stop small-arms fire and provide protection from mortars.
Fortifications with firing ports, which needed to be above ground level, were kept as low as possible. Banked earth was piled high on the sides and angled at a fairly steep slope to absorb armour-piercing projectiles and the blast and fragmentation of high explosives. Layers of logs were sometimes laid just below the surface of the side banking as a burster layer. The above-ground portion of covered fortifications tended to be uniform rather than irregular.
Rocks were used for fortifications wherever they could be found, but were especially common in North Africa and Italy, where fortifications were often constructed entirely of these. Rocks and logs were laid in layers beneath the piled-earth overhead covering to act as shell-burster material. Rocks were also used as in-fill between double log walls to detonate projectiles or deform armour-piercing rounds. One particular hazard to the occupants was from fragments caused by bullet and shell strikes. Trenches and positions were sometimes revetted with rock walls, but unless stakes and horizontal bracing or wire mesh were used to anchor this, a near miss artillery round could make it collapse. Materials such as corrugated sheet metal, lumber, timbers, roofing tiles and shingles, doors, masonry, structural steel, pipes, railroad rails, concrete and steel railroad ties were frequently salvaged from local structures, and applied to defensive positions.

Hedgerow defences, Normandy, 1944. The faint lines represent the hedgerows and the double broken lines are sunken roads. This c.300m × 800m company area was self-contained and could fend off attacks from any direction. Note that the buildings were undefended, as they attracted artillery fire. If the perimeter were penetrated, troops would move to the flanking hedgerows to engage the attackers. There were several clusters of positions located in adjacent hedgerows on all sides of this area. (Ian Palmer © Osprey Publishing)
On the Eastern Front, ice and frozen snow proved to be ideal for fortifications and shelters. The duration and average depth of snowfall varied depending on the region. In the north it began in December, accumulated 100cm or more, and remained into June. In the south it began in January and remained until April with only 10–40cm falling. Temperatures remained 20–40°F below zero through the winter. Ice blocks and packed snow were surprisingly bulletproof, and simple to work. They required no revetting, but bale of hay or straw were sometimes used to support trenches and walls and to provide additional insulation.
Detailed and elaborate plans for the construction of field fortifications, shelters and obstacles were provided, and many of the principles on which they were based had been developed in World War I. Even though time and resources did not always allow these ideal positions to be built, they served as guides and their influence can be seen in the design of those actually constructed. A great deal of local initiative was used.

A square 3.7cm Flak 36 gun emplacement made of concrete, with much of the formation planking left in place. Some effort was made to camouflage-paint the emplacement’s sides. Ammunition and gun equipment niches were built into the interior sides. The gun’s wheeled carriage was removed and the jack-stands set on earth-filled ammunition boxes. A second emplacement can just be seen in the background, to the left of the US soldier. Such weapons were usually employed in threes. (Gordon Rottman)

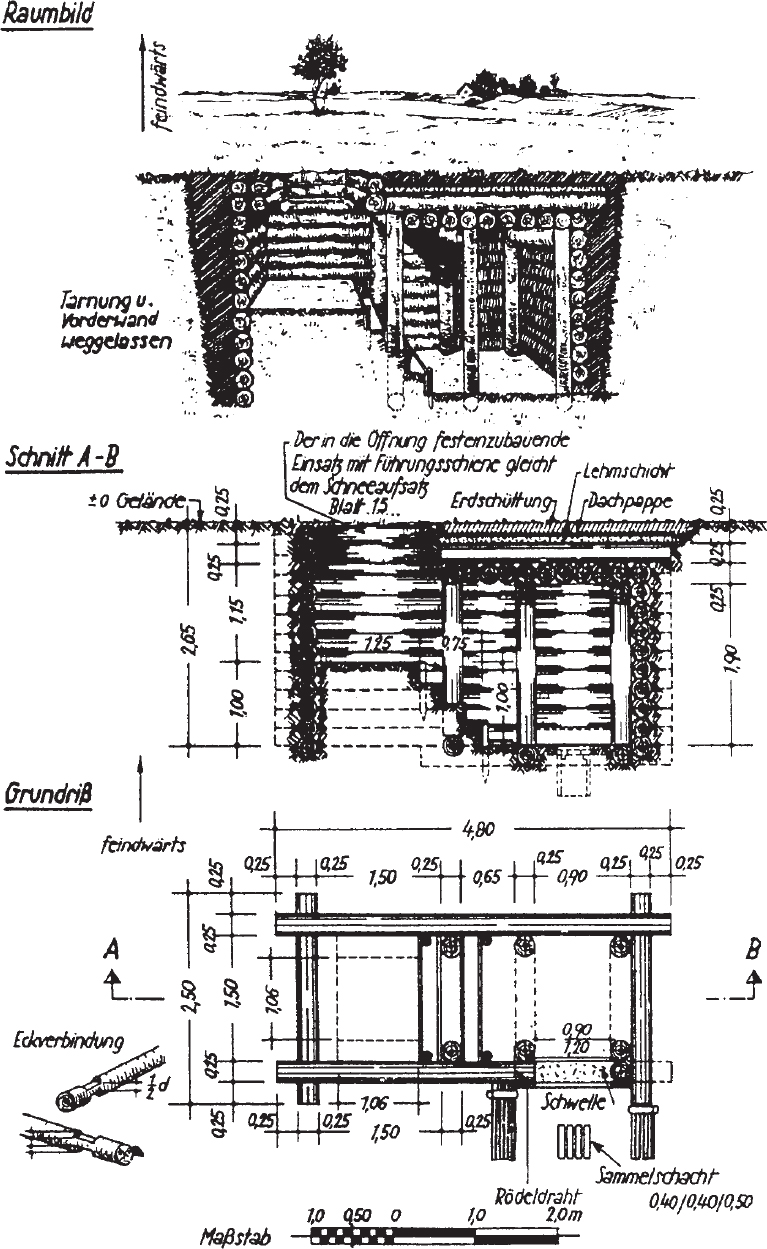
The log machine-gun bunker (Maschinengewehr-Schartenstand aus Rundholz) was loosely based on larger concrete fortifications on the West Wall. The bunker’s firing port (FP) was oriented perpendicular to the enemy’s expected line of advance in order to engage him from the flank. This allowed positions to have a thicker than normal wall on the enemy side, and to inflict a surprise attack from an unexpected direction: it also made it much easier to conceal the bunker. The interior included a battle room (Kampfraum, 1) for the light machine gun (a tripod-mounted heavy machine gun could be installed); an adjacent ammunition room (Munitionsraum, 2); and an entry alcove (Vorraum, 3). A communications trench (4) connected it to other positions. The double-log walls were filled with rock or packed earth (5). The roof was made of multiple layers of logs, clay, rocks and earth (6). The sides and roof were covered over with sods of turf and care was taken to ensure that it blended into the terrain. The large red arrow on the main illustration indicates the direction towards the enemy (feindwärts): bunkers of this type were also built with the firing port oriented forward. Image A shows the bunker in plan view; image B shows the bunker with its full earthern covering in place, without cutaway details; and image C depicts an alternative method used to mate the corners of log walls. (Ian Palmer © Osprey Publishing)
For the most part defensive positions were dug as deep as possible and kept low to the ground in order to present a low profile, both for concealment and to offer less of a target. Positions not requiring firing ports were usually flush with the ground. This was not always possible because of a high water table, swampy ground or shallow bedrock. In such instances the position had to be completely above ground level. In addition, the roof had to protect the position from heavy artillery: its thickness might also mean that the position’s profile was not always as low as desired. In some instances the firing port had to be well above the ground in order to cover its field of fire effectively, especially if firing downhill, which could also raise the position’s profile. Positions dug into the sides of hills, ridges, gorges and the like were usually built flush with the surface if possible, making them difficult to detect when camouflaged.
Most covered positions and shelters were built from logs, usually laid horizontally and with the ends notched for assembly, or spiked together. Horizontally constructed log walls were supported by vertical pilings with the ends often held together by steel staples. Wire was sometimes used to bind logs together. The upper ends of vertical load-bearing support posts were sometimes bound by wire to prevent the end from splintering from high-explosive impacts. Interior walls were built of logs, planks, woven branches and saplings, rock, sandbags or hay bales to prevent collapse when hit by artillery or bombs.
Overhead cover comprised a layer of large-diameter logs with a second layer laid perpendicular to them on top. Manuals called for no more than two or three layers, but in practice up to half a dozen layers could be used to ensure protection from heavy artillery. Waterproof roofing felt, if available, was laid atop the roofing logs before they were covered with earth. A 5cm layer of clay was sometimes laid over the logs providing marginal waterproofing. If above ground, sods or peat blocks were stacked brick-like to shore up the angled sides. The whole fortification was covered over with sods removed from the site before digging began. If needed, additional sods were brought for the rear. This was supposed to be removed from areas beneath trees and brush so that it was undetectable from the air. While the manuals provided precise dimensions for fortifications, they often did not specify the thickness of overhead cover. This depended on how deep the position could be dug: the deeper it was, the thicker the overhead cover. Examples of specified overhead thickness are 160cm for a below-ground squad bunker and 130cm for an above-ground machine-gun bunker. The spacing of vertical support posts and stringer logs varied from approximately 1m to 1.5m.
Light mortars (US 60mm, UK 2in, USSR 50mm) did not possess the ability to penetrate most bunkers. Medium mortars (US 81mm, UK 3in, USSR 82mm) were more effective, but heavy mortars (US/UK 4.2in, USSR 120mm) were best suited, especially since they sometimes had delay fuses. Light artillery (75mm, 105mm, 25pdr) had limited effect, whereas medium artillery, like the 155mm, could destroy a well-prepared bunker.
Firing ports or embrasures (Schießscharten) were kept small to make them more difficult to detect and hit. A 60° field of fire (Wirkungsbereich) was recommended, but the angle could be narrower or wider. The ports were made of smaller-diameter logs, planks or sandbags. There was usually only one firing port; seldom did additional ports exist to cover alternate sectors. These were usually placed very low to the ground, if not flush with it.
Open-topped fighting positions, such as rifleman’s holes, trenches and holes for machine guns, mortars, infantry guns and anti-tank guns, were kept as small as possible. Small positions, just large enough to accommodate the weapon and crew and allow them to function effectively, required less construction time and camouflage, were more difficult to detect, especially from the air, and made a smaller target. Manuals called for trenches to be 60–80cm wide at the top and 40cm wide at the bottom, providing slightly sloped sides. In practice they tended to be narrower if the soil was stable enough to support it, with the sides almost vertical. They were either without an earth parapet or had a very low parapet for concealment. Parapets were used if the hardness of the soil, a lack of time, or a high water table did not allow the positions to be dug sufficiently deep. It also required significant time and effort to remove the spoil, conceal it, and return the ground around the position to a natural state.

Panzergrenadiers from the ‘Grossdeutschland’ Division in a two-man rifle position. They have erected a parapet to their front, and have provided it with a loophole. ‘Egg 39’ and ‘Stick 29’ hand grenades lie ready on the edge of the hole. (Gordon Rottman)
The idea of removing soil and keeping the position level with the ground was learned from the Italians in North Africa. On flat, barren desert floors natural features and vegetation were non-existent and concealment was achieved by blending the positions into the ground. For machine-gun positions the Italians developed an underground shell-proof shelter and magazine with a small circular chamber. Its ceiling tapered to a neck, serving as the machine-gun position. The tobruk pit provided a small, circular, difficult to detect opening with 360° fire for the machine gun. Separate entrances were provided or they were connected to central bunkers by tunnels. The German Army developed similar positions for the 5cm mortar and the Panzerstellung.
Entrances to positions were normally in the rear, but in some instances they might be on the side of a position depending on the protection and concealment afforded by surrounding terrain. Entrances were often protected to prevent direct fire, blast fragmentation, grenades and demolitions from entering. This protection might be in the form of a blast barrier inside the position, or a similar barrier or wall on the outside. A trench with at least one right-angle turn usually formed the entry passage. Many positions, though, had only a straight, unprotected entry way. This often proved to be the strongest defensive point: if the attackers gained the position’s rear, they would usually come under fire from adjacent positions. Larger positions often had a vestibule or entry hallway separated from the main compartment by a log wall. Such helped protect occupants from grenades and demolition charges as well as from external blast overpressure and chemical agents. It also served as a changing area for wet clothes and helped keep out cold draughts as troops entered and exited for guard duty and patrols.
A light machine-gun position with a large firing platform and a niche for the ammunition bearer. The parapet is low in order to reduce the profile of the position. This practice was first adopted in the featureless landscape of North Africa and was later used in other open areas. (Gordon Rottman)
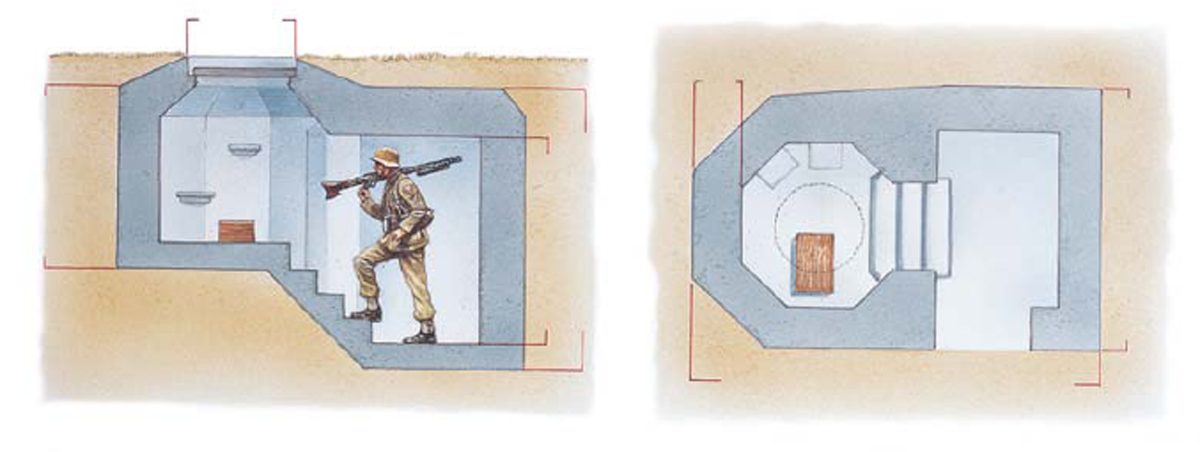
Top: ‘Tobruk turret’ (Ringstand). This standard machine gun position was used in many German defensive schemes in the second half of the war. Only the uppermost ring of the buried concrete pillbox showed above the surface. This firing position was provided with two fixed concrete steps up the side, and a removable wooden platform below. Ammunition was stored in the 1.9m-high compartment at the bottom of the steps, inside a subterranean entrance. The walls and most of the roof were 38cm thick, the floor 18cm thick.
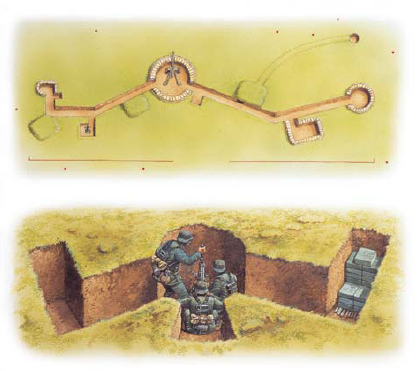
Middle: Reinforced squad position. An outer defence of barbed wire and anti-tank mines would typically ring the position about 50m out from the trenches. Dug off the zigzag trenches are bunkers with overhead protection, sandbagged MG positions, and an advanced listening or sniping post at the end of a tunnel from an underground bunker. Apart from the squad’s own weapons, an anti-tank gun is emplaced centrally and a mortar at left, attached from the unit support elements. The red dots are randomly scattered anti-personnel mines. The position is designed to be defensible against attack from almost any direction, the weapons being turned as required.
Bottom: 8cm mortar pit. This is the regulation ‘winged’ pit which was dug whenever time allowed, with a central weapon pit and separate ammunition and crew shelters at the ends of short trenches. The earth spoil has not been gathered into a parapet, but scattered – concealment takes priority. (Peter Dennis © Osprey Publishing)
Frontline open positions for crew-served weapons were provided with Panzerdeckungslöcher (armour protective trenches). These were narrow, deep slit trenches on either side of the position – ‘wings’ that provided cover for the crew if overrun by tanks. Often they would be dug with an angled turn, in the form of a wide ‘V’. For protection from the crushing action of a tank, the trench had to provide 75cm of clearance above the crouching occupants. They were also used if the position came under artillery or mortar fire, or air attack, as well as for firing positions for close-in defence. Ideally these would be covered if time and resources permitted.
Munitionslöcher (ammunition niches) were dug into the sides of trenches and other positions, and usually a wooden box was inserted there. Anti-armour gun, infantry gun, and artillery positions had ammunition niches dug into the ground at an angle and lined with a box with a lid. These were located a minimum of 10m to the rear of the position.
The basic rifleman’s position (Schützenloch – literally ‘firing hole’) was a two-man slit trench, analogous to a foxhole; it was also nicknamed a Wolfgrabhügel (wolf’s barrow). While a one-man hole was used when necessary, the two-man was preferred. It offered soldiers moral support and allowed one to rest with the other on watch. Also, if a one-man position was knocked out, a wide gap was created in the defensive line, whereas in a two-man hole if one was lost the other could still conduct the defence. The one-man rifleman’s position, nicknamed Russenloch (Russian hole), was a simple 70cm-wide, 60cm-deep hole – deep enough to allow a man to kneel in. Soil was piled in a crescent to the front to reduce the amount of digging required. As with other positions the soil was meant to be removed, but often time constraints meant the parapet remained. In the absence of a parapet, the rifle was propped on a small mound of earth or a Y-shaped fork driven into the ground. The ‘Russian hole’ could be deepened to allow a standing position and could later be widened for two men. Initially, Schützenloch für 2 Gewehrschützen (two-man positions) were specified as a short straight trench, 80cm × 1.8m. A slightly curved trench was also approved and this became standard in 1944. This version had two firing steps with a deeper centre section, allowing the riflemen to sit on the firing steps with their legs in the centre hole during shelling and offering protection from overrunning tanks. Panzerdeckungslöcher (armour protection trenches) used the same concept and they too were suitable as rifle positions. They could be V-, W- or U-shaped, or a shallow crescent. The firing steps were recommended to be 1.4m deep and the deeper central portion 1.8–2m. All of these positions were recommended to be 60–80cm wide at the top and 40cm at the bottom. The recommended distance between positions was 10m, but this varied depending on the unit’s assigned frontage, the terrain and vegetation.
Anti-armour rifles were placed in two-man positions. No special positions were provided for Panzerfäuste; they could be fired from any open position with a few considerations. This rocket launcher was normally fired held under the arm, but it could be fired from the shoulder from a dug-in position. In the latter case the rear of the breech end had to be clear of any obstructions because of the 30m back-blast, meaning no rear parapet; nor could the breech-end be angled down too far. They could not be fired from within buildings unless from a very large room, such as a warehouse, with open doors and windows to relieve blast overpressure. The same restrictions applied to the 8.8cm Panzerschreck, but it had a greater back-blast. They were often employed in threes with two positioned forward and one to the rear, the distances dependent on terrain. This allowed the launchers to engage enemy tanks approaching from any direction plus provided an in-depth defence: at least two of the launchers could engage a tank. A 2m-long, V-shaped slit trench without parapet was used, with the two ends of the ‘V’ oriented away from the enemy. The gunner would occupy the arm of the ‘V’ that offered the best engagement of the target tank, and the assistant would load and take shelter from the back-blast in the other arm.
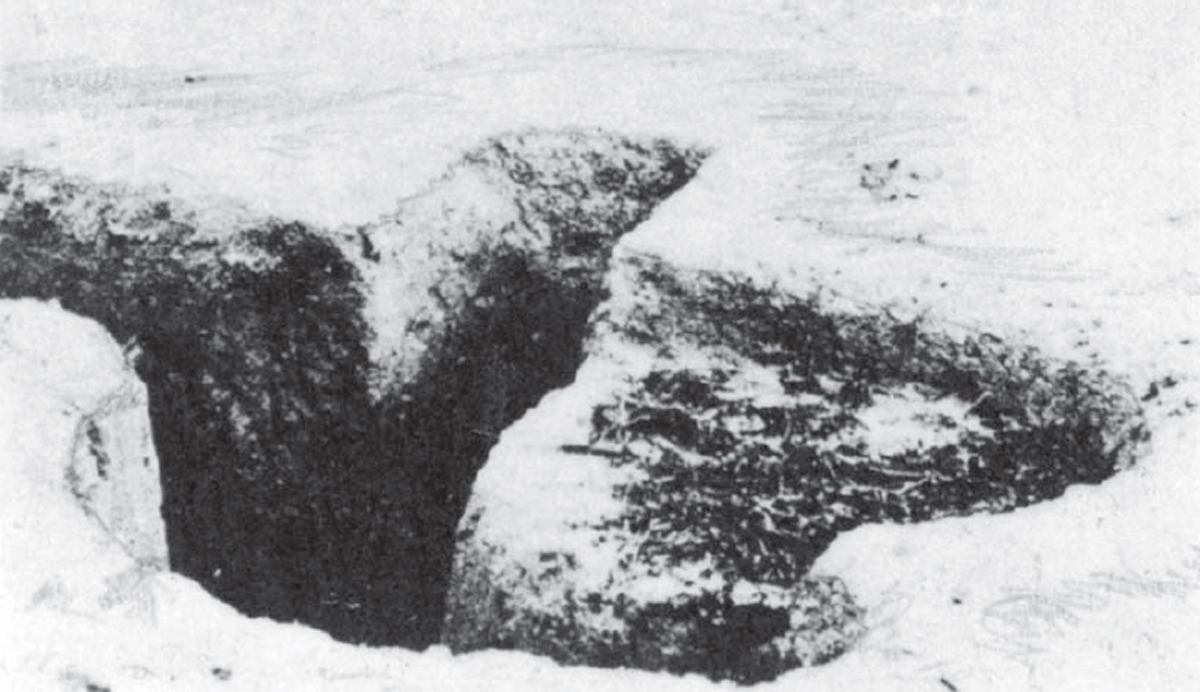
A squad trench in the final days of the war, in East Prussia. Firing steps have been cut into the trench’s sides. In the upper centre is the entrance to a squad bunker. (Gordon Rottman)

A company hilltop strongpoint. Stützpunkt Zuckerhutl was typical of the company strongpoints in the far north of Finland in 1944. It was surrounded by two parallel double-apron barbed-wire fences with anti-personnel mines. A firing trench revetted with rock and mortar ran around the entire perimeter with communications trenches connected to support positions in the centre. The large red arrow indicates the direction towards the enemy. (Ian Palmer © Osprey Publishing)
The squad’s Schützenloch für leichtes Maschinengewehr (two-man light machine-gun position), or Maschinengewehrloch oder Nest (literally ‘machine-gun hole or nest’), was a slightly curved, 1.4–1.6m trench with two short armour protection trenches angled to the rear. On the forward side was a 20cm-deep U-shaped platform for the bipod-mounted gun. The position could be placed anywhere within the squad line that provided it with the best field of fire. Alternative positions were meant to be up to 50m from the primary position, but were often closer. The three-man Schützenloch für schweres Maschinengewehr (heavy machine-gun position) was similar to the light one, but with armour protection trenches extending from the ends. The platform was still 20cm deep, requiring the long tripod legs to be dug in to lower the weapon’s profile. The difference in design between the light and heavy positions was a weakness, as it allowed aerial photographic interpreters to differentiate between the types. A common design would have prevented this.
Expedient efforts and materials were used to construct positions. As the Soviets swept into East Prussia in late 1944, the German forces employed civilians to construct defensive positions and obstacles behind the field army, so that it could fall back on them. Two sections of 1.5m-diameter, 2m-long concrete culvert pipe were used to build tobruk machine-gun positions. A pit was dug and one section laid horizontally on the bottom with one end shored with sandbags or planks, creating the troop shelter. The second pipe was set vertically, with a U-shaped section cut out of one side of the bottom end to mate with the horizontal pipe. The top end of the vertical pipe was flush with the ground. It was quick to build and easily camouflaged.

Squad (Gruppenunterstand) and half-squad bunkers (Halbgruppenunterstand) were built in many forms, from simple single rooms to large, complex, multi-room bunkers. (Gordon Rottman)
If a position was occupied for long enough, the rifle and machine-gun positions might be connected by trenches. Trench systems were widely used in the desert as they allowed concealed movement between firing positions in terrain otherwise devoid of cover. They were also used extensively within strongpoints. Trenches followed the terrain’s contours in contrast to the geometric patterns laid out in World War I-style that ignored the terrain. Trench systems were not necessarily continuous. Some sections may have been covered with branches and saplings and perhaps a light covering of earth or snow. Trench patterns were zig-zag with each section 10–15m in length: in this way, artillery or mortar rounds striking the trench would only inflict casualties in the section struck. The angled trench sections also prevented any enemy troops that gained the trench from firing down its full length. Kriechgraben (crawl trenches) were 60–80cm wide at the top (as specified for all trenches), 60cm deep and 60cm wide at the bottom. Verbindungsgraben (connecting trenches) or Annäherungsgraben (approach trenches) were 1.8–2m deep and 40cm wide at the bottom. Kampfgraben (battle trenches) were the same, but with Schützennischen (firing steps) and ammunition niches cut into the sides. Some firing steps might be cut into the trench’s rear side for all-round defence. Connecting trenches too might have firing steps, and adjoining armour protection trenches were recommended every 40–50m. Two-man rifle and machine-gun positions were usually dug 2–3m forward of the battle trench and connected by Stichgraben (slit trenches). These were located at the points of trench angles and along the straight sections. Unterschlupfe (dugout shelters) protecting one to six men were situated in the trench’s forward side at intervals, and nicknamed Wohnbunker (dwelling bunkers). These provided protection from sudden artillery and air attacks and tank overruns. They were built as small as possible and in a variety of manners. As the position developed, squad and half-squad bunkers were built off connecting trenches for both protection from artillery and as living quarters. In muddy and wet conditions, plank duckboards might be placed in the trench’s bottom over a central drainage gutter.
The Schützenloch für leichten Granatwerfer (5cm mortar position) was a simple slit trench similar to a two-man rifle position, with a 70cm x 1m x 70cm step in the front for the mortar. Shallow rectangular pits were also dug as hasty positions with a U-shaped parapet open in the front. The pit for the 8cm heavy mortar (Nest für schweren Granatenwerfer) was a 1.6m-deep circular pit, 1.8m in diameter at the bottom. The top would be slightly larger, the degree of side slope depending on the stability of the soil. A 1m3 shelf was cut in the back for ammunition. On either side were armour protection trenches.
In 1943 the ‘8cm heavy mortar pit’ was redesignated the Feuerstellung für mittleren Granatwerfer (firing position for medium mortar), as the new 12cm had been adopted as a heavy mortar. The latter’s Feuerstellung für schweren Granatenwerfer was simply an enlarged version of its 8cm counterpart, 2m deep and 2m in diameter. Since mortars were highly mobile and relatively small, they were often simply emplaced behind any available cover such as in gullies and ditches, or behind mounds, walls or rubble.
‘Nests’ for anti-armour and infantry guns too were redesignated ‘firing positions’ in 1943. Anti-armour gun positions were circular or oval, about 4m across (though this varied), and shallow (40cm for 3.7cm anti-armour guns, and slightly deeper for the 5cm and 7.5cm). Slots were sometimes dug for the wheels to lower the profile of these anti-armour guns. Infantry-gun positions were similar, but deeper (3m in diameter, 50cm deep for the 7.5cm; 6m in diameter, 1.3m deep for the 15cm). Ramps dug in the position’s rear allowed the gun to be emplaced and withdrawn. A low parapet was placed some 2m behind the ramp’s upper end to protect the position’s rear opening. If armour protection trenches were not dug on either side of the position, shallow slit trenches were dug inside the position immediately adjacent to the gun and in some instances beneath the gun between the wheels. In fully developed positions a downward angled ramp was sometimes dug, and the gun could be rolled down this to place it below ground level. The lower end of the ramp was sometimes provided with overhead cover.

A firing position for the 15cm rocket projector (Feuerstellung für 15cm Nebelwerfer) required substantial protection for the crew and ammunition from the launcher’s considerable back-blast. The launcher would be in the central position, and there are ammunition niches on either side. The crew shelters are in the curved trench wings. (Gordon Rottman)

An early-war rifle platoon (Zug) defensive position is depicted here with all three squads (Gruppen, labelled A, B and C) deployed on line. 19 two-man rifle positions (1) are used. It was intended that the squad light machine guns (2) be positioned to cover the entire platoon front without gaps, but this was not always possible. Alternative machine-gun positions may have been prepared to cover gaps as well as the flanks and the gaps between adjacent platoons. Time permitting, some scattered rifle and one or two light machine-gun positions may have been dug in the rear and oriented in that direction (3). On this type of terrain the positions were typically at 10m intervals, less in densely wooded terrain. In some exceptional circumstances one squad may have been deployed to the rear, oriented forward, to provide depth to the position. If the platoon had four squads one would normally be deployed in the rear. The platoon’s 5cm light mortar (4) is positioned to the rear, but in a place where it could observe its target area, as it had no observers. A 3.7cm anti-armour gun (5) and two heavy machine-gun squads (6) have been attached to the platoon along with an anti-armour rifle troop (7). The forward perimeter and flanks are protected by a double-apron barbed wire fence (a ‘Flanders fence’, 8) some 30–50m from the positions, keeping the troops beyond hand-grenade range. Sods of earth for camouflaging the positions have been removed in the rear from beneath trees and brush (9). The Zugführer’s (10) and Zug-Truppführer’s (11) positions are also indicated. An observation or listening post (12) is located to the front of the platoon, beyond the wire fence. The large red arrow indicates the direction towards the enemy. (Ian Palmer © Osprey Publishing)
A tobruk light machine-gun position built from logs rather than the usual concrete (Maschinengewehr-Ringstand aus Rundholz). The overhead cover was always flush with the ground, making the position difficult to detect. Note the inset illustration at the bottom left, showing the method of notching logs. (Gordon Rottman)
Infantry guns, being smaller and lighter than artillery pieces, were often emplaced in hastily built positions, like mortars. Anti-armour guns by necessity had to be in well-concealed positions to survive and inflict losses on enemy tanks. They also had to be able to relocate to other positions quickly once detected by the enemy. For this reason, while a gun’s initial position may have been a fully prepared one, subsequent positions were often only partly prepared or simply a hastily selected site providing concealment and the necessary field of fire.
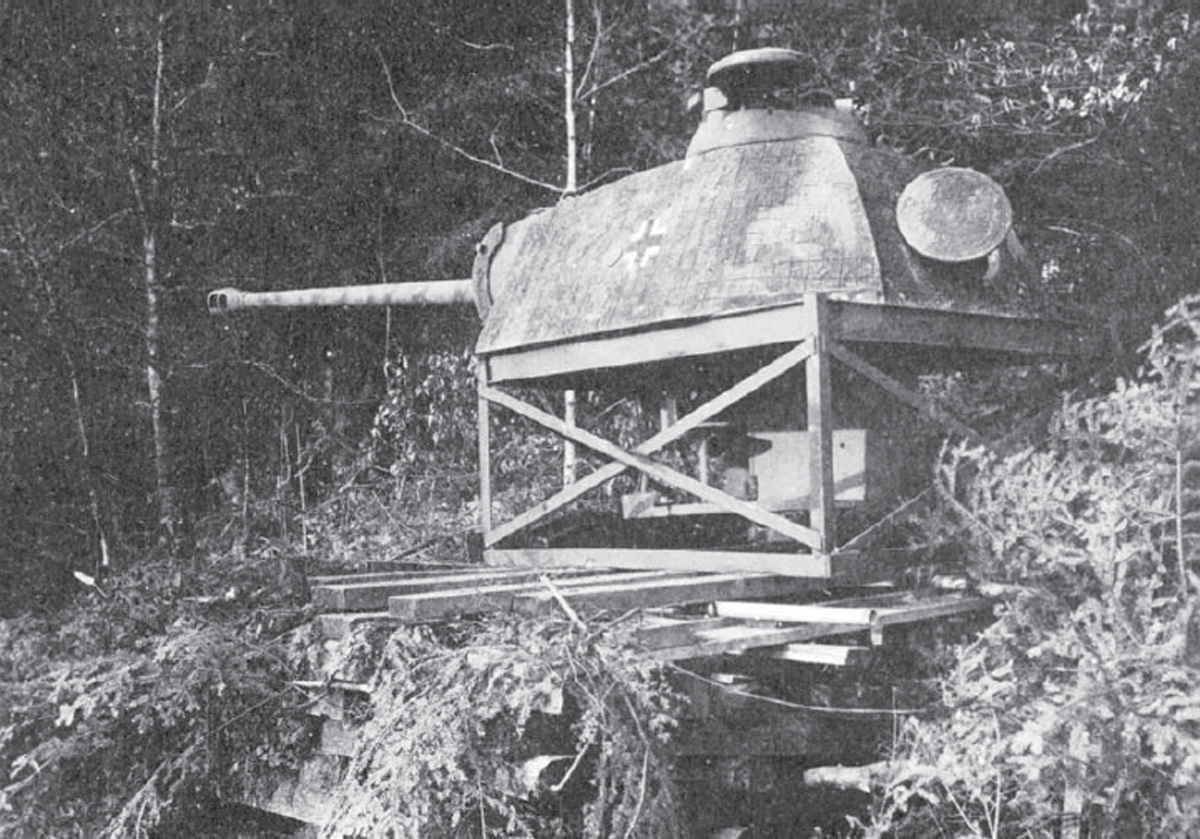
An incomplete tank turret emplacement (Ringstand für Panzerkampfwagen Turm), here using a 7.5cm Panther PzKpfw. V turret. The turret was mounted on a steel frame and could be hand-traversed. The frame’s sides would be strengthened with timbers or logs and banked with earth. Beneath the frame is the crew’s log-built shelter. While under construction, the position was camouflaged from aerial detection by branches, which have been pulled away to allow it to be photographed. (Gordon Rottman)
During the war 2cm Flak guns, single and quad, were increasingly employed in forward positions in the ground-fire role, especially on the Eastern Front. When deployed so, they were positioned on their own in the frontline. The firing position for 2cm Flak (Feuerstellung für 2cm Flak) was circular, 5.5m in diameter and 45cm deep, and was lined with ammunition niches and compartments for gun equipment. 2cm and 3.7cm guns were set on a slightly elevated triangular platform.
The 8.8cm Flak gun was employed as an ad hoc anti-armour gun on all fronts. While extremely accurate at long range and capable of knocking out any tank with high rates of fire, it had its limitations in this role. It was very large and had a high profile, making it difficult to conceal and requiring a great deal of effort to dig in. Its large size and the need for a heavy prime mover made it difficult and slow to withdraw and reposition. When used in the anti-armour role, the ‘88’ was hidden among buildings, or in wooded areas, or defiladed in gullies and road cuts.

The 7.5cm and 15cm infantry gun positions comprised a circular pit with armour protection trenches on two sides. This one has a low berm behind the exit ramp and ammunition niches are located to either side and to the rear. (Gordon Rottman)

Infantry battalion defence sector. A full-strength infantry battalion normally deployed for defence with two companies forward on its 800–2,000m front. The positions of the heavy machine guns and mortars of the battalion machine-gun company (4th) are depicted along with the four 3.7cm anti-armour guns and two 7.5cm infantry guns attached from the regiment. (Ian Palmer © Osprey Publishing)
Divisional field artillery pieces were provided with circular or roughly triangular firing positions called Geschützestellungen. These usually had substantial all-round parapets and were deeper than other more forward gun positions for protection from counter-battery fire. Ready ammunition niches might be dug into the forward side, armour protection trenches attached to the sides, a rear entry/exit ramp added and separate ammunition niches and crew shelters located to the rear. A simple artillery firing position was prepared by digging a shallow pit and piling the earth to the front. Any existing cover might be used for this purpose. Armour protection trenches or merely simple slit trenches were dug to either side of the gun to protect the crew from ground, artillery and air attack. As air attack became common, these slit trenches were placed further from the gun position. Several ammunition niches were dug to the rear. A battery’s four gun positions were set 30–50m apart and could be placed in a straight or staggered line, a square or a diamond formation. The battery headquarters was to the rear of the positions. The horse and ammunition wagon parking was well to the rear of the battery position (up to 200m) in a concealed area to protect it from artillery. Camouflage was essential for the battery to survive, and so positions were often covered with camouflage nets. Each battery had two light machine guns for ground and air defence.
Slit trenches were dug in rear areas as Luftschutzräume (air raid shelters). These varied in form and dimension, but two typical examples were the straight trench (2m long, 40–60cm wide and 1.6m deep), and the three-leg zig-zag trench of which each leg had approximately the same dimensions as the straight trench. Trenches might be roofed over with earth-covered logs or bundled brushwood fascines. Interestingly, such shelters were dug in at distances as great as 40km behind the front.
A variety of different designs of squad and half-squad underground shelters or bunkers (Gruppen und Halbgruppenunterstände) were available for protection and living. These bunkers were built to the rear of the main defences, within strongpoints and near crew-served weapons positions. They were not fighting positions, being completely below ground and lacking firing ports. They were to provide more practical living quarters than small dugouts, trenches and holes. They also provided good protection from artillery and air attack, as well as the extremes of wind, rain, snow and cold. Wherever possible, they were built completely below ground level, with the top flush with the ground. If the water table or extremely hard or rocky ground prevented a buried bunker they were dug as deep as possible with double log walls (50cm between logs), filled with rock or packed soil, and the above-ground sides and roof banked with packed soil and covered with sod. Entry was gained through a trench (connected to a communications trench), down some stairs, and into a vestibule separated from the main room, although this last luxury was not always present. Wood floors were provided if sufficient dimensioned lumber was available. When it was not, straw was used, which had to be changed periodically. Individual or multi-person two- or three-level platform bunks were integrated. A table and benches were provided. Rifle racks might be mounted on a wall near the door. Sometimes a short emergency exit tunnel was provided.
If available a wood or oil stove was installed with a stovepipe. Small, canister-like, gasoline-burning heaters were used such as the motor vehicle heater and the smaller Juwel 33 heater. Little folding stoves, fuelled by hexa methylene tetamine tablets, were used to heat mess tins. Sand-filled cans soaked with petrol were used for heat during cold nights. Light was provided by kerosene lanterns, candles (with melted wax remoulded into new candles) and small ration cans fitted with a wick burning rifle oil known as a Hindenburger Lampe. Expended cartridge cases, 2cm or 3.7cm for example, had the mouth crimped to a narrow slit, filled with oil, and a wick inserted to make a crude lamp. Issue field pocket lamps were used sparingly, as batteries were scarce.
The elaborate bunkers pictured in manuals could not always be built in urgent situations. During December 1941, 6. Panzer-Division, with its former tank crews fighting as infantry, was forced from a chain of villages within a forested area. Either it could withdraw to another line of villages and possibly be enveloped, or it could establish a hasty defensive line in a temperature of -49°F without adequate shelter, which would mean death from exposure. During the previous few days’ engagements on open terrain, daily casualties from frostbite had risen drastically to 800 per day. The division would soon lose its ability to function.

On the Russian steppes, long snow-bank barriers formed defensive lines with firing positions. Dugouts too were set in the snow berms, which were revetted with snow-filled fuel drums and hay bales (as shown here). Canvas tarps sometimes covered the dugout entrances. (Gordon Rottman)

West Wall defences, Germany, October 1944. The 1,100m2 area shown lies immediately to the south of Palenberg. The moated Rimburg Castle, to the centre left, was heavily defended, as was the large farm complex to the upper right of the castle. The River Wurm flows through the upper left area – itself an obstacle with its bridges blown. (Ian Palmer © Osprey Publishing)
The immediate construction of bunkers for both fighting and shelter was essential. The single corps and two divisional engineer battalions had only 40–60 men each and very little equipment. However, the division had recently received a large quantity of demolitions. The engineer battalion commanders were ordered to disregard the harsh weather conditions and blast multiple lines of craters in the solidly frozen ground along the specified battle line to shelter all combat units and reserves. The craters were sighted to provide mutual in-depth fire support. Each crater/bunker could hold three to five men. The engineers also mined approaches and built tank obstacles at three sites. The reserves and service troops packed down paths between the craters and to the rear, essentially snow communications trenches. They used readily available lumber and logs to cover the craters.
The blasting of the crater lines began the next morning. The enemy appeared to think that the blasting was artillery fire and did not advance. The blasting was completed by noon and by night the craters were finished by infantrymen with hand tools, covered with lumber, logs and snow, and occupied. Smoke soon rose from the bunkers, where the troops kept warm with open fires. Outposts were established forward of the bunkers, and abatis obstacles were laid in front of these, with anti-armour guns emplaced on higher ground covering the tank obstacles. The entire line was prepared within 12 hours of the first detonation. The engineers who prepared the positions suffered 40 per cent frostbite casualties, but the next day division frostbite casualties dropped from 800 to four. The line withstood all enemy attacks and was not abandoned until ten days later, in milder weather, when the adjacent units on both flanks were forced to withdraw after enemy tanks had penetrated their lines.
German camouflage practices attempted to blend fortifications into the surrounding terrain and vegetation to prevent detection from both the ground and air. Efforts were made to hide positions outright as well, an example being the personnel bunkers which were completely buried below ground. Natural materials were used alongside camouflage nets, screens and pattern painting. German directives stated that cover and camouflage measures should not obstruct a weapon’s field of fire.
Basic camouflage principles of frontline positions included positioning emplacements within vegetated areas and among rubble and broken terrain, avoiding a neat orderly appearance (although manuals depicted fortifications as tidy, in practice they were not), avoidance of silhouetting against the sky and contrasting backgrounds, removing spoil or concealing turned earth, concealing firing ports with tree branches or wreckage materials, building fortifications inside existing buildings, and the fabrication of screens from brushwood to mask movement along roads and tracks. The dispersal of fortifications, positions and facilities in irregular patterns was also common.
In barren, snow-covered and featureless desert areas it was cautioned that camouflaged positions should not be located near any existing features, otherwise this would allow an enemy observer to reference the position’s location. Snow positions were not as easy to camouflage as may be assumed. Dug-up snow looks very different to undisrupted snow and even after additional snowfall it appears different. Vehicle and foot tracks point to positions. Machine guns cause black powder marks in front of firing ports making them easy to detect. Any movement, even by white-clad troops, is easily detectable against snow backgrounds. Smoke from heating and cooking fires also signals the locations of positions. White sheets were often used to conceal crew-served weapons, but were easily detected at close range.
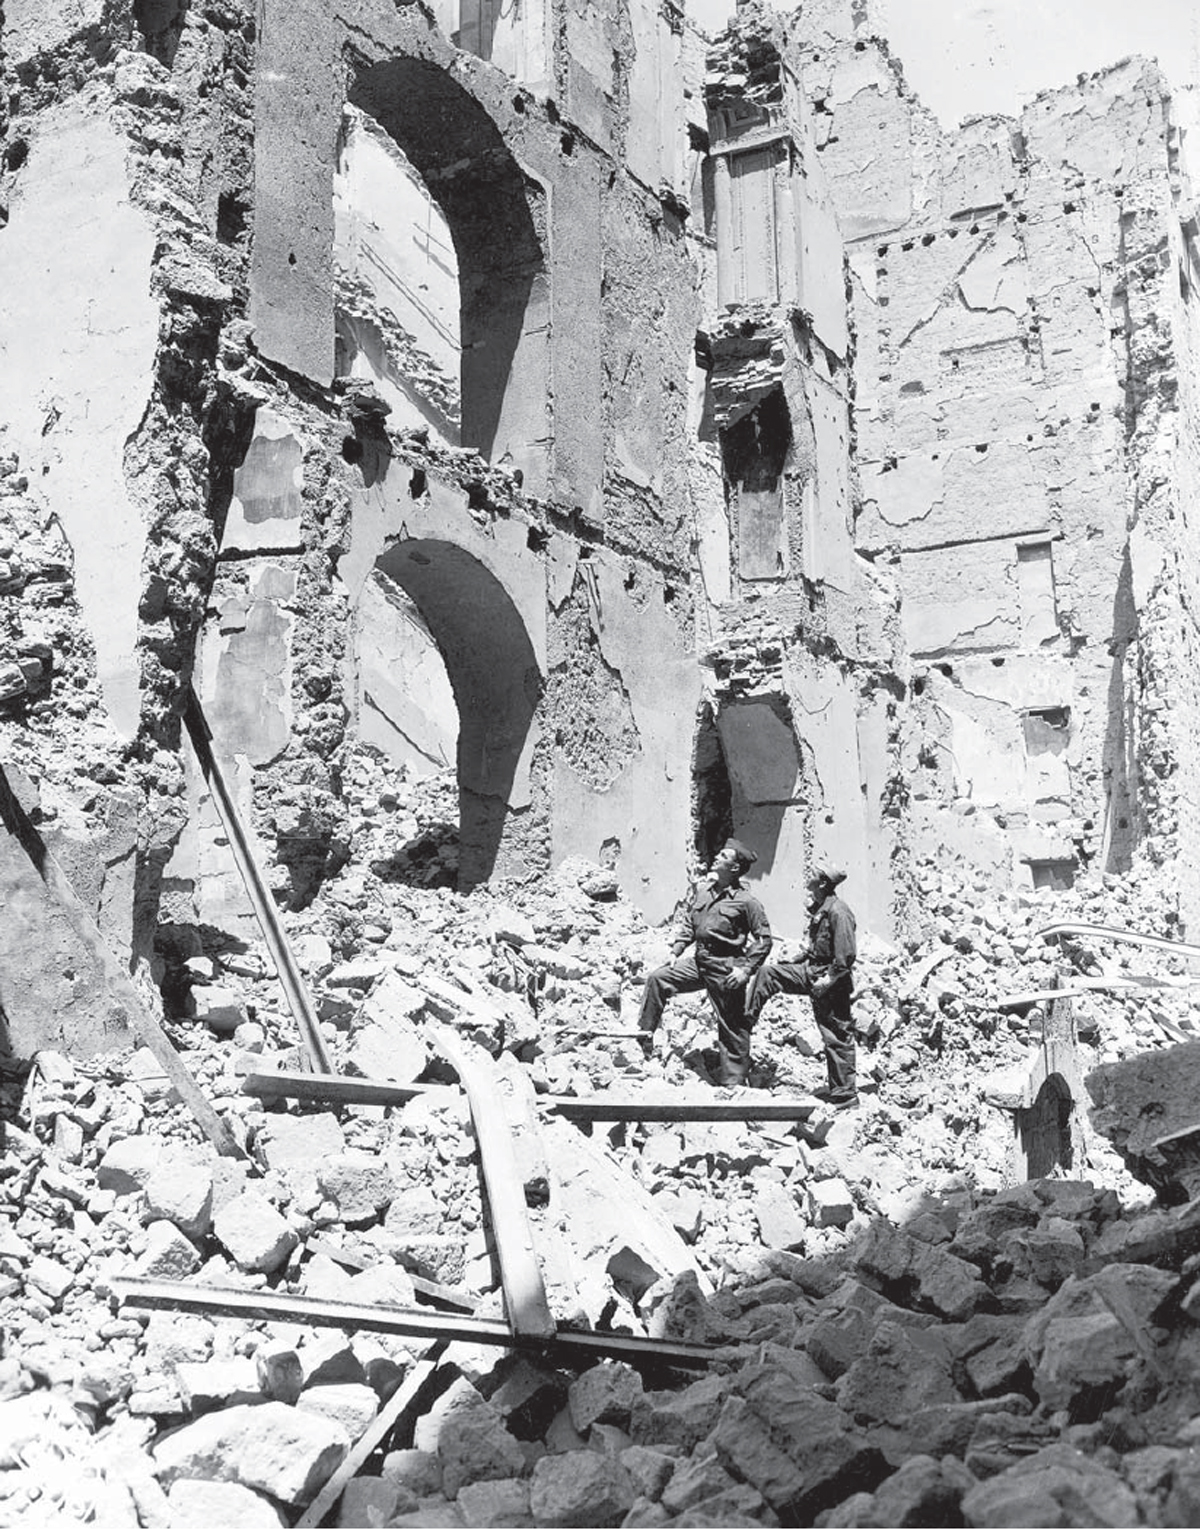
The well-built, multi-storey, interconnected buildings of European urban areas provided robust defensive positions. When destroyed, the rubble created countless hiding places for defenders and obstacles to the attackers. (Gordon Rottman)

A squad strongpoint in the desert. Because of the need to defend wide frontages in the desert and the expansive fields of observation and fire, German units often built self-contained, widely scattered, reinforced squad strongpoints. An ideal example is shown here. The weapons positions and dugouts were to be at least 6m apart along the 40–60m zig-zag trench. One- and two-man rifle positions (1) were set 1–2m forward of the trench. Firing steps might be used, including on the trench’s rear side. Not all such strongpoints had an 8cm mortar (2). A 2cm Flak gun may have been substituted for the 3.7cm or 5cm anti-armour gun (3, shown above scale for clarity). Some strongpoints may have had two machine guns, one at each end (4 and 5). Lacking a Flak gun, one of the machine guns (5) would be provided with an air-defence mount as well as an alternative position for ground fire. This combination of weapons provided the strongpoint with direct and indirect anti-personnel fire, direct anti-armour fire and air defence. Sufficient dugouts and small bunkers (6, hidden) were available for all personnel. Such a strongpoint might be manned by 16–24 troops. It would be sighted on any piece of high ground, even if only a couple of metres above the surrounding desert. Camouflage nets might have been used. The barbed-wire barrier (7), if present, was erected c.50m from the strongpoint. Anti-armour mines would be emplaced outside the barbed wire along with some anti-personnel mines (8). The listening post (9), accessed via a crawl trench, was manned at night to guard against infiltration. Flare pistols were used to signal other strongpoints and command posts that a strongpoint was under attack, with coloured flare combinations identifying the type of attack and direction. The large red arrow indicates the direction towards the enemy. (Ian Palmer © Osprey Publishing)
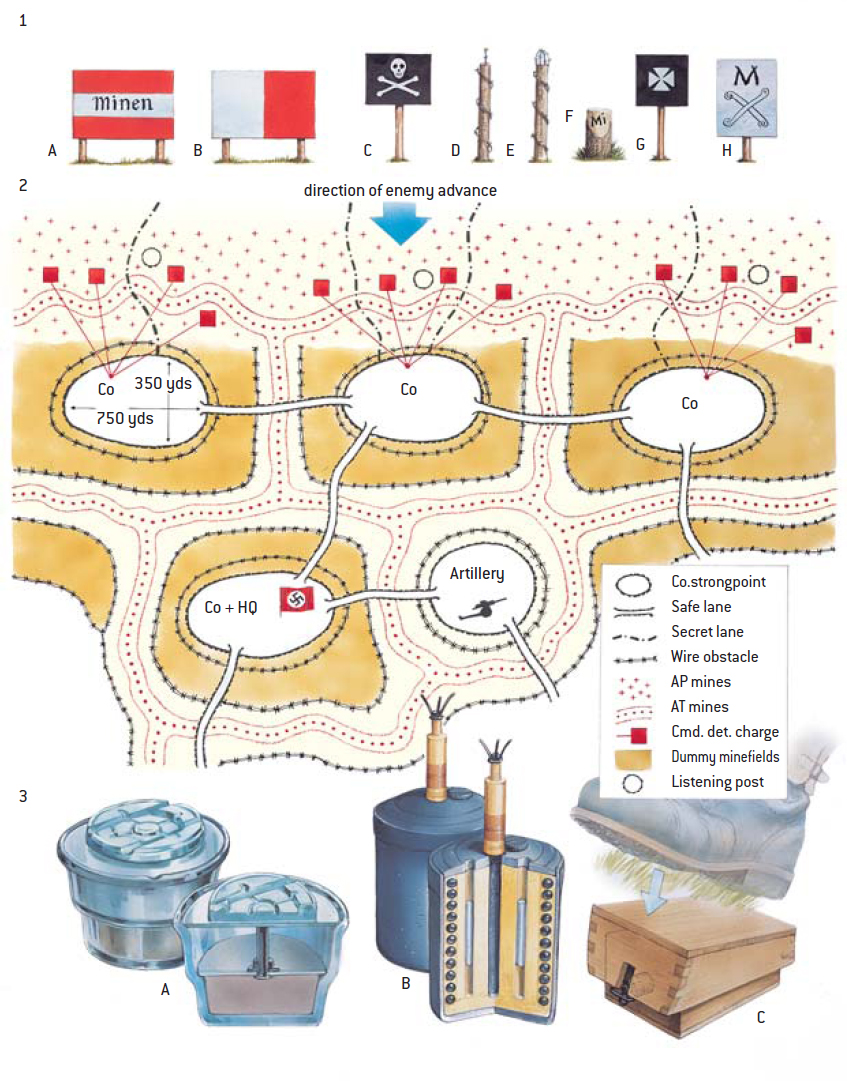
(1) Minefield signs – (A) Actual minefield; dummy minefields were sometimes marked with this sign but with ‘Minen’ in italic lettering. (B) Minefield gap sign – gap on the white side, mines on the red. (C), (G) & (H) Alternative painted signs for actual minefields. (D) & (E) ‘Subtle’ signs made with barbed wire and stakes; (D) = anti-personnel mines, (E) = anti-tank. (F) Hastily painted sign on shaved tree stump. Diagram (2) shows a reinforced company position, while in (3) we see three common German mine types: (A) Glas-Mine; (B) S-Mine; (C) Schu-Mine. (Peter Dennis © Osprey Publishing)
The removal of soil from around positions and the lack of parapets were for concealment purposes. It is extremely difficult to detect such positions from ground level, especially if all signs of work have been removed or concealed. Soil parapets around positions are easily detectable from the air because of the turned soil’s contrast with surrounding undisturbed soil and vegetation, which appears white or very light grey. Parapets also cast shadows, which are detectable from the air. The lack of parapets for concealment was especially effective in the desert and Russian steppes.
One determining factor might be the location of a position in relation to enemy ground-level observers. A parapet might be thrown up behind a position so that the occupants would not be silhouetted against the sky or contrasting terrain. When parapets were built they were sometimes camouflaged with sod removed from the position’s site and beneath where the parapets would be thrown. The soil was spread outward from the position and the parapet kept low. Evergreen tree branches were also used to conceal parapets, but had to be replaced every couple of days: in the Russian winter they froze and remained green for some time. If the ground was covered with fallen leaves these too were spread over parapets and other turned soil for camouflage. Positions were often placed on the reserve slopes of hills and ridges to conceal them from ground observation and direct fire. Camouflage nets were used to conceal the entrances to bunkers, erected over artillery positions, and sometimes laid on the ground to cover trenches and their parapets. In the latter case the nets were supported by taut wire staked in a zig-zag pattern over the trench, and it also supported camouflaging brush and branches.

Pre-war photograph showing the MG34 used in the sustained-fire role on its tripod mount, here angled close to the ground to allow the crew to fire prone. The No.1 is looking through the x3 power prismatic telescopic sight while the gun commander observes with binoculars. (Gordon Rottman)
Riflemen’s positions were sometimes camouflaged with camouflage tent quarters (Zeltbahn rain capes), covers woven from vines and twigs, and sections cut from camouflage nets. Lift-up lids for riflemen’s positions were made by constructing a crisscrossed stick frame and wiring on sections of sod trimmed to match the surrounding ground. These are known as ‘spider holes’.
The use of dummy positions and facilities and mock-up vehicles was very common, especially in Africa. Since it was impossible to conceal activity in the desert, deception efforts were widespread. To be effective, dummy vehicles had to be moved nightly, at least partly camouflaged, and fake tracks had to be made. Dummy bunkers were constructed by simply piling, shaping and lightly camouflaging spoil removed from actual positions, which provided a means of disposing of excess soil. Knee-deep dummy trenches connected dummy positions and were filled with brush to make them appear deeper from the air. Sentries manned dummy positions and fires were burned to make them appear occupied.
German field fortifications were highly developed and were as effective as any others employed during the war. The specified designs of individual positions were well thought out, and were designed to protect against direct and indirect fire and from being overrun by tanks. They could accommodate troops and weapons, allowing them to take full advantage of their capabilities. However, individual positions, no matter how well designed, were ineffective unless fully integrated into a defensive system that coordinated the various elements of adjacent positions, obstacles, fire support, reserves and command and control. Avenues of approach and obstacles (including minefields) needed to be kept under constant observation to prevent surprise attacks. Camouflage and concealment from both ground and air observation were essential, including deception measures such as decoys and dummy positions. The overall layout and layering of the defences in depth was also essential to a successful defence. German troops were capable of achieving all of this, and often did so (with time, resources, weather and the tactical and operational situations permitting).

German street fighting in defence, Ortona, 1943. (B) Barricades of rubble formed by blowing down houses on each side of streets; height varied from 1.2m to 1.8m. (AT) 7.5cm PaK 40 AT gun hidden to cover barricade. (MG1) Automatic weapon covering barricade from third floor of house in next street, with field of fire over demolished buildings between. (MG2) MG42 dug into actual barricade. (MG3) Automatic weapons – MG42s, FG42s and MP40s – in second and third floors of houses, to cover barricades, the whole square and all roads leading into it. (Peter Dennis © Osprey Publishing)
In most instances the German soldiers, at all levels, adhered to the basic precepts of selecting, locating and building field fortifications. Generally these fortifications were well positioned, effectively covered their assigned sectors of observation and fire, provided mutual support to adjacent positions, made good use of their weapon’s capabilities, were well camouflaged (especially at ground level) and fitted well within the terrain and avenues of approach to their positions. In particular, the obstacles employed made good use of natural features to create more effective barriers, but there were many instances when the German troops failed to maintain observation and fire on these areas – more a result of a specific tactical situation or a lack of resources as opposed to the neglecting of key principles. Camouflage was sometimes deficient, especially overhead, a factor usually due to insufficient time and resources, coupled with the inherent difficulties of hiding from airborne observation.
The German units demonstrated a great deal of flexibility, ingenuity and initiative in adapting their doctrinal defensive tactics and techniques to the varying terrain and weather conditions on different fronts. Field fortifications and obstacles were modified and new ones designed to exploit locally available materials (vital when considering how limited supplies were) as well as to attempt to counter new Allied assault tactics and heavier armour.
Regardless of the front on which the German forces defended, the most significant problem they faced was the lack of sufficient troops to provide adequate in-depth defence, and of armour and other motorized units for a mobile reserve allowing rapid and hard-hitting counter-attacks. No defence could resist a strong, well-coordinated, combined-arms attack supported by massive artillery and air resources. The defence line could be restored or partly restored if strong mobile reserves could conduct substantial counter-attacks, but the lack of air defence cover, or rather the air superiority of the Allies, prevented the timely commitment of mobile reserves even when they were available.
The Allies developed extremely effective offensive tactics to deal with German defences. Allied basic doctrine was repeatedly modified and perfected as new weapons became available and lessons were learned. No two units, even within the same division, used the same assault tactics.
German combat troops in particular realized the fallacy of fixed, permanent defences, such as on the West Wall: these were used to strengthen the field fortifications, and not vice versa. Ultimately, the German soldiers were rarely able to develop complete mobile or elastic defences as specified by doctrine. What the defences did do was buy time at a strategic level. It should be noted that it took the Soviets from February 1943 (after the fall of Stalingrad) until 30 April 1945 (the fall of Berlin) – some 27 months – to bring the Germans to the point of defeat.
Little remains today of these field fortifications. In most areas new construction, agriculture and government polices have covered over the mostly temporary sites. Many of the semi-permanent concrete fortifications have been demolished too. However, in some remote areas of Germany, France, the former USSR and other countries, traces of trench lines and shallow, overgrown depressions can be found, marking the vanished frontiers of the Third Reich.