CHAPTER 4
After-Work Origami
To Download the folding papers, please click here.
This chapter includes beautiful display models that can be given away as endearing gifts. The flowers and foliage can be folded during short breaks of time. Then when you have a little more time to yourself, such as after work, you can create pretty floral arrangements. You will also make a charming vase that you can fold in the evening and use to display your floral arrangements. For a change of pace, you will also make an intricate geometric design that is modular. Its individual modules can be completed during coffee breaks. Later on, the entire model can be assembled after work.
Intermediate
Fluted Vase
Created by Marcia Joy Miller
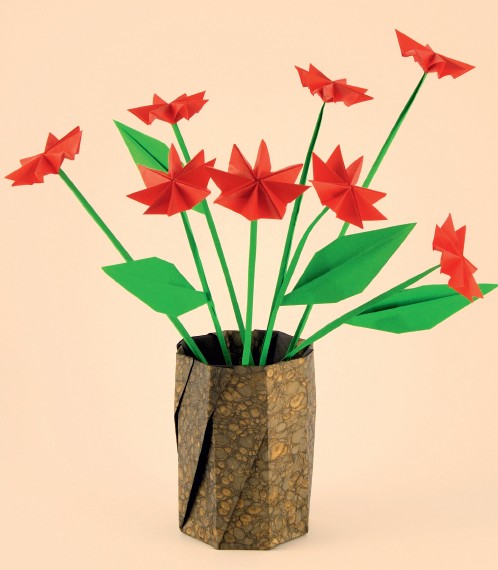
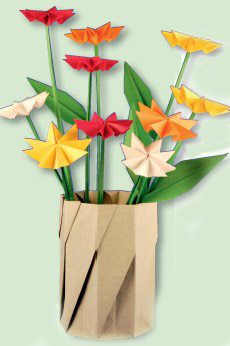
Display your origami flowers in elegant style with Fluted Vase. You can also use the vase as a handy pencil holder. This model is a little more challenging than the other intermediate-level models. So, make a few of the other intermediate models before working on this one.
PAPER: Make the model from the designated sheet of folding paper included in the back of the book on page 179. You can also use a square of bond paper that is from 8½ to 11 inches in size. After you gain experience folding the model, you will be able to create an especially attractive vase from a larger square of paper that has the thickness of heavy weight bond (such as art paper). If you do, then choose paper that is the same color or pattern on both sides. To make a pencil holder, fold the model from a square of medium weight bond paper that is from 8 to 10 inches in size.
BASIC TECHNIQUES: See Chapter 1 for the Flower Base exercise.

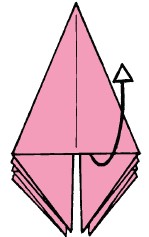
1 Start with a completed Flower Base. Open the model completely to its inside face.
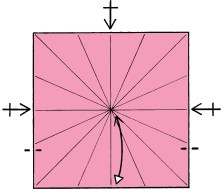
2 Bring the bottom edge to the horizontal center crease and make a short partial fold at each side edge. Unfold. Repeat with the other three edges.

3 Make the indicated partial crease. Repeat three times as shown.
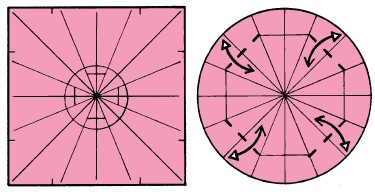
4 See the magnification circle for detail. Form an octagon by making partial creases that connect the existing partial creases.
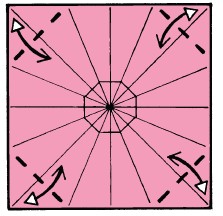
5 Make the four valley creases as shown.
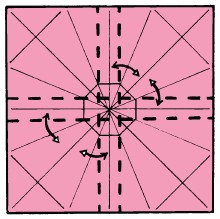
6 Make the four valley creases as indicated. (Notice that each new crease will intersect two corners of the octagon and will be parallel to an edge of the paper.)
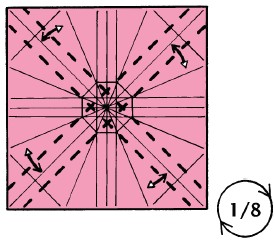
7 Make the four valley creases as shown. (Notice that each new crease will intersect two corners of the octagon and will be parallel to a diagonal crease.) Rotate the model one-eighth turn clockwise.
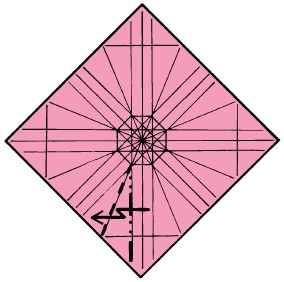
8 Make the indicated pleat fold. The model is now three-dimensional. (Tip: before making the pleat fold, make a mountain crease on the section of the line indicated for a mountain fold.)
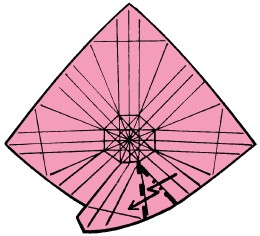
9 Make the indicated pleat fold. (Tip: before making the pleat fold, pinch a mountain crease on the section of the line indicated for a mountain fold.)
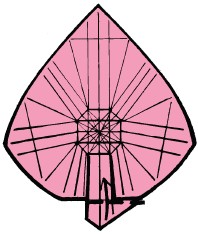
10 Make a fold on the existing crease.
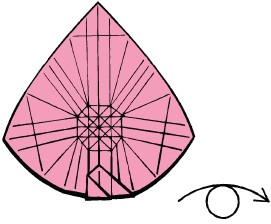
11 Turn the model over from side to side.
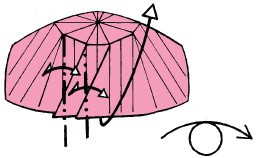
12 Pinch two mountain creases. Unfold the model. Turn the model over from side to side.
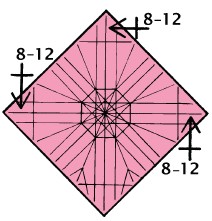
13 Repeat steps 8–12 on the other three sections.
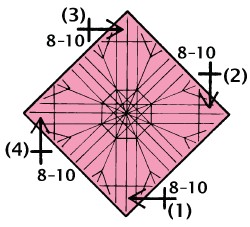
14 Repeat steps 8–10 on each of the four sections in counter-clockwise order (as shown by the sequence numbers).
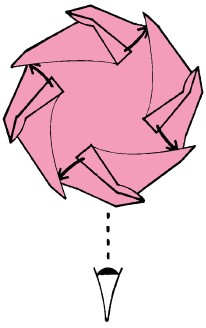
15 You are now looking into the vase. Tuck each of the four flaps into its adjacent pocket. Rotate the model to the view illustrated in the next step.
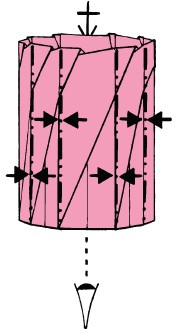
16 The vertical mountain folds are each composed of two segments. Emphasize each of the segments separately by pinching along its fold. Repeat behind. The next view will be from the bottom.
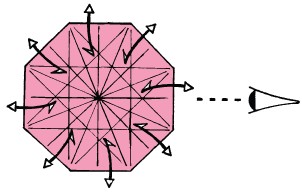
17 Emphasize each mountain fold by pinching along it, which will cause each to curve gently inward. This will also cause the center area to recede from you. Don’t overdo this process. The next view is from the side of the vase.
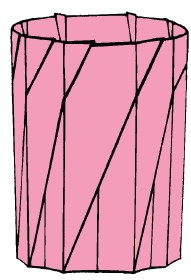
18 Some flaps at the top may have popped out of their respective pockets. Tuck them in again as you did in step 15. Fill your Fluted Vase with a bouquet of origami flowers (see Spring Flower next in this chapter). For stability, you can place a coin or two inside the vase.
Intermediate
Spring Flower
Created by Marcia Joy Miller
Bring the beauty of a garden indoors by folding a bouquet of cheery blooms. You can make Spring Flower during lunchtime and then use it for floral display items that you create after work.
PAPER: Make your first Spring Flower from either the designated 8-inch square of folding paper included in the back of the book on page 181 or a 5½-inch square of bond paper. You can fold the stem from a 1½-inch rectangular strip of paper obtained by cutting on the dotted lines of the designated folding paper included in the back of the book on page 187. You can also use a 1½-inch strip of green medium weight bond paper. After you are comfortable folding the model, you can create the flower from a 4-inch square using the designated folding paper included in the back of the book on page 185. (See the instructions under the subheading “Other Supplies” in Chapter 1 to learn how to make a 4-inch square from an 8-inch square.) You can also fold the flower from a 3½-inch square of bond paper or memo cube paper and fold the stem from a strip of green medium weight bond paper that is 1-inch wide.
BASIC TECHNIQUES: See Chapter 1 for the Waterbomb Base and Sink Fold exercises.

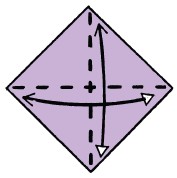
1 Fold the right corner to the left corner. Unfold. Fold the bottom corner to the top corner. Unfold.
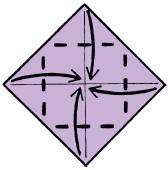
2 Fold each corner to the center.
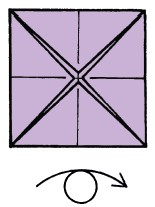
3 You have made what is commonly referred to as a “blintz fold.” Turn the model over from side to side.
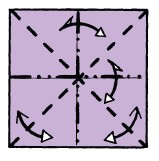
4 Make the crease pattern for a Waterbomb Base.

5 Depress the center point. Bring A and B to C.
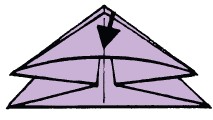
6 Flatten the model.
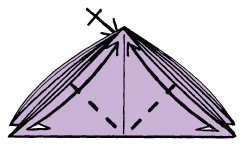
7 Notice that the flaps created by the blintz fold are on the outside of the model. The form that you have made is known as a “Blintz-Waterbomb Base.” On the right front flap, make a valley crease and then mountain crease it on the same fold line. On the left front flap, make both a valley crease and a mountain crease on the same fold line. Repeat on the back.
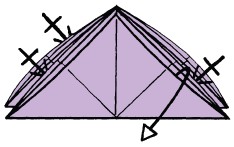
8 Bring the front flap down. Repeat with the back flap and each side flap.
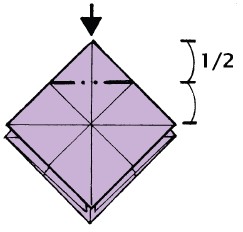
9 Sink fold the top corner making the fold one-half the distance from the top corner to the horizontal crease.
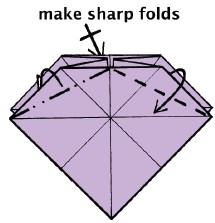
10 Sharply fold the front upper right corner down as indicated. Sharply fold the front upper left corner away from you as indicated. Turn the model over to repeat the sharp folds on the back.
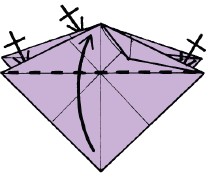
11 Fold the front flap up. Repeat on the other three flaps.
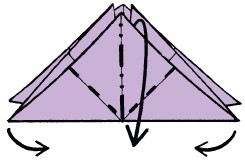
12 Bring the corner toward you pinching it so that a mountain fold forms on the center crease. As you do this, the two side corners will move toward you a little and two valley folds will form on existing creases.
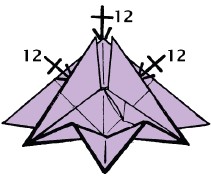
13 Repeat step 12 on the other three flaps.
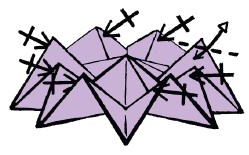
14 Make a small fold on the peak as shown and then unfold. Repeat on the other seven peaks. (Note: you will fold each peak so that it “points” in a clockwise direction before unfolding it.)
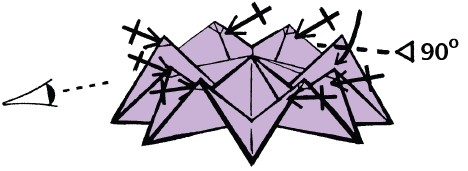
15 Arrange the eight petals so they are an equal distance from each other. Partially close the little folds that you folded and opened in the last step. Repeat with the other seven flaps. Position the model so that one of the four long flaps (that radiates from the center) points toward you.
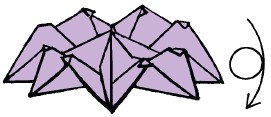
16 Notice how each little flap is “pointing” in the same direction—clockwise. Turn the model over from top to bottom. See step 20 for this view.

17 Paper Stem: If you are using the included folding paper, start with the solid-color side facing you. Fold the right edge to the left edge. Unfold. Next, fold the side edges toward the center crease so that they almost touch it.

18 Fold the side edges toward the center crease so that they almost touch it.

19 Fold the right edge to the left edge.
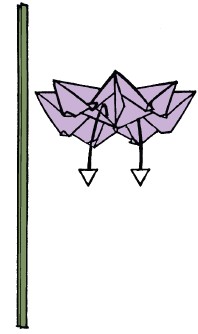
20 Completed stem. Open two of the long folds that are underneath the flower and opposite each other.
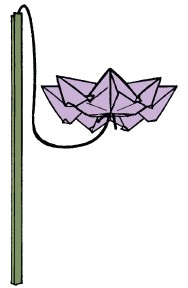
21 Insert the stem into the center of the opening as far as possible.
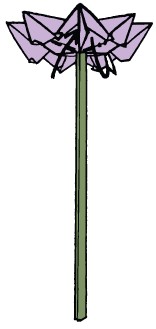
22 Close the two folds. Arrange the petals so that they are equally spaced. Also, partially close any of the little folds that have opened.
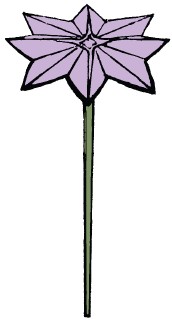
23 Create a bouquet of spring flowers and display them in a vase.
Intermediate
Foliage
Created by Marcia Joy Miller
Adding Foliage transforms a flower into a plant. It can also be used in a vase or a scene. At the end of the instructions, floral display ideas are shown that include Spring Flower and Fluted Vase (both models are taught in this chapter). You can create the components of Foliage during coffee breaks and then connect them during another coffee break.
PAPER: Fold the two leaf components from two 4-inch squares created from the designated folding paper included in the back of the book on page 189. (See the instructions under the subheading “Other Supplies” in Chapter 1 to learn how to make a 4-inch square from an 8-inch square.) Fold the stem from a 1½-inch rectangular strip of paper obtained by cutting on the dotted lines of the designated folding paper included in the back of the book on page 191. This included folding paper has optional dotted lines that you can cut along to shorten the strip for the stem. You can also create the model from bond paper. Use two 3½-inch squares of bond paper for the leaf components and a 1½ by 5½-inch strip of green medium weight bond paper for the stem component. For use in a vase, fold the stem from a longer strip of paper.
BASIC TECHNIQUES: See Chapter 1 for the Diamond Base exercise.
SPECIAL INSTRUCTIONS: Make sharp folds.


1 Start with a stem folded from a strip of paper (as shown by steps 17–19 of Spring Flower). Next, unfold the right side of the stem twice and the left side once.
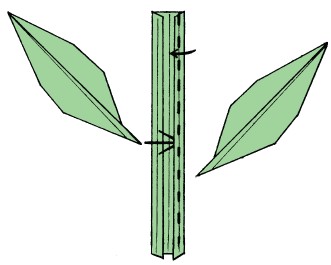
2 Fold a left-hand version and a right-hand version of Oval Leaf from the squares (see Chapter 2). Insert the bottom of the left-hand leaf under the right flap of the stem as far as possible. Next, hold the leaf steady as you fold on the right vertical crease.
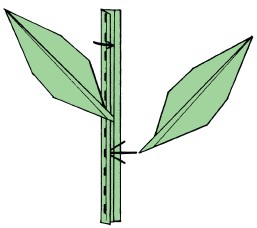
3 In a similar fashion to step 1, insert the right-hand leaf somewhat below the first leaf and under the left flap. Next, fold on the left vertical crease re-closing the flap so it rests underneath the left leaf.
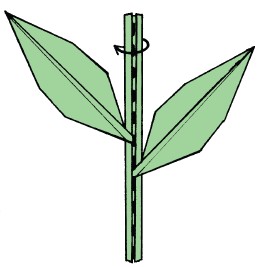
4 Fold the right side of the stem to the left side.
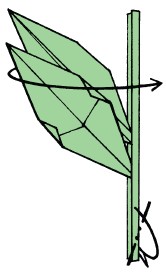
5 Fold the bottom leaf to the right. If you will be using Styrofoam to support Foliage, then make the mountain fold as indicated.
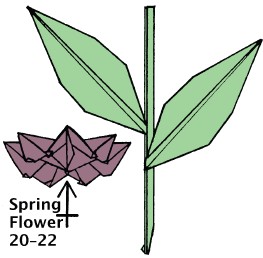
6 Foliage can connect to an origami flower that has an opening in the back. To use it with Spring Flower, follow steps 20–22 of the instructions for Spring Flower.
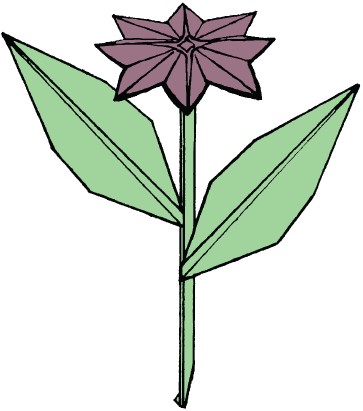
7 The illustration shows the result of step 6. This may be “planted” in a flower pot or vase that contains a piece of Styrofoam or included in an origami scene that has a Styrofoam base.
FLORAL DISPLAY IDEAS
One bonus of creating flowers and vases from paper is showing them off. Foliage makes them especially attractive. Some ideas are discussed below:
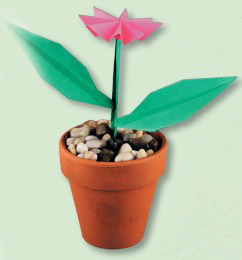
Create a delightful hostess gift using Foliage, Spring Flower, and a small flower pot. Styrofoam can be used to support the plant. Cover the Styrofoam with gravel for a finished look.
Use Foliage to enhance floral arrangements. If you like, you can include only the left-hand leaf. In that case, do not open the left side of the stem in step 1 and skip step 3. For variety, you can make a version with just a right-hand leaf. In the floral arrangement shown in the photograph, the leaves were made from 3-inch squares of bond paper. Fluted Vase was folded from a 13½-inch square of drawing paper.
Intermediate
Starry Sky
Created by Marcia Joy Miller
What a special feeling it is to gaze upon an evening sky. Recreate that experience by making Starry Sky. This model is a modular design that may be displayed on a wall. It is constructed from two types of units. You can create the modules during coffee breaks and connect them after work.
PAPER: Use thirty-six squares of medium weight bond paper that are all the same size. Choose twenty-four squares in a sky color and twelve squares in a star color. A convenient paper from which to fold Starry Sky is 3½-inch memo cube paper.
BASIC TECHNIQUES: See Chapter 1 for the Squash Fold, Preliminary Base, and Sink Fold exercises.

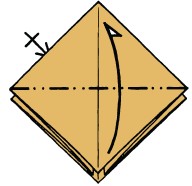
1 Tab unit: Start with a completed Preliminary Base made from star-color paper. Mountain fold the bottom of the flap into the model. Repeat behind.
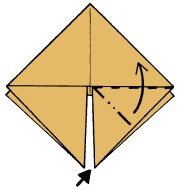
2 Squash fold the right flap.
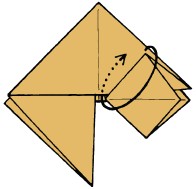
3 Tuck the top of the double layer under the triangular flap.
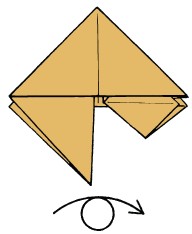
4 Turn the model over from side to side.
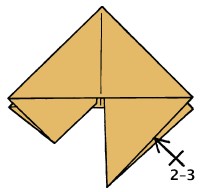
5 Repeat steps 2–3 on the right flap.
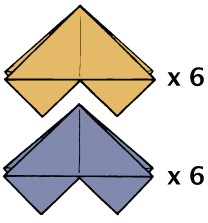
6 Completed tab unit. Make five more from star-color paper and six from sky-color paper.
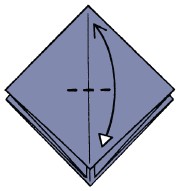
7 Pocket unit: Start with a completed Preliminary Base made from sky-color paper. Make a short crease on the front.

8 Sink fold the top quarter of the model.
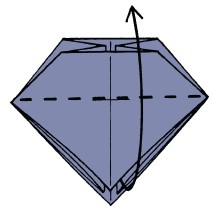
9 Fold the flap up.
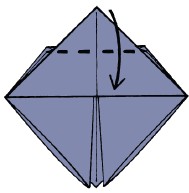
10 Fold the top corner to the folded edge.
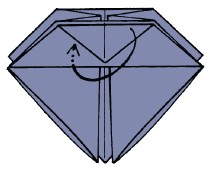
11 Tuck the double layer inside.
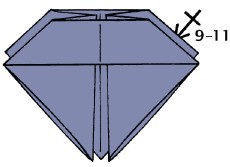
12 Repeat steps 9–11 on the back.
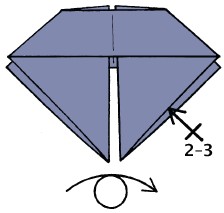
13 Repeat steps 2–3. Turn the model over from side to side.

14 Repeat steps 2–3.
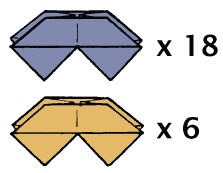
15 Completed pocket unit. Make seventeen additional pocket units in sky-color and six pocket units in star-color.
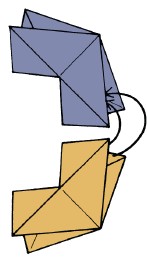
16 Assembly: Steps 16–22 show how to connect the ends of two units to build the motifs shown in step 24. Place the bottom unit between the layers of the top unit.
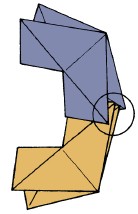
17 Steps 18–19 show a magnified view of the circled area.
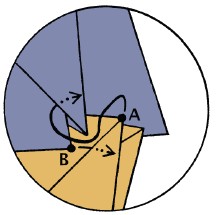
18 Notice that B identifies the bottom right corner of the square flap that is underneath the front layer of the top unit. Insert B into the pocket that is near A.
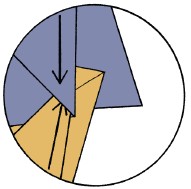
19 Slide the two units toward each other as far as possible.
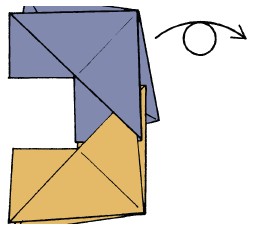
20 Turn the model over from side to side.
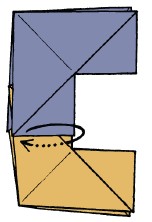
21 Tuck the flap of the top unit under the flap of the bottom unit.
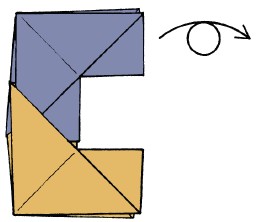
22 Turn the model over from side to side.
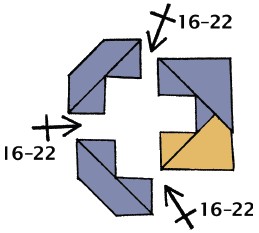
23 Connect the units by repeating steps 16–22. (Tip: before making the last connection, temporarily pull the units of the opposite connection a little apart.)

24 You have finished one motif. Now, complete the indicated numbers of motifs, by type, using the sky and star colors as shown. Notice that some motifs are made using only one tab unit and there is one motif made from only pocket units. This will give the outside edge of the completed model a uniform look.
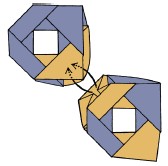
25 This step shows how to connect motifs by using the pocket and tab feature. Place each of the inner layers of the pocket between the layers of the tab. Slide the tab into the pocket as far as possible.
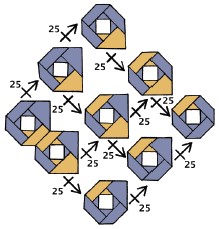
26 Position the motifs as shown and connect them by repeating step 25.

27 Congratulations! Your Starry Sky is ready for display.