Chapter 11. Reminders and Notifications
In the last chapter we set up our settings view and wrote the code to let the user decide if they want to support location features in the app. Now we can add a new feature—a reminder to take a selfie each day that will display as a notification—and configure this to only be enabled based on the user choosing this setting. To do this we will need to write code to add a new row into the settings table view, write new code to generate a daily reminder notification, and enable and disable that reminder being fired based on the user’s selection in the settings.
Adding a Reminder to the Settings
The first thing we want to do is set up a new row in the settings table view that we can use for toggling the reminder on and off as needed:
-
Open Main.storyboard.
-
Select the table view section (not the row or table view itself) from the settings view controller.
The easiest way to select the table view section is by using the outline, as shown in Figure 11-1.
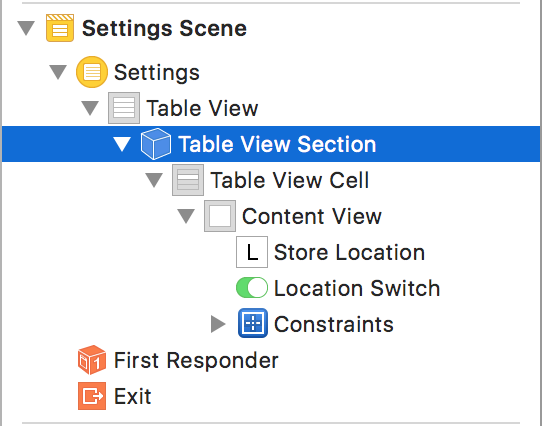
Figure 11-1. Select the table view section from the outline
-
Using the Attributes inspector, increase the number of rows from one to two. Doing this will create an exact duplicate of the location setting row, which will save us having to recreate the constraints. This does, however, have the drawback of also duplicating the actions, so we will have to change this if we don’t want to find ourselves very confused why turning off the reminder setting also turns off the location setting.
-
Select the bottom cell’s label.
-
Change the text to “Remind me at 10am”.
-
Select the switch in the bottom cell.
-
Inside the Connections inspector, break the connection from the Value Changed event in the Sent Events section by clicking the small x button. This will have the effect of unlinking this switch from the action we wrote in Chapter 10.
-
Open the assistant editor.
-
Inside the
SettingsTableViewControllerclass create a new outlet for the switch calledreminderSwitch. -
Create a new action for the switch called
reminderSwitchToggled.
We are now finished with our UI and can close the storyboard and assistant editor. The rest of what we are doing is going to be in code.
Creating a Notification
In Chapter 10 we used UserDefaults to maintain the state of the location setting. This time we are going to be doing something a little bit different. We will be creating a new user notification to actually show our reminder, and then we will be scheduling this reminder with the Notification Center, which will handle it from there. Because the Notification Center persists across multiple launches we can query it, asking if there is a reminder scheduled, and use that as the way of determining the appearance of the switch. This requires a bit more work than using UserDefaults, but we need to do the work anyway to configure the notification, so we might as well not add more work by also supporting UserDefaults for the reminder.
Note
We will be creating a local notification—that is, one that only exists in the device itself. The other kind is a push notification, which is sent to your device by a remote server. The basic configuration of both is the same, but push notifications require a lot more work to get up and running. For a start, you need to have them sent remotely to your device, adding another layer to worry about, and even once you’ve done that it doesn’t significantly change how you handle them in your app. For this reason, we aren’t going to cover push notifications.
Apple has very good documentation on how you can use notifications in your app, and if you are curious as to how to get push notifications working it is worth checking out.
Let’s get started creating our notification:
-
Open SettingsTableViewController.swift and include the
UserNotificationsmodule:importUserNotificationsThis will give us access to the
UserNotificationslibrary, which is what we will be using to create and present the notification.Note
iOS supports a few different types of notifications. We are going to be using user notifications, which are what most people think of when you say the word “notification.” They appear on the lock screen or SpringBoard and allow your app to share information with your users when the app isn’t at the forefront. There are also system notifications, which let users know when system-related events occur (such as the keyboard being dismissed, or an application moving to the background).
-
Add a new property to the
SettingsTableViewControllerclass:privateletnotificationId="SelfiegramReminder"This will be used later by the notification system to uniquely identify our notification amongst all the others out there.
-
Add the following to the
reminderSwitchToggledmethod:@IBActionfuncreminderSwitchToggled(_sender:Any){// Get the Notification Center.letcurrent=UNUserNotificationCenter.current()switchreminderSwitch.isOn{casetrue:// Defines what kinds of notifications we send --// in our case, a simple alertletnotificationOptions:UNAuthorizationOptions=[.alert]// The switch was turned on.// Ask permission to send notifications.current.requestAuthorization(options:notificationOptions,completionHandler:{(granted,error)inifgranted{// We've been granted permission. Queue the notification.self.addNotificationRequest()}// Call updateReminderSwitch,// because we may have just learned that// we don't have permission to.self.updateReminderSwitch()})casefalse:// The switch was turned off.// Remove any pending notification request.current.removeAllPendingNotificationRequests()}}Here, we first get a reference to the current
UserNotificationCenter. This is the singleton object that is responsible for managing user notifications. We then switch over the state of the reminder switch. If it is off, all we do is tell the Notification Center to cancel all unfired notifications, effectively purging our notification from the system. If the switch is on, however, we have to do a bit more. Like with location gathering, the user must grant the app permission to present notifications before we are allowed to do so, so we first have to check if we have permission to send notifications. Unlike with location, we use a closure to determine our authorization status. If permission is granted we then proceed to call a method to actually create the notification. If permission is denied we instead call a message to update the switch’s UI. Don’t worry about Xcode complaining about missing methods; we are going to be writing them now.Note
In the preceding code there’s a line that creates a new constant
UNAuthorizationOptionsarray. When requesting permission for notifications you need to let the authorization method know what kind of notifications you intend on sending. This is so the users can decide whether or not they want to receive notifications of the various types. In our case we only care about sending alerts, the standard pop-up-style notifications, but the call expects a list of them so we bundle it up and pass that over. -
Implement the
addNotificationRequestmethod:funcaddNotificationRequest(){// Get the Notification Centerletcurrent=UNUserNotificationCenter.current()// Remove all existing notificationscurrent.removeAllPendingNotificationRequests()// Prepare the notification contentletcontent=UNMutableNotificationContent()content.title="Take a selfie!"// Create date components to represent "10AM" (without// specifying a day)varcomponents=DateComponents()components.setValue(10,for:Calendar.Component.hour)// A trigger that goes off at this time, every daylettrigger=UNCalendarNotificationTrigger(dateMatching:components,repeats:true)// Create the requestletrequest=UNNotificationRequest(identifier:self.notificationId,content:content,trigger:trigger)// Add it to the Notification Centercurrent.add(request,withCompletionHandler:{(error)inself.updateReminderSwitch()})}This method is the meat of the notification generation. First, we tell the Notification Center to purge all unfired notifications. This is to prevent the user toggling the reminder switch multiple times and at the next 10 a.m. being sent a whole heap of alerts to take a selfie.
Warning
There are few things more annoying to your users than spamming them with notifications—make sure you only send notifications for useful and important information! Pelting your users with hundreds of notifications because you forgot to keep track of what you are sending will not give your app a very professional appearance.
Then we create a notification content object, which we can configure however we like. In iOS you don’t directly create the notification you want to send; instead, you set up how you want it to work and let the Notification Center take care of it. In our case all we are doing is giving it a title telling our user to take a selfie, although you can do quite a bit more, including using custom sounds and images. Next, we set up a trigger, which will be used to determine when the notification is delivered. We have set it to go off at 10 a.m. each day by using a
DateComponent.With our content and trigger ready, we make a notification request. This is what the Notification Center will use to create the notification and fire it at the appropriate time. The request is basically just a bundled-up form of our trigger (10 a.m. each day), our content (the title “Take a Selfie!”), and the identifier we set up earlier. Then we pass the request to the Notification Center, and it will take it from there. Once all this is done we call a method to update the switch UI, which we are about to write.
When the appropriate moment is reached for the trigger to fire, the Notification Center will create a notification object with the content we set up and send it off.
-
Implement the
updateReminderSwitchmethod:funcupdateReminderSwitch(){UNUserNotificationCenter.current().getNotificationSettings{(settings)inswitchsettings.authorizationStatus{case.authorized:UNUserNotificationCenter.current().getPendingNotificationRequests(completionHandler:{(requests)in// We are active if the list of requests contains one// that's got the correct identifierletactive=requests.filter({$0.identifier==self.notificationId}).count>0// Our switch is enabled; it's on if we found our pending// notificationself.updateReminderUI(enabled:true,active:active)})case.denied:// If the user has denied permission, the switch is off and// disabledself.updateReminderUI(enabled:false,active:false)case.notDetermined:// If the user hasn't been asked yet, the switch is enabled,// but defaults to offself.updateReminderUI(enabled:true,active:false)}}}This method is where we work out what state the reminder switch needs to be in—whether it’s on, based on if there is a reminder scheduled, and whether it should be enabled, based on the user’s permission setting for notifications. By determining if the switch should be enabled, we prevent it from being interactive even if the user has denied permission for notifications.
First we determine the permissions from the Notification Center. If permission has been given, we enable the switch and then check if the Notification Center currently has a scheduled notification that matches the notification ID we created earlier. Depending on this, the switch will then be toggled to true or false. If permission has been denied we set the switch to false and disable it, preventing user interaction. Finally, if permission hasn’t yet been determined, we enable the switch but set it to false, allowing the first interaction with it to be possible.
-
Implement the
updateReminderUI(enabled: active:)method:privatefuncupdateReminderUI(enabled:Bool,active:Bool){OperationQueue.main.addOperation{self.reminderSwitch.isEnabled=enabledself.reminderSwitch.isOn=active}}This is a convenience method that sets the toggle and enabled states of the switch to those determined in the
updateReminderSwitchmethod. The only interesting part here is that we are wrapping the calls inside a call to the main queue. The reason for this is that we don’t know what queue the Notification Center will run the completion closure on when it completes adding a notification, but updates to the UI are only allowed on the main queue. Because of this we are making sure that changes to the state of our switch are explicitly run on the main queue. -
Add the following to the end of
viewDidLoadto set the switch state on first launch of the view controller:updateReminderSwitch()Tip
Testing your notifications can be time-consuming and annoying. An easy way to quickly test your recent code changes is to set up a trigger that will fire quickly. For example, this is a nonrepeating trigger that will fire 10 seconds after it is sent to the Notification Center:
lettrigger=UNTimeIntervalNotificationTrigger(timeInterval:10,repeats:false)It is very important, however, that you make sure you test your notifications in situ. Fake triggers are good for quick testing but are insufficient for proper testing.
With that done, Selfiegram is now ready to start showing notifications. If you run the app, jump into the settings view, and turn that switch to “on” (Figure 11-2) a notification will be scheduled to fire at 10 a.m.!

Figure 11-2. Showing off our snazzy new notification
With all of this done, we have now completed the basic version of Selfiegram. We started with nothing and have implemented an entire app that is ready for people to start using and testing. In the next chapters we are going to look at adding some polish and advanced functionality to our working app.