Without question, the fuel and lubrication systems are two of the most important supplying your engine with its basic needs. Also without question is the fact that most cases of poor running, or no running at all, are caused by problems with fuel.
From a design perspective, these two systems represent the areas where the most change has occurred. Lubrication systems have either been completely altered to four-stroke technology, with a conventional sump (or oil pan like your car) and pressurized delivery to strategic locations throughout your engine's innards, or, for those still using two-stroke technology, fuel/oil mixing is computer controlled on mid- to larger-size engines.
Carburetors, always somewhat problematic, have been replaced with computerized fuel injection systems on all but the smallest engines. This technological evolution has changed the concerns of the do-it-yourself outboard engine mechanic. These changes have also forced some extreme limits on what the do-it-yourselfer can actually do. We've already discussed the extreme importance of fuel filtration and water separation. In spite of your best efforts at maintenance, water, dirt, and gunk can enter your fuel system and cause problems. If you follow the advice in this chapter, you'll know how to deal with most fuel problems, and you can also feel confident that your engine's lubrication system is operating as it should.
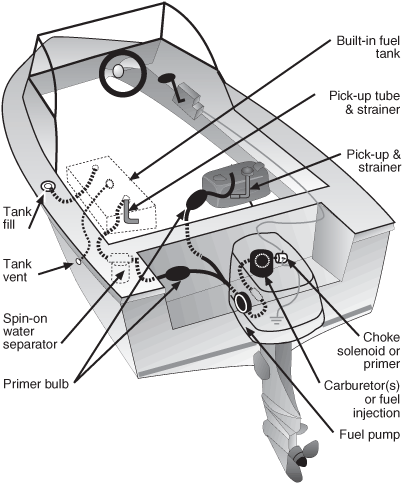
Figure 7-1 shows two common fuel systems. The first has a removable tank. The second, a system found on larger boats, has a built-in tank system similar to the one shown in dotted lines in Figure 7-1.
A third system consists of the integral fuel tank found on the smallest dinghy engines. It's a simple, gravity-feed system, with a tank mounted to the engine block, a simple shut-off valve for the fuel leaving the tank, a fuel strainer, and a carburetor assembly. It requires no fuel pump or primer bulb, although on some of the newest small engines, a diaphragm-type fuel pump has been incorporated in the carburetor. This type is easily recognized because the carburetor has an additional hose (besides the fuel delivery hose) going to it. The additional hose comes from a fitting on the side of the engine crankcase.
The fuel system begins at the fuel tank. Whether it's built-in or removable, the tank has the same potential for problems. One of the most common problems is water accumulating in the tank. It's caused by moisture condensing from the air in a partially filled tank.
Figure 7-1. An overview of the fuel system, showing portable and built-in tanks.
Sometimes, though, the water is in the fuel when you buy it. Conscientious dealers constantly check their tanks for water and contamination, but some just don't take the time to bother. This means it's quite possible for you to buy gas containing a high concentration of water, right at the fuel dock. This happens mostly during spring and fall, when significant changes in temperature from day to night cause the maximum amount of condensation in the dealer's tanks.
Eventually this water will begin to create rust on the inside of the painted-steel portable fuel tanks traditionally supplied by outboard engine manufacturers. In time, the rust will begin to flake off, and what's not caught by the built-in strainer will be sucked into the engine. Most of it will be stopped by the fuel filter/water separator found on most large engine installations, but even these filters can't stop some of the microscopic rust particles. They'll eventually end up inside your engine's carburetor(s), plugging the jets and tiny passages. In the case of a fuel-injected engine, the injectors could eventually become plugged. This is when the first symptoms of trouble may appear—rough engine idle, loss of power, and perhaps even reluctance to run at all.
Aluminum tanks are often used for permanent tanks below deck, and they certainly won't rust in the way steel does. But aluminum does eventually begin to oxidize or corrode, generating its own microscopic particles to mix with the fuel.
Plastic tanks are available as both portable and built-in installations, and they eliminate particulate matter from tank deterioration as a source of problems. But they still don't eliminate rust, dirt, or water from your supplier's tank. And, unfortunately, plastic tanks are almost as susceptible to the problems of condensation as metal tanks.
Since there's no way you can guarantee uncontaminated fuel from your tank, the bottom line with all fuel systems is that you must use adequate and properly sized fuel filters and water separators. All manufacturers list these items in their accessory catalogs, and I'd highly recommend that you add one of the spin-on fuel/water separators shown in Figure 7-1, even on a small engine. These elements provide a simple way to check for excess water build-up in the system, as well as an easy way to take a fuel sample from your tank.
Checking or replacing the spin-on water separator is easy. Simply spin the element off, holding a bucket beneath it to catch spilled fuel. Use a clockwise force to loosen the element, as you look at it from above. Drain the element into the bucket and look for water, which will separate from the fuel into globules, and for any dark-brown rust particles.
When you replace the element, check to make sure the old sealing ring came off the mount. Just as with oil filters, spinning on a new element over an old seal is sure to cause a severe leak.
These elements should be changed at least once a season, or perhaps twice if you use your boat frequently. Inspect the fuel sample for signs of trouble at each change. You can expect years of service free of trouble from water or rust build-up if you conscientiously maintain this filter.
Because of the extremely flammable nature of outboard engine fuel, tank installations must incorporate special safety features. This is especially true of built-in tanks, where many potential problems will be hidden. You should note that boat fuel tanks and installations are regulated by U.S. Coast Guard (USCG) safety standards, and any deviation from these standards is not only illegal but could be extremely dangerous to you and your passengers. If your boat has a "NMMA Certified to ABYC Standards" sticker on it, rest assured that the fuel system has been installed to a safe standard.
Let's begin with the built-in fuel tank, as represented by the dotted lines in Figure 7-1. You'll notice that in addition to the tank itself, you can see the filler-cap fitting on deck, and the hose connecting it to the tank. Also, there is a smaller hose connecting the tank to a fitting that must vent excess fuel or fumes outside the hull.
There is also, of course, the hose that supplies fuel to the engine. All marine fuel hoses must meet specific standards, not only for compatibility with the fuel used, but also for fire resistance. This precludes the use of most automotive-grade flexible fuel hose. In general, without getting into a lengthy explanation of the code, let me urge you to be certain that any flexible (rubber) fuel hose installed on your boat has the words "Approved, USCG type" embossed on it.
All fuel-hose clamps must be made completely of stainless steel. Don't be fooled by the standard clamp purchased at your auto parts store. It may have a stainless band, but the screw mechanism on it is more than likely plated steel. It will rust on a boat and eventually fail. Check all fuel-system clamps, hoses, and connecting fittings at least annually to be sure they're tight and showing no sign of leakage.
The regulations also call for all metallic parts of the fuel tank and deck fill to be electrically grounded, to minimize the possibility of sparking when the fill nozzle touches the deck fitting. This is generally done with a green wire attached to the back of the deck-fill fixture and connected to a tab on the fuel tank near the fill-pipe connection. These wires frequently corrode and break off, rendering the grounding system useless and unsafe. Check these connections periodically to be sure of their integrity.
One of the most frequent fuel-system problems is a blockage in the tank's vent fitting or hose. You'll know if there's a problem here if you have constant trouble filling your tank without fuel surging out of the fill pipe. Usually, the blockage occurs when the finemeshed screen built into the vent fitting begins to corrode—or when saltwater installations get clogged with salt, preventing the vent from "breathing" properly.
Vent screens can be cleaned by scraping away the build-up with a pocket knife, but sometimes they get too encrusted with salt, and need replacement. Always be sure this vent is clear to do its job because it affects the way your engine runs as well as the way your fuel tank gets filled.
On most portable tanks, the vent is located in the fill cap and is either unscrewed to open or, on some tanks, simply pulled up to snap open. A third type of tank vent has a hidden vent that allows air to enter only when a slight vacuum is created in the tank.
This design is intended to eliminate the possibility of gas vapors escaping through the vent into the atmosphere. The vent lies under the point where you plug the fuel hose to the tank. It's a small opening connected to a diaphragm-type, one-way valve inside the tank on the bottom side of the gauge assembly. As a vacuum is formed in the tank, this valve opens and air is drawn into the tank to allow fuel to escape. Once an adequate amount of air enters the tank, the valve closes. A problem with this type of vent is that the small opening on the gauge housing must be kept clear—but it's located where oil, dirt, and dust are certain to accumulate, causing a restriction in the vent system. If you have a "non-vented" tank, be sure to check this opening periodically to make sure it's not plugged with dirt and debris. If the vent isn't working, or if there's a kink in the hose connecting it to the fuel tank, a vacuum will form inside the tank and prevent fuel from getting to the engine. The symptoms would be the same as those caused by running out of fuel, even with a full tank.
Another item to consider with a permanent fuel tank is the fuel pickup strainer inside the tank. You can usually reach the area where the strainer sits by removing a deck plate, or perhaps a cover inside a center-console. Once removed, the fuel fill pipe, fuel gauge sender, tank vent connection, and fuel delivery system will be exposed.
In some cases, the fuel delivery pipe is an integral part of the sending unit, and by removing the fastening screws that hold the sender to the tank and lifting the unit up and out, you can reach the strainer on the end of a long fuel pickup tube that protrudes down to near the tank's bottom. This strainer screen will be made of either a fine nylon mesh or a metal mesh of either stainless or brass. This screen should be inspected at least annually and, if dirty, should be cleaned.
In many cases, the fuel delivery tube is screwed or even welded into place on the tank, and access to the pickup screen isn't possible as part of routine service.
If your boat has a permanently installed fuel tank it is probably equipped with an anti-siphon valve. These valves typically consist of a small pipe fitting with a spring-loaded check ball installed inside it. They are known for sticking and premature failure, and have frequently caused outboard engine fuel starvation. It's important to remember, however, that these valves are a part of the mandatory USCG and ABYC safety standards for gasoline-fueled boats. Simply removing the sticking valve is not an option; the valves are required by law. But these valves are not the only acceptable method for anti-siphon protection.
Another method builders use to prevent siphoning is to mount and secure all fuel lines above the highest fuel level in the tank, with the boat floating in its normal position. This anti-siphon feature is important. It will prevent the fuel tank from draining into the bilge of your boat in the event a leak develops in the feed line to your engine. Never make any modifications to the original positions of the fuel lines in your boat; and if your tank pickup is equipped with an anti-siphon valve, make sure any replacement pickup has one, too.
Any modifications to fuel systems should be carried out by the dealer. This is a serious safety matter.
Finally, while you've got the pickup unit removed, take a moment and look down into your fuel tank with a flashlight. See if there's any dirt or water building up down there. If there is, you might need to siphon the tank to clean out any contamination trapped inside. Also, when you reinstall the tank sending unit, you may have to replace the sealing gasket, depending on the type. When the unit's back in place, remember to check for fuel leakage next time you fill the tank, and correct any leaks immediately.
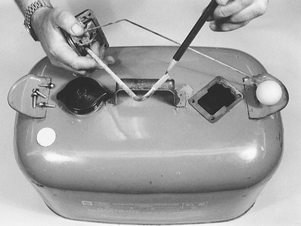
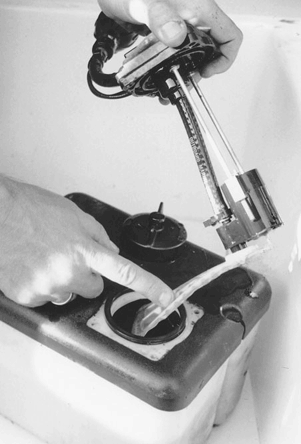
Portable tanks also are equipped with in-tank fuel strainers. If you see any contamination when you look into the tank's fill opening, then inspection of the strainer screen is warranted. You can get to the screen by unscrewing the mounting plate where your fuel hose attaches, and lifting the assembly up out of the tank.
Inspect the screen and clean it or replace it as needed. As with the permanent tank installations, the gasket sealing this assembly to the tank may have to be replaced once the unit is lifted out. Your dealer should be able to provide a new gasket or strainer screen. If dirt or water has contaminated the fuel and the inside of the tank, the fuel must be properly disposed of, and the tank flushed out until it is perfectly clean. Figure 7-2 shows the portable tank fuel strainer and pickup tube removed for inspection.
Moving from fuel tanks to the next point in the fuel delivery system, you will usually find the spin-on fuel/water separator we discussed earlier in this chapter. Again, if your boat is not equipped with a water separator, I highly recommend that you add one. These filters are cheap insurance, and greatly ease maintenance problems. I've already explained the servicing of these units. The only additional recommendation I have regarding the filters is that it's a good idea to keep a spare element on board. Once they're full of water, these separators will generally stop fuel flow to the engine. Spinning on a new element can often spell the difference between motoring home under your own power and having to get a tow.
Incidentally, on large engines, or dual-engine installations, there may be an auxiliary electric "primer" pump installed between the tank and the fuel filter/water separator. Check with your dealer to see if your boat is equipped with one. Failure of this pump will cause fuel starvation and hard starting.
The next stop in the fuel delivery system is the familiar primer bulb. This device is
Figure 7-2. A portable fuel tank strainer ready for inspection.
needed to start the draw of fuel from your tank, whether it's portable or built-in. The primer needs to fill the fuel system all the way to your engine-mounted fuel pump.
In addition to setting up this initial supply of fuel, the primer bulb serves one other important function that many people are unaware of. The bulb also has a one-way check valve built into it to allow fuel to flow toward the engine, but not back into the tank again. All primer bulbs have an arrow molded into them. This arrow must point toward the engine in the direction of fuel flow. Many engines have mysteriously stopped running simply because the fuel hose from the engine to the tank has been hooked up backward.
Whenever you replace fuel delivery hoses, or primer bulb/hose assemblies, make sure the inside diameters of the new hoses and fittings are the same as the old ones. The same principle applies to fuel filters added to your system—they must allow adequate fuel flow. Check the manufacturer's specifications. Failure to do so can cause trouble—poor engine performance at least; or severe engine damage, because of a lean fuel mixture, at worst.
Here are minimum inside diameters for fuel-delivery hoses and primer-bulb assemblies:
For engines above 150 hp, the recommended minimum ID is  inch (10 mm). For engines of less than 150 hp, this is still the preferred diameter, but
  inch (8 mm) is acceptable.
Any metal pipe fittings in the system, such as those used at the spin-on fuel/water separator, must have a minimum inside diameter of ¼ inch (6.5 mm). The largest V8 models require a minimum inside diameter for these fittings of  inch (7.1 mm). Always match whatever you have removed, assuming the installation was supplied by your dealer or engine manufacturer and has been giving no problems.
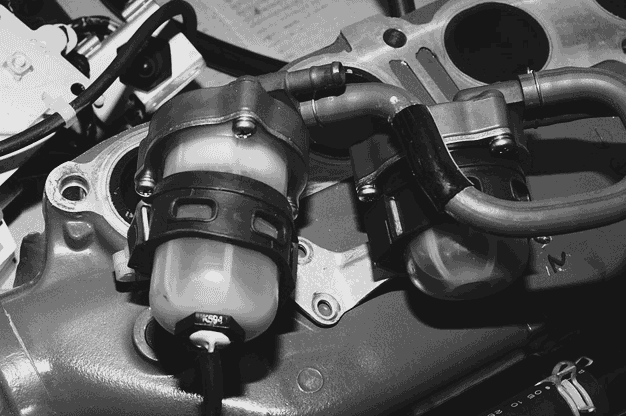
The next stop in the fuel line to your engine's carburetor is either an additional fuel strainer mounted separately under the engine cowl, or in some cases, a strainer built into the fuel pump itself. I prefer the separately mounted units as they often provide an additional visual clue to fuel quality.
Some pumps have a plastic cover that can be unscrewed, exposing a screen mesh designed as the final phase in your fuel filtration system. Whenever fuel delivery problems occur, this screen or remotely mounted strainer should be one of the first items checked. Figure 7-3 shows a strainer and water separator assembly on a newer Honda engine. Note the wiring that exits from the bowl on the water separator element. This wiring is attached to a sensor that warns the operator of water in the fuel. Check your owner's manual to see if your fuel pump has this feature.
Once fuel has passed through this final filter, it enters the fuel pump for delivery to the carburetor(s). But you don't need to bother about checking your carburetor(s) before you've done a thorough job of troubleshooting the fuel-supply system. More often than not, fuel-related problems crop up in the supply system rather than the carburetor(s). At the very least, the problems are always generated in the supply system, and sometimes affect the carburetor(s).
Before you begin to tear your fuel system apart, it's a good idea to be able to recognize the symptoms of fuel system problems. It's also important to realize that these symptoms may be intermittent, which can further complicate the diagnostic process.
Here are the most common symptoms of trouble with the fuel supply:
• Loss of power.
• Engine "surging" at high speed.
Figure 7-3. A fuel pump strainer mounted on a new Honda. Note the wiring sensor that warns of water.
• A "pinging" sound coming from the engine, caused by pre-ignition/detonation.
• Engine cutting out or hesitating on acceleration.
• General rough running.
• Engine quits, or simply won't start.
All of these problems result from one of your engine's basic needs not being met.
If you suspect you have a fuel delivery problem, start by disconnecting your fuel system from the engine. Attach a portable tank to the engine, one that is known to contain good fuel and to be in good working order. Run the engine and see if the symptoms go away. If so, then you can be certain you're on the right track. You can eliminate your carburetor(s) as a possible source of problems, and focus on the tanks, filters, and other parts of the delivery system.
If switching tanks makes no difference, it's possible that the running problem lies in the carburetor. In this event you'll need to sharpen your diagnostic skills a bit, and it won't hurt to apply some common sense either.
First, think about anything you may have done recently that may have created this new problem.
Did the symptoms develop shortly after filling with fuel? A sure clue.
Have you visually checked your fuel filters and water separators and found evidence of water or other fuel contamination? If the answer is yes, then it's a reasonable assumption that some of this water or dirt has got through the filters and fouled the carburetor.
Give your engine a quick look-over. Any loose wires or corrosion evident, causing an ignition problem? When was the last time you changed the spark plugs? If the answer is at the proper interval as described in Chapter 3, then a bad spark plug is an unlikely cause for your present problem.
How old is your engine? If it's more than several years old, it is possible that gradual accumulation of dirt and gum deposits have finally settled in your fuel system. Disassembly and cleaning will be required.
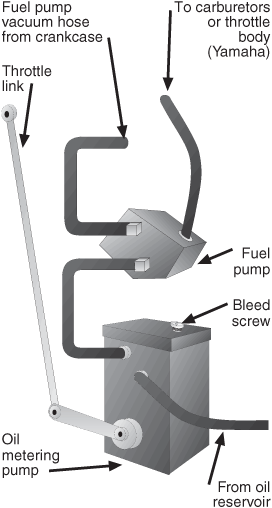
Fuel pumps on newer fuel injected engines are getting harder to identify, as the engine will have a variety of hoses, plumbing, and additional components under the cowling that are sure to confuse you at first glance. They will typically have multiple fuel pumps and a vapor separator installed, as well as a fuel rail and injectors for each cylinder. So let's look at how the fuel flows through a typical system to get a better understanding of what's going on in this vital system. A portion of the system is also operating at much higher pressure (20 to 30 psi vs. 2 to 8 psi) than a conventional fuel system. Figure 7-4 shows the component layout for an Evinrude E-Tec fuel system as an example of how things have changed.
The bottom line on fuel systems, at least the components located on your engine's power head, is that there really aren't any serviceable components in the system if your engine is fuel injected. Actual troubleshooting of these systems requires a laptop computer and proprietary software. On these engines, the only troubleshooting and component servicing an operator can do is replace the filters and look at the water separator to determine if water has entered the system.
Figure 7-4. The component layout for an Evinrude E-Tec fuel system.
Before we move on to carburetor problems and solutions, we need to be quite sure we're feeding the carb with an adequate supply of clean fuel. Here's a final check for you—the step-by-step systematic approach.
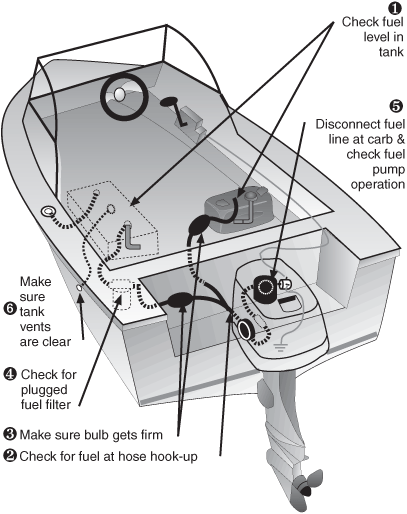
Figure 7-5 illustrates the fuel systems for midsize and large engines. The numbers give the order in which you should carry out your search for problems.
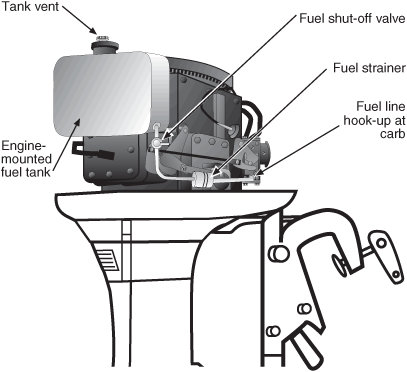
Figure 7-6 illustrates the check points for simple, built-in tank arrangements used on small engines.
After years of use, running without proper filtration, getting stuck with a really bad tank of fuel, or simple neglect, carburetor problems may plague you. If you have followed this chapter carefully, you should be able to make this determination with certainty.
For carburetor work you will need your engine workshop manual as well as this book. Carburetors vary widely, and internal design features are quite intricate. The essential components of all carburetors are the same, however, and the principles of operation are the same for all. This means that basic symptoms of trouble are the same for all makes of carburetor, and you'll be able to identify them.
If the symptoms your engine is experiencing are the same as those listed above for fuel-delivery problems, and you have traced the contamination through the system and past the fuel pump, then quite simply, debris has reached the carburetor. You must remove the carburetor and clean it.
But symptoms of carburetor trouble may also pop up outside the carburetor itself. Flooding, a condition where too much fuel is entering the engine, or leaking out of the carburetor throat into the intake-air box, is a sure sign. Spark plugs that are wet with fuel, or black and sooty when removed, are a sign of too rich a mixture.
The carburetor's job is to atomize fuel and mix it with air in a prescribed ratio. Too much fuel, or not enough air, alters this ratio and causes running problems. Fuel/air ratios must be maintained
Figure 7-5. The fuel system—checking by numbers, for midsize and large engines.
Figure 7-6. The fuel system—checks for a small engine.
perfectly all the time the engine's running, from idle to maximum speed.
Lean conditions are especially dangerous. The mixture is lean when there is not enough fuel mixed with the air. Since the engine gets its lubrication from a mixture of oil and gasoline, inadequate fuel also means inadequate lubrication. At high speeds, a fuel mixture that's too lean can burn up a piston in short order.
Other carburetor problems may be revealed by a sudden onset of hard starting, especially when the engine is cold, indicating a problem with the choking or enrichment function of the carburetor.
Hesitation, or a surging, sputtering transition from low speed to high speed when you suddenly advance the throttle lever, is a sign of plugged jets inside the carburetor body.
Naturally, before you can isolate specific carburetor problems, you must understand the basics of how the carburetor works. The next section will give you the information you need.
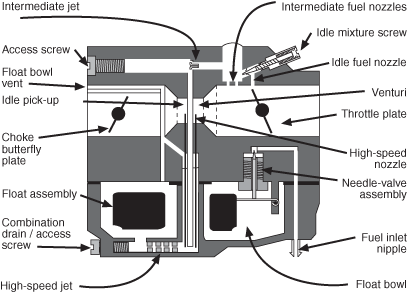
Figure 7-7 illustrates the internal layout of a typical outboard engine carburetor. You'll note that carburetors contain a series of subsystems that in technical lingo are referred to as "circuits." Each of these circuits carries out a specific job, and may operate only at certain engine speeds. Here's a description of each circuit, and its component parts:
Figure 7-7. Inside a typical carburetor.
The float circuit maintains the correct level of fuel in the float bowl. As fuel enters into the carburetor through the fuel inlet nipple, it continues through an internal passage to a needle valve. This is the main "switch" turning the flow of fuel on and off. The needle valve is controlled by the float assembly.
As fuel runs past the needle valve into the float bowl, the rising float pushes the needle upward. When the float gets to the desired level, the needle completely closes the opening, shutting off the fuel supply. The maximum and minimum levels of the float are adjusted by bending the lever the float is attached to. It's actually the lever that makes contact with the needle. The terms used to describe these adjustments are "float height" and "float drop." These are the most critical adjustments to the inside of any carburetor, and should always be checked as part of carburetor service.
Floats stuck in either the open or closed position can be a problem. If the carburetor is flooding and gasoline seems to be pouring out, you likely have a float stuck open. A float stuck closed would be indicated by a "lean" condition, where insufficient fuel is getting to the cylinder(s). These problems usually occur after the engine has been in storage for extended periods, allowing the float valve needle to "freeze" from lack of use. Generally, several light taps on the side of the carburetor with a screwdriver handle will free the needle valve.
The idle circuit controls the amount of fuel entering the engine at idle speed only. It draws fuel up out of the float bowl and passes it through the idle pickup tube into the intermediate fuel chamber. The fuel passes the tip of the idle mixture screw, and is then pulled by vacuum through the idle fuel nozzle, located behind (downstream of) the throttle plate.
Adjusting the idle mixture screw will alter the amount of fuel reaching the idle fuel nozzle, effectively changing the idle fuel/air ratio.
The intermediate circuit controls fuel entering the system as the engine is accelerated, during the middle of the engine-speed range. As the throttle plate opens, it allows the intermediate fuel nozzles to be exposed to the engine vacuum located downstream of the throttle plate. The fuel is drawn to the intermediate nozzles through the same internal passages as the idle circuit, the difference being the position of the fuel nozzles relative to the throttle plate.
As the throttle plate continues to open, the volume of air passing through the carburetor venturi into the engine increases. This increased flow of air accelerates dramatically at the narrowest part of the venturi, where the high-speed fuel nozzle is located.
The high-speed circuit consists of the high-speed jet, located at the bottom of the float bowl, and the tube that connects the float bowl with the center of the venturi, sometimes referred to as the high-speed fuel nozzle. This tube will often surround the idle pickup tube, as illustrated in Figure 7-7.
This circuit works on a scientific principle called the "Bernoulli effect," named after Daniel Bernoulli, a Swiss mathematician who lived during the 1700s. Bernoulli's Law states that as air accelerates, a low-pressure area is created at the point of maximum acceleration.
The high-speed nozzle is located at the narrowest point in the carburetor "throat." There, because of the constricted passage, the air moves fastest and the pressure is lowest. In fact, the pressure is so low compared to the normal atmospheric pressure inside the float bowl that the effect is one of a vacuum drawing fuel from the float bowl up through this large-diameter, high-speed fuel nozzle. This comparatively high volume of fuel is mixed with the large amount of air being drawn into the engine to serve its high-speed fuel/air needs.
The final circuit incorporated into the outboard engine carburetor is the choke circuit, sometimes referred to as the primer or enrichment circuit.
When an engine is cold, it needs a richer fuel mixture to get started. Several methods are employed by manufacturers to accomplish this task.
The simplest, and most common, method is illustrated in Figure 7-7. With this system, the choke butterfly plate is closed during cold starting, restricting air flow into the carburetor throat.
The butterfly plate is activated by pulling a choke lever; on larger engines it may be activated by an electric solenoid switch. When you close this butterfly plate, you reduce the volume of air mixing with the fuel, effectively enriching the mixture.
Primer systems actually squirt an extra spray of fuel into the air stream. These primer systems can be activated by pulling a choke lever, as you would on a smaller engine, or by operating an electric solenoid valve on the larger engines. This valve opens an extra fuel nozzle in the carburetor, allowing a direct flow of fuel as you crank the engine.
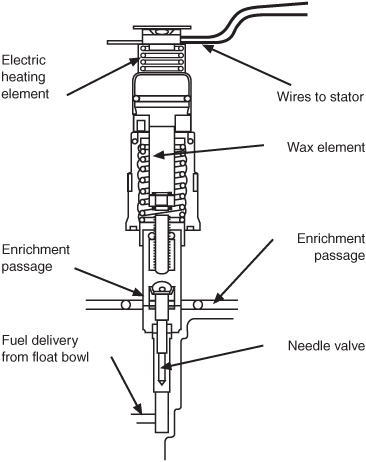
An ingenious method used by Yamaha has a combination of a wax element (similar to a cooling-system thermostat) and an electrically activated heating coil to open and close an enrichment passage built into the carburetor body. This system has been widely used on the 1992 and newer Yamaha 9.9 hp four-stroke engines. The wax element screws directly into the top of the carburetor body. A cold engine makes it contract and pull the attached needle valve off its seat, opening the enrichment passage. That allows the normal engine vacuum to draw extra fuel directly from the float bowl. Once the engine starts, electric current from the engine's stator windings feeds the heating element, warming it and forcing it to expand. This pushes the needle valve closed and blocks the enrichment passage during normal engine operation. Figure 7-8 shows a cutaway of this thermal wax valve. If this system is in good working order, it is completely automatic, requiring no operator activation.
Removing your carburetor(s) for cleaning will involve disconnecting and removing a few other components first. Your workshop manual can help you here.
In all cases you'll have to remove the air box or breather assembly. Next, you'll have to disconnect the carburetor linkage, and often the choke mechanism will have to be taken off, too. On modern engines these components are frequently made of plastic, which has a tendency to become brittle with age and exposure to high engine temperatures. Be careful. Many of these parts snap together and frequently break when you
Figure 7-8. Yamaha's thermal wax valve.
snap them apart on disassembly. Pay close attention to the orientation of linkage arms and connecting links on multiple-carburetor engines; there is only one right way to reassemble these parts.
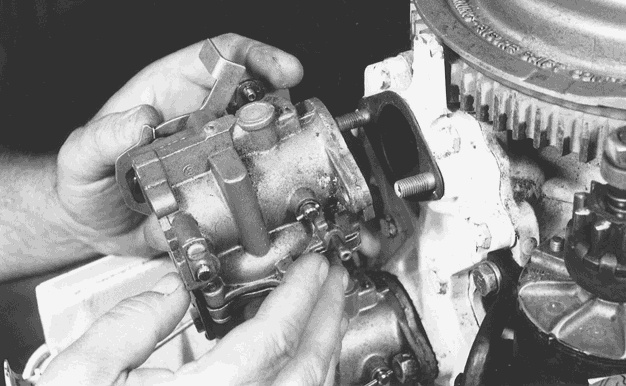
Once you've removed all the linkages and control pieces, disconnect the fuel line from the pump to the carburetor(s). Next, back off the nuts holding the carburetor to the engine. On smaller carburetors there will be two nuts for each carburetor. On larger, two-barrel carbs, such as those used on many V4 and V6 engines, there will be four nuts holding each carburetor in place.
Figure 7-9 shows a carburetor being removed for service. If your engine is equipped with more than one carburetor, it's a good idea to label each unit so it can go back in the exact same location. Now you're ready to begin evaluation of the unit before disassembly.
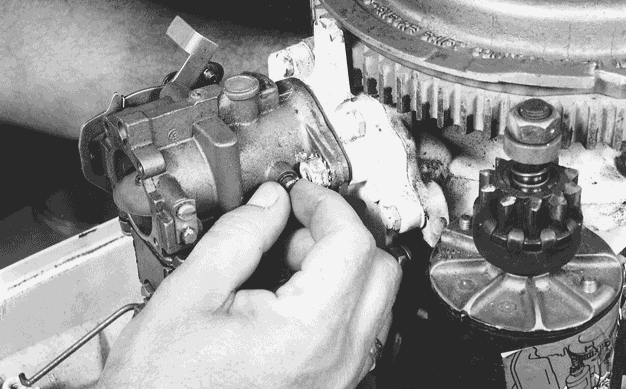
A common problem on older units is wear at the shaft that the main throttle plate is mounted on. An elongated hole wears in the body of the carburetor at the shaft's pivot points. Excessive wear at this point allows air to leak into the air/fuel mixture, causing leanness.
Figure 7-10 shows the point to check for this wear. Unfortunately, excessive wear here, indicated by noticeable side-to-side movement of the throttle shaft in the carburetor body, means the carburetor will have to be replaced. Rebuilding will be a waste of time. Check for wear at this point on any carburetor before you bother to disassemble it for cleaning. If you are in doubt about how much play is too much, take the carburetor to your dealer for appraisal. I can tell you from my experience that excessive play would be anything in excess of about  inch (0.4 mm). But it's hard to take an accurate measurement at this point, so the "feel" of an experienced mechanic is your best guide.
Before disassembly starts, you should have on hand a rebuild kit for your carburetor as supplied by your dealer. These are often available as a "master" kit and a "clean-out" kit.
The clean-out kit generally consists of gaskets, O-rings, and a needle-valve assembly. Many kits also include a cardboard float gauge for checking its adjustment once you replace the needle-valve assembly.
Master kits will generally include all of those parts, plus such things as replacement idle mixture screws, jets, a new float, and aluminum core plugs for the carburetor body. (These look like miniature "freeze plugs" for engines.)
In most cases, you will need only the "clean-out" kit. If your engine is old and has many hours on it, you may consider getting the master kit.
In addition to the parts kit, you will need an aerosol can of "Carb and Choke Cleaner," available at any auto parts store. You should also be sure to wear eye protection whenever spraying the carb cleaner. This stuff invariably ends up splashing back at you.
As a final precaution, lay out some clean paper to set all your carburetor parts on as you disassemble the unit. If you have multiple carbs, disassemble them one at a time. And take careful note: Never mix parts from one carburetor with another.
Once you've assembled all the necessary supplies, you can begin disassembly by unscrewing the float bowl from the main body of the carburetor.
With the float bowl removed, you can now get a pretty good idea of how badly the carburetor is gummed up by examining the contents of the bowl. Any contamination will have settled in the bottom of the bowl, and in many cases may have even partially solidified as a brown paste. If water contamination was your reason for getting to this point, you will actually see bubbles of water floating in the small amount of gas mixture left in the float bowl. You must remove all of this foreign matter and clean all the carburetor's internal passages and jets.
Begin by removing the float assembly. Push the small pivot pin that holds it in place out through the holder in the carburetor body. Be careful to follow any instructions given in your manual, as some of these pins are removed by pressing in one direction only.
Once the pin is pressed out, lift the float away from the carburetor. On some units, the needle will lift out of the needle-valve assembly as you remove the float. It will be attached by a small spring clip to the lever arm on the float. Once removed, the needle and spring clip will simply slide off the float lever. Next, get the appropriate hex socket or wrench and unthread the needle-valve body from the carburetor. The needle and seat assembly must always be replaced as a unit. Note: Some carburetor assemblies have a permanent seat that can't be removed from the carburetor body. In this case, the needle will be the only component replaced.
After removing the float and needle-valve assembly, you should carefully remove all traces of gaskets used in the carburetor assembly.
Leave the choke and main throttle plate in place. There is no reason to remove them. Just make sure they move freely and that the pivot shafts are not too loose in the carburetor body.
Be sure to remove any screws on side-cover plates, either plastic or metal, and lift the covers off. Removing the side plates and access screws will expose the
Figure 7-9. Removing a carburetor.
Figure 7-10. Checking for throttle-shaft wear.
small brass jets and calibrated orifices inside the carburetor passages.
For general cleaning, you shouldn't attempt to remove these jets with a conventional screwdriver even though they have a screw slot machined in them. They're designed to be removed with a special jet tool, and attempting to remove them will usually do more harm than good, raising small brass filings that can further plug the jets.
Once all the side covers, top covers, and access screws have been removed from the body of the carburetor, you can begin spraying with the carb and choke cleaner. Remember this solvent is quite strong, and prolonged exposure to the skin, or contact with your eyes is dangerous. Be aware that it will lift paint and destroy many rubber parts, so take precautions. Be sure to use the nozzle tube supplied with the cleaner to inject solvent into all small holes, jets, and passages inside the carburetor. Use the force of the aerosol spray to blow out any dirt or contamination.
Note: If your carburetor is quite dirty or old, it might be better to take the carburetor body to your dealer or local car repair shop and ask to have the body "dipped" in an extremely potent solvent tank designed especially for carburetor cleaning. This will remove stubborn deposits and spots you can't get to with aerosol spray.
Several precautions regarding these dip tanks are in order. First, remove all rubber or plastic components; the solvent will ruin them. Second, some manufacturers are epoxy-sealing the insides of carburetor bodies for corrosion protection; don't soak these parts for more than an hour or the solvent will attack the epoxy. Check your service manual for advice.
Sometimes you need to find the opposite end of the passageway you are blowing through and reverse the direction of flow with the cleaner nozzle. Spend some time on this to be certain all passages are clear.
When you're certain that all parts and passages are clean, wipe down the parts with a clean, lint-free rag. Any solvent residue will evaporate rapidly. Next, match the parts supplied in your rebuild kit with the components you removed from your carburetor. Don't be surprised to find an extra gasket or two in the kit—manufacturers often use one part number to service several carburetors. Be sure to match gaskets exactly, as sometimes they can be very close in appearance to one another. Often, one will block internal passageways, and not others; or vice versa. Rest assured, there is only one correct gasket in the kit.
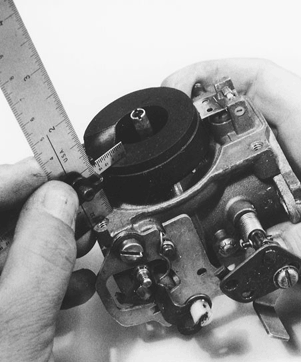
The next step in the carburetor overhaul will be to install the new needle-valve assembly, and to adjust the float height and maximum drop. This is a critical step, as it is this adjustment that determines how much fuel will be maintained in the float bowl, ensuring correct delivery to the carburetor's venturi area.
Figures 7-11 and 7-12 show the float height and drop being checked with a standard machinist's ruler with a sliding T-bar set to the correct measurement. Your workshop manual will explain fully where to take these measurements. If you find your float measurements are different, adjust the float position by bending the metal lever and positioning tab until it agrees with the specifications.
Figure 7-11. Checking the float height.
Figure 7-12. Checking the float drop.
Once the float is set properly, you can begin reinstalling the access screws you removed, and the top and side plates, replacing them with the parts provided in your carburetor kit. A precaution on reassembly is to be careful to tighten all screws evenly, starting from the center and working in a criss-cross pattern as you tighten. Also, and particularly with the newest carburetors that use many plastic components, remember that overtightening can be quite damaging, either distorting the parts or, in extreme cases, actually breaking them. Snug is the operative word here.
Once you have your carburetor(s) cleaned and reassembled, install them on the engine using the new mounting gaskets provided in the rebuild/clean-out kits, and reattach all choke and throttle linkages.
If your engine has multiple carburetors, and you suspect that you changed any of the adjustments that synchronize the carbs, you must have the "synch and link" adjustments checked by your dealer.
If your engine has just one carburetor, your concern is that the idle mixture and speed are set correctly. These tasks are not especially difficult, but you must follow the manual for your specific engine, as there are just too many combinations to explain all of them here.
If your engine has suddenly become difficult to start when cold, or is emitting excessive black smoke, running rough, or fouling plugs constantly, you may have a problem with the choke circuit.
On small engines, the manually activated systems that close a butterfly plate over the inlet end of the carburetor throat are quite easy to check by eye. You may have to remove an air-box cover installed on the engine, and turn or pull the choke lever on the engine control panel while observing the linkage and the butterfly plate in the carburetor throat.
If this plate is not closing and opening fully when the choke lever is moved, then the linkage problem will have to be corrected. Most often, all that's required is replacement of a small plastic or metal clip that has broken, allowing the linkage to fall out of place.
An engine with this butterfly plate stuck closed will run rich, and give off black smoke. The engine will run roughly and the plugs will become fouled. If the butterfly is stuck open, the engine will be difficult to start when cold.
Manual or electric primer systems are a little more difficult to diagnose, but will reveal the same symptoms as the manual butterfly systems. Black smoke indicates a rich mixture—the system is stuck on. Hard starting usually means the system is not functioning.
For further checks on these systems, you'll need to get the engine running and allow it to warm up. Next, run the engine at about 2,000 rpm in neutral.
If you have a manual primer, push the primer knob three or four times and observe engine performance. If the primer is working, engine speed should decrease and the engine should begin to stumble and run poorly for a while before it clears itself. If not, the primer is not working.
With the electric system, push the key switch in several times to activate the primer solenoid. If the system is operational, the engine will stumble and lose speed. If not, the system is malfunctioning.
To proceed with further checks of the manual system, you must find out if the primer pump is a separate component, or if it's built into your carburetor. Your manual will have this information.
If the primer pump is separated from the carburetor, it will be connected to the carburetor by a small hose. To check it, squeeze the fuel-primer bulb at the fuel tank until it's firm. Then, disconnect the hose connecting the enrichment primer pump to the carburetor and activate the primer knob on the engine. You should see fuel squirting from the hose. If not, look for a kink or some kind of restriction.
If the hose appears to be okay, the problem is in the primer pump assembly. Remove the unit from the engine and follow the instructions in your manual for disassembling and replacing any O-ring seals inside the pump. Note that these O-rings are often made of a special material designed to withstand fuel and additives—so use only dealer-supplied O-rings as replacements.
Once the O-rings have been replaced, reinstall the pump. It should now be squirting fuel just fine.
To check the operation of the built-in manual primers, you must get clear vision down the throat of the carburetor. Depending on the engine, this may mean removal of the air box. Once you can look down the carb throat, activate the primer knob. If no fuel builds up in the carb throat, the primer isn't working. You'll have to remove the carburetor and disassemble it.
Generally, these units have a diaphragm that acts against a spring inside the carb. Pushing against the diaphragm will force extra fuel into the carb throat. Most often, it's this diaphragm that ruptures. It will have to be replaced.
Electrically activated primer systems use a solenoid to move a plunger against a diaphragm in the primer-pump housing. The diaphragm displaces a calibrated amount of fuel into the carburetor throat, enriching the mixture.
These primers can fail electrically, or the diaphragm can rupture. There could also be a restriction in the delivery hose.
Other electric-choke systems use a solenoid to activate, via a lever and linkage, a series of choke butterflies.
In any case, checking the electric operation of the system is a matter of having someone operate the key primer switch in the remote-control box while you listen and feel for a light clicking noise coming from the solenoid.
The solenoid will be located near the carburetor linkage on the side of the engine block. Check your manual for the exact location. If necessary, use a screwdriver, as shown in Figure 4-1, to listen for the click of the solenoid engaging.
If you hear no sound when the switch is activated, then verify that the solenoid has a good ground to the engine block, and check for 12 volts at the wire coming from the remote control to the solenoid. Your engine manual's wiring diagram will pinpoint this wire for you. To check, simply set your multimeter to the DC volts scale and hook the meter's black lead to a good ground. Hook the red lead to the terminal connecting the wire from the remote-control box to the solenoid. With the key switch pushed in, you should have a reading of 12 volts.
If not, the problem may be in the plug assembly joining the engine to its main harness. If the connections inside this plug look good, you will have to trace this wire back to the remote control.
If no problems are found in this harness, the difficulty lies inside the remote-control box itself. You should send it to the dealer for repair.
If your test at the engine shows 12 volts getting to the solenoid, yet it's still not working, check the wire used as a ground lead. It should be securely held and making a good electrical connection. If you're satisfied that it is, then it's the solenoid that needs replacement.
If the choke/primer solenoid checks out okay, but is still not working properly, you'll need to investigate further.
In the case of an electrically activated butterfly-valve system, check just as you would for the manual system:
Remove the air box to expose the choke butterflies.
Activate the solenoid. When you hear it click, the butterfly plates should snap closed.
If they don't, the problem will lie in the linkage, and it should be quite obvious. Check and repair the linkage as needed.
With a solenoid-activated primer pump, the easiest and quickest way to check the pump is to remove the few screws holding the pump body to the solenoid and inspect for any blockage or a ruptured diaphragm. Use your engine manual as a guide. Clean or replace parts as needed.
On the more advanced primer systems, such as Yamaha's thermal wax valve (see Figure 7-10), the symptoms of a malfunction are the same as for the other types.
If the problem is hard starting or stalling you'll need to be certain the engine idle-speed adjustment is correct. If it's too low, the engine could stall. If it's too high, the engine vacuum will be reduced when you're cranking the starter motor, and the system will not draw in the extra fuel it needs.
If the idle speed is correct, remove the mounting screws for the thermal wax valve and pull it up out of the carburetor. Check the O-ring seal under the mounting flange for damage. If it's damaged, this is probably the cause.
Incidentally, on 1992 and early 1993 engines using this system, changes may be required to cure hard starting or stalling. Some thermal wax valves needed a modified jet to correct starting problems. Consult your dealer if your engine is of this vintage.
If your symptom is rough running or the emission of black smoke after engine warm-up, check the electric-heating element at the top of the thermal switch while the engine is running. It should be warm.
If it's not, it may not be getting voltage from the stator windings, or the electric coil inside the switch may be burned out.
To test the heating coil, use your ohmmeter. Trace the two black wires from the switch to their connection at the stator. Disconnect the wires. Use your ohmmeter and check for continuity through the electric heating coil. If you get a reading of between 4.8 and 7.2 ohms of resistance, the heating element is probably okay. To double-check this, take two of your alligator-clip jumper leads and clip them to the two wires from the thermal switch. Clamp one of the alligator leads to the positive post on your boat battery and the other to the negative. It doesn't matter which wire goes where. Watch the plunger on the thermo valve. If it begins to extend further from the valve housing, the heater is definitely working. In that case, your problem is with the stator windings on the engine. A dealer should be consulted.
Regarding choking and priming systems in general, it's interesting to note that Yamaha alone used at least seven different methods for choking and priming between 1985 and 1995. Other manufacturers have used a wide variety of systems as well. It's obviously an area of constantly changing technology.
The systems described here are the most popular used during the last 20 years, but always use this book in conjunction with your engine's manual to help you solve problems with this important part of the fuel system.
Upcoming chapters will discuss some of the idiosyncrasies of specific systems, but it is important to have a general understanding of how electronic fuel injection systems work and what they do that makes them better than the carburetors used on engines for over a century.
Carburetors are the final stage in a fuel system and are responsible for delivering one of the four basic needs of an engine described in Chapter 1—a proper mixture of fuel and air to each cylinder. The problem is that a carburetor is nothing more than a dumb machine, with no built-in intelligence. No matter how sophisticated the carburetor design, in the end its fuel/air delivery will always be a reasonable compromise under certain real-world conditions. Computerized fuel injection systems, on the other hand, have some engineered intelligence built in, and as a result can achieve much more precise results. The trick that makes this all work is the ability to monitor changing conditions in real time, and send updated information to the engine's onboard computer for needs analysis. As the actual needs change, the computer adjusts things like ignition timing and fuel delivery to each cylinder. As an example of how this may all play out, a brief look back in time is worthwhile.
In the not-so-old days, if a customer wanted to bring his boat to a place like Lake Dillon, Colorado, he could only achieve optimal engine performance by adjusting the carburetor jets for the thinner, high-altitude air at the lake. On extremely cold days either early or late in the boating season, fiddling with the engine's choke was often necessary to keep the fuel/air mixture a bit "rich" (more fuel) to keep the engine running.
Today, unless something is wrong, engines start on the first try and run smoothly throughout their operating range no matter the altitude or weather conditions. Further, they do all this using less fuel and burning cleaner. So besides the fuel injectors, which are obvious, what components might contribute to this system?
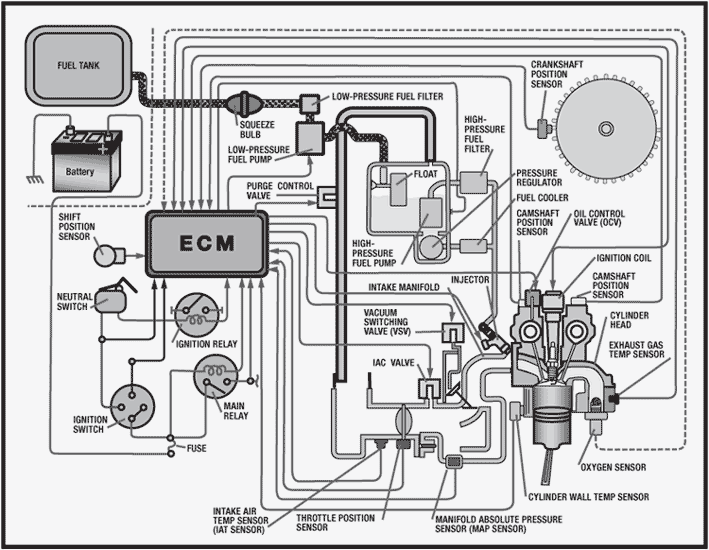
This is an area where alphabet soup takes over. Acronyms are rampant in the fuel injection arena, and unfortunately not all manufacturers use the same acronyms to describe similar components. So, as with just about anything fuel injection related, you'll really need your engine manual to deal with this issue. Below is my attempt to create a generic list of components common to most systems. Figure 7-13 illustrates the typical component layout on a modern engine, in this case a Suzuki DF250. The arrows pointing into the ECM identify the data input points for the electronic fuel injection system. Once you learn what all the acronyms stand for, you'll have a much clearer understanding of why these new engines can run better on less fuel.
• BARO—Barometric/atmospheric pressure sensor
• BPS—Boost pressure sensor (turbocharged or blown engines only)
• CKP—Crankshaft position sensor
• CMP—Camshaft position sensor
• CPU—Central processing unit
• CTP—Close throttle position switch
• CTS—Cylinder temperature sensor
• ECM—Electronic control module
• ECT—Engine coolant temperature
• IAC—Idle air control
• IAT—Intake air temperature sensor
• MAP—Manifold absolute pressure
• OCV—Oil control valve
• SPS—Shift position sensor
• TPS—Throttle position sensor
• VST—Vapor separator tank
• VSV—Vacuum switching valve
• VVT—Variable valve timing
So now that you know the names for some of the key players in this system, they need to be further broken
Figure 7-13. The component layout for a Suzuki DF250.
down into specific categories, such as data input, data processing, and signal outputs.
Anything listed as a sensor in the above list is one of the data-gathering devices in the system. Its signal gets sent to the CPU, ECM, or whatever the engine maker calls it, and the data is processed based on the real-time data. The computer then calculates the time and duration of its signal outputs accordingly, and sends these signals to the fuel injectors and ignition system. Under infinitely variable conditions, the system automatically adjusts such things as ignition and valve timing, and fuel injector opening time and duration of opening. This effectively adjusts the fuel/air mixture entering each of your engine's cylinders. Additionally, alarms are available and integrated into the system that can warn the operator of such things as overheating, engine over-rpm, or, in the case of two-stroke fuel injected engines, a fault in the fuel/oil mixture ratio. In some cases, extreme faults may even kick the engine into an automatic "get-home" mode, which forces engine rpm reduction to just above idle speed. Also, fault data is stored in the computer's memory for recall with a serial port connection to the engine via laptop computer. Additional information such as maximum rpm, engine hours, maximum engine temperature, and the like may also be stored as reference for the dealer or technician.
Over the years, manufacturers have tried various ways of mixing oil with the fuel on two-stroke outboard engines, not only to make refueling easier but also to provide more accurate fuel/oil ratios over the engine's entire operating range.
The truth is, an outboard engine doesn't need the same fuel/oil mix at low speed as it does at full throttle towing a water-skier. And a mixture that's too rich in oil results in excess exhaust smoke—an important challenge for outboard engineers to overcome.
There are currently several general types of lubrication for two-stroke engines, and one for four-stroke models. We'll take a look at all of these methods now, and I'll offer diagnostic and maintenance tips for each.
Mixing the engine lubrication oil with gasoline before use is by far the simplest method. Unfortunately, it's also the messiest and the greatest polluter of the environment.
Nothing complicated here, though. Just add the correct amount of oil to a certain volume of fuel in your tank, and the job is done.
One important consideration often overlooked is the grade of oil to use. I've said it before, but please stick to the current, state-of-the-art TCW-3. This blend has a far superior additive that promises to reduce many common outboard-engine problems such as sticking rings and carbon build-up in the combustion chamber.
It's also important to know what ratio of fuel to oil your engine maker recommends. In recent years, many manufacturers have reduced the ratio from 50 to 1 to 100 to 1. This means 100 parts of gasoline to 1 part of oil, or half as much oil as before—a significant change. Your owner's manual will give you the right ratio.
The order in which you do things counts, too. Remember to put the correct amount of oil in the tank before adding the gasoline, so the gasoline will mix with the oil as you fill the tank. The following chart gives the correct amount of oil to add for a certain volume of gasoline for each of the commonly used ratios:
For each 3 gallons (11.4 liters) of gasoline add this amount of oil: |
100 to 1 ratio: 4 fl. oz. (118 ml) |
50 to 1: 8 fl. oz. (236 ml) |
25 to 1: 16 fl. oz. (473 ml) |
For each 6 gallons (22.7 liters) of gasoline add this amount of oil: |
100 to 1 ratio: 8 fl. oz. (236 ml) |
50 to 1: 16 fl. oz. (473 ml) |
25 to 1: 32 fl. oz. (946 ml) |
For each 18 gallons (68.1 liters) of gasoline add this amount of oil: |
100 to 1 ratio: 24 fl. oz. (708 ml) |
50 to 1: 48 fl. oz. (1.419 liters) |
25 to 1: 96 fl. oz. (2.838 liters) |
Outboard Marine Corporation (OMC) can be credited with pioneering automated oiling systems on outboard two-stroke engines. Its variable-ratio oiling (VRO) system was a real breakthrough when it was first introduced nearly 25 years ago.
Later iterations (and there have been many) of this system are known as oil-metering systems, or OMS. These systems were used right up through the "Ocean-Pro" series of engines, so let's take a look at the basics for this system.
The VRO system delivers oil in varying fuel/oil ratios based on the needs of the engine.
Like more conventional fuel pumps, this unit is powered by the positive and negative pressures inside the engine crankcase. The higher the engine speed, the more quickly the diaphragm in the fuel pump oscillates, pumping increased amounts of fuel.
Incidentally, the pump is bracket-mounted to the engine powerhead, and the crankcase pressure pulses are delivered through a connecting hose from the crankcase.
The VRO pump is fed oil from a separate reservoir with a capacity of 1.8 gallons (6.8 liters). You can order an optional unit holding 3 gallons (11.4 liters).
Built into the VRO pump is an electrical circuit to activate a warning horn if the supply system runs out of oil, or if the fuel delivery becomes restricted.
Because of the critical nature of this pump, and the fact that some special tools are required for testing, I don't recommend that you try to service it. Let your dealer look at it immediately if you suspect trouble, to avoid expensive engine damage due to improper lubrication.
Since this system was first introduced in 1984 there have been at least nine changes in the VRO system's design. Many of these changes require a dealer retrofit to accommodate a new part or wiring harness. This
kind of work obviously doesn't fall into the do-it-yourself realm.
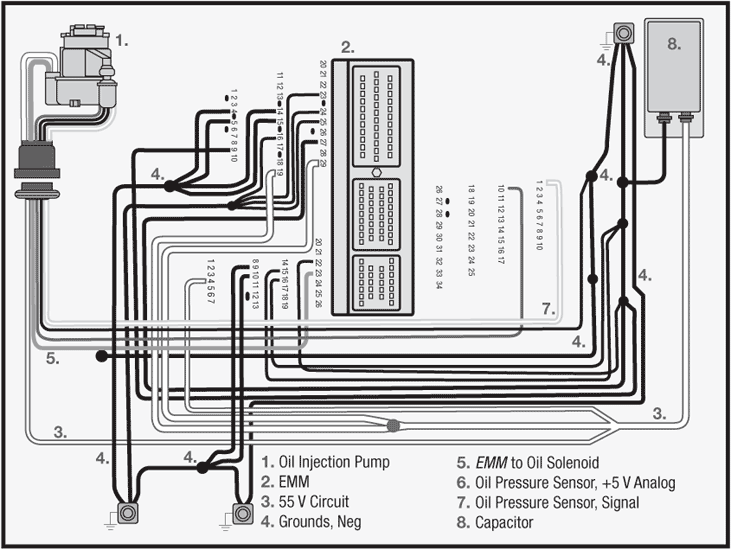
The very latest Evinrude E-Tec engines use a computer-controlled variation of this very system. Figure 7-14 shows a wiring diagram of this modern version. Unfortunately, as with fuel injection systems, I do not recommend attempting troubleshooting or repairs to this system without using a service manual or checking in with your dealer. Extreme engine damage can be caused if a mistake is made within this vital system.
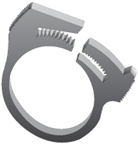
With either VRO or E-Tec systems, you can, however, carry out routine checks of the system's filtration and warning systems. But let me warn you first that whenever you replace any hose clamps on the VRO system, you should use only the ratchet-style of clamp—see Figure 7-15. In use, the male and female
Figure 7-14. A wiring diagram of a computer-controlled fuel-injection system.
Figure 7-15. A ratchet-style hose clamp.
ratchet pieces are squeezed together with a pair of pliers. It's important to note that these ratchet clamps often lose their grip after disassembly, and quite frequently need replacement. The E-Tec system uses a completely different screw-type clamp that is more conventional and less problematic.
The oil reservoir is one area you should check. First, and at least annually, remove the strainer screen from the tank and inspect it for tears or contamination. You'll need to buy a special #25 Torx screwdriver to remove the oil pickup cover plate on the tank. You can get one at any Sears or auto parts store.
Next, remove the four screws holding the fixture into the tank and lift the assembly up and out of the tank. Inspect the screen and clean it or replace it, as needed.
Figure 7-16 shows this screen removed for inspection. While you have the screen and the oil pickup assembly out of the way, remove the oil tank itself and thoroughly clean it out with a parts-cleaning solvent.
When you've cleaned the oil reservoir and serviced the strainer screen, take the opportunity to test the lowoil warning system. You can do this easily before you add oil to the tank.
With the boat's battery master switch on, turn the engine's ignition key on. With the oil reservoir empty, the warning horn should beep every 20 seconds. Now add oil to the reservoir and keep listening for the beep. When the tank is about one-quarter full, the beeping should stop.
A feature of 1996 and newer engines—one that can be retro-fitted to many of the older units with VRO—is called the System Check warning system. This features a dash-mounted gauge and horn that is a great improvement over the earlier horn-only system. Previously, the horn had multiple functions, leaving you wondering what was malfunctioning when it sounded.
The System Check feature still gives an audible signal, but adds a row of very bright, light-emitting diodes (LEDs), visible even in bright sunlight, to pinpoint one of four possible causes for the sounding of the horn. As soon as the horn goes off, an LED flashes on the gauge unit to indicate one of four problems: no oil, overheating, low oil, or a restricted fuel supply. I can highly recommend this improved system because it costs far less than the repairs that could be associated with an unnoticed failure in any of these four crucial areas.
As with the VRO pump itself, I strongly recommended that if your warning system operation is suspect, you consult your dealer.
Figure 7-16. Inspecting the oil reservoir filter screen.
Other outboard engine manufacturers use a mechanically driven oil pump mounted on the engine block. It's connected to the throttle by way of a linkage arm.
The theory of operation here is that the crankshaft drives a gear in the pump, creating oil pressure. As the throttle lever is advanced to increase engine speed, the linkage arm also moves, opening a valve that allows more oil to flow into the oil pump.
There are two schools of thought on the matter of where to inject the oil, and this is where the significant difference lies between the mechanical oil-pump systems.
Yamaha, with its Precision Blend oil-injection system, injects the oil into a port in the carburetor/fuel-injection throttle body intake system behind the carburetor/fuel-injection throttle plate. This means that only pure fuel passes through the carburetor/fuel-injection throttle body. The oil blends with the incoming fuel/air mixture immediately after it leaves the carburetor/fuel-injection throttle body throat, just before the mix enters the crankcase through the reed-valve plates. Yamaha engineers feel the pure gasoline mixture is less likely to gum up and form deposits inside the carburetor/fuel-injection throttle body.
Mercury and other outboard makers inject the oil from the mechanical pump into a port in the engine-mounted fuel pump, where it is mixed with the fuel before it enters the carburetor/fuel-injection throttle body. Figure 7-17 illustrates a typical mechanical injection-pump system, showing how all the major components are connected.
As with the VRO system, the mechanical-injection systems incorporate low-oil warning alarms that are also connected to an engine overheating sensor. Also, these systems (as well as the VRO) may have a built-in speed limiter. This sub-system is designed to reduce engine speed automatically when oil problems occur. This important feature goes a long way toward preventing severe engine damage in the event of an oil-injection problem. Check your owner's manual and study thoroughly the section describing warning-system tests and specific engine features such as the speed (rpm) limiter so you will know exactly what to do if one of these alarms sounds and your engine suddenly slows down mysteriously.
One problem with these systems can be air entering into the pump or oil lines. This can be caused if the system runs out of oil and becomes "air bound." Another problem that can stop oil delivery is a restriction in the vent hole at the top of the oil tank. The naturally oily surface at the fill cap attracts dirt and dust that can eventually block the air passage. This will cause a vacuum to develop within the tank. Since all of these systems on midsize engines have an engine-mounted oil reservoir set above the oil pump, they rely entirely on gravity to get the oil to the pump. Gravity, however, won't overcome a vacuum. Periodically check the tank vent, and clean it as needed.
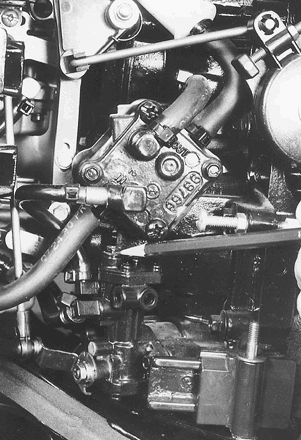
If you do run out of oil, or if you find the tank vent was plugged, you may have to bleed air from the pump before you run the engine again. Most engines have a bleeder screw on their pumps at the top of the assembly. Figure 7-18 shows the location of the pump and bleeder screw on 75-hp Mercury outboard.
Bleeding the pump is an easy task, although a little messy. First make sure the oil tank is full. Next, get a rag and place it under the oil pump to catch oil that will leak out of the air-bleed screw.
Figure 7-17. A mechanical oil-injection system.
Figure 7-18. The oil-injection pump bleeder screw on a 75-hp Mercury.
With the engine not running, open the bleeder screw three or four turns. Let the oil drip out of the bleed screw until no air bubbles are visible. Once you have a good flow of oil at this point, snug the bleed screw back up, and wipe spilled oil off the pump and surrounding area.
Next, run the engine at idle and observe the oil as it leaves the pump through the clear delivery hose connected to the fuel pump. You may see some air bubbles at first, but these should clear out in a few minutes, showing a solid stream of oil going through the hose. Never attempt to run the engine at high speed if you can see air bubbles in this hose. As with the VRO system, it's not recommended that you try to adjust or rebuild any of the components in these systems. Calibration requires special tools in some cases and a solid mechanical background to ensure that oil delivery is correct at all engine speeds.
If you ever suspect that your oil delivery system is malfunctioning, either because the warning horn has sounded, or because of excessive blue smoke in the exhaust, there's a simple trick that will protect your engine from damage.
First, if an alarm has sounded, make sure the cause is not overheating. Look for water squirting from the tracer hole on the side of the engine. That tells you the water pump is working. Your owner's manual might be helpful here, too, allowing you to distinguish between overheating and an oil system problem.
Once you are sure the problem is related to the oil-injection system, and not from overheating, you can set up an alternate fuel/oil system. Simply disconnect the fuel inlet to your engine and install a portable fuel tank with oil pre-mixed at a 50 to 1 ratio. This will ensure that your engine is adequately lubricated until you can get to a dealer.
In summation, if you are mechanically inclined and have a reasonable amount of experience, it's possible to run through the oil-injection system checks outlined in workshop manuals and fix any problem that may come up with these systems. But if you are unsure of yourself, stay away until you've gained more experience. Stick to the routine maintenance tasks, such as cleaning the tank, checking the oil-strainer screen, and clearing tank vents. Follow the routine to make sure your alarm system is functioning as it should be.
Keeping this system clean, and being sure that all hose and wiring connections are tight, will give you years of trouble-free service.
All two-stroke outboard engines since 1969 are equipped with a system that's designed to recycle excess oil accumulating in the crankcase. Oil that's injected into the engine will not be completely consumed as it enters the combustion chamber with the fuel-and-air mix. Some of it "puddles" inside the crankcase.
To remove this excess oil, manufacturers have devised a simple system of small fittings screwed directly into the side of the powerhead block assembly at key points. These fittings have hoses connected to the carburetor intake system, so the excess oil from the crankcase can be mixed with the incoming air/fuel mixture.
This system is extremely simple and virtually trouble-free—but it can cause trouble if a hose becomes cracked or disconnected at either end. If your engine is equipped with this system, your workshop manual will have a detailed routing diagram showing where all hoses connect. Follow this diagram closely to ensure that all connections are correct.
Classic symptoms of trouble with this system would be excessive oil accumulation on the outside of the engine block, or a rough idle condition.
If a hose for this system becomes disconnected, you will have opened a small hole directly into the crankcase. Air entering the crankcase, or the carburetor intake for that particular cylinder, will effectively lean out the fuel/air mix. Of course, if you have religiously followed maintenance instructions in this book and have periodically checked all hose connections on your engine, this should never be a problem.
If you have a four-stroke outboard engine, its lubrication system is entirely different from the two-stroke systems we've talked about so far.
You'll never have to worry about mixing oil with fuel. You'll never wonder if your oil-injection system is functioning. Four-strokes don't have or need any oil mixed with the fuel.
The four-stroke lubrication system is quite similar to the one in your car engine. It's a pressurized system with a conventional oil pump that lubricates key points inside the engine crankcase. Your engine will have either a strainer or a conventional spin-on oil filter element—just like the one on your car. Figure 1-2 in Chapter 1 shows the location of the oil sump and the oil pump itself.
There are no user-serviceable components within these systems, other than a filter or strainer that must be serviced at prescribed intervals described in Chapter 3 of this book.
As all the working components of the oil pump are constantly submerged in lubricating oil, the internal parts of this system will last as long as the engine itself. The only things that can damage a pressurized system of this type are running without oil or running beyond the recommended oil-change frequency, which may cause a build-up of varnish and sludge that can block oil-delivery passages.
In addition to oil and filter changes, simply check the oil-pressure warning system on your particular engine following the instructions in your owner's manual each time you use your engine, and check the oil level as part of your daily checklist. If ever you have reason to believe that your oil pressure is inadequate, even when the engine's properly filled with the correct oil, consult your dealer immediately.