Chapter 20. Accessing CSS from JavaScript
With a good understanding of the DOM and CSS now under your belt, you’ll learn in this chapter how to access both the DOM and CSS directly from JavaScript, enabling you to create highly dynamic and responsive websites.
I’ll also show you how to use interrupts so you can create animations or provide any code that must continue running (such as a clock). Finally, I’ll explain how you can add new elements to or remove existing ones from the DOM so you don’t have to pre-create elements in HTML just in case JavaScript may need to access them later.
Revisiting the getElementById Function
To help with the examples in the rest of this book, I would like to provide an enhanced version of the getElementbyId function, for handling DOM elements and CSS styles quickly and efficiently, without the need for including a framework such as jQuery.
However, to avoid conflicting with frameworks that use the $ character, I’ll use the uppercase O, since it’s the first letter of Object, which is what will be returned when the function is called (the object represented by the ID passed to the function).
The O function
Here’s what the bare-bones O function looks like:
function O(i)
{
  return document.getElementById(i)
}
This alone saves 22 characters of typing each time it’s called. But I choose to extend the function a little by allowing either an ID name or an object to be passed to this function, as shown in the complete version of the function in Example 20-1.
Example 20-1. The O() function
function O(i)
{
  return typeof i == 'object' ? i : document.getElementById(i)
}
If an object is passed to the function, it just returns that object back again. Otherwise, it assumes that an ID is passed and returns the object to which the ID refers.
But why on earth would I want to add this first statement, which simply returns the object passed to it?
The S Function
The answer to this question becomes clear when you look at a partner function called S, which gives you easy access to the style (or CSS) properties of an object, as shown in Example 20-2.
Example 20-2. The S() function
function S(i)
{
  return O(i).style
}
The S in this function name is the first letter of Style, and the function performs the task of returning the style property (or subobject) of the element referred to. Because the embedded O function accepts either an ID or an object, you can pass either an ID or an object to S as well.
Let’s look at what’s going on here by taking a <div> element with the ID of myobj and setting its text color to green, like this:
<div id='myobj'>Some text</div>

<script>
  O('myobj').style.color = 'green'
</script>
The preceding code will do the job, but it’s much simpler to call the new S function, like this:
S('myobj').color = 'green'
Now consider the case in which the object returned by calling O is stored in, for example, an object called fred, like this:
fred = O('myobj')
Because of the way function S works, we can still call it to change the text color to green, like this:
S(fred).color = 'green'
This means that whether you wish to access an object directly or via its ID, you can do so by passing it to either the O or S function as required. Just remember that when you pass an object (rather than an ID), you must not place it in quotation marks.
The C Function
So far I’ve provided you with two simple functions that make it easy for you to access any element on a web page, and any style property of an element. Sometimes, though, you will want to access more than one element at a time, and you can do this by assigning a CSS class name to each such element, like these examples, which both employ the class myclass:
<div class='myclass'>Div contents</fiv>
<p class='myclass'>Paragraph contents</p>
If you want to access all elements on a page that use a particular class, you can use the C function (for the first letter of Class), shown in Example 20-3, to return an array containing all the objects that match a class name provided.
Example 20-3. The C() function
function C(i)
{
  return document.getElementsByClassName(i)
}
To use this function, simply call it as follows, saving the returned array so that you can access each of the elements individually as required or (more likely to be the case) en masse via a loop:
myarray = C('myclass')
Now you can do whatever you like with the objects returned, such as (for example) setting their textDecoration style property to underline, as follows:
for (i = 0 ; i < myarray.length ; ++i)
  S(myarray[i]).textDecoration = 'underline'
This code iterates through the objects in myarray[] and then uses the S function to reference each one’s style property, setting its textDecoration property to underline.
Including the Functions
I use the O and S functions in the examples for the remainder of this chapter, as they make the code shorter and easier to follow. Therefore, I have saved them in the file OSC.js (along with the C function, as I think you’ll find it extremely useful) in the Chapter 20 folder of the accompanying archive of examples, freely downloadable from the http://lpmj.net website.
You can include these functions in any web page by using the following statement—preferably in its <head> section, anywhere before any script that relies on calling them:
<script src='OSC.js'></script>
The contents of OSC.js are shown in Example 20-4, where everything is neatened into just three lines.
Example 20-4. The OSC.js file
function O(i) { return typeof i == 'object' ? i : document.getElementById(i) }
function S(i) { return O(i).style                                            }
function C(i) { return document.getElementsByClassName(i)                    }
Accessing CSS Properties from JavaScript
The textDecoration property I used in an earlier example represents a CSS property that is normally hyphenated like this: text-decoration. But since JavaScript reserves the hyphen character for use as a mathematical operator, whenever you access a hyphenated CSS property, you must omit the hyphen and set the character immediately following it to uppercase.
Another example of this is the font-size property (for example), which is referenced in JavaScript as fontSize when placed after a period operator, like this:
myobject.fontSize = '16pt'
An alternative to this is to be more long-winded and use the setAttribute function, which does support (and in fact requires) standard CSS property names, like this:
myobject.setAttribute('style', 'font-size:16pt')
Warning
Some older versions of Microsoft Internet Explorer are picky in certain instances about using the JavaScript-style CSS property names when applying the browser-specific -ms- prefixed versions of the rules. If you encounter this, use the setAttribute function and you should be all right.
Some Common Properties
Using JavaScript, you can modify any property of any element in a web document, in a similar manner to using CSS. I’ve already shown you how to access CSS properties using either the JavaScript short form or the setAttribute function to use exact CSS property names, so I won’t bore you by detailing all of these hundreds of properties. Rather, I’d like to show you how to access just a few of the CSS properties as an overview of some of the things you can do.
First, then, let’s look at modifying a few CSS properties from JavaScript using Example 20-5, which loads in the three earlier functions, creates a <div> element, and then issues JavaScript statements within a <script> section of HTML, to modify various of its attributes (see Figure 20-1).
Example 20-5. Accessing CSS properties from JavaScript
<!DOCTYPE html>
<html>
  <head>
    <title>Accessing CSS Properties</title>
    <script src='OSC.js'></script>
  </head>
  <body>
    <div id='object'>Div Object</div>

    <script>
      S('object').border     = 'solid 1px red'
      S('object').width      = '100px'
      S('object').height     = '100px'
      S('object').background = '#eee'
      S('object').color      = 'blue'
      S('object').fontSize   = '15pt'
      S('object').fontFamily = 'Helvetica'
      S('object').fontStyle  = 'italic'
    </script>
  </body>
</html>
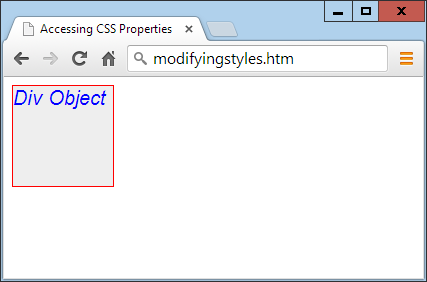
Figure 20-1. Modifying styles from JavaScript
You gain nothing by modifying properties like this, because you could just as easily have included some CSS directly, but shortly we’ll be modifying properties in response to user interaction—and then you’ll see the real power of combining JavaScript and CSS.
Other Properties
JavaScript also opens up access to a very wide range of other properties, such as the width and height of the browser and of any pop-up or in-browser windows or frames, handy information such as the parent window (if there is one), and the history of URLs visited this session.
All these properties are accessed from the window object via the period operator (for example, window.name), and Table 20-1 lists them all, along with descriptions of each.
| Property | Sets and/or returns |
|---|---|
closed |
Returns a Boolean value indicating whether a window has been closed or not |
defaultStatus |
Sets or returns the default text in the status bar of a window |
document |
Returns the document object for the window |
frames |
Returns an array of all the frames and iframes in the window |
history |
Returns the history object for the window |
innerHeight |
Sets or returns the inner height of a window’s content area |
innerWidth |
Sets or returns the inner width of a window’s content area |
length |
Returns the number of frames and iframes in a window |
location |
Returns the location object for the window |
name |
Sets or returns the name of a window |
navigator |
Returns the navigator object for the window |
opener |
Returns a reference to the window that created the window |
outerHeight |
Sets or returns the outer height of a window, including tool and scroll bars |
outerWidth |
Sets or returns the outer width of a window, including tool and scroll bars |
pageXOffset |
Returns the pixels the document has been scrolled horizontally from the left of the window |
pageYOffset |
Returns the pixels the document has been scrolled vertically from the top of the window |
parent |
Returns the parent window of a window |
screen |
Returns the screen object for the window |
screenLeft |
Returns the x coordinate of the window relative to the screen in all recent browsers except Mozilla Firefox (for which you should use screenX) |
screenTop |
Returns the y coordinate of the window relative to the screen in all recent browsers except Mozilla Firefox (for which you should use screenY) |
screenX |
Returns the x coordinate of the window relative to the screen in all recent browsers except Opera, which returns incorrect values; not supported in versions of IE prior to 9 |
screenY |
Returns the y coordinate of the window relative to the screen in all recent browsers except Opera, which returns incorrect values; not supported in versions of IE prior to 9 |
self |
Returns the current window |
status |
Sets or returns the text in the status bar of a window |
top |
Returns the top browser window |
There are a few points to note about some of these properties:
-
The
defaultStatusandstatusproperties can be set only if users have modified their browsers to allow it (very unlikely). -
The
historyobject cannot be read from (so you cannot see where your visitors have been surfing). But it supports thelengthproperty to determine how long the history is, and theback,forward, andgomethods to navigate to specific pages in the history. -
When you need to know how much space there is available in a current window of the web browser, just read the values in
window.innerHeightandwindow.innerWidth. I often use these values for centering in-browser pop-up alert or “confirm dialog” windows. -
The
screenobject supports the read propertiesavailHeight,availWidth,colorDepth,height,pixelDepth, andwidth, and is therefore great for determining information about the user’s display.
Note
Many of these properties can be invaluable when you’re targeting mobile phones and tablet devices, as they will tell you exactly how much screen space you have to work with, the type of browser being used, and more.
These few items of information will get you started and already provide you with many new and interesting things you can do with JavaScript. But, in fact, there are far more properties and methods available than can be covered in this chapter. However, now that you know how to access and use properties, all you need is a resource listing them all, so I recommend that you check out tinyurl.com/domproperties as a good starting point.
Inline JavaScript
Using <script> tags isn’t the only way you can execute JavaScript statements; you can also access JavaScript from within HTML tags, which makes for great dynamic interactivity. For example, to add a quick effect when the mouse passes over an object, you can use code such as that in the <img> tag in Example 20-6, which displays an apple by default, but replaces it with an orange when the mouse passes over, and restores the apple again when the mouse leaves.
Example 20-6. Using inline JavaScript
<!DOCTYPE html>
<html>
  <head>
    <title>Inline JavaScript</title>
  </head>
  <body>
    <img src='apple.png'
      onmouseover="this.src='orange.png'"
      onmouseout="this.src='apple.png'">
  </body>
</html>
The this Keyword
In the preceding example, you see the this keyword in use. It tells the JavaScript to operate on the calling object, namely the <img> tag. You can see the result in Figure 20-2, where the mouse has yet to pass over the apple.
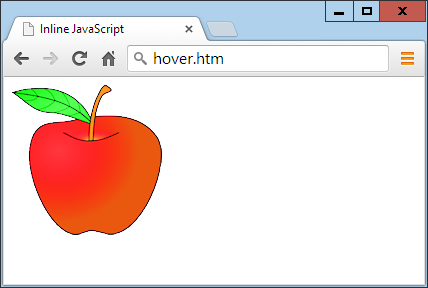
Figure 20-2. Inline mouse hover JavaScript example
Note
When supplied from an inline JavaScript call, the this keyword represents the calling object. When used in class methods, it represents an object to which the method applies.
Attaching Events to Objects in a Script
The preceding code is the equivalent of providing an ID to the <img> tag, and then attaching the actions to the tag’s mouse events, like Example 20-7.
Example 20-7. Non-inline JavaScript
<!DOCTYPE html>
<html>
  <head>
    <title>Non-inline JavaScript</title>
    <script src='OSC.js'></script>
  </head>
  <body>
    <img id='object' src='apple.png'>

    <script>
      O('object').onmouseover = function() { this.src = 'orange.png' }
      O('object').onmouseout  = function() { this.src = 'apple.png'  }
    </script>
  </body>
</html>
In the HTML section, this example gives the <img> element an ID of object, and then proceeds to manipulate it separately in the JavaScript section by attaching anonymous functions to each event.
Attaching to Other Events
Whether you’re using inline or separate JavaScript, there are several events to which you can attach actions, providing a wealth of additional features you can offer your users. Table 20-2 lists these events and details when they will be triggered.
| Event | Occurs |
|---|---|
onabort |
When an image’s loading is stopped before completion |
onblur |
When an element loses focus |
onchange |
When any part of a form has changed |
onclick |
When an object is clicked |
ondblclick |
When an object is double-clicked |
onerror |
When a JavaScript error is encountered |
onfocus |
When an element gets focus |
onkeydown |
When a key is being pressed (including Shift, Alt, Ctrl, and Esc) |
onkeypress |
When a key is being pressed (not including Shift, Alt, Ctrl, and Esc) |
onkeyup |
When a key is released |
onload |
When an object has loaded |
onmousedown |
When the mouse button is pressed over an element |
onmousemove |
When the mouse is moved over an element |
onmouseout |
When the mouse leaves an element |
onmouseover |
When the mouse passes over an element from outside it |
onmouseup |
When the mouse button is released |
onsubmit |
When a form is submitted |
onreset |
When a form is reset |
onresize |
When the browser is resized |
onscroll |
When the document is scrolled |
onselect |
When some text is selected |
onunload |
When a document is removed |
Warning
Make sure you attach events to objects that make sense. For example, an object that is not a form will not respond to the onsubmit event.
Adding New Elements
With JavaScript, you are not limited to manipulating the elements and objects supplied to a document in its HTML. In fact, you can create objects at will by inserting them into the DOM.
For example, suppose you need a new <div> element. Example 20-8 shows one way you can add it to the web page.
Example 20-8. Inserting an element into the DOM
<!DOCTYPE html>
<html>
  <head>
    <title>Adding Elements</title>
    <script src='OSC.js'></script>
  </head>
  <body>
    This is a document with only this text in it.<br><br>

    <script>
      alert('Click OK to add an element')

      newdiv    = document.createElement('div')
      newdiv.id = 'NewDiv'
      document.body.appendChild(newdiv)

      S(newdiv).border = 'solid 1px red'
      S(newdiv).width  = '100px'
      S(newdiv).height = '100px'
      newdiv.innerHTML = "I'm a new object inserted in the DOM"
      tmp              = newdiv.offsetTop

      alert('Click OK to remove the element')
      pnode = newdiv.parentNode
      pnode.removeChild(newdiv)
      tmp = pnode.offsetTop
    </script>
  </body>
</html>
Figure 20-3 shows this code being used to add a new <div> element to a web document. First, the new element is created with createElement; then the appendChild function is called, and the element gets inserted into the DOM.
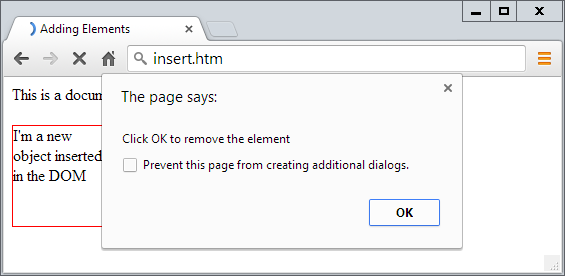
Figure 20-3. Inserting a new element into the DOM
After this, various properties are assigned to the element, including some text for its inner HTML. And then, in order to make sure the new element is instantly revealed, its offsetTop property is read into the throwaway variable tmp. This forces a DOM refresh and makes the element display in any browser that might otherwise delay before doing so—particularly Internet Explorer.
This new element is exactly the same as if it had been included in the original HTML, and has all the same properties and methods available.
Note
I sometimes use the technique of creating new elements when I want to create in-browser pop-up windows, because it doesn’t rely on there having to be a spare <div> element available in the DOM.
Removing Elements
You can also remove elements from the DOM, including ones that you didn’t insert using JavaScript; it’s even easier than adding an element. It works like this, assuming the element to remove is in the object element:
element.parentNode.removeChild(element)
This code accesses the element’s parentNode object so that it can remove the element from that node. Then it calls the removeChild method on that object, passing the object to be removed. However, to ensure the DOM instantly refreshes on all browsers, you may prefer to replace the preceding single statement with something like this:
pnode = element.parentNode
pnode.removeChild(element)
tmp   = pnode.offsetTop
This first statement makes a copy of element.parentNode (the parent element of the object) in pnode, which (after the child element is removed) has its offsetTop property looked up (and discarded in the throwaway variable tmp), thus ensuring that the DOM is fully refreshed.
Alternatives to Adding and Removing Elements
Inserting an element is intended for adding totally new objects into a web page. But if all you intend to do is hide and reveal objects according to an onmouseover or other event, don’t forget that there are always a couple of CSS properties you can use for this purpose, without taking such drastic measures as creating and deleting DOM elements.
For example, when you want to make an element invisible but leave it in place (and with all the elements surrounding it remaining in their positions), you can simply set the object’s visibility property to 'hidden', like this:
myobject.visibility = 'hidden'
And to redisplay the object, you can use the following:
myobject.visibility = 'visible'
You can also collapse elements down to occupy zero width and height (with all objects around it filling in the freed-up space), like this:
myobject.display = 'none'
To then restore an element to its original dimensions, you would use the following:
myobject.display = 'block'
And, of course, there’s always the innerHTML property, with which you can change the HTML applied to an element, like this, for example:
mylement.innerHTML = '<b>Replacement HTML</b>'
Or you can use the O function I outlined earlier, like this:
O('someid').innerHTML = 'New contents'
Or you can make an element seem to disappear, like this:
O('someid').innerHTML = ''
Note
Don’t forget other useful CSS properties you can access from JavaScript, such as opacity for setting the visibility of an object to somewhere between visible and invisible, or width and height for resizing an object. And, of course, using the position property with values of 'absolute', 'static', or 'relative', you can even locate an object anywhere in (or outside) the browser window that you like.
Using Interrupts
JavaScript provides access to interrupts, a method by which you can ask the browser to call your code after a set period of time, or even to keep calling it at specified intervals. This gives you a means of handling background tasks such as Ajax communications, or even things like animating web elements.
To accomplish this, you have two types of interrupt: setTimeout and setInterval, which have accompanying clearTimeout and clearInterval functions for turning them off again.
Using setTimeout
When you call setTimeout, you pass it some JavaScript code or the name of a function, and the value in milliseconds representing how long to wait before the code should be executed, like this:
setTimeout(dothis, 5000)
And your dothis function might look like this:
function dothis()
{
  alert('This is your wakeup alert!');
}
Note
In case you’re wondering, you cannot simply specify alert() (with brackets) as a function to be called by setTimeout, because the function would be executed immediately. Only when you provide a function name without argument brackets (for example, alert) can you safely pass the function name so that its code will be executed only when the time-out occurs.
Passing a string
When you need to provide an argument to a function, you can also pass a string value to the setTimeout function, which will not be executed until the correct time, like this:
setTimeout("alert('Hello!')", 5000)
In fact, you can provide as many lines of JavaScript code as you like, if you place a semicolon after each statement, like this:
setTimeout("document.write('Starting'); alert('Hello!')", 5000)
Repeating time-outs
One technique some programmers use to provide repeating interrupts using the function setTimeout is to call the setTimeout function from the code called by it, as with the following, which will initiate a never-ending loop of alert windows:
setTimeout(dothis, 5000)

function dothis()
{
  setTimeout(dothis, 5000)
  alert('I am annoying!')
}
Now the alert will pop up every five seconds.
Cancelling a Time-Out
Once a time-out has been set up, you can cancel it if you previously saved the value returned from the initial call to setTimeout, like this:
handle = setTimeout(dothis, 5000)
Armed with the value in handle, you can now cancel the interrupt at any point up until its due time, like this:
clearTimeout(handle)
When you do this, the interrupt is completely forgotten, and the code assigned to it will not get executed.
Using setInterval
An easier way to set up regular interrupts is to use the setInterval function. It works in just the same way, except that having popped up after the interval you specify in milliseconds, it will do so again after that interval again passes, and so on forever, unless you cancel it.
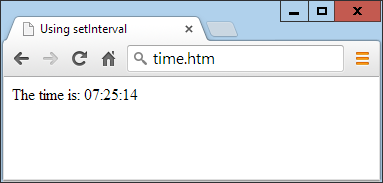
Example 20-9 uses this function to display a simple clock in the browser, as shown in Figure 20-4.
Example 20-9. A clock created using interrupts
<!DOCTYPE html>
<html>
  <head>
    <title>Using setInterval</title>
    <script src='OSC.js'></script>
  </head>
  <body>
    The time is: <span id='time'>00:00:00</span><br>

    <script>
      setInterval("showtime(O('time'))", 1000)

      function showtime(object)
      {
        var date = new Date()
        object.innerHTML = date.toTimeString().substr(0,8)
      }
    </script>
  </body>
</html>
Every time ShowTime is called, it sets the object date to the current date and time with a call to Date:
var date = new Date()
Then the innerHTML property of the object passed to showtime (namely, object) is set to the current time in hours, minutes, and seconds, as determined by a call to the function toTimeString. This returns a string such as 09:57:17 UTC+0530, which is then truncated to just the first eight characters with a call to the substr function:
object.innerHTML = date.toTimeString().substr(0,8)
Using the function
To use this function, you first have to create an object whose innerHTML property will be used for displaying the time, like this HTML:
The time is: <span id='time'>00:00:00</span>
Then, from a <script> section of code, a call is placed to the setInterval function, like this:
setInterval("showtime(O('time'))", 1000)
It then passes a string to setInterval, containing the following statement, which is set to execute once a second (every 1,000 milliseconds):
showtime(O('time'))
In the rare situation where somebody has disabled JavaScript (which people sometimes do for security reasons), your JavaScript will not run and the user will see the original 00:00:00.
Cancelling an interval
To stop a repeating interval, when you first set up the interval with a call to the function setInterval, you must make a note of the interval’s handle, like this:
handle = setInterval("showtime(O('time'))", 1000)
Now you can stop the clock at any time by issuing the following call:
clearInterval(handle)
You can even set up a timer to stop the clock after a certain amount of time, like this:
setTimeout("clearInterval(handle)", 10000)
This statement will issue an interrupt in 10 seconds that will clear the repeating intervals.
Using Interrupts for Animation
By combining a few CSS properties with a repeating interrupt, you can produce all manner of animations and effects.
For example, the code in Example 20-10 moves a square shape across the top of a browser, all the time ballooning in size, as shown in Figure 20-5, before starting all over again when LEFT is reset to 0.
Example 20-10. A simple animation
<!DOCTYPE html>
<html>
  <head>
    <title>Simple Animation</title>
    <script src='OSC.js'></script>
    <style>
      #box {
        position  :absolute;
        background:orange;
        border    :1px solid red;
      }
    </style>
  </head>
  <body>
    <div id='box'></div>

    <script>
      SIZE = LEFT = 0

      setInterval(animate, 30)

      function animate()
      {
        SIZE += 10
        LEFT += 3

        if (SIZE == 200) SIZE = 0
        if (LEFT == 600) LEFT = 0

        S('box').width  = SIZE + 'px'
        S('box').height = SIZE + 'px'
        S('box').left   = LEFT + 'px'
      }
    </script>
  </body>
</html>
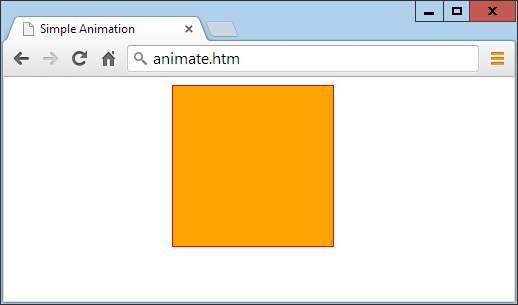
Figure 20-5. This object slides in from the left while changing size
In the <head> section of the document, the box object is set to a background color of 'orange' with a border value of '1px solid red', and its position property is set to absolute so that it is allowed to be moved around in the browser.
Then, in the animate function, the global variables SIZE and LEFT are continuously updated and then applied to the width, height, and left style attributes of the box object (with 'px' added after each to specify that the values are in pixels), thus animating it at a frequency of once every 30 milliseconds—giving a rate of 33.33 frames per second (1,000/30 milliseconds).
Questions
- What are the
O,S, andCfunctions provided to do? - Name two ways to modify a CSS attribute of an object.
- Which properties provide the width and height available in a browser window?
- How can you make something happen when the mouse passes both over and out of an object?
- Which JavaScript function creates new elements, and which appends them to the DOM?
- How can you make an element (a) invisible, and (b) collapse to zero dimensions?
- Which function creates a single event at a future time?
- Which function sets up repeating events at set intervals?
- How can you release an element from its location in a web page to enable it to be moved around?
- What delay between events should you set (in milliseconds) to achieve an animation rate of 50 frames per second?
See Chapter 20 Answers in Appendix A for the answers to these questions.