If you collect baseball hats, this project is for you. You will need a lot of hockey stick blades. Any self-respecting hockey player will tell you that some blades curve left and others right. An aesthetic decision must be made, therefore, as to the arrangement of the blades. I would suggest an equal number of blades of each orientation, mounted so that they curve outward from the middle towards each end. If you were a fine arts major in university, you could say, “The confluence of the organic bend of each curve speaks of the interplay of structure and utility. It is a didactic representation of a neo-postmodern adaptation to form.” Now, how you explain your ridiculous collection of baseball hats is up to you. You must cut consistently exact angles at the handle end of the blades so they all project at the same pitch. If you are not confident in your ability to measure such precise angles, you can forego the blades and just use sawed-off 6” hockey stick pieces as pegs for the hats.
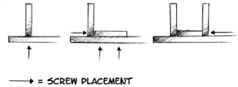
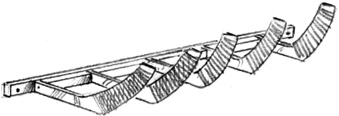
To create this fine hat rack, find a piece of stick longer than the desired width of the finished rack to use as the mounting piece. Cut each peg 5” long, and cut 4” pieces as spacers to fit between the pegs. (So, for example, if you have 5 pegs you will need 4 spacers.) Lay out the rack before assembling. Leave 2” on each end and place the pegs and spacers accordingly. Drill a hole in each end for your mounting hardware. A fine embellishment would a fancy rink-rat-style taping job to make a knob at the end of each peg, thereby improving their grip. Do this before you attach the pegs to the back. Start assembling by drilling and screwing the first peg from the back of the rack. Screw on the first spacer from behind with two screws, making sure it fits tightly against the peg. Put another screw through the peg into the spacer. Repeat the process with each peg.