chapter 3
Caring for Your Containers
One of the most important things to remember about gardening in any form is that plants are surprisingly forgiving. A rhododendron pruned into a meatball shape will eventually outgrow its odd form, a small tree with hacked branches will look fine once it’s properly trimmed, and a perennial that was aggressively cut back by an overzealous gardener will quickly outgrow even the worst “haircut.” There are very few mistakes you can make in a garden that can’t be corrected.
In this chapter, I’m going to share many plant care tips and maintenance techniques, but be aware that not a single one of them is carved in stone. Yes, completing every task outlined in this chapter definitely results in a gorgeous, healthy, and productive container garden, but skipping a few of them from time to time is not going to spell certain disaster. Care for your containers to the best of your ability, make mistakes and learn from them. When things go wrong, remember: you can always try again next year.
But although you can skip some of the following maintenance tasks from time to time, there is one job you absolutely cannot forget when it comes to container gardening. And, because this one core duty is so critical, it’s the first thing we’ll talk about.

Little containers like this clay pot hold a small volume of potting mix and need to be watered more frequently.
WATERING
The vast majority of failed container-grown plants are the result of the gardener either failing to water or watering improperly. There’s no doubt about it: if you want a beautiful container garden, you have to make sure the plants receive regular and consistent moisture.
How Often?
The irrigation needs of a particular container are directly related to the volume of potting soil contained in it. Smaller containers need to be watered more frequently—so frequently, in fact, that if a small clay pot is in the full summer sun, you may have to water it two or three times a day. The large volume of potting soil found in bigger containers can store more moisture, so in general, the larger the pot, the less frequently you’ll need to water it.
Since irrigation needs are also dependent on the size and type of plants, there are other factors to consider. No matter what size container they’re growing in, bigger plants need more water (unless, of course, you’re growing a cactus or another plant with low-water requirements). Mature plants also tend to need more water than immature ones. That means a container generally needs more and more water as the season progresses and the plants grow. Porous containers, like unglazed clay or moss-lined planters, dry out more frequently, as well. If you want to limit how often you have to water, opt for glazed ceramic, plastic, metal, or fiberglass containers over terracotta.
Rainfall also plays a role. Invest in a rain gage and stick it right into one of your containers at or just above the soil level. It will collect and measure the amount of rainfall that finds its way there. Keep in mind, however, that rain may slide and bounce off foliage, diverting it away from where it’s needed. You may find your rain gage empty, even after a heavy rain, simply because the leaves scatter the droplets before they reach the soil. The only way to know for sure is to head outside and check the moisture level of your pots in person.
There are many ways to check the moisture level of a container. You can purchase a fancy moisture sensor meter or soil water monitor to insert into the soil, you can feel the weight of the pot, or you can wait for the plant to wilt. But the most reliable way to assess soil moisture levels also happens to be the easiest: stick a finger into the pot up to your knuckle. If the soil is dry, water it. If it’s not, don’t. And if you’ve done a good job selecting a pot with adequate drainage, you’ll never be in danger of overwatering, because excess water simply drains out the hole in the bottom of the pot. Which brings us to the next consideration…

To reduce watering needs, select larger containers whenever possible and make smart plant choices.

Large, glazed ceramic pots, like this one, hold a lot of soil and therefore need to be watered less frequently than smaller, porous containers.

Succulents and cacti are some of the best choices for filling terracotta containers because they have low-water requirements and prefer to stay on the dry side.

Stylish, light-weight plastic containers are a great choice for gardeners who want a bigger container without the weight of traditional clay or ceramic pots.
How Much?
Another common mistake is using the “splash-and-dash” method of irrigation: sprinkling a little water on top of each plant every morning, maybe splashing a bit onto the soil as you go. The foliage gets peppered with water, but the roots remain parched. The plants suffer, and the gardener can’t understand why their containers are underperforming when they’re “watering them every day.”
This kind of “splash-and-dash” irrigation, where a small amount of water is added every day, is not good for in-ground gardens or lawns either. Plants need deep, thorough irrigation that penetrates down through the soil to reach the entire root system. Shallow irrigation promotes shallow root systems that cannot access ample nutrition or withstand any amount of drought, while deep irrigation promotes deep, self-sufficient root systems. In containers, this means you need to apply irrigation water directly to the root zone, and you need to drench the soil repeatedly until at least a quarter of the water applied runs out the drainage hole in the bottom of the pot.
The argument that frequent light watering prevents overwatering is a fallacy. Overwatering is most often the result of applying water too frequently. Roots need access to air, and when the soil is constantly wet, the roots can’t breathe and the plant wilts and eventually dies. Unfortunately, the symptoms of overwatering look a lot like the symptoms of underwatering.
The trick to proper container irrigation is balance. Aim to supply your plants with plenty of water, but do it on an as-needed basis. Allow the growing mix to dry out a bit between waterings, but not enough to induce any plant stress.
If you’re worried about forgetting to check the moisture levels of your containers, set a reminder on your smart phone. Or, if you don’t have time to regularly check for irrigation needs, consider growing your container garden in self-watering planters, like the commercial brands discussed in Chapter 1 or by making the DIY self-watering planter featured in the next project sidebar.

Overwatering occurs when the soil is constantly wet and the plant roots can’t breathe. Never allow water to sit in a saucer beneath a plant for longer than a few hours.
SELF-WATERING PATIO CONTAINER

Purchasing manufactured self-watering containers is expensive, especially if you want more than one or two. The following step-by-step plan lets you make five or six self-watering containers for the cost of a single manufactured one. Use large, 50-gallon storage bins like the ones in the photographs, to grow tomatoes, zucchini, and other big veggies, or choose smaller bins for smaller plants or smaller spaces. Simply follow the steps to turn a pair of plastic storage bins of any size into an inexpensive, self-watering planter.
HOW TO MAKE A SELF-WATERING PATIO CONTAINER

STEP 1 Use a utility knife to cut a 2-in. square hole in the middle of the bottom of one of the storage bins, near the center. Cut the cotton hand towel lengthwise, to make four strips of the same approximate width.
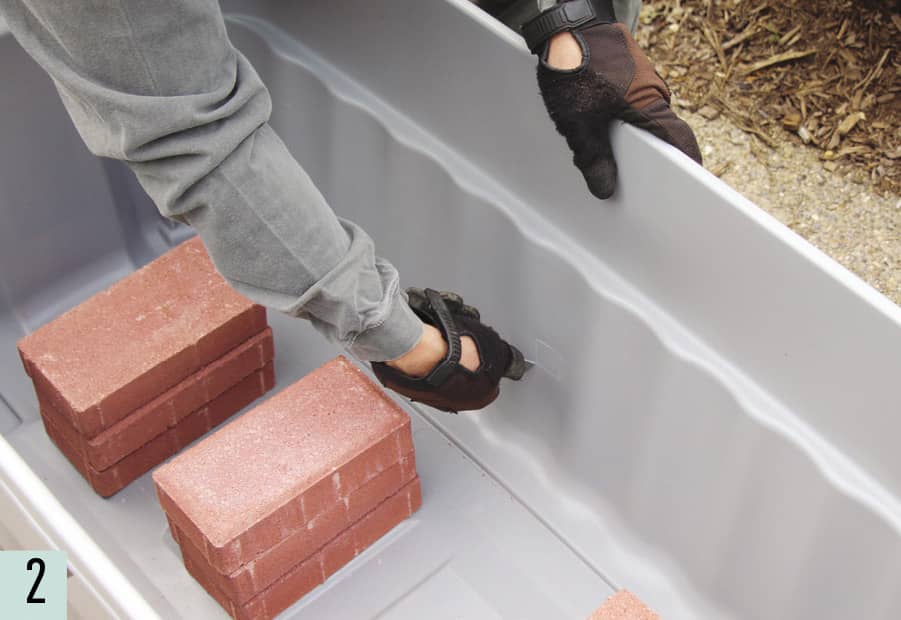
STEP 2 Position the second bin wherever you’d like your planter to be located, then stack columns of bricks or blocks 4 to 8 in. high in the bottom to create a water reservoir. For larger bins, make three columns of bricks; smaller bins will only need two columns. Do not place a column in the exact center of the bin, as it could restrict the movement of water. Use the utility knife to cut a 2-in. square hole into the back of this bin. The top of the hole should be the exact same height as the top of your brick columns. This hole will be where you fill the water reservoir, but it will also serve as an overflow outlet.

STEP 3 Fill the reservoir with water up to the bottom of the fill/overflow hole. Place the first bin into the second, nestling it securely inside and making sure the bottom of the inside bin is resting on top of the brick columns.
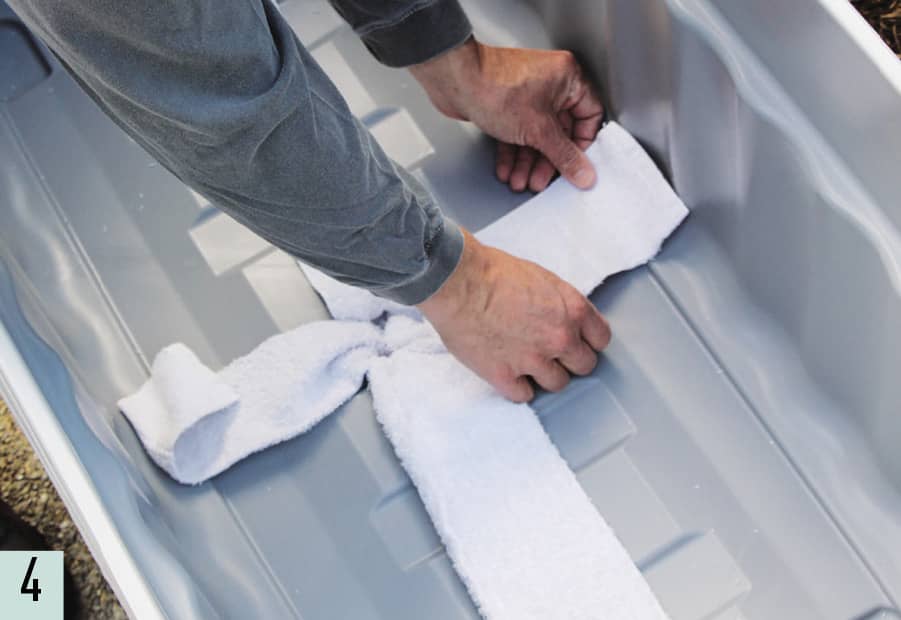
STEP 4 Gather the strips of hand towel together and insert one end through the hole in the bottom of the inner bin. Enough of the towel should extend through the hole to reach the bottom of the reservoir bin. Then, spread the upper portion of the towel strips out into the bottom of the container, in a “+” shape. The towel strips will serve as a wick, drawing water out of the reservoir and delivering it to the soil in the upper bin.
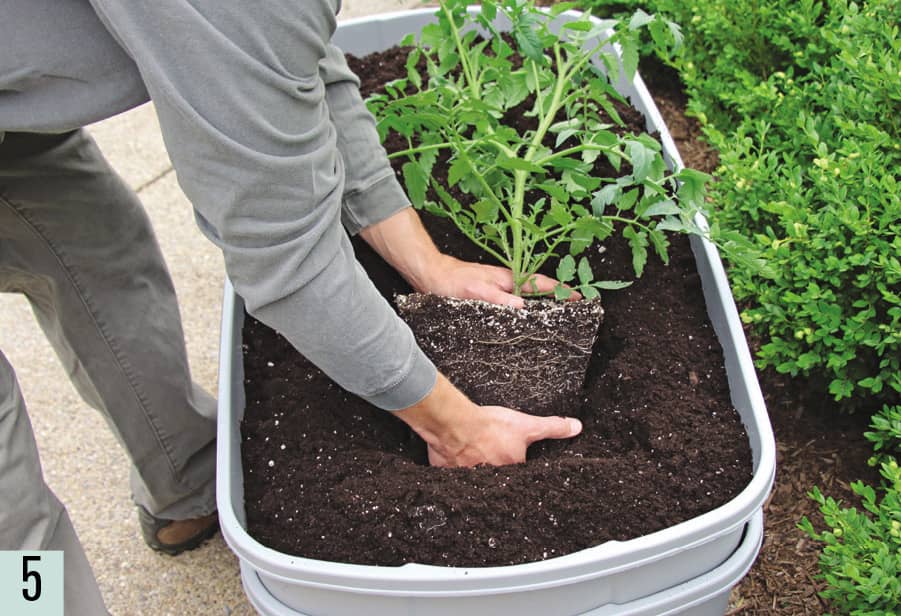
STEP 5 Fill the inner bin with a 50/50 mixture of high-quality potting soil and compost. Don’t overfill with the soil blend; leave 1 in. of headspace at the top to collect any rainfall. Now you can plant. This 50-gallon self-watering planter will house two patio-type bush tomatoes, two basil plants, a cucumber vine, a miniature watermelon vine, and a hot pepper plant. If you use smaller bins, you’ll have to whittle down your plant list. Water the plants after planting. This will be the only time you’ll need to water from the top.

STEP 6 Insert stakes and cages, if necessary. For this example, we used two colored tomato cages to support the tomato plants as they grow, but you could also incorporate any of the trellising ideas discussed later in this chapter.

STEP 7 Though you won’t have to add water to the reservoir every day, you will have to check it from time to time. Fill the reservoir by inserting a hose into the hole in the back of the planter and letting it run until water starts coming back out of the hole. The amount of water needed depends on how empty the reservoir was when you started.
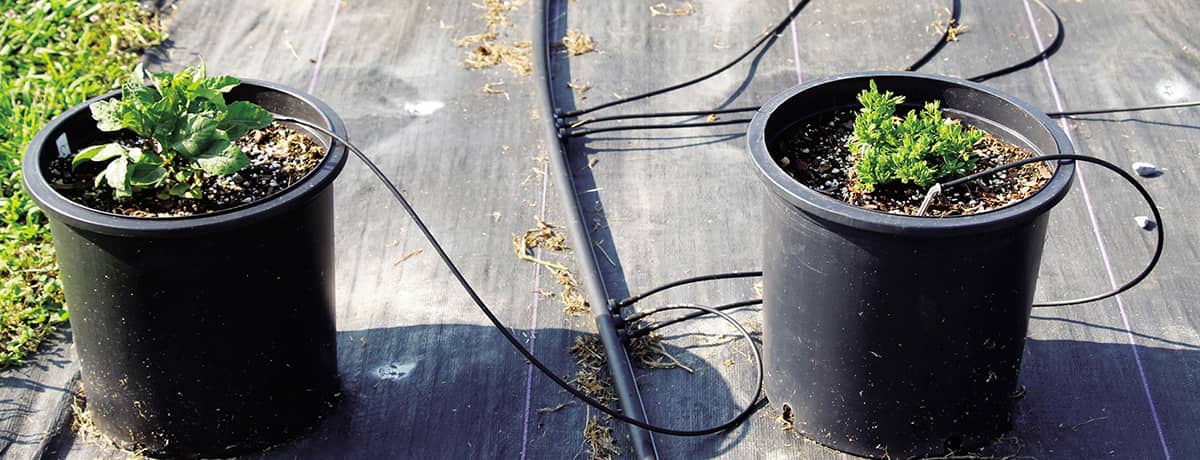
Commercial container growers often use automatic drip irrigation to water many pots at the same time. The next project shows you how to make a similar system to use at home.
The Water Delivery System
There’s no single best way to deliver water to your container garden—it’s only important that the water is focused on the plants’ root zone rather than on the foliage. Plenty of gorgeous container gardens are watered by hand, with watering cans, buckets, or pitchers full of water. Others are hand-watered with a gentle spray from a water wand nozzle attached to the end of a hose. But if you really want to cut down on the amount of time you spend watering, consider setting up an automatic irrigation system to water your containers.
This is a particularly useful method if you grow a large number of containerized fruits and vegetables, or if you’re growing for commercial purposes. Automatic irrigation systems deliver water to containers drop by drop, which is very efficient because the water is delivered straight into the pot with very little lost to evaporation or misapplication. This type of system is usually installed by distributing irrigation tubing along rows of containers, and then running a section of small, flexible tube out from the main tubing and into each of the pots. Irrigation kits are sold at nurseries, farm supply stores, specialty greenhouse and irrigation supply companies, or you can build your own automatic irrigation system by following the step-by-step instructions found in the next project sidebar.
Once installed, irrigation systems can be hooked up to a programmed timer, or the system can be turned on or off with a simple twist of whatever spigot it’s connected to.

This bucket-in-bucket system at the rooftop garden of Dinette Restaurant in Pittsburgh, Pennsylvania, utilizes an automatic irrigation system to make watering easier. Water is added to the bottom bucket via a drip system and then wicked up into the top grow bucket as needed.
DIY CONTAINER IRRIGATION SYSTEM

This DIY system irrigates up to six pots, but you can adjust the design for your needs, adding more tubing and dripper stakes to water up to ten pots at a time or even using T couplings to add additional branches. Commercial drip irrigation kits contain all the components you’ll need to make a similar system, but it’s cheaper to buy the materials and construct the system yourself.
HOW TO MAKE A DIY CONTAINER IRRIGATION SYSTEM

STEP 1 Put all the pots you want served by your irrigation system in their places. Measure the amount of 1/2-in. black poly irrigation tubing you’ll need to go from the nearest pot to the furthest pot on the line. Lay the tubing out and cut it to size with a sharp scissors.

STEP 2 Cap the end of the tubing that’s farthest away from the hose spigot with either a poly tube end cap or a shut-off valve (shown in photo). If you use a shut-off valve, make sure it’s in the closed position. Attach the faucet connection kit to the end of the tube closest to the hose spigot. (After construction of the system, you’ll need to run a length of garden hose from the spigot out to the faucet connection kit.)
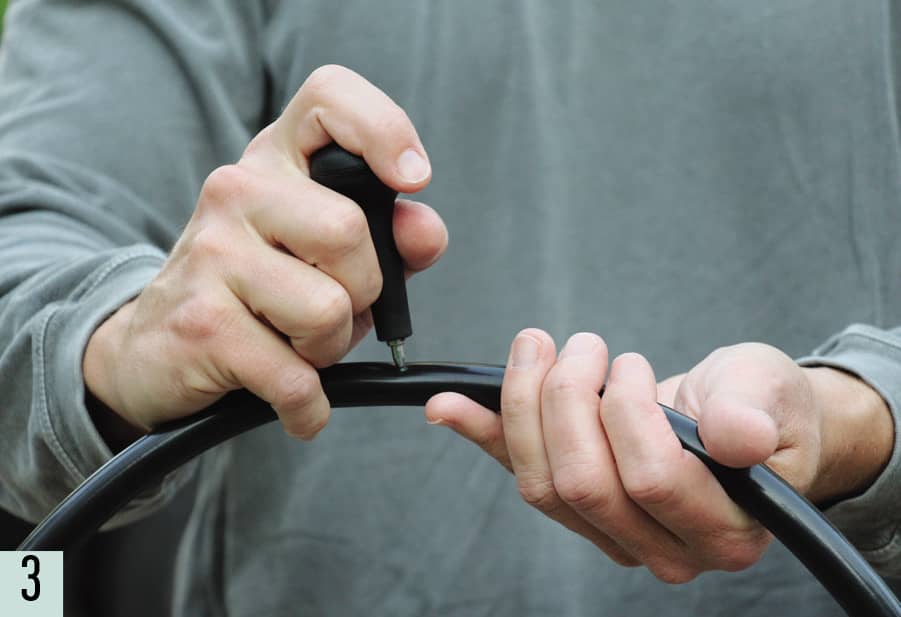
STEP 3 Now it’s time to add lengths of micro tubing line to go into each container. Use the hole puncher to punch a small hole through the 1/2-in. black poly irrigation tubing you’ve laid out. Punch one hole for each drip line that will extend from the main line.
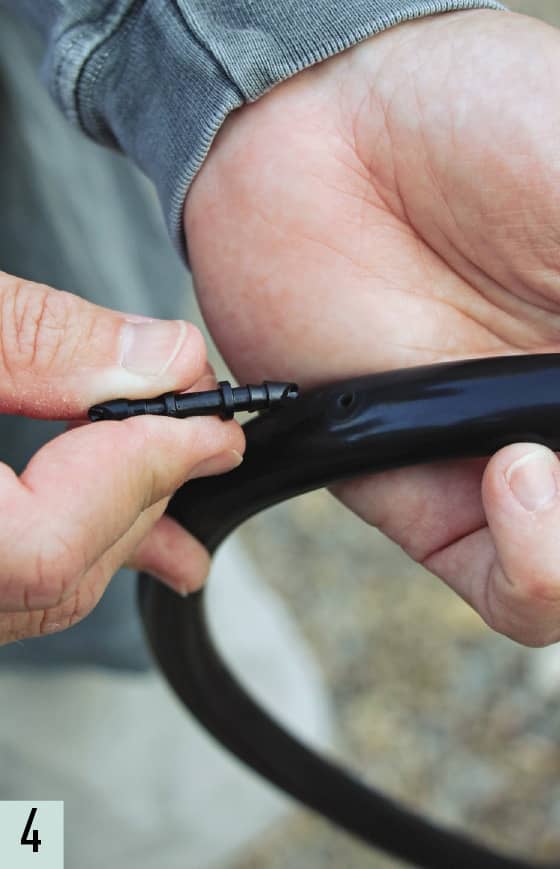
STEP 4 Once each hole has been punched, put one end of a 1/4-in. double-barbed connector into each of the holes. Measure and cut a piece of 1/4-in. black micro poly tubing to reach from each barbed connector to the container, allowing a little slack in each line. Slide one end of the micro poly tubing down over the exposed end of the double-barbed connector.
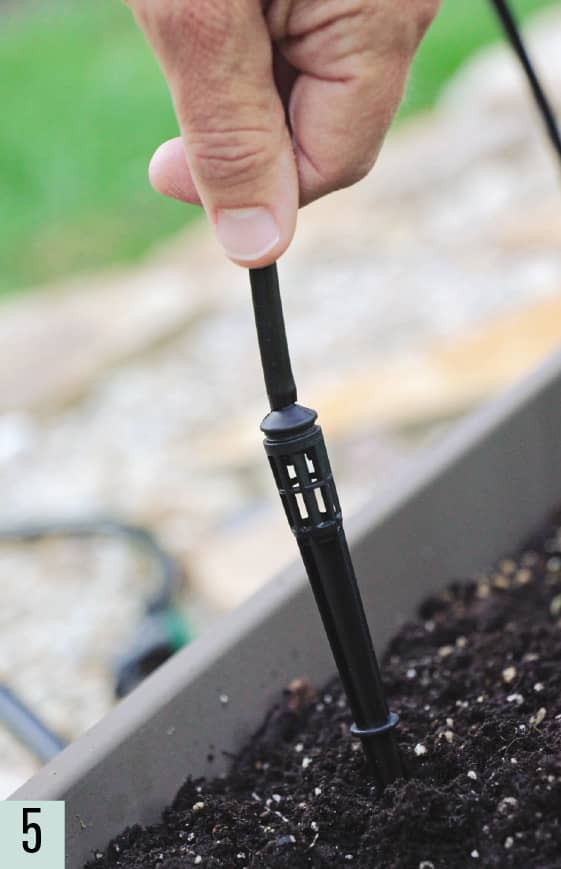
STEP 5 Attach a dripper stake with basket or a mini in-line dripper to the other end of each micro poly tubing by pushing the tubing down over the nipple. Insert the dripper stake with basket into the container’s soil; or, if you’re using mini in-line drippers instead, lay the end of the in-line dripper on top of the soil.
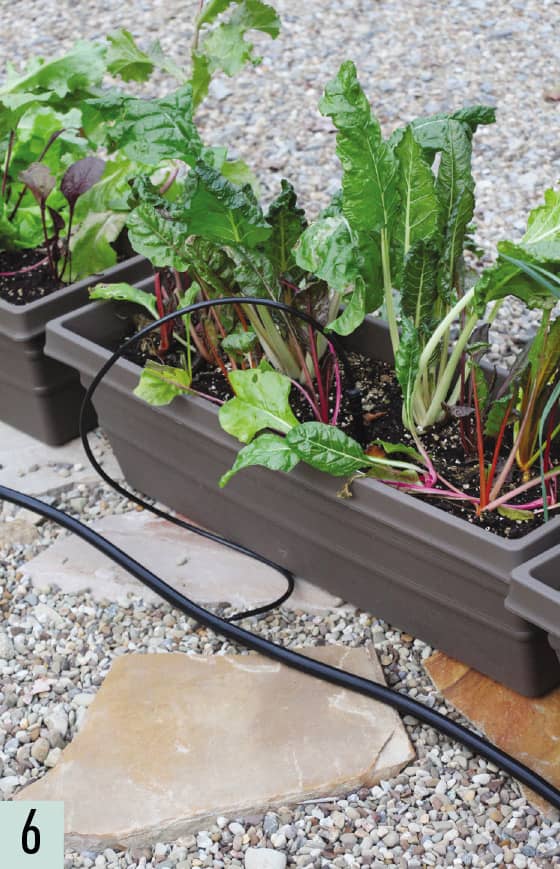
STEP 6 Test your system by connecting it to a hose and turning the faucet on. Depending on the type of dripper stakes you used, you may be able to control the flow of water coming out of them by twisting the top of the basket. Check the system carefully for leaks and repair any you happen to find.
STEP 7 If you’d like, connect a programmable timer to the spigot to control when and how much water is supplied. How long it will take to fully irrigate your pots depends on your water pressure and how many containers are being watered on the same line. Run a test from time to time to determine how long the timer needs to run before the containers are fully watered.
STEP 8 To see your new irrigation system safely through the winter, disconnect it from the spigot before freezing temperatures arrive. Drain the system completely, then lift it out of the garden and overwinter it in a garage or shed. Or, if you want to leave it in place, use an air compressor to blow air through all the lines to make sure there’s no moisture remaining in them.
TIP: To use this DIY system in conjunction with a rain barrel, hook it up to a small, submersible pond pump (a 250- or 400-gallons-per-hour pump should work just fine). Submerge the pump into the rain barrel and plug it in. The pump will draw water out of the barrel and send it down the irrigation tubing to water the pots. If you need to move the water uphill, you’ll need a more powerful pump.
FERTILIZING
Garden centers and nurseries are beautiful places, but they can also be very confusing. Endless shelves and end caps overflowing with fertilizer choices are enough to make your head spin.
By definition, a plant fertilizer is either a synthetic chemical or a natural material added to the soil or growing media to increase its fertility and aid in plant growth. Your mother may have drenched her potted plants with a water-soluble chemical fertilizer every week, but there’s been a major shift in thinking over the past decade. We’ve moved away from the idea of “feeding the plants” and toward the idea of “feeding the soil.”
When you use naturally derived fertilizers, your plants are provided with a much more balanced nutrient source—one that provides mineral nutrition for growing plants by feeding the soil’s living organisms. These microscopic organisms (most of which are fungi and bacteria) process these fertilizers, breaking them down into the nutrients plants use to grow. In addition, many of these microbes live in a mutually beneficial relationship with the roots of plants, providing the plants with certain mineral nutrients in exchange for small amounts of carbohydrates. When we feed the soil, our plants reap the benefits.

Gorgeous container plants are the result of encouraging healthy, biologically active soil through the addition of compost to the planting mix and feeding with natural fertilizers.
You may think all this doesn’t matter for container gardens, since the root system is contained in a small area, but if you use a 50/50 blend of compost and potting soil to fill your containers, quite the opposite is true. The compost in your containers is alive with beneficial soil organisms. Plus, compost contains myriad macro- and micronutrients essential for plant growth. Science has shown us that encouraging healthy, biologically active soil is the best way to promote optimum plant growth, even when plants are growing in containers.
Nevertheless, there are times when our container-grown plants need more nutrition, such as when the nutrients contained in the compost are depleted or unavailable. For those times, there are a number of easy-to-use natural fertilizers that do an excellent job of feeding the soil. These fertilizers are derived from assorted combinations of naturally-sourced materials, and they can readily be added to containers throughout the growing season. An added benefit of using these natural fertilizers is that many of them contain trace nutrients, vitamins, amino acids, and plant hormones that aren’t usually noted on the label and are rarely found in chemical fertilizers. These compounds act as natural growth enhancers and play a vital role in the health and vigor of plants.
Reading the Label
When shopping for fertilizers, spend some time reading the labels. Natural fertilizers have four main ingredient sources.
1. Plant materials. These are fertilizer ingredients derived from plants. A few examples include corn gluten meal, alfalfa meal, kelp meal, and cottonseed meal.
2. Manure materials. You may also see pelletized poultry manure, dehydrated cow manure, cricket manure, bat guano, and worm castings or worm “tea” on the label of a natural fertilizer.
3. Animal byproducts. Fertilizer components found in this category are often derived from the byproducts of our food industry. They include things like fish emulsion, bone meal, feather meal, blood meal, and crab meal.
4. Mined minerals. Natural fertilizers for plants may also include mined minerals, such as greensand, rock phosphate, crushed limestone, and sulfate of potash.

Dehydrated cow and poultry manure can be found in bags at your local garden center, but it’s also a common ingredient in many natural granular fertilizer blends.
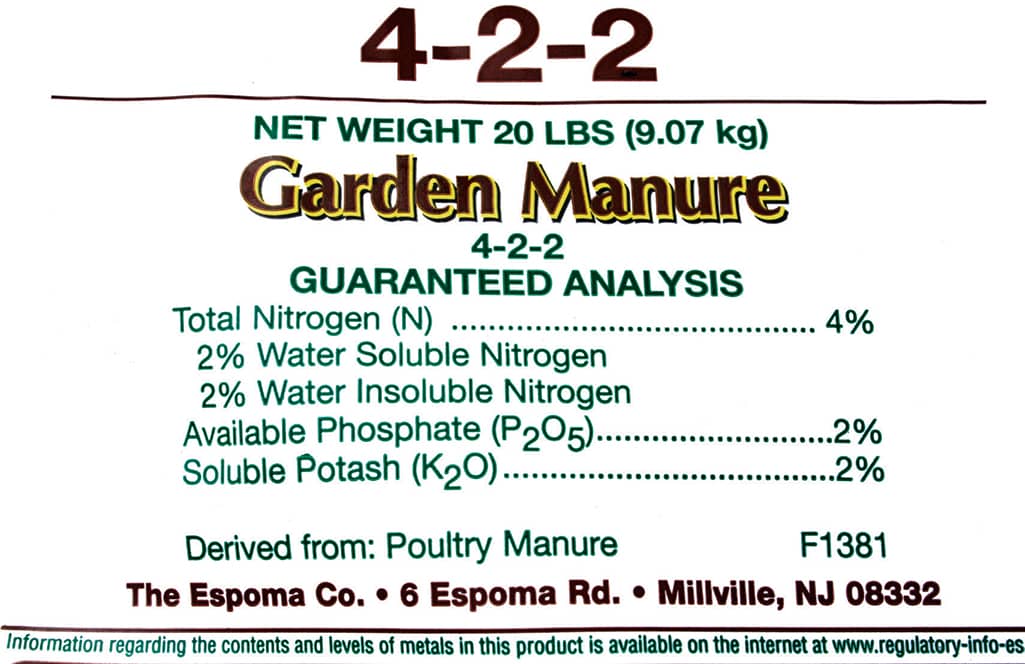
Carefully read the labels of any fertilizers you use in your container garden. Pay special attention to both the N-P-K ratio of the product and the ingredient list to determine if it’s the right fertilizer for your needs.
Using fertilizers containing a combination of these ingredients is a terrific way to feed your soil when nutrients become depleted and adding more compost isn’t an option.
Before choosing any type of fertilizer for your container garden, however, it’s important for you to understand the numbers you see on the label. In addition to listing their ingredients, natural fertilizers also state their N-P-K ratio somewhere on the bag. This ratio exhibits the percentage by weight of three macro-nutrients—nitrogen, phosphorous, and potassium. For example, a bag of 10-5-10 holds 10% N, 5% P, and 10% K. The remaining 75% of the bag’s weight is filler products. For natural-based fertilizers, the numbers in the N-P-K ratio are often smaller (2-3-2 or 1-1-6, for example). This is due to the fact that the label percentages are based on levels of immediately available nutrients, and many of the nutrients in natural fertilizers are not available immediately upon application; it takes some time for the soil microbes to process these nutrients and release them for plant use. Although this may seem like a disadvantage, natural fertilizers release their nutrients gradually, serving as a slow-release fertilizer.
It’s also important to understand how plants use these different macronutrients.
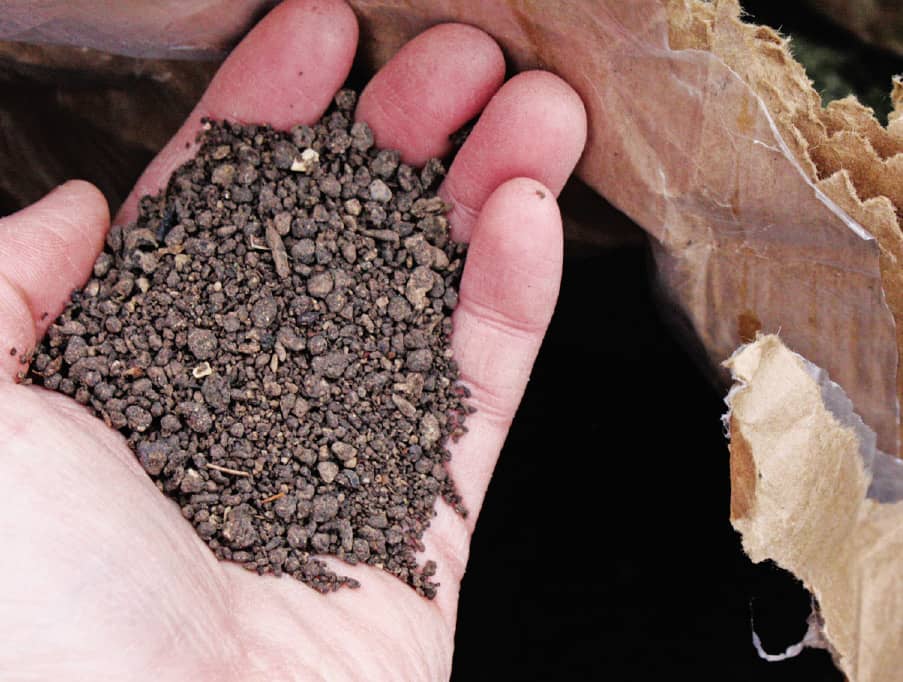
Commercially available granular fertilizer blends are a great way to add nutrition to your container garden.
Nitrogen is a component of the chlorophyll molecule, and it promotes optimum shoot and leaf growth. Adding a fertilizer high in nitrogen (such as 6-2-1 or 10-5-5) to a fruiting or flowering plant, such a tomato or a petunia, will result in excessive green growth, often at the expense of flower and fruit production. But adding it to a green, leafy vegetable plant, such as spinach or lettuce, makes much more sense.
Phosphorus, on the other hand, is used for cell division and to generate new plant tissue. It promotes good root growth and is used in fruit and flower production. Phosphorous is particularly important for root crops, such as beets, carrots, and onions, as well as for encouraging flower and fruit production. That’s why fertilizers that contain bone meal and rock phosphate are often recommended for use on root crops: both are rich in phosphorous.
Potassium helps trigger certain plant enzymes and regulates a plant’s carbon dioxide uptake by controlling the pores on a leaf’s surface, called stomata, through which gasses pass. Potassium levels influence a plant’s heartiness and vigor.
Making a Choice
To make your decision easier, you have two basic choices when it comes to natural fertilizers for your container garden. Let’s talk about each of them in turn.
Complete Granular Fertilizer Blends
There are dozens of different brands of complete granular fertilizer blends. Most combine assorted plant, manure, animal, and mineral-based ingredients, and depending on the brand, they may have an N-P-K ratio of 4-5-4 or 3-3-3 or something similar. What makes them “complete” is that they contain a combination of ingredients that provides some amount of all three macronutrients, in addition to many trace nutrients, vitamins, and other things. All of these products have different formulations and compositions, so be sure to choose appropriately according to what plants you’re growing. Some complete granular fertilizer blends are even tailored for specific crops, such as tomatoes or flowers or bulbs, and are labeled as such.

Different plants have different nutritional needs. These radish roots and other root crops, for example, require the right level of phosphorous to form properly.

Vegetables such as Swiss chard, lettuce, spinach, and other leafy greens utilize nitrogen to produce optimum leaf growth.
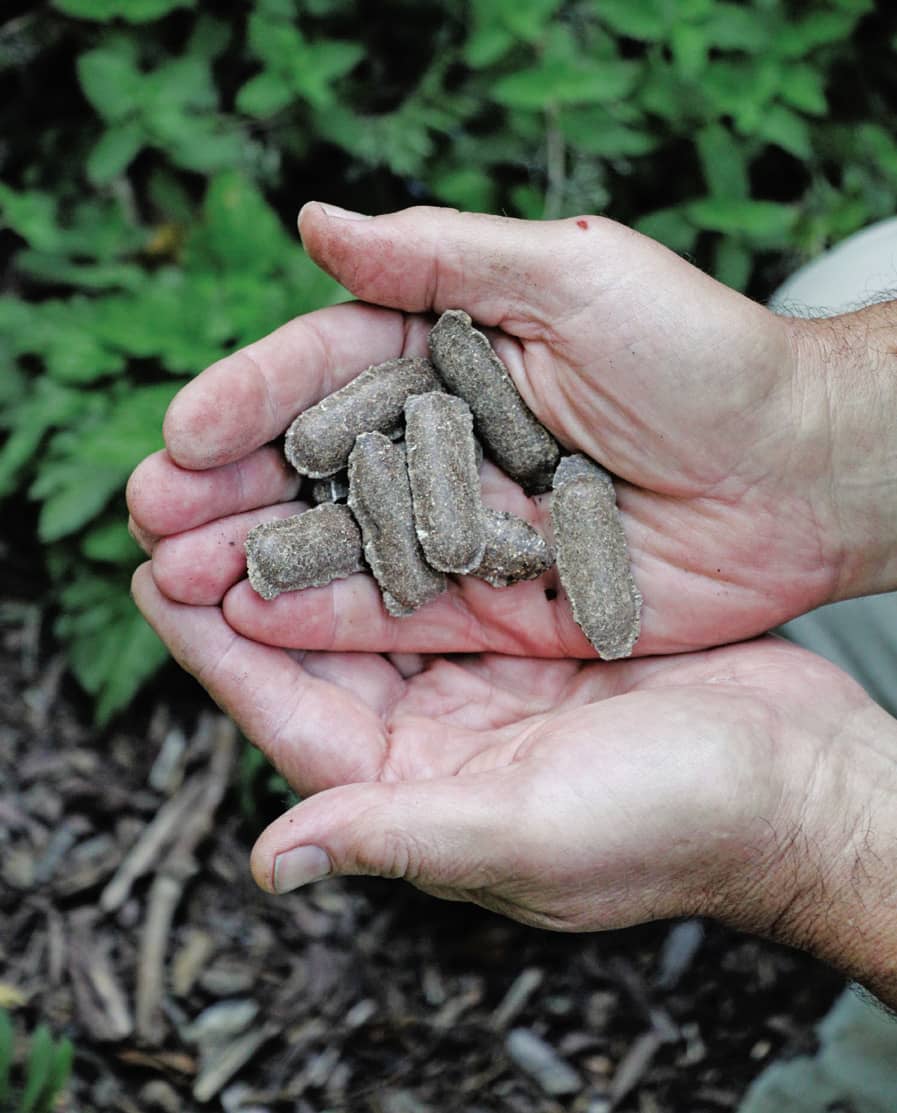
Fertilizer spikes are another easy way to add fertilizer to your container garden. These are formulated especially for tomatoes, peppers, and other fruiting crops and are pushed down into the soil around the base of the plant.
For the best results, add granular fertilizer to your containers according to the label instructions. Many gardeners find they get the best results by fertilizing their containers with granular fertilizers two or three times throughout the growing season.
With granular products, it’s possible to have too much of a good thing. Even natural fertilizers can be easily overapplied, leading to nutrient deficiencies, pH imbalance, and/or fertilizer “burn” (yes, even some natural fertilizers are capable of this). To avoid these issues, don’t apply too much, too often. Again, be careful to follow all label instructions.
Liquid Fertilizers
Liquid fertilizer products are absorbed into plants via both their roots and their foliage. In general, nutrients provided to plants via a liquid solution are more readily and rapidly available for plant use. Like all fertilizers, water soluble ones provide plants with some of the necessary nutrients for increasing yields and improving growth and vigor, but not all liquid fertilizers are created equal.
While chemical-based, water soluble fertilizers certainly supply plants with the macronutrients specified on the label, these products are made from salts that can harm beneficial soil organisms. Instead of chemical salt-based fertilizers, look for organic or natural-based liquids, which will reduce the risk of fertilizer burn and offer a more balanced “diet” for your plants. In addition to the three macronutrients, most natural liquid fertilizers also contain dozens of trace nutrients, vitamins, amino acids, and plant hormones, each of which plays a vital role in the health and vigor of a plant. There are many different types of liquid fertilizers available on the shelf of your local garden center, or, in some cases you can even make your own. Here are some of the most popular types of natural liquid fertilizers.

Natural liquid fertilizers are absorbed into plants through both their roots and their foliage. Mixing liquid fertilizers in a watering can is the simplest way to apply them.
Liquid kelp or seaweed is created by processing sea kelp at cool temperatures. It’s rich in many trace minerals and amino acids and is a source of several plant hormones known to aid in shoot and root growth, improve soil structure, and increase hardiness and fruit development. Research has shown that liquid kelp is adept at increasing yields and drought resistance. It’s one of the least expensive yet most highly beneficial liquid fertilizers. Liquid kelp can also be applied in combination with any of the other products listed below, with very little chance of fertilizer burn.
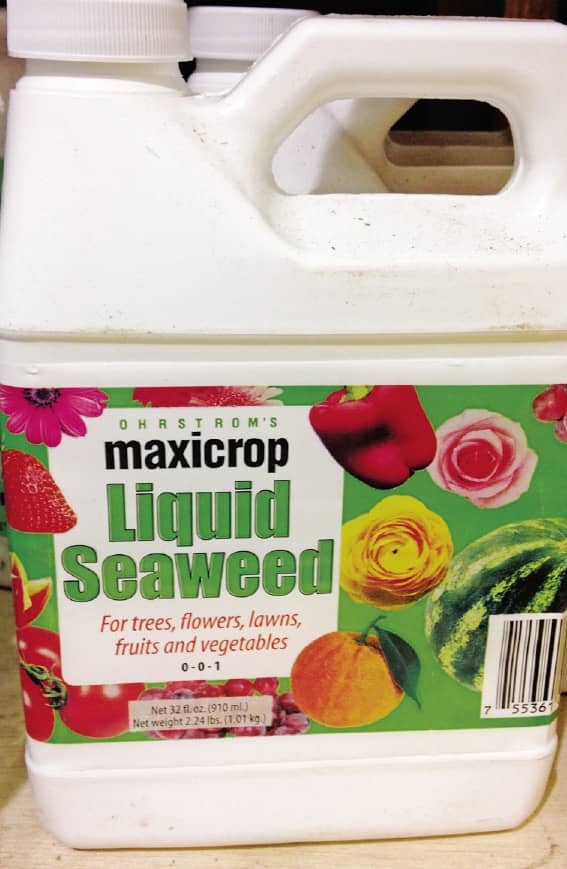
Liquid kelp or seaweed is an excellent fertilizer for container-grown plants.
Fish emulsion is made when whole fish is cooked and filtered. Before the finished fertilizer emulsion is created, the oils and proteins are removed for use in other products, leaving the resulting fertilizer bereft of many of the amino acids, vitamins, and hormones most beneficial to plant growth. Still, fish emulsion is a good natural alternative to chemical water-soluble fertilizers, albeit a smelly one. Because the aroma of fish emulsion is so strong, it’s wise to use it only in the mornings, so the odor has time to dissipate before nightfall. Otherwise, every raccoon and cat in the neighborhood will happily dig up your containers in search of dead fish.
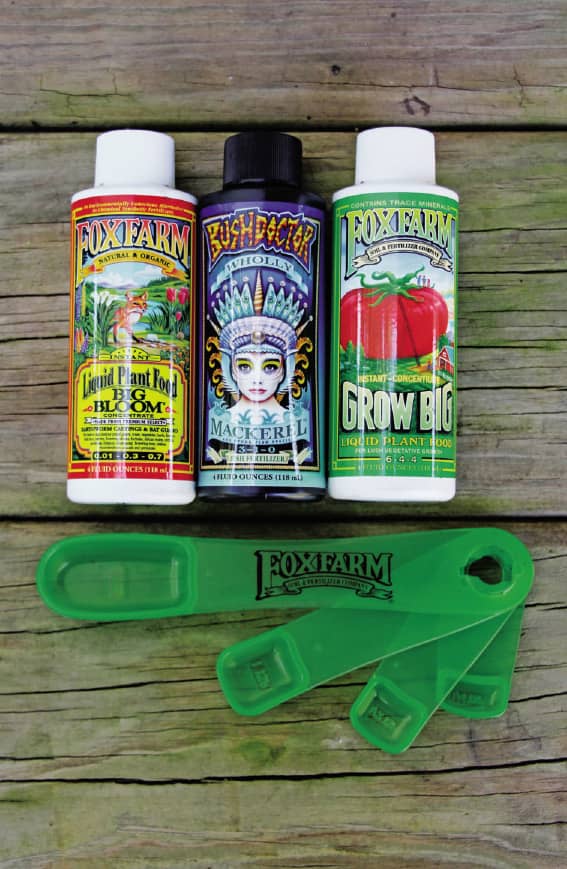
Fish emulsions and fish hydroslate products are nutrient-rich, but they often have a bad odor.
Fish hydroslate (or liquid fish) is another, less odorous form of fish-based fertilizer. Instead of cooking the fish, they’re digested with enzymes at cooler temperatures to make hydroslate products. Then, the partially dissolved fish are ground up and liquefied, resulting in a nutrient-rich fertilizer containing many trace minerals. The fish used in hydroslate products come from either commercial fishing by-catch, or are the byproducts of the fish-farming industry. The enzymes used in the creation process also help break down the fishy odor and some manufacturers even add mint and other essential oils to help mask the smell, but it’s still a good idea to use fish hydroslates in the morning.
Compost tea is getting a lot of attention these days for its ability to nurture beneficial soil life, suppress certain diseases, and stimulate optimum plant growth. But the compost tea of old, created simply by steeping some compost in water for a few days, isn’t what it’s cracked up to be. The anaerobic conditions of bucket steeping can lead to some pretty funky concoctions.
Today’s compost tea is aerated. Air is pumped through the water as a blend of quality compost and a microbial food source (often unsulphured molasses) brews to perfection. The tea is finished and ready to use a few days later. High-quality compost tea is teeming with beneficial microbes, adept at boosting soil and plant health and fighting off foliar diseases. Making compost tea is an involved process, but it’s not a difficult one. You’ll find plenty of information and how-to instructions on various websites devoted to the topic.
Companies that brew compost tea for purchase are popping up in cities across the country, but because the tea needs to be used a few hours after the brewing process is complete, this may prove to be a difficult business model.
Worm tea is a variation of compost tea. It is created in the same way, using a homemade or commercial brewing system. But instead of using regular compost, this tea is made from worm castings. The resulting liquid is nearly odorless, rich in a diversity of beneficial microbial life, and perfect for watering containers and houseplants. Worm tea is especially good if you have your own worm bin and have a regular source of castings.
The above products are useful on their own, but they’re also quite valuable when combined with other ingredients. Natural liquid fertilizer combination products blend the products described above with ingredients such as liquid bone meal, blood meal, feather meal, and rock phosphate to create a well-rounded fertilizer and growth stimulant.
When using any natural liquid fertilizer, follow label instructions for mixing rates and application instructions. Generally, most liquid fertilizers are applied either by mixing the product in a watering can and watering by hand, or by using a hose-end fertilizer distribution system to automatically deliver the fertilizer with the irrigation water.
Liquid fertilizers are best absorbed when the plants growing in your containers are not under stress. Do not fertilize your plants when they’re wilting or suffering from heat stress. Water them first, a few hours before fertilizing them, to maximize their absorption of nutrients.
Though overdoing natural liquid fertilizers is seldom possible in terms of plant health, overdoing it can be hard on the budget. Don’t use more than you need. Most liquid fertilizers should be applied every 2 to 4 weeks throughout the growing season.

Hose-end sprayers are a great way to deliver liquid fertilizers with irrigation water. Some brands, such as this one, come with the hose-end sprayer attached to a siphon bottle, but reusable hose-end sprayers are also available at most garden centers and hardware stores.
DEADHEADING AND PINCHING
Two other tasks to be performed from time to time are deadheading and pinching. While you can take these two jobs off your to-do list if you’re growing vegetables, they’re important chores for keeping flowers and herbs in tip-top shape.

Deadheading is the term used when removing an old, spent flower head from a blooming plant.
Deadheading
Deadheading is a term we gardeners use when removing the old, spent flower heads from a blooming plant. The practice encourages the production of new blooms by preventing the plant from setting seed (and using lots of energy to do so). Removing spent flowers often cues the plant to produce another set of blooms.
Deadheading is an ongoing chore, beginning as soon as the first peony petals fall and continuing until the last annual has been touched by frost, but midsummer is the prime deadheading season. Perennials such as peonies (Paeonia spp.), lilies (Lilium spp.), Oriental poppies (Papaver orientale), delphiniums (Delphinium spp.), and bearded iris (Iris germanica), typically bloom only once per season, so deadheading these plants won’t encourage more blooms. Instead, it tidies them up and encourages further growth on the rest of the plant. In other words, these plants are deadheaded mostly for aesthetic reasons.
There are, however, many other plants that flower repeatedly throughout the growing season, and as long as they’re regularly deadheaded, the plant will continue to generate more blooms. Deadheading freshens up the plant’s overall appearance and often generates fresh, new foliage as well. When the spent bloom is removed, side-buds are formed and go on to develop subsequent flushes of flowers. Most flowering annuals fit in this category, along with some perennials, including Shasta daisies (Leucanthemum × superbum), perennial sage (Salvia spp.), bee balm (Monarda spp.), yarrow (Achillea spp.), butterfly bushes (Buddleia spp.), garden phlox (Phlox paniculata), coneflowers (Echinacea spp.), Coreopsis (Coreopsis spp.), and some black-eyed Susans (Rudbeckia spp.). Deadheading flowering plants several times throughout the growing season is a great way to ensure constant color in your container garden.
Tips for Deadheading
• For plants whose flowers occur on stalks that have leaves along them, follow the tip of the faded bloom all the way back to where you see the first few leaves emerging from the stem. Snip or snap off the flower stalk just above these leaves. Do not leave a lengthy stump behind, as it could succumb to botrytis or another fungal disease as it naturally rots away. Plants in this category include butterfly bush, Monarda, cosmos, snapdragons, black-eyed Susans, zinnias, annual geraniums (Pelargonium × hortorum), salvias, Shasta daisies, sedums, dahlias (Dahlia spp.), and many, many others.
• For plants with large flowering stalks that do not have foliage along them, like daylilies (Hemerocallis spp.), hosta, or bearded iris, cut the entire flowering stem all the way back down to the crown of the plant, where the foliage emerges from the ground.
• For plants with mounded foliage and many small flowers, it’s often easier to shear back the entire plant rather than removing the spent flowers one by one. Plants like coreopsis, bidens, sweet alyssum, French marigolds, ageratum, nepeta, dianthus (Dianthus spp.), and lavender (Lavandula spp.) should be sheared once or twice throughout the growing season to encourage more blooms.
• Some flowering plants don’t need to be deadheaded at all. There is a hearty handful of plants that pump out new blooms and always look fresh, even without deadheading. These easy-care plants might need to be pinched back from time to time (see the next section), but they’ll be in constant bloom almost all season long. Plants on this list include impatiens, lobelia, nemesia, torenia, oxalis, wax begonias, dragon- and angelwing begonias, calibrachoa, diascia (Diascia spp.), and some petunias, among others.
There is, however, one occasion when you don’t want to deadhead. If you’d like a particular plant to purposefully set seed, then don’t remove its spent flowers. It’s easy to collect and save your own seed from lots of different flowering annuals, perennials, and herbs. You can save a lot of money by using collected and saved seeds to start the following year’s container garden. Cosmos, zinnias, amaranth, calendula, dill, and sunflowers are easy plants to start with. Simply wait for a few of the seed heads to fully dry, then cut them from the plant and allow them to finish drying in a cool, dry room for a few weeks. Then crack the seed heads apart, pull out the seeds, and store them in sealed glass jars or plastic containers until next spring.
Some gardeners also stop deadheading as late-summer approaches to allow some of their plants to set seed for birds such as goldfinches, cardinals, chickadees, and other seed-eaters.
Deadheading is an especially important task if your container garden is serving double-duty as pollinator habitat. Pollinating insects, such as butterflies and bees, need a constant source of nectar, and if you want these beneficial bugs to stick around, having a container garden that’s in continual bloom is a must. The following two projects are great ways to start supporting these two groups of important insects with a specialized container garden created just for them.
BUTTERFLY GARDEN TUBS

Gardening to attract and support wildlife is a great way to be an eco-conscious gardener. Incorporating the right kind of plants into your landscape influences which types of insects call your garden home. This project uses a combination of bright, colorful blooms to entice some of the world’s most-beloved insects—butterflies.
Since most species of butterflies need different plants at different stages of their life, it’s important to combine flowers that supply nectar to adult butterflies with the specific plants their caterpillars use as food. Most gardeners already know monarch caterpillars can only feed on milkweed plants, but there are many other species of butterflies that require a particular host plant to feed their young. For this project, begin by selecting a mixture of plants that serve as either a nectar plant, a host plant, or both.
Popular Nectar Sources for Adult Butterflies:
• Coneflower (Echinacea spp.)
• Bee balm (Monarda spp.)
• Goldenrod (Solidago spp.)
• Asters (Symphyotrichum spp.)
• Joe Pye weed (Eutrochium purpureum)
• Milkweed (Asclepias spp.)
• Buttonbush (Cephalanthus occidentalis)
• Pentas (Pentas lanceolata)
• Zinnia (Zinnia elegans)
• Million bells (Calibrachoa spp.)
• Salvia (Salvia spp.)
• Cosmos (Cosmos bipinnatus and C. sulphureus)
• Mexican sunflower (Tithonia rotundifolia)
• Sunflower (Helianthus annuus)
• Ironweed (Vernonia spp.)
• Black-eyed Susan (Rudbeckia spp.)
• Verbena (Verbena spp.)
• Heliotrope (Heliotropium arborescens)
• Phlox (Phlox spp.)
• Blanket flower (Gaillardia spp.)
• Lantana (Lantana camara)
• Liatris (Liatris spicata)
• Coreopsis (Coreopsis spp.)
• Yarrow (Achillea spp.)
Caterpillar Host Plants and Butterflies These Plants Benefit:
• Milkweed: Monarchs
• Violets (Viola spp): Several species of fritillary butterflies
• Passionflower (Passiflora spp.): Gulf fritillary
• White turtlehead (Chelone glabra), hairy beardtongue (Penstemon hirsutus), and speedwell (Veronica spp.): Baltimore checkerspot
• Yarrow, borage, and sunflowers: Painted lady
• Hops (Humulus lupulus): Eastern comma and the red admiral
• Dill, fennel, and golden Alexanders (Zizia spp.): Eastern black swallowtail
• Asters: Pearly crescent
• Pussytoes (Antennaria spp.), hollyhock (Alcea rosea), and lupine (Lupinus spp.): American lady
• Blueberries and viburnums (Viburnum spp.): Spring azure
NOTE: As you build Butterfly Garden Tubs of your own, include as many of these plants as possible. Use a combination of the annuals, perennials, and shrubs listed above for season-long color and a varied food source for the butterflies.
HOW TO MAKE BUTTERFLY GARDEN TUBS

STEP 1 Flip the plastic bucket tubs upside down and use a utility knife to cut a triangular hole in the bottom of each bucket for drainage. Make sure the hole is about 1 in. across. Fill each bucket three-quarters of the way to the top with the 50/50 potting soil and compost blend.

STEP 2 Carefully pull the plants from their containers and situate them in the plastic buckets, moving them around until you’re happy with their placement. If your butterfly garden tubs are located against a wall or fence, put the tallest plants toward the back of the containers and the shortest plants in the very front. If the tubs can be viewed from all sides, put the tallest plants in the center, surround them with mid-sized plants, and then put the shorter plants around the outer edge. Once happy with the arrangement, loosen any pot-bound roots and fill in around each plant with potting soil and compost blend. Do not overfill the buckets; there should be 1 in. of headspace between the soil and the top edge of the bucket’s rim. Water the plants well.

STEP 3 Maintain your Butterfly Garden Tubs by regularly deadheading the flowers. Carefully inspect host plants for caterpillars on a frequent basis and don’t disturb any you happen to find. Avoid using pesticides or fungicides of any sort on your Butterfly Garden Tubs as they could negatively affect both the adult butterflies and the caterpillars.
POLLINATOR CAN

There are over 4,000 species of native bees in North America, and while supporting European honeybees is important, helping our native bees is even more so. Bees are responsible for pollinating more than $20 billion dollars of food crops each year, and many species are suffering from population declines due to pesticide exposure, diseases, and habitat loss. Even urban gardeners with small patio gardens or containers can provide important habitat for these insects.
If every homeowner and apartment dweller built a Pollinator Can like this one, what a huge difference we’d make!
Excellent Host Plants for Bees:
• Goldenrod
• Liatris
• Phacelia (Phacelia tanacetifolia)
• Culver’s root (Veronicastrum virginicum)
• Asters
• Bee balm
• Meadowsweet (Spirea alba)
• Boneset (Eupatorium perfoliatum)
• Penstemon (Penstemon spp.)
• Coneflower
• Black-eyed Susans
• Sunflowers
• Agastache
• Globe thistle (Echinops spp.)
• Coreopsis
• Milkweed
• Mountain mint (Pycnanthemum spp.)
• Dill
• Oregano
• Nepeta (Nepeta spp.)
• Salvia
HOW TO MAKE A POLLINATOR CAN

STEP 1 Flip the trashcan upside down and hammer the awl through the bottom of the can in eight to ten places to create drainage holes. Turn the can back over and locate it where it will receive eastern or southeastern exposure on its front.

STEP 2 Place an upturned, empty 5-gallon bucket in the bottom of the trashcan. This will fill up some of the space and reduce the amount of potting soil/compost blend you’ll need.

STEP 3 Stick one end of the 2x4 down into the can, propping it vertically between the 5-gallon bucket and the wall of the trashcan. Fill the can three-quarters of the way to the top with the potting soil blend, straightening the 2x4, if necessary.
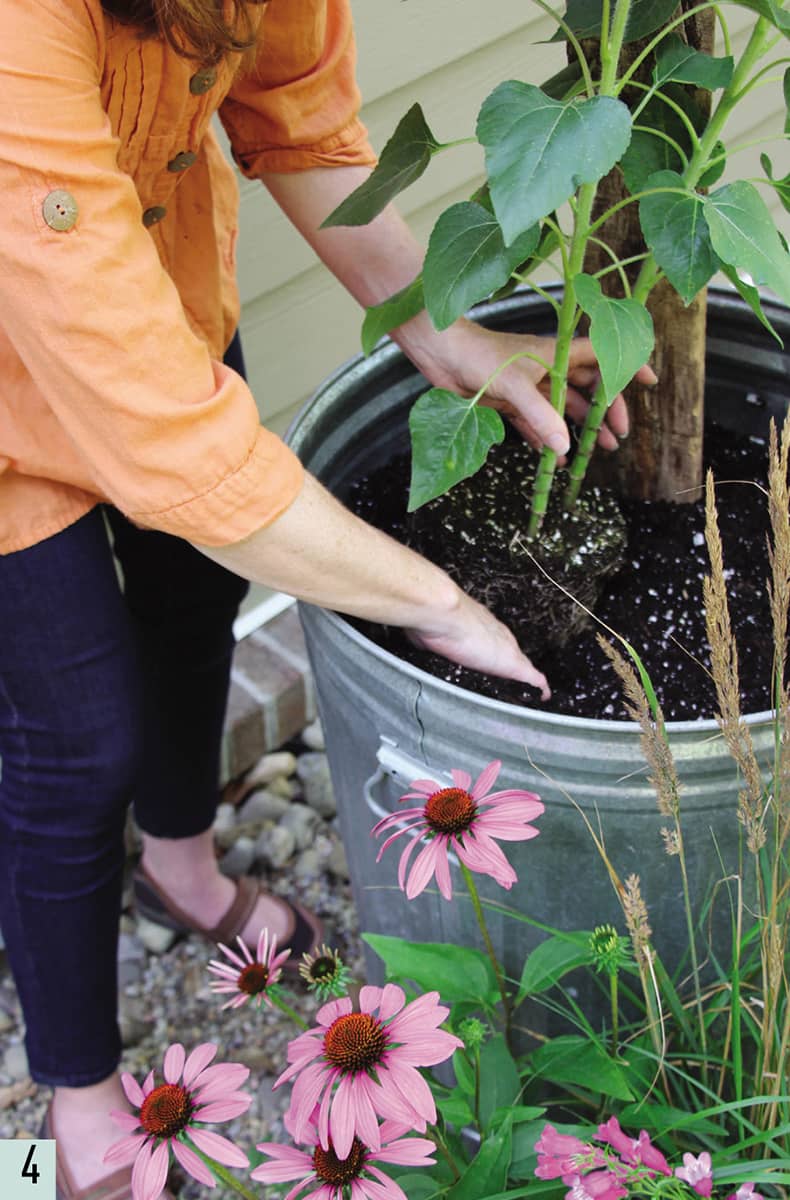
STEP 4 Carefully slide the plants out of their pots and arrange them in the can, keeping the taller plants closest to the 2x4 and the shorter plants along the outer edge of the can. Once happy with the placement of plants, loosen any pot-bound roots and fill the spaces in between the plants with more potting mix until the container is filled to within an inch of the top. Leave a small, empty space somewhere close to the front edge of the can. Lay the brick in this space.

STEP 5 Build the bee nesting block by gluing the three pieces of 2×6 in. lumber together with wood glue. Allow the glue to dry for several hours, then drill holes into one cut end of the blocks, perpendicular to the wood’s grain. To encourage diversity, alternate hole sizes by using both the 5/16-in. drill bit and the 7/16-in. drill bit to make holes approximately 4 to 5 in. deep, spaced about 3/4 in. apart. Do not drill all the way through the block as bees prefer to nest in closed-end tunnels. Place the drilled nesting block on top of the brick positioned among the plants. Make sure the holes are not blocked by any vegetation.
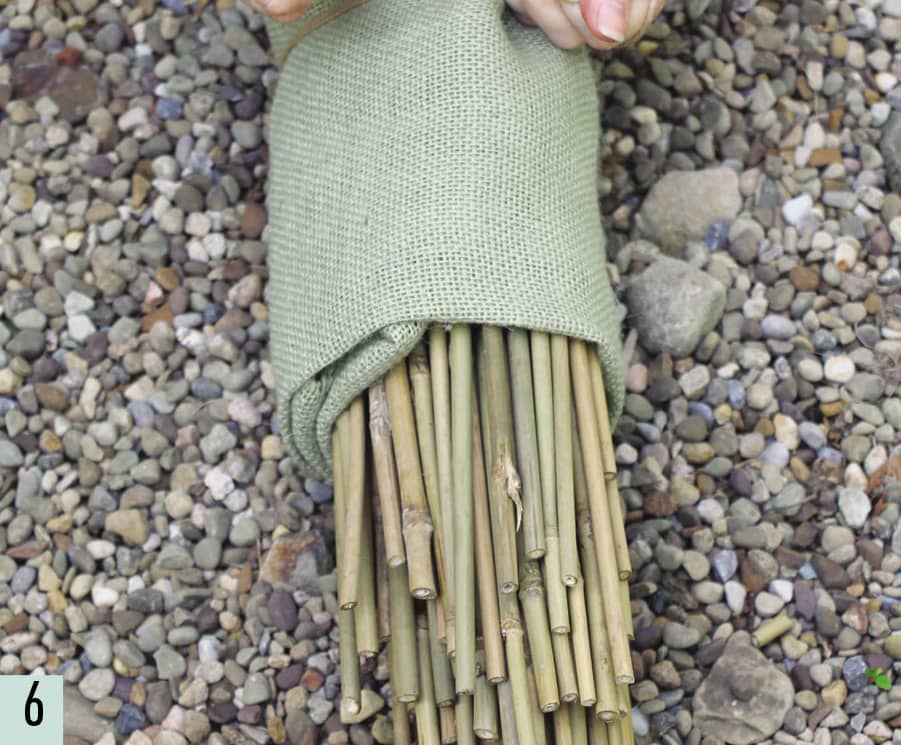
STEP 6 Next, lay the piece of burlap on the ground and place the bundle of bamboo stakes in the center of it. Use a pair of sharp pruners to cut the stakes to approximately 2 ft. in length. Use the wire cutters to cut two 18-in.-long pieces of aluminum hobby wire. Wrap the wire around the bamboo stakes, one close to each end, to fasten them into a secure bundle. Roll the burlap around the center of the bundle and use a piece of natural jute twine to secure it in place.

STEP 7 Fasten the burlap-wrapped bundle of bamboo stakes to the top of the 2x4, using more jute twine. Make sure the stakes are parallel to the ground and fairly level. If any of the cut ends of the bamboo pieces are blocked with dried bamboo pulp, use the awl to clear out the debris and give the bees better access.

STEP 8 Care for your new Pollinator Can by watering the plants regularly. When winter arrives, do not cut the plants back or otherwise disturb them. Some species of native bees may take shelter in the plant debris for the winter. Instead, do your cleanup when spring arrives and the weather is consistently warm. By then the bees will have emerged from their overwintering sites. You can also replace any plants that didn’t make it through the winter at that time.
NOTE: You’ll know the bees are using your nesting sites when the ends of the openings are sealed over with mud or plant debris. To prevent pathogens and predators from taking over your nesting sites, replace the wood nesting block and bamboo stakes every 2 years in the early summer, after the young bees have emerged and before new eggs are laid.
Pinching
Pinching is another important practice for container gardens, especially when it comes to maintaining many different flowering annuals and herbs. Pinching involves removing a portion of the plant’s shoot system in order to promote branched, bushy growth. Pinching serves to either encourage more flowers, or in some cases, to prevent the plant from flowering altogether.
Most, but not all, annual plants benefit from being pinched back several times a year, starting in the late spring. Licorice plant, impatiens (Impatiens walleriana), salvias, torenia, petunias, geraniums, plectranthus, ageratum (Ageratum houstonianum), cosmos, verbena, snapdragons (Antirrhinum spp.), and many other annuals should be pinched back on a regular basis to generate new growth and future flowers. But, there are a handful of plants that are pinched for the opposite reason: to prevent the formation of flowers. Plants in this category include basil, whose flavor alters when the plant comes into flower; coleus, which is grown primarily for its colorful foliage; and chrysanthemums (Dendranthema spp.), which are pinched several times before the arrival of the July 4 holiday to delay flowering until the autumn.
Many gardeners are hesitant to pinch back flowering plants, but it really is the best way to freshen-up container plantings and keep plants from getting too leggy. Here are a few tips for pinching back plants the right way.
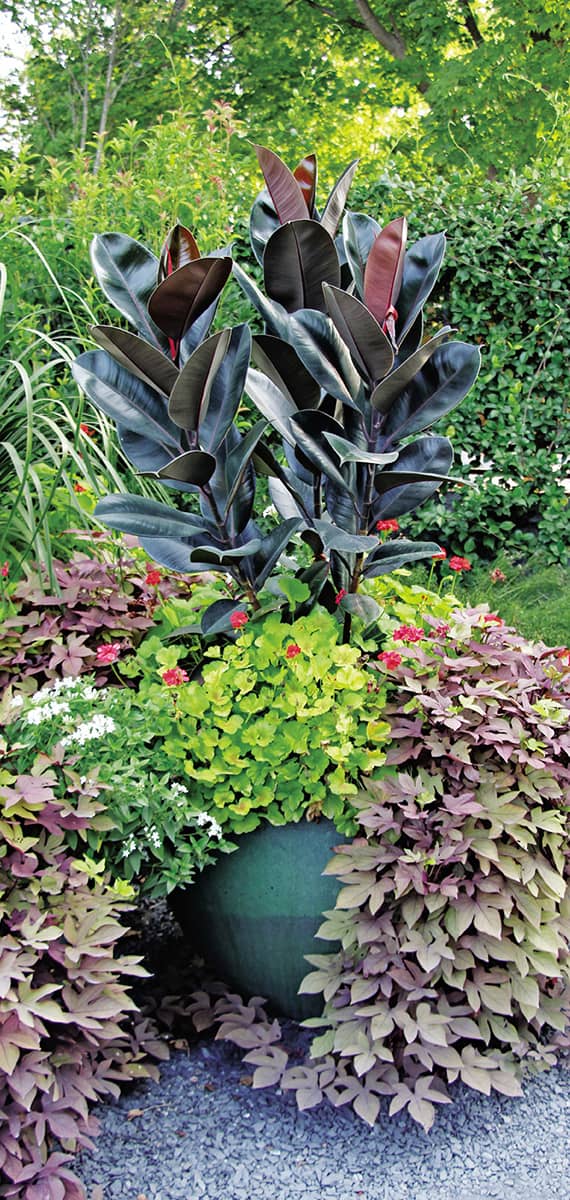
A properly pinched plant doesn’t look like it’s been pinched at all. The sweet potato vine and geranium in this container were pinched back several times throughout the growing season, resulting in the bushy, highly branched plants you see now.

Hardy chrysanthemum is one common plant that’s pinched to delay its flowering period.
• Pinching does not equal shearing. When you shear a plant, you remove every single growing point, leading to a plant that’s covered with leafless, blunt stumps. Pinching, on the other hand, is the selective removal of just a few plant stems.
• Use a sharp pair of scissors or pruners for tougher stems. Though the term pinching comes from the fact that, traditionally, gardeners have used their thumb and forefinger to pinch off a plant’s stem, it’s much better to use a scissors or pruning shears on thicker stems, to avoid tearing them. Torn stems welcome fungal and bacterial infections and are unsightly.
• Remove about 1/3 of the total growth. To pinch a plant, follow the stem tip down from the tip until you reach a set of side-buds. Snip the stem off just above these side-buds. By removing the stem tip, you’ll encourage those side shoots to develop into two flowering stems where you used to have only one.
• A little at a time is best. Pinch off a few stems every week or two. This keeps the plant full and lush.
STAKING, CAGING, AND TRELLISING
Whether it’s to keep heavy blossoms off the ground, to prevent fruits and veggies from hitting the dirt, to keep foliage from splaying, or simply to maintain a sense of order, supporting certain container-grown plants with stakes, cages, or trellises preserves their form and beauty. And, in the case of vining vegetables, staking and trellising can also increase yields and reduce pest issues. Not all plants need to be supported, but for those that do, it is essential.

Make sure your staking or trellising system is big enough to support the mature plant. This Malabar spinach plant is quickly outgrowing its tiny trellis.
When to Stake or Trellis Plants
When it comes to supporting plants with a stake, cage, or trellising system, completing the job at the start of the growing season is critical. Better to stake early and allow the foliage to mask the materials holding the plant up than to tie them up after they’ve already become unruly. If you wait too long to provide a support system to a plant that needs it, you’ll begin with a wrestling match and end up with a plant that looks like it’s been strapped up in a corset.
Install supports for containerized plants at planting time, if possible. The stakes, cages, and trellises will look naked for a few weeks, but soon the plants will be off and running and quickly begin to rely on their support system.
For the most part, flowering plants grown in containers seldom need to be staked, caged, or trellised, unless they are a vining plant, like a black-eyed Susan vine, a hyacinth bean, or a morning glory—or if they produce heavy blooms on wimpy stems. Some dahlias grown in containers may require a hardwood stake to keep the flowers upright, but most flowering and foliage plants grow quite well in containers without the need for support. But for a lot of container-grown veggies, staking and trellising are essential chores.
When it comes to supporting potted veggies, always choose a system that’s stronger than you think you’ll need. Some plants are vigorous growers, and they can take down a wimpy stake or cage before summer even arrives. But remember, strong and sturdy doesn’t have to mean unattractive. There are tons of beautiful options, both in commercially available systems and DIY projects just about anyone can make. The following project is a great example of a container trellis that’s both good looking and hard working.

Staking the plants in your container garden while they’re still young keeps fruits and veggies from hitting the ground. It also supports blossoms so you can enjoy them longer.
SQUASH ARCH

This creative system uses two large containers to support a curved rebar arch extending between them. Though I’m growing tromboncino squash on this arch, the system can also be used to grow pole beans, gourds, cucumbers, melons, or any other vining crop.
This example uses two pieces of 10-ft.-long rebar to make the arch, but if you’d like a taller arch, opt for longer pieces of rebar and increase the number of 2-ft.-long pieces used as cross braces. Use your creativity and make X-shaped cross braces, if you’d like. Paint the rebar for a splash of color, or hang little ornaments from the arch to add a touch of whimsy. The possibilities are infinite.
Building this squash arch is a two-person job, and you’ll need a big tree to use as a form to bend the rebar. But both the containers and the arch last for years, making it well worth your time and effort.
HOW TO MAKE A SQUASH ARCH

STEP 1 Flip the cans upside down and hammer the scratch awl through the bottom of each can in several places to make multiple drainage holes. Flip the cans right-side-up, and place them 4 to 5 ft. apart.

STEP 2 Put an upended, empty 5-gallon bucket into each empty trashcan. This helps fill some of the empty space and reduce the amount of potting mix you’ll need. Fill both galvanized trashcans with the 50/50 potting soil and compost blend until there’s only 1 in. of headspace remaining below the top of the can.
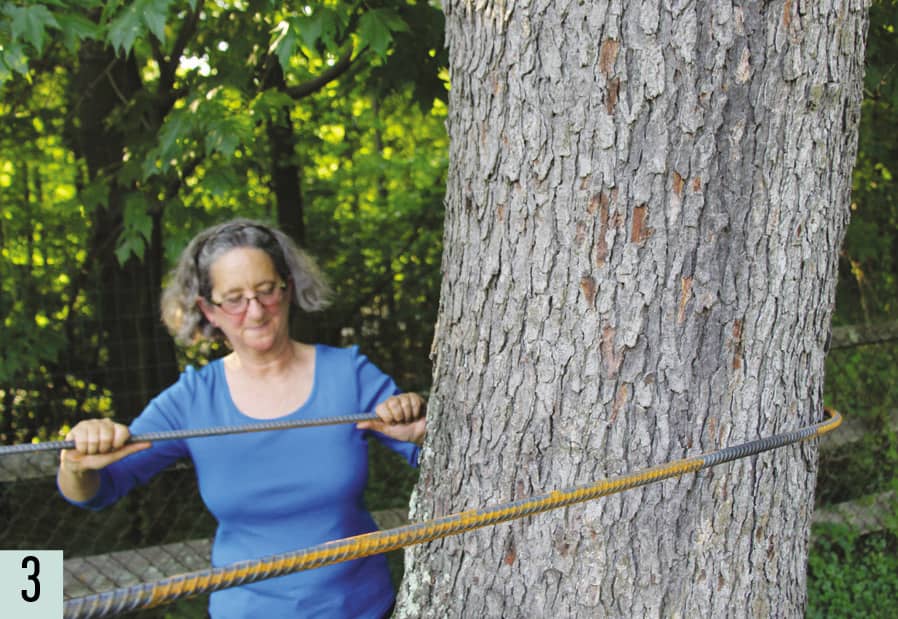
STEP 3 Using a large tree (at least 2 ft. in diameter) as a bending form, bend each long piece of rebar exactly in the middle to form an arch. For this step, it is essential to have two people, one holding each end of the rebar. Begin by holding the rebar straight with the center against the tree, then slowly walk around the tree to bend the rebar until the legs of the arch are nearly parallel. Repeat with the second long piece of rebar, making sure that both arches are exactly the same.
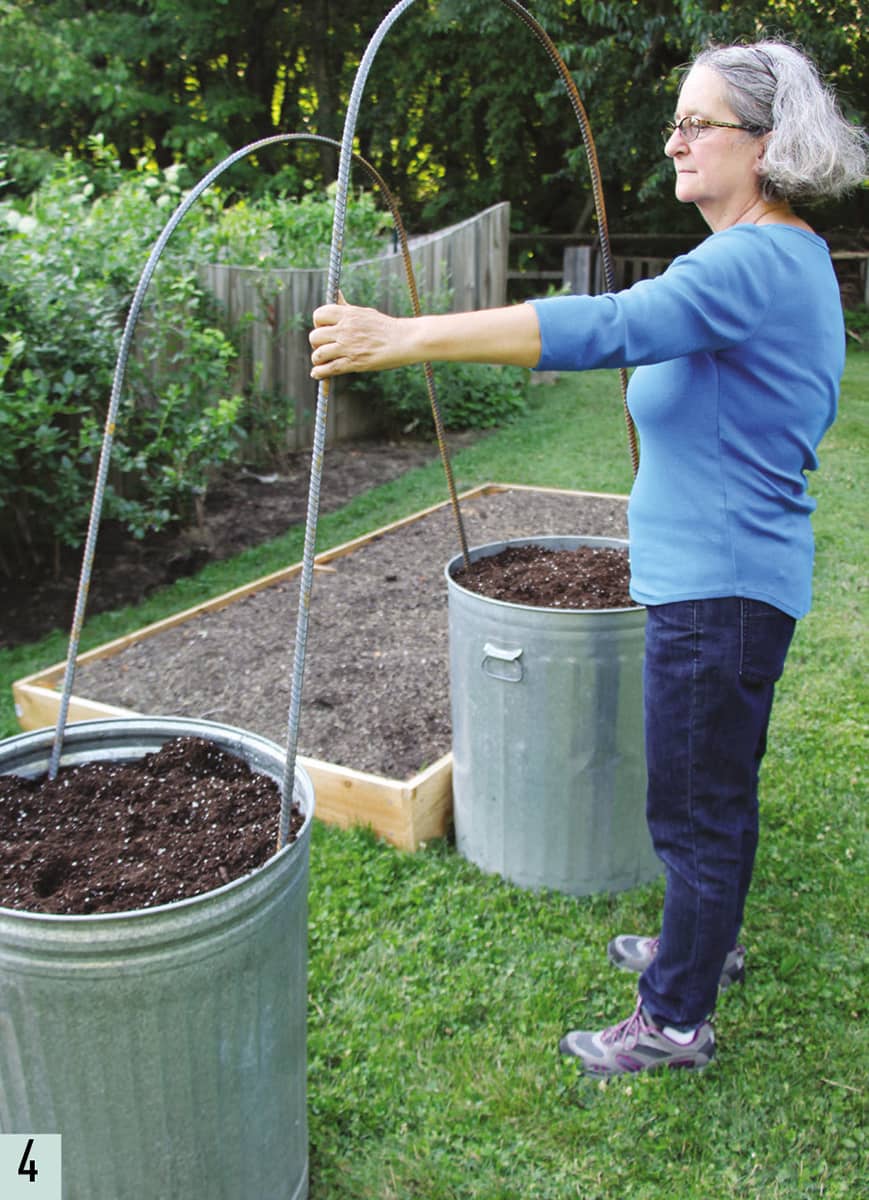
STEP 4 Insert the ends of the two rebar arches into the trashcans, keeping the bars about 18 in. apart. For added interest, you can keep the arches close together at the bottom and lean the tops outward. Now cut 14 pieces of aluminum hobby wire, each 16 in. to 18 in. long.

STEP 5 Attach the rebar cross braces to the arches by using wire wrapped in a figure-8 around the intersections. Use a level and tape measure to ensure that the crossbars are level and spaced evenly along the arches. This, too, is a step that will be easier with the assistance of a helper.

STEP 6 Fill each can with 8 to 10 flowering annuals, then sow 3 to 5 squash seeds at the base of the rebar arch. As the squash plants grow, train the young vines to climb the arch by tying them with jute twine and guiding them in the right direction until their tendrils are mature enough to provide support.
BIKE-RIM SWEET POTATO TRELLIS

Many gardeners avoid planting sweet potatoes simply because they don’t have enough room for the vines to ramble all over their garden. But it’s easy to grow a great crop of sweet potatoes by planting them in a container and training the vines to grow up a trellis.
Sweet potatoes require a fairly long growing season, and they love hot summer weather, so if you live in the north, look for varieties that have been bred to produce a good crop in a shorter period of time. ‘Beauregard’ and ‘Georgia Jet’ are two good choices for growers north of the Mason-Dixon Line.
Sweet potato vines are easily trained to grow up this bike-rim trellis; as they grow, simply weave the vines through the spokes. You can even make patterns and designs by weaving the vines around the spokes in a spiral fashion.
HOW TO MAKE A BIKE-RIM SWEET POTATO TRELLIS

STEP 1 Position the two bicycle rims on the ground, one above the other, and measure the total height. Add this to the height of the container; this combined measurement will be the length of the conduit stake you need to cut.
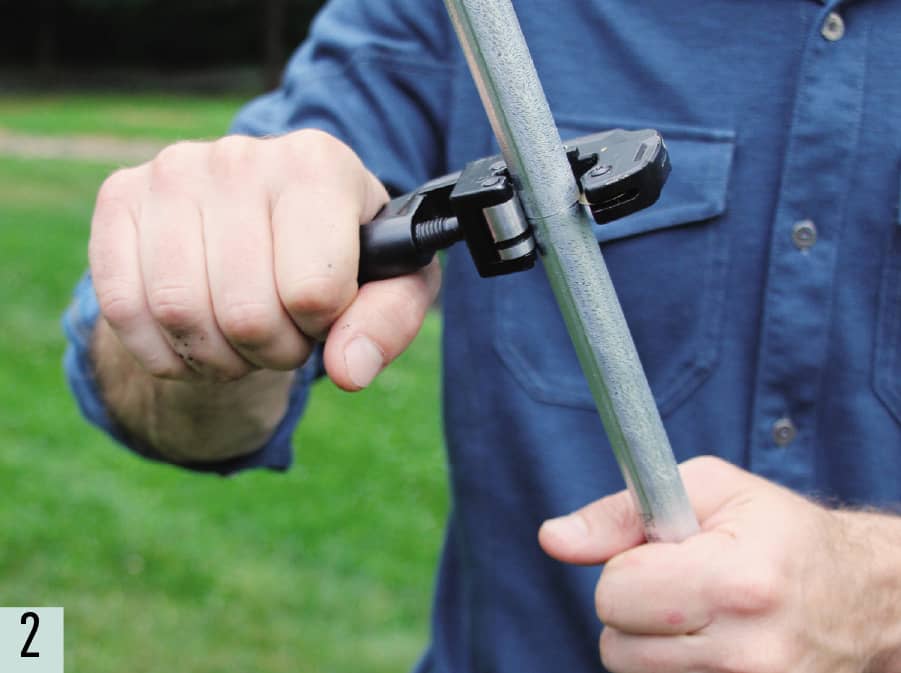
STEP 2 Cut the conduit pipe to the desired length with a copper tube cutter or a hacksaw.
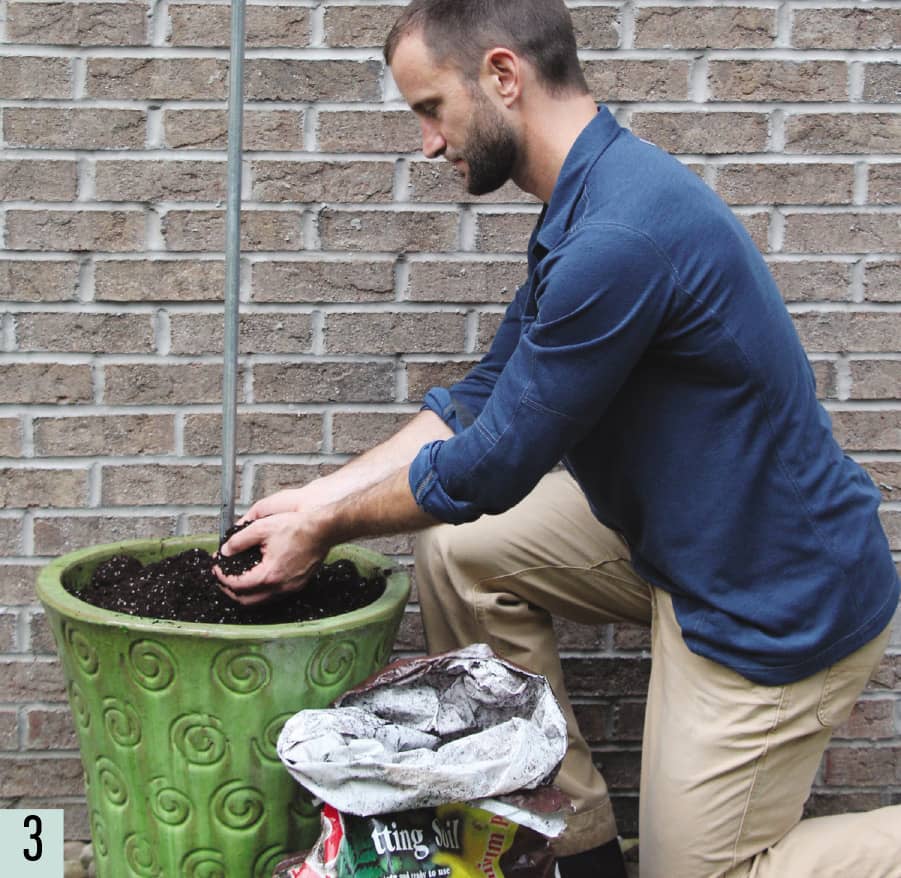
STEP 3 Fill the container most of the way with the 50/50 potting soil and compost blend, then insert the piece of EMT conduit into the center. Fill the rest of the container with the soil mix until it’s within an inch of the pot’s rim.

STEP 4 Use aluminum hobby wire to secure the bike rims to the conduit stake, one above the other. If your bike rims are two different sizes, use the larger one on the bottom. Wrap the wire securely to hold the rims in place on the conduit stake, and to one another.
If you want to add a splash of color, paint the rims and conduit pole before continuing.

STEP 5 Plant 3 to 6 sweet potato plants or slips in the container, depending on the size of the pot. Water them well.
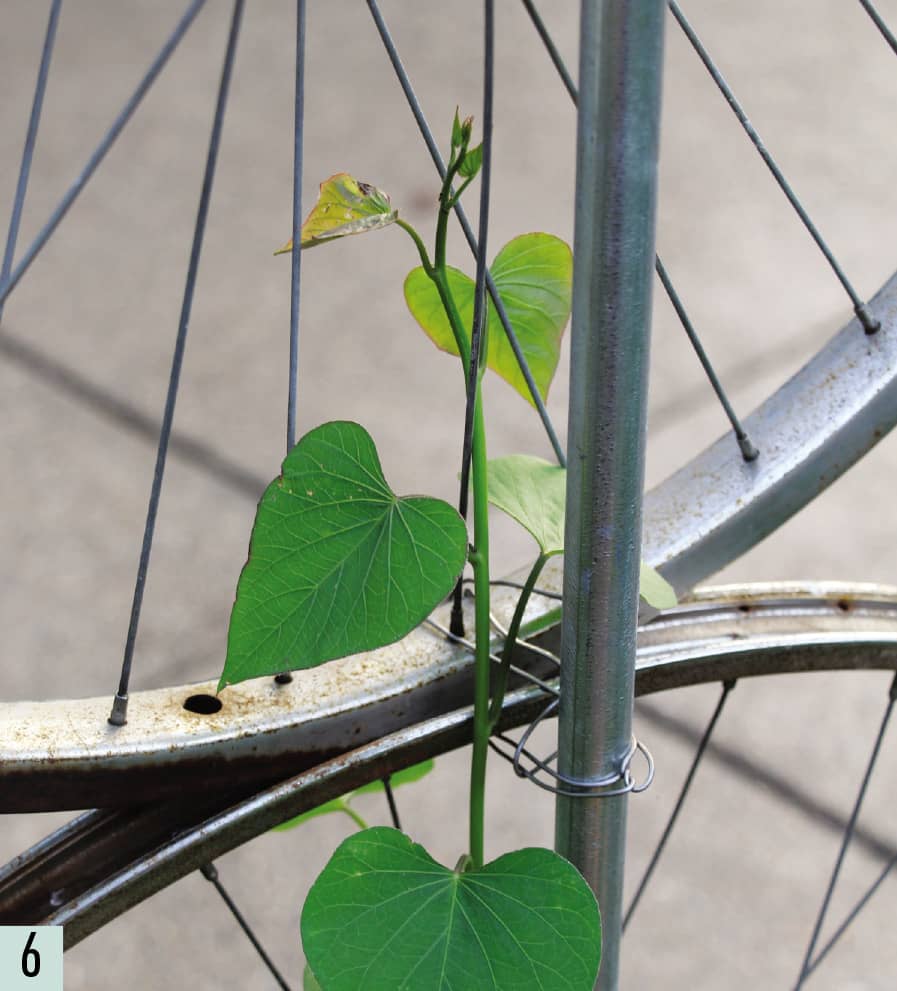
STEP 6 As the vines grow, weave them between the spokes. To keep the container from toppling over, do not place the container in an area with high winds, and make sure the plants receive at least 6 to 8 hours of full sun per day.

STEP 7 The sweet potatoes are ready to harvest as soon as the leaves begin to yellow, but the longer you leave them in the ground, the better. Just remember to dig them up immediately if the vines get blackened by a frost. Store the dug tubers in a warm room (80° to 90°F) for 8 to 10 days to cure them and sweeten the flavor. After the curing period passes, move the tubers to a cool location, such as a basement or root cellar, where temperatures are between 50° and 60°F.
Support Options
When selecting the appropriate stake, cage, or trellis system for container-grown plants, vegetables in particular, there are several things to keep in mind:
• Veggies that produce heavy fruits, such as beefsteak tomatoes, full-sized eggplants, and bell peppers, will no doubt need to rely on a 1x1 hardwood stake, a metal tomato cage, a teepee, or some other staking system for support. Their stems don’t grip the staking system as vine crops do, so you must fasten the plant to them.
• Twining crops such as pole and runner beans and malabar spinach (Basella alba), have twining stems that coil around their support system. These plants look great growing up just about anything they can wrap themselves around, including hardwood stakes, tree branches, sunflower stalks, bamboo poles, teepee legs, and the like.
• Vining crops with tendrils growing off their main stems will grow up and over just about anything. Cucumbers, winter squash, gourds, pumpkins, peas, and melons produce small tendrils at their leaf nodes, and will easily grow up anything from chicken wire and chain link fencing, to nylon garden netting and hardware cloth. To keep them under control, you’ll need a very sturdy trellis.

There’s no need to build a trellis when one’s already in place. Use existing fences, arbors, and even window bars as support structures for climbing container plants. These hyacinth beans (Lablab purpureus) and morning glories (Ipomoea purpurea) are quite happy to cling to whatever they can.

Upcycled trellises are perfect for container gardens. Here, the skeleton of an old patio umbrella is soon to be covered with pea vines.

Repurposed household items also make great garden trellises. Keep your eyes peeled for things like closet organizers, wire shelving units, and store displays, all of which are easily transformed into vertical supports for container plants.

A simple arch of cattle fencing makes an excellent support for flowering vines and climbing veggies. Extend the arch between two containers to make a unique arbor over a walkway or gate.

If there’s nothing in your container for a plant to climb, try placing the container in front of a wall with a trellis attached to it. This mandevilla plant is quite happy to cover the wall behind it with flowers.

Wooden trellises and cages are excellent choices for supporting plants in your container garden. With a little finesse, you, too, can build custom wooden trellises like this one to fit a particular size and shape of container.
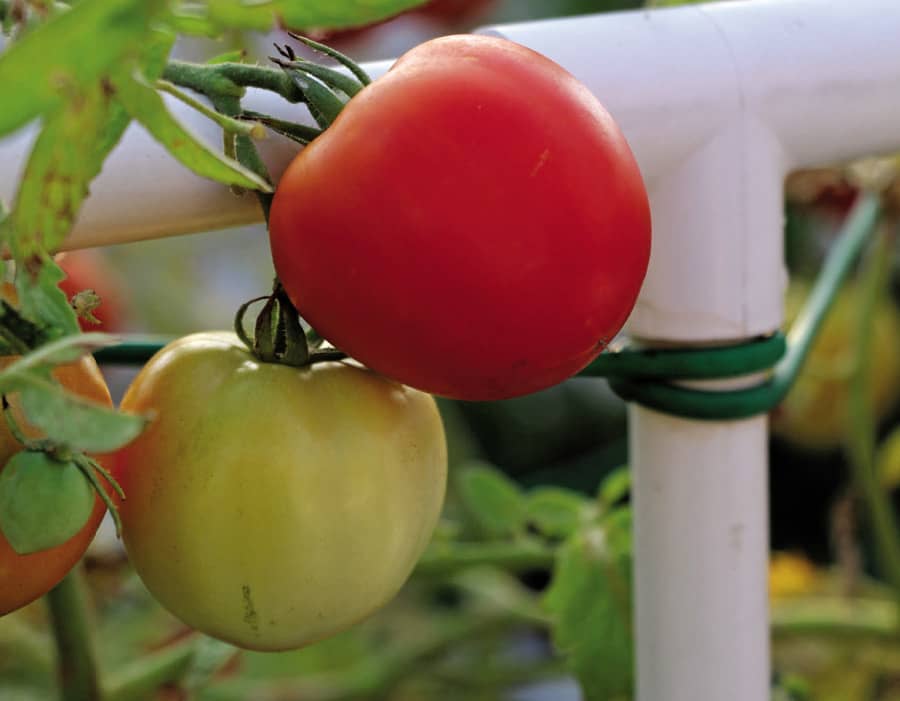
While white PVC pipes aren’t necessarily pretty, they sure do make versatile, inexpensive, and sturdy trellises. This gardener built super-sturdy cages out of PVC pipe and surrounded his containerized tomato plants with them.

Wooden ladders make great trellises. Place them over containers filled with vine crops, like these pole beans, and you’ll soon discover it makes harvesting a snap.

Natural bamboo stakes fashioned into teepees and inserted into fabric pots work like a charm when it comes to growing a good crop of pole beans. Connect the teepees with a bamboo cross bar at the top for added protection against high winds and heavy plants.
As with all things gardening, there are a hundred different ways to complete a project, and staking your plants is no exception. There’s no right or wrong way to do it, as long as the end result maintains the plants’ natural form and habit without making it look restricted or soldierly. This page shows some great ideas for staking, caging, and trellising your container garden.
In addition to using commercially made plant stakes, cages, and trellises, it’s also fun to use natural materials to build support structures for plants. It’s easy to build a teepee made from tree branches and vines and place it over a container to support the pea crop growing there. Here’s a project that uses a recycled container and natural materials to grow a hearty harvest of pole beans.
As you can see, maintaining a container garden is, in many ways, far easier than taking care of a traditional garden in the ground. Though we have to water and fertilize a bit more often than other gardeners, container growers get to skip such tasks as weeding, mulching, and tilling. Instead, we get to focus on enjoying the garden’s beauty and yields.
BEAN TRELLIS BIN

Pole beans are one of the most productive garden crops you can grow, but because the plants grow so large, they require a lot of support. Their twining vines wrap around whatever they touch, and unless you give them some type of trellis to climb, they’ll quickly get out of hand.
This simple trellis, made from a recycled storage bin and some branches is perfect. It gives the vines plenty of room to grow while taking up very little real estate. Use it to grow pole beans on an apartment patio, a deck, or a balcony. For something a little different, try growing yellow or purple pole beans, pole limas, runner beans, Chinese yard-long beans, or winged beans on it, too.
HOW TO MAKE A BEAN TRELLIS BIN
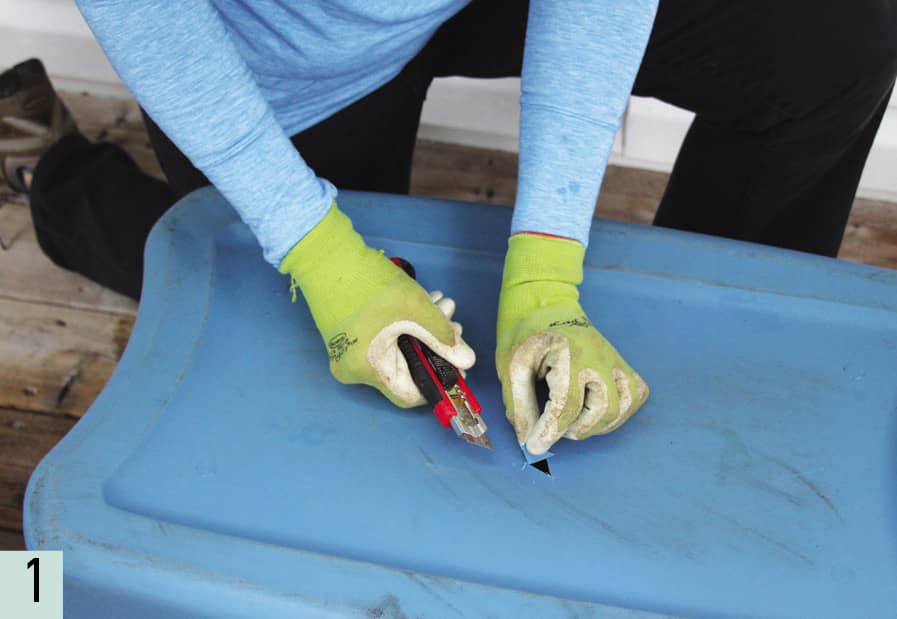
STEP 1 Flip the plastic storage bin over and use the utility knife to cut a 1-in.-square drainage hole in the bottom of the bin. Use the wire cutters to cut eight pieces of aluminum hobby wire, each about 30 in. long. Put them aside, but keep them within arm’s reach.
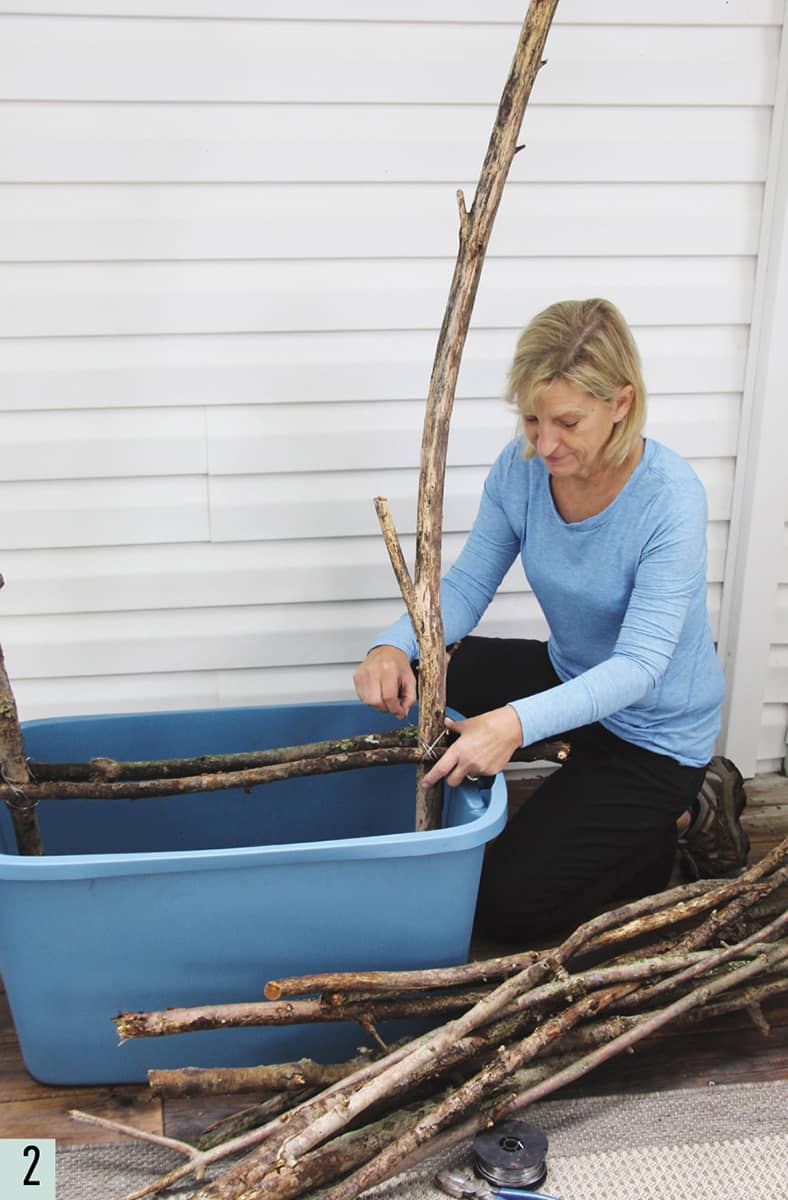
STEP 2 Lay the two shorter branches across the top of the container, spacing them about 2 in. apart. Insert one of the taller branches in between the shorter branches, just inside one of the container’s side edges. Wrap a piece of aluminum hobby wire around the vertical branch and both horizontal branches in a figure-8 fashion to secure them together. Repeat with another vertical branch on the edge of the opposite side of the container.
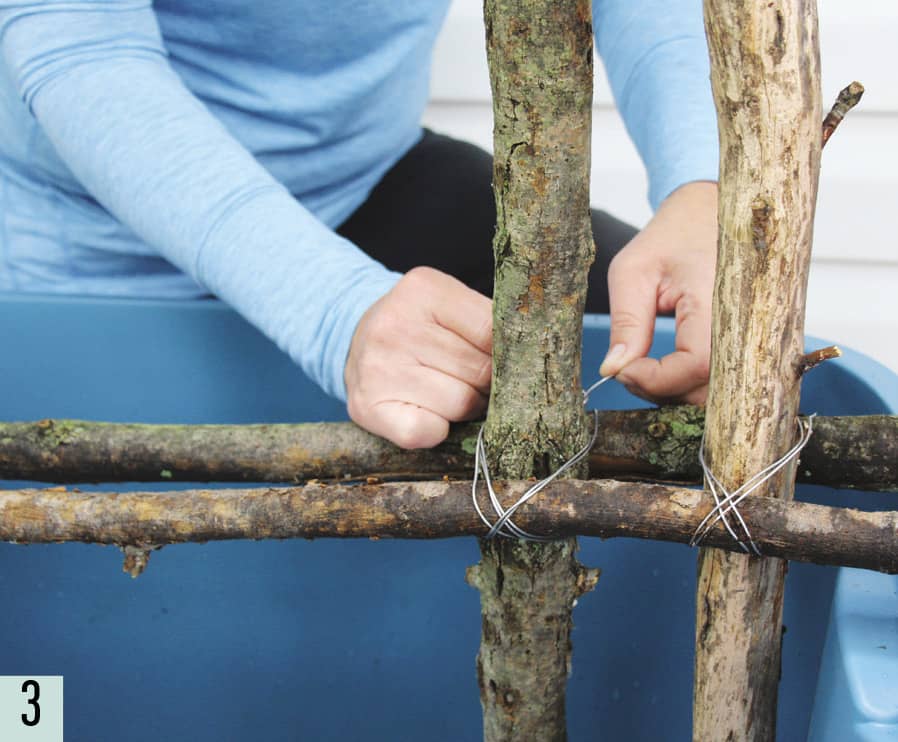
STEP 3 Place two more branches in between the horizontal support branches, about 3 in. in from the first vertical branches. Use aluminum hobby wire to secure these to the horizontal branches.
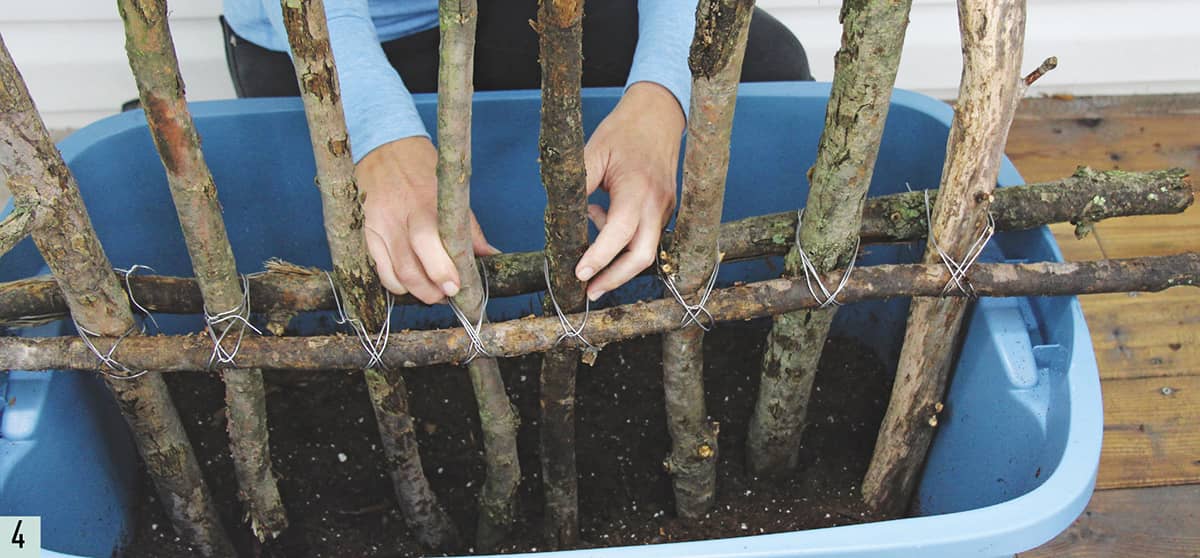
STEP 4 Fill the container about halfway with the 50/50 potting soil and compost blend. This helps support the remaining branches as they’re installed. Continue to insert more vertical branches, spacing them evenly and then securing them to the horizontal branches with hobby wire wrapped in a figure-8 pattern. Once all the branches are installed and secured, fill the rest of the bin with the potting soil blend until there’s only about an inch of headspace remaining.

STEP 5 Plant a row of your favorite variety of pole beans on either side of the branch trellis. Space bean seeds 2 in. apart. If you’d like to add some color, plant a handful of flowering annuals around the outer edge of the bin. Water everything in well and place your Bean Trellis Bin where it receives at least 6 to 8 hours of sun per day. As the beans grow, train them to grow up the branches by gently guiding them in the right direction.