Chapter 1
Your eBay Photo Studio
IN THIS CHAPTER
 Setting up a photo studio
Looking into camera features
Scanning paper items
Buying other tools for your photo studio
Welcome to the world of imaging, where pictures aren’t called pictures but images. Pictures taken with a digital camera or a smartphone — or scanned on a scanner — can be cropped, color-corrected, and made near-perfect with simple software. Crisp images draw attention to your listings and grab viewers by the lapels.
Sellers, take heed and read why you should use numerous, well-made digital images in your listing pages:
- If you don’t have a crystal-clear picture, potential customers may wonder whether you’re deliberately hiding something about the item from view because you know something is wrong with it. Paranoid? Maybe. Practical? You bet.
- Many fickle shoppers don’t even bother reading an item description if they can’t take a good look the item.
- Aside from using eBay’s catalog photos (when available), taking your own pictures shows that you actually have the item in your possession. Lazy sellers take images from a manufacturer’s website to illustrate possibly bogus sales on eBay. Why risk being suspect? Snap a quick picture!
- Everyone’s doing it. I hate to pressure you, but depending on the category, several images are expected by eBay shoppers. So if you’re not using more than one, you’re not reaching the widest possible number of people who would consider your item. From that point of view, you’re not doing the most you can to serve your potential customers’ needs.
So which is better for capturing images — a digital camera, smartphone, or a digital scanner? As with all gadgets, here’s the classic answer: It depends. For my money, it’s hard to beat the latest smartphones for close up images. Today’s smartphones take pictures that rival older digital cameras, but new phones can be expensive. You might be able to justify the cost of a new smartphone if you consider that it will be your eBay camera as well.
But before you go snag one, decide what kind of investment (and how big) you plan to make in your eBay business. If you’re already comfortable taking photos with your camera and it does a good job for now, keep on using it. Using an all-in-one printer with a scanner can balance out your photo needs. The scoop on the alternatives is coming right up.
Setting Up Your Studio
Taking pictures for eBay? No problem! You have a digital camera and you know how to use it. Just snap away and upload that picture, right? Sorry, but no. There are good ways and bad ways to take photos for eBay — and believe it or not, the techniques taught by many ecommerce instructors aren’t necessarily the best way.
I recommend that you set up a mini photo studio for your eBay pictures. That way, you won’t have to clean off your kitchen counter every time you want to take pictures.
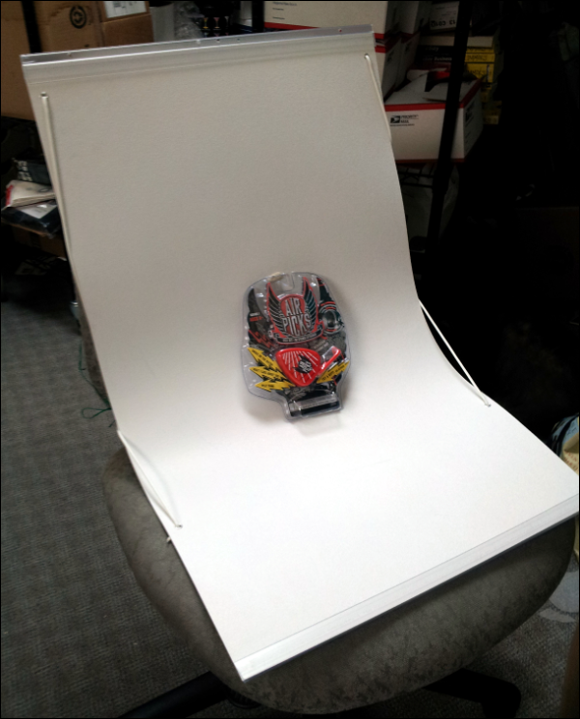
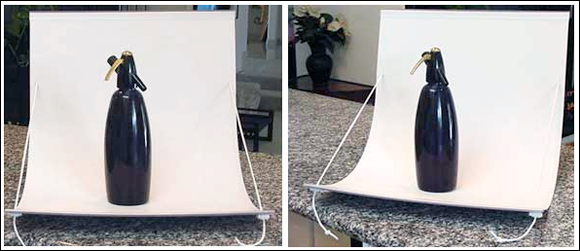
 If you must use the kitchen counter, a desktop, or even a chair (as in Figure 1-1), be sure to use an inexpensive infinity photo background, which you can find on — where else? — eBay.
You need several basic things in your photo studio; the extras you need are based on the type of merchandise you’re selling. An eBay generalist, someone who sells almost anything online — like me! — should have quite a few extras for taking quality photos.
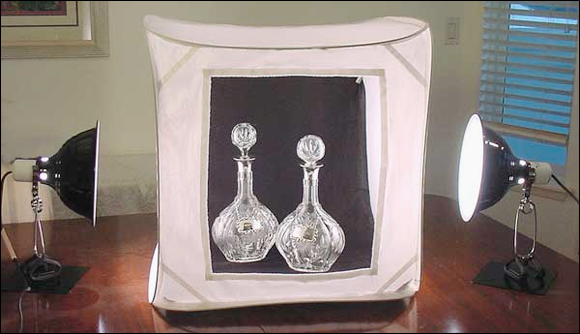
I often use a photo cube combined with small clamp lights (shown in Figure 1-2), true color lamps, or tall floodlights. An inexpensive photo cube works well for larger detailed and collectible objects — as well as any object that will fit in it. By using a translucent fabric cube, you can fully illuminate your item and have no resulting glare, harsh shadows, or detail burnout.
Hands down, the equipment for photographing jewelry and teeny, tiny items is the Cloud Dome (see “Other Studio Equipment” further on). It not only helps with lighting, but also holds your camera or smartphone steady for difficult to light or super-magnified (macro) shots.
What you find in this section might be more than you thought you’d need to produce good pictures. But your photographs will help sell your merchandise, so you need to consider this part of your business seriously. Of course, if you sell only one type of item, you won’t need such a varied selection of stuff, but you should have the basic photo setup.
Your #1 Tool: A Digital Camera
Digital cameras, whether smartphone or point-and-shoot, are mysterious things. You may read about megapixels (a million pixels) and think that more is supposed to be better, but that doesn’t apply to eBay or to web images. Megapixels measure the image resolution that the camera is capable of recording. For eBay use, all you need from a camera is a miniscule 2 megapixels, or 1600 x 1200 in size, which allows for cropping — although my current smartphones take a minimum of 6 megapixels (3264 x 1840). Images uploaded to eBay’s picture hosting are optimal when they’re at least 500 pixels wide. The eBay servers will perform magic on your pictures and reduce them down sharply.
 If you’re going to self-host because you want to show multiple images of your items within a listing description, beware! With so many online shoppers using mobile devices, your images may not show up clearly on smaller screens. If you use a high-resolution camera, you’ll have a pixel-bloated picture that takes a looooong time to load online.
The camera you use for eBay is a personal choice. Would-be big-time sellers starting out in an eBay business (with no experience on the Internet) usually go out and buy the most expensive digital camera they can find. Maybe having lots of megapixels is a macho thing, but a camera with a bunch of megapixels is the last thing you need for eBay images.
You don’t need a million pixels, but you do need the following:
- Quality lens: I’m sure anyone who has worn glasses can tell the difference between a good lens and a cheap one. Cheap cameras have flimsy plastic lenses, and the quality of the resulting pictures is accordingly lousy. Your camera will be your workhorse, so be sure to buy one from a company known for making quality products.
- Removable media: Most cameras (and smartphones) can connect to your PC with a USB cable, and many sellers are happy with that type of connection. Whether you choose to transfer images is your choice. Some sellers edit on devices and send pictures direct to eBay. Some find that using cables to download pictures to the hard drive is annoying. Based on your device, you can also use SD cards of varying sizes.
-
Optical zoom versus digital zoom: When shopping for your camera, find one with the highest-power optical zoom that you can afford. Optical zoom is magnified by the camera’s lens (using the camera’s internal optics), producing a vivid picture.
Digital zoom is valuable when you have quality software in the camera. When your camera uses digital zoom, it does the same thing as enlarging a picture in photo-editing software: The camera centers the focus over half the focal plane, and uses software interpolation to enlarge the picture. If the algorithm is lacking, your image may be slightly fuzzy.
-
Tripod mount: It’s simple to mount a camera on a stable tripod — although I prefer holding a camera to take shots at varied angles. Tripods can help you avoid blurring your pictures if your hands are a bit shaky. To use a tripod, you need a tripod mount, or a clamp to attach your device.
Modern smartphones have OIS (Optical Image Stabilization) built in, thereby making tripod use unnecessary for some.
-
Macro setting capability: These features will come in handy if you plan to photograph coins, jewelry, or small detailed items. A camera’s macro setting enables you to get in really close to items while keeping them in focus. Usually the macro mode can focus as close as 1 inch and as far away as 10 inches.
The average camera’s focal length (focus range) is from three feet to infinity. If you have a camera that says the macro focus range is set at 5.1 inches, it means you can’t focus it clearly on an object any closer than 5.1 inches. Macro pictures require a steady hand (or you can affix your camera to a Cloud Dome); any vibration can blur your image.
- Battery life: When you’re choosing your camera (or smartphone), be sure to check into the length of time the camera’s battery will hold a charge. The last thing you want to do is run out of juice at the wrong moment. Consider the following:
- Keep a spare battery on hand so you’ll be prepared if your camera battery runs low while you’re shooting multiple items.
- Invest in a portable charger. These rechargeable batteries last a long time and are worth the investment.
-
White-balance setting: This is a tricky feature. Most eBay photographers set the camera to Auto (if there is a setting) and hope for the best. If you can adjust the white balance, do so. Manufacturers use different presets. The list of options can include settings for incandescent lights, twilight, fluorescent lights, outdoor, indoor, or shade. All these lighting situations have different color temperatures, as I discuss in the “Lighting” section later in this chapter.
 It’s worthwhile to take the time to play with the various white-balance settings of your camera in the different places where you normally photograph eBay merchandise. Make notes on settings that give you the truest colors in your digital images.
- Autofocus and zoom: These options just make life easier when you want to take pictures, and should be standard features.
The bottom line is that you should buy a brand-name camera or smartphone. Occasionally I still use an older Wi-Fi Samsung camera for shooting; lately I prefer my smartphone for its larger visual display. My camera is technically outdated, but it’s also loaded with all the bells and whistles I need for eBay photos and for some reason, I can always find it. My smartphone camera comes in handy when I want to get a picture taken quickly because it is always at hand.
I bet you could find a camera or used smartphone that fits your needs right now on eBay. Keep in mind that in our tech-savvy society, many camera and smartphone users chase the latest trends and buy the newest available device. They then sell their older devices on eBay for a pittance. Many tech stores also sell used and refurbished equipment.
Scanning Your Wares
Scanners have come a long way in the past few years. A once-expensive item can now be purchased new for as little as $100 (or as part of an all-in-one printer). If you sell books, autographs, stamps, or documents, a scanner may be all you need to shoot your images for eBay.
When shopping for a scanner, don’t pay too much attention to the resolution; the higher the resolution, the bigger the file, and (often) the slower the load. Some scanners can provide resolutions as high as 12,800 dpi, which is more data than you need when you print the image. But to dress up your eBay listings, all you need is (are you ready?) 96 to 150 dpi! That’s it. Your images will look great, won’t take up much storage space, and won’t take forever to load when a buyer looks at them. Basic scanners can scan images up to 1200 dots per inch (dpi), so even they are more powerful than you need for your eBay images. As with smartphones and digital cameras, I recommend you stick with a brand-name flatbed wireless scanner.
Other Studio Equipment
What you find in this section might be more than you thought you’d need for photographing your items. But photographs can help sell your merchandise, so you need to take this seriously. Of course, if you sell only one type of item, you won’t need such a varied selection of stuff, but you should have the basic photo setup.
Tabletop tripod
A tripod is a three-legged stand that holds your camera or smartphone. The legs should stand on a surface and extend to your desired height or tilt to an angle. The latest ones have a Bluetooth remote so you don’t have to touch the camera (or phone) to get the best angle to snap pictures. You can purchase one like this online for as low as $15.
Power charger
If you’ve ever used digital cameras for any length of time, you know that they can blast through batteries faster than sugar through a 5-year-old. Smartphones, too, can run out of juice at the most inopportune of moments. A portable power charger is a must, especially if you take product photos away from your home base. You can find them online reasonably priced. I use the brand Anker, but it’s like I always say: Read the feedback and reviews on the product before purchasing.
Lighting
Trying to take good pictures of your merchandise can be frustrating. If you don’t have enough light and use the camera’s flash, the image might be washed out. If you take the item outside, the sun might cast a shadow.
Many digital cameras don’t work well in low light. I’ve seen some eBay sellers use a flash and instruct their children to shine a flashlight on the item as they photograph it from different angles — all the while hoping that the color isn’t wiped out.
After consulting specialists in the photo business to solve the problem of proper lighting for digital cameras, I put together an inexpensive studio lighting set for online product photography. It’s the same one that I successfully use in my home photo studio (refer to Figures 1-1 and 1-2).
Professional studio lights can be expensive, but you might be able to find a set for around $100. (You need at least two lights, one for either side of the item, to eliminate shadows.) Search eBay for used studio lighting; I’m sure you’ll find a good deal.
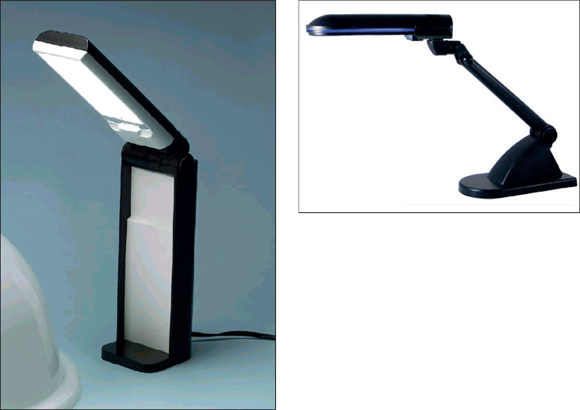
In lieu of a professional set-up, you can successfully use an Ott-Lite or a less expensive, generic true-color version, as shown in Figure 1-3. The lamp’s bulb is a full-spectrum, daylight 5000K florescent tube, good enough for jewelry photography. This same light is used for grading diamonds.
The color temperature of a light, which ranges from 2500°K to 7800°K, is a number given to a lighting condition. The K after the number signifies the Kelvin color temperature range. Actual daylight color temperature is about 5500°K, and it’s best to get your lighting as close to that as you can. Using a bulb with a daylight number is important because it’s a pure neutral, which means that it throws no blue or yellow cast on your images.
Photo cube
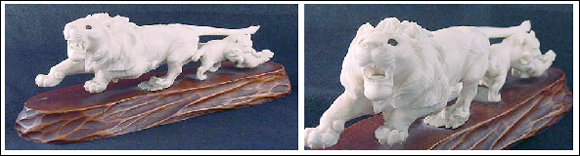
How much do I love my photo cube? I could write a poem! But I’d rather take another picture with it. It allows me to take the most detailed photos of antiques and specialty items at night in my home. It works incredibly well wherever I use it, because my kit includes two true-color lights. The nylon cube diffuses the light so that there are no harsh shadows and I don’t burn out minute details with too much light. Take a look at the details in Figure 1-4.
Photo background and stage
Backgrounds come in many shapes and sizes. You can get paper, fabric, or use one of the portable photo stages for smallish items:
- Seamless: In professional photo-talk, seamless is a large roll of 3-foot (and wider) paper that comes in various colors and is suspended and draped behind the model and over the floor. (Ever wonder why you never see the floor and wall come together in professional photos?) Photographers also drape the seamless over tabletop shots. Some people use fabrics such as muslin instead of seamless.
- Fabrics: I recommend using neutral fabrics (such as white, light gray, natural, and black) for photographing your merchandise so the color of the fabric doesn’t clash with or distract from your items. Some of the photo cubes on eBay come with great low-wrinkle fabric backgrounds as well.
- Portable photo background: A portable photo stage is another valuable tool for taking pictures indoors or out. Textured ABS plastic is manufactured so you can set it in a curve shape (see Figure 1-5); the stage can be set on any surface — and will permit you to take a clean picture without extraneous backgrounds. You can store it flat on a bookshelf till you need it next. Some experts recommend using poster board, which is prone to getting unsightly dirt and dents; it’s not worth it. Spend the money and get a cleanable tool you will use forever.
Cloud Dome
If you’re going to photograph a lot of jewelry, collectible coins, or other metallic items, you’ll probably become frustrated at the quality of your pictures. Metallic objects seem to pick up random color from any kind of light you shine on them for picture-taking. Bad results: Gold jewelry will photograph with a silver tone, and silver will look gold-ish!
After conferring with lots of eBay photo gurus, I was told the secret of getting crisp, clear, close-up pictures: Use a Cloud Dome. It stabilizes your camera (just as if you were using a tripod) and filters all unwanted color tones, resulting in image colors that look like your item.
The Cloud Dome is a specially designed plastic bowl on which you mount your camera. You take your pictures through the dome. The translucent white plastic diffuses the light so your item is lit evenly from all sides, eliminating glare and bad shadows. Check out the manufacturer’s website at www.clouddome.com to see some amazing before-and-after pictures.
Cloud Dome makes a smaller version for smartphone photography, called the Nimbus. The Nimbus also manages to get the best images from gems. You can actually capture the light in the facets! Pearls, too, will show their luster. Several eBay members (including yours truly) sell the Cloud Dome; I highly recommend it! In Book 5, Chapter 2, I show you how to use it.
Props
To take good photos, you need some props. Although you may think it strange that a line item in your accounting program will read props, they do qualify as a business expense. (Okay, you can put it under “photography expenses” — props just sounds so Hollywood!)
How often have you seen some clothing on eBay from a quality manufacturer, but you just couldn’t bring yourself to bid more than $10 because it looked like it had been dragged behind a car and then hung on a hanger before it was photographed? Could you see how the fabric would hang on a body? Of course not.
Mannequin
If you’re selling clothing, you’d better photograph it on a mannequin. If you don’t want to dive right in and buy a mannequin, at least get a body form to wear the outfit. Just search eBay for mannequin to find hundreds of hollow forms selling for less than $20. If you sell children’s clothing, get a child-size mannequin form as well. The same goes for men’s clothes. If worst comes to worst, find a friend to model the clothes. There’s just no excuse for hanger-displayed merchandise in your listings.
I got my mannequin (Midge) at a department store’s liquidation sale here in Los Angeles. I paid $25 for her. Her face is a little creepy, so I often crop her head out of the photos. She has a great body and everything she wears sells at a profit. Many stores upgrade their mannequins every few years or so. If you know people who work at a retail store, ask when they plan to sell their old mannequins; you may be able to pick one up at a reasonable price.
Display stands, risers, and more
Jewelry doesn’t photograph well on a person’s hand and looks a lot better when you display it on a stand or a velvet pad. If you’re selling a necklace, display it on a necklace stand, not on a person. You can find these stands on eBay by searching jewelry display stand; they can be bought for under $10.
Risers can be almost anything that you use to prop up your item to make it more attractive in a picture. Put any riser pieces that aren’t attractive under the cloth that you use as a background. Keep a collection of risers and propping materials in your photo area so they’re always close at hand.
You wouldn’t believe what the back of some professional photo setups look like. Photographers and photo stylists think resourcefully when it comes to making the merchandise look good — from the front of the picture, anyway! Throughout my years of working with professional photographers, I’ve seen the most creative things used to prop up items for photography:
- Bottles of heavy stuff: A photographer I once worked with used little bottles of mercury to prop up small boxes and other items in a picture. Mercury is a heavy liquid metal — but also a poison, so I suggest you try the same technique with small bottles (prescription bottles work well) filled with other weighty stuff (how about sand?).
- Beeswax and clay: To set up photos for catalogs, I’ve seen photographers prop up fine jewelry and collectible porcelain with beeswax (the kind you can get from the orthodontist works great) or clay. Beeswax is a neutral color and doesn’t usually show up in the photo. However, you must dispose of beeswax afterward, often because it picks up dirt from your hands and fuzz from fabric.
- Museum Gel or Quake Hold: These two products are invaluable when you want to hold a small object at an unnatural angle for a photograph. (They’re like beeswax and clay, but cleaner.) Museums use this puttylike product to keep breakables secured in one place — even during an earthquake! Museum Gel can sometimes be difficult to remove from items (and can leave a residue), so that’s why I use Quake Hold putty for my eBay items.
- Metal clamps and duct tape: These multipurpose items are used in many photo shoots in some of the strangest places. For example, if your mannequin is a few sizes too small for the dress you want to photograph, how do you fix that? Don’t pad the mannequin; simply fold over the dress in the back and clamp the excess material with a metal clamp, or use a clothespin or a small piece of duct tape to hold the fabric taut.