Chapter 1
Going Pro with Seller Hub
IN THIS CHAPTER
 Opting in
Tracking your payments
Relisting the easy way
Checking your Seller Dashboard
Once the selling bug has bitten you, it’s a natural transition to go from listing a few items a month to 20, or 50, or more. And that, dear reader, means you are officially running an eBay business. Congratulations! There’s a good and a bad side to this increase. The good is that you’re making considerably more money than you did before signing up with eBay. The bad? Well, call it challenging instead: It’s time to start using tools to streamline how you do business. This chapter gets you started with some of the best available tools.
Seller Hub is a suite of tools for managing your selling business from your My eBay page.
Getting Seller Hub
As I write this book, eBay is in flux. Currently if you have an active seller account, eBay will opt you in automatically to Seller Hub. If you are a new user who registers as a business, you may already have Seller Hub as your My eBay link.
 If you’ve been on eBay for a while and yearn for the days of using a simpler format, you can still access the old My eBay: All Selling page by scrolling to the Selling Tools box in Seller Hub and clicking View My eBay Selling.
Seller Hub Features
Seller Hub allows you to monitor or automate many of the more tedious eBay tasks. The page is divided into several boxes, which I break down here.
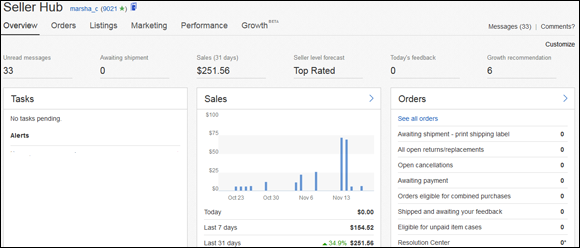
You can click the Orders link to view a summary of your sales activities. The Overview page lists at-a-glance statistics so you can see what’s going on with your sales quickly, at any time (see Figure 1-1). Links to other pages are enabled by clicking the arrow in the title bar of each box of data.
Aside from the boxes, there are some powerful links at the top of the Hub after the Overview tab. Each of these headers has a drop-down menu to link you to more data.
- Orders
- Listings
- Marketing
- Performance
Both Orders and Listings have summary boxes on the Overview page, but more detailed information appears when you mouse over the link. I describe the important details of each section further on.
Customize
Looking at the page initially may seem a little disorienting. Scroll up and down the page, and look at the data boxes. If you think you’d prefer not to see some of the options, just click Customize in the upper right and you’ll be able to remove those areas you don’t think you need. You can always click Customize again to get them back.
We all like to know how we’re doing, and the Sales (Last 31 days) area allows you to do just that. A bar chart with percentages shows a sales summary that compares your sales to previous periods and to the market in general.
Seller Level
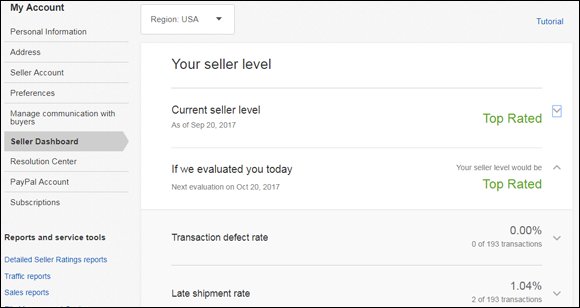
Once you have received ten Detailed Seller Ratings, the Seller Level Summary box gives you a quick way to check your status on eBay. Clicking on the arrow (or title) on the right of Seller Level will take you to your Seller Dashboard page.
Your Seller Dashboard Summary covers the all-important results of the DSR ratings you get from your buyers. (Find more about Detailed Seller Ratings in Book 1, Chapter 5.) It also keeps you apprised of whether you’re following eBay’s policies or, instead, have violated any in the recent past.
If you feel that any of the defects listed on this page are erroneous, go to Help & Support and call eBay to get marks against your reputation expunged. Honest mistakes happen, and you don’t want to lose your seller status because of a mistake. Click Help and Support, and click the Contact us button at the bottom of the page. After clicking on topics, you’ll be presented with the option to call eBay at 866-540-3229 and a passcode with an expiration time. (You can call without the passcode, but it might take longer to get to the right human.)
If you’re a Top Rated Seller Plus, you also see your DSR-based Final Value Fee discount (more on that in Book 8, Chapter 3).
On your official Dashboard, like the one in Figure 1-2, you can find out the details of what makes you a good seller in eBay’s eyes — and in your customers’ eyes, too. Scroll all the way to the bottom to get all the details.
Listings
An important box on Seller Hub Overview page is Listings. You’ll get some valuable information there. It references what you did — or didn’t — sell, along with even more stats on your sales. This section points out the most important activities you will view once you’ve got some transactions in progress.
Create Listing
Click the top link on the drop-down menu to put a new item up for sale.
Active Listings
Click the Active Listings link, and you can observe the bidding action just as you can from the My eBay Selling page. The color-coding that indicates auction bidding activity is the same as on the My eBay Selling page. (If the current price is in green and bolded, your item has a bid and the number reflects the high bid. The current price is in red if there are no bids.) Your listings are accessible with a click of your mouse.
You have the option to sort and see only auctions or fixed-price listings on the Active Listings page. You can also search your own listings by keyword or item number.
Unsold Listings
You can access your Unsold ended listings from the links on the left side of the page for easy relisting. You can relist either as an auction or as a fixed price listing.
You need to know that to be eligible for relisting credit (once you have exceeded your free listings and have to pay insertion fees), the item gets only one shot at reselling. If it’s being relisted for a second time, you need to start the listing again by using the Sell Similar link. The Sell Similar link (versus the Relist link) starts the transaction in a new cycle for the sale, thereby making it eligible for the relisting credit if it doesn’t sell.
Scheduled Listings
The Scheduled Listings link takes you to any auction or fixed-price listing you’ve asked eBay to begin at a later time or date. You can also view these pending (scheduled) listings through links that narrow them to listings that start within the next hour — or start today.
When you enter the Scheduled Listings area (by clicking the Scheduled Listings link), you can go directly to any of your listings.
From the Scheduled Listings page, you can confirm all information about the sale, as well as make any changes to the listing or to the scheduling time.
Orders
The Orders link shows you the details of the past 90 days’ worth of transactions. You can get to the details by clicking appropriate links in the Orders box (refer to Figure 1-1). You’ll find quite a bit of information here, including
- Awaiting payment: This is where items that have been won or bought are shown before a payment is made.
- Returns: Here you’ll see the status of your returns. This area can go back as far as the prior 18 months.
- Awaiting Shipment: When a buyer has sent payment through PayPal, the transaction automatically moves to this category.
- Paid and Shipped: After an item is paid for, a reference to it appears here so you can keep abreast of the feedback you need to leave. When you’ve shipped an item and posted your tracking number, you can also check to see when the item is delivered.
- Cases: This is your Resolution Center where you turn in non-paying buyers and see whether a buyer has opened a complaint on one of your transactions.
Selling Tools links
Scroll down the page and you’ll see the Selling Tools box on the Overview page. It’s a powerful group of links that allow you to download and export your sales history to your computer. Depending on your eBay business, you also have quick links to PayPal, Manage your Store, Sellers you follow, Apps, and to the good old My eBay Selling page — in case you get nostalgic for the old, pre-Seller Hub days.
Getting More from Seller Hub
Within Seller Hub, you’ll find lots of handy tools to run your business more efficiently. In this section, I mention some of the most-used features.
Handling order activities
One of my favorite features is that I can follow the progress of my Paid and Shipped sales from this page. When an item has been won or paid for using PayPal, I can click the appropriate link to see the list of items ready for some sale-related action (such as shipping).
Notice the record number next to the buyer’s information. To send an eBay message or combined invoice, follow these steps:
-
Click the record number to the left of the buyer’s User ID and name.
The Transaction Detail record for the sale appears. The Buyer information appears at the top of the page (name, email address, street address, phone number) and any items sold to that buyer are below. (If the buyer has made more than one purchase, you’ll see a notation stating as much. You then have the option to click the link to combine purchases in the sales record.)
- To send an eBay message to the buyer:
- Click the feedback number next to the buyer’s User ID. This will take you to the buyer’s Feedback profile.
- On the Feedback profile, click Contact Member. A window will open, showing the item you have sold to the buyer.
- Click the item, then click continue. An eBay Message contact form appears.
- Write your message and click Send the button.
- To send a combined invoice (prior to payment):
- Click one of the record numbers attributed to the buyer’s purchase.
- Find the combined purchases button and click it. Purchases are combined into one transaction, with each item showing its own record number.
- Return to the Sold: Awaiting Payment area and click Send Invoice next to the transaction.
Tracking payments and shipping
Seller Hub makes many selling processes considerably easier. Take a look your Orders⇒ All Orders page. From here, you can see how many buyers have paid for their purchases — and how many haven’t.
If you’ve sold items and you’re expecting payments, be sure to check this page several times a day. When a buyer makes his or her payment using PayPal, eBay will update your records. (PayPal also sends you a payment-received email.)
After you ship the item, you can indicate any pertinent information on the Sales Records screen. The transaction information is available when you click the record number next to the item that’s been shipped. After you ship the item, select the check box next to Shipped On and the date will appear automatically. Now, type in the tracking number (I do this from PayPal as I double-check for buyers’ notes before I print a label), and click Save; the record moves from the Sold: Awaiting Shipment page to the Paid and Shipped page. This change is also reflected on the Summary page.
Relisting and Selling Similar Items
Wouldn’t it be better if you could select a whole bunch of items and relist them all together? Step up to Seller Hub for a one-click option. You can access items that have not sold, logically enough, from the Unsold Items area. Relisting is accomplished with a click of the mouse.
To relist an item through Seller Hub, follow these steps:
-
Click Unsold Listings.
To do so, click the appropriate tab at the top of the page in Seller Hub (or just link through the Overview page box).
-
Mark the items to relist (or Sell Similar from the drop-down menu) by selecting the check box next to each item’s Title.
You may select any or all of the items listed on the page.
-
Click the Relist button (or the Sell Similar link).
The Relist Multiple Items page appears.
- Review all the items listed (along with the fees).
- Submit the items by clicking the Submit All button.
Accessing Seller Hub Reports
I like the Hub because it gives you the opportunity to keep all your selling information in one place. It also provides a downloadable report — in spreadsheet format — that you can archive for your records. Here’s the information you can expect to find in the reports:
- Sales record number: The number assigned to the transaction by Selling Manager for identification purposes.
- User ID: The eBay User ID of the person who purchased the item from you.
- Buyer zip: The buyer’s Zip code.
- State: The state the buyer resides in.
- Buyer country: The country your buyer lives in.
- Item number: The eBay number assigned to the item when you listed it for sale on the site.
- Item title: The title of the listing as it appeared on eBay.
- Quantity: The number of items purchased in the transaction.
- Sale price: The final selling price of the item.
- Shipping amount: The amount you charged for shipping the item.
- Shipping insurance: If the buyer paid insurance, it’s listed next to his or her sales record.
- State sales tax: If you’ve set up Selling Manager to calculate sales tax for your in-state sales, and sales tax was applied to the item when it was sold, that amount is listed here.
- Total price: The GSA (gross sales amount) for the transaction.
- Payment method: The method of payment used by the buyer. This is inserted automatically if the item is paid through PayPal, or manually inserted by you into the sales record if paid by another method.
- Sale date: The date the transaction occurred on eBay.
- Checkout: The date of checkout. This is usually the same as the transaction date.
- Paid on date: The date the buyer paid for the item.
- Shipped on date: The ship date you entered in Selling Manager.
- Feedback left: Whether you left feedback for the buyer is indicated by a Yes or No in this column.
- Feedback received: The feedback rating left for you by the buyer (positive, negative, or neutral).
- Notes to yourself: If you input any personal notes regarding the transaction in the sales record, they appear here.
 Keep in mind that Seller Hub reports are available on the site for only four months, so be sure to download your information regularly.
Notice that there is no column reflecting the eBay fees you paid for listing and selling the item. If you have plenty of time on your hands, you can create another column and input the fees from your eBay invoice for each item. Save time by posting the monthly total once a month in your bookkeeping program.
To get the file from eBay to your computer, follow these steps:
- Go to Seller Hub Overview.
-
Under Seller Tools, click the File Management Center link.
This takes you to the File Management Center.
-
Click the Create a Download Request link.
A Create a Download Request page appears.
- Select the records you want from the links provided.
-
Select the time period you want to include in your report.
It’s best to generate monthly or quarterly reports, so that your reports coincide with specific tax periods. You can always combine more than one report in your spreadsheet program to show different periods of time.
-
Click the Save button.
You then see a confirmation page and a confirmation number for your request. eBay will send you an email when your report is ready.
-
You will receive an email (almost immediately).
Click the link in the email, and you’re taken to the View Completed Downloads page.
-
Click the link to download the file.
The Save As dialog box appears so you can save the file on your hard drive.
-
Rename the file to reflect the sales month and year, and then click Save.
After the file is downloaded, you’ll see a confirmation with your new filename.
It’s a good idea to create a directory on your computer with a name such as eBay Sales. In this directory, you can store all the reports you download from eBay, PayPal, or any other online service. Be sure to include this directory when you perform regular data backups.
Now you can open the new file in Microsoft Excel.
With simple spreadsheet commands, you can customize the look of your report. For example, if the column for Buyer Country is unnecessary for your records (for example, if you ship only within the United States, that information is not useful), you can delete the column in two quick steps:
- Highlight the column by clicking the column letter.
-
Choose File⇒ Cells⇒ Delete.
Voilà! The offending column is no more.
All spreadsheet tasks mentioned here can be performed in similar fashion in Google Docs.
The spreadsheet generated by Seller Hub is much more useful if you total the columns. That way, you can see your total sales at a glance. To total a spreadsheet column:
- Click in the blank cell at the bottom of the column you want to total.
- Click and drag over the cells you want to sum.
- Click the AutoSum (Σ) button (also found under Formulas tab).
- The total appears.
If you want to total the columns next to the one you just totaled, you don’t have to re-input the formula. Just highlight the results cell from your last formula, and highlight cells in the same row that you want to contain totals of the columns. Then under Editing, click below the ∑ symbol to fill cells to the right. This copies the formula to the connecting cells and all the columns are totaled.