
Supplies
• Cake filling of your choice
• Black candy melts
• Yellow candy melts
• White candy melts
• Yellow jumbo confetti sprinkles
• Jumbo heart sprinkles
• White Sixlets
Tools
• Digital scale
• Sheet pans
• Microwave-safe bowls
• Lollipop sticks
• Plastic bags
• Toothpicks
1. Begin by hand weighing the cake into one-ounce portions. Roll them into balls and set aside on a sheet pan. Place in the fridge while you prepare the candy melts.
2. Melt the black candy melts according to the directions indicated on the package.
3. Remove the cake balls from the fridge. Dip the sticks into the candy melts and insert them halfway into the cake balls.
4. Use the jumbo heart sprinkles for the ears. Slightly dip the rounded portion of the hearts into the candy melts and insert into the cake. Take two white Sixlets and use them to create an indentation in the cake where they will be placed after being dipped. You want to position them on the lower portion of the cake ball, just under where you plan on adding the nose.
5. Once the candy melts have fully set on the ears, you are ready to dip the pops. Allow the pops to come to room temperature before dipping. Fully submerge the pops into the candy melts and tap off any excess, keeping the face of the pop towards you. Once the excess candy melts have been removed, while still wet, place two white Sixlets into the indentations created earlier. If the candy melts pool up around where you placed them, gently tap the pops on the edge of your dipping vessel to smooth it out once again.
6. Place the pops in a stand and allow them to fully dry. Once dry, dot the eyes onto the pop with the melted black candy melts. Glue on jumbo confetti sprinkles and let the pops set.
7. Place a small amount of melted white, yellow, and black candy melts in separate plastic bags. Snip off corners of the bags and set aside until needed.
8. Using the black candy melts, pipe the pupils of the eyes as well as dots onto the Sixlets and let set. Once set, take the yellow melts and pipe a nose between the two Sixlets and allow to set.
9. Dot white candy melts onto the pupils of the eyes.
Supplies
• Cake filling of your choice
• Chocolate candy melts
• Black candy melts
• Red candy melts
Tools
• Sheet pans
• Microwave-safe bowls
• Lollipop sticks
• Plastic bags
• 2 x ¾ inch dog cookie cutter
1. Stuff the cookie cutter with the cake mixture, using the palm of your hand to squeeze out any excess cake. Gently push the cake out of the cookie cutter. Chilling your dough ahead of time makes this process easier.
2. Set them aside on a sheet pan and place in the fridge while you prepare the candy melts.
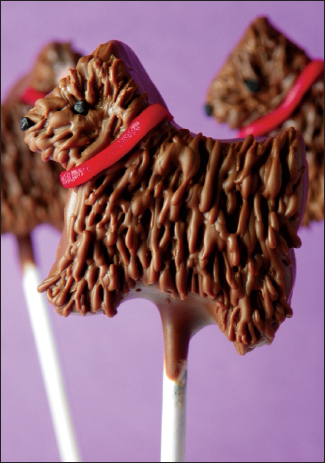
3. Melt the chocolate candy melts according to the directions indicated on the package.
4. Remove the shaped cake from the fridge. Dip the sticks into the candy melts while holding the cake with fingers, both on top and underneath, and insert sticks halfway into the cake.
5. Once the candy melts have fully set and the cake is back at room temperature, you are ready to dip the pops. Fully submerge the pops into the candy melts and tap off any excess. Place them in a stand and allow them to fully set.
6. Once the pops are fully dried, fill a small plastic bag with the chocolate candy melts and snip off a small piece of the corner. Pipe small strands of fur, leaving space between each strand, starting at the base of the pop. Allow to set and fill in the spaces you created with more strands of chocolate. Repeat in layers until the whole pop is fully covered.
7. Place both the melted red and black candy melts in plastic bags for piping. Using the black candy melts, dot an eye and nose onto the pop. With the red candy melts, pipe on a collar around the neck.
Supplies
• Cake filling of your choice
• Red candy melts
• Black candy melts
• Chocolate candy melts
• Sugar pearls
• Bone candies
Tools
• Digital scale
• Sheet pans
• Microwave-safe bowls
• Lollipop sticks
• Plastic bag
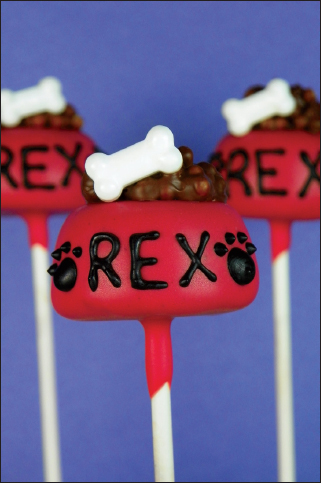
1. Begin by hand weighing the cake into one-ounce portions. Shape them as cones with flat tops to create the shape of dog dishes. Set aside on a sheet pan and place in the fridge while you prepare the candy melts.
2. Melt the red candy melts according to the directions indicated on the package. Remove the cake from the fridge. Dip the sticks into the candy melts and insert them halfway into the cake.
3. Once the candy melts have fully set and the cake is back at room temperature, the pops are ready to be dipped. Fully submerge the pops into the red candy melts and tap off any excess. Allow to set in a stand.
4. Fill a plastic bag with the black candy melts and snip off a small corner. Pipe a name on the front of the dishes and paws on the opposite sides of the name. Allow to fully set.
5. Melt the chocolate candy melts. Fill a small bowl with sugar pearls and pour the candy melts over them so that all the pearls are evenly coated.
6. Place a small amount of the chocolate-covered sugar pearls on top of the dishes with a spoon and attach the bones while still wet.
Supplies
• Cake filling of your choice
• White candy melts
• Black candy melts
Tools
• Digital scale
• Sheet pans
• Microwave-safe bowls
• Lollipop sticks
• Plastic bag
• Toothpick
• 1⅞ x ¾ inch fish cookie cutter
1. Stuff the cookie cutter with the cake mixture, using the palm of your hand to squeeze out any excess cake. Gently push the cake out of the cookie cutter. Chilling your dough ahead of time makes this process easier.
2. Set them aside on a sheet pan and place in the fridge while you prepare the candy melts.
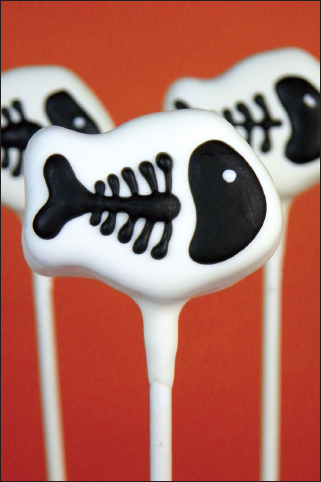
3. Melt the white candy melts according to the directions indicated on the package.
4. Remove the cake from the fridge. Dip the sticks into the candy melts and insert them halfway into the cake.
5. Once the candy melts have fully set and the cake is back at room temperature, the pops are ready to be dipped. Fully submerge the pops into the candy melts, tap off any excess, and allow to set.
6. When the pops have set, prepare the black candy melts in a plastic bag and snip off the corners. Pipe fish skeletons on top. Dot the heads with white candy melts, using a toothpick to create an eye socket.
Supplies
• Cake filling of your choice
• Light blue candy melts
• Green candy melts
• Black candy melts
• Blue pearl dust
Tools
• Digital scale
• Sheet pans
• Microwave-safe bowls
• Lollipop sticks
• Plastic bags
• Stiff-bristle paintbrush
• Soft-bristle paintbrush
• 1⅞ x ¾ inch fish cookie cutter
1. Stuff the cookie cutter with the cake mixture, using the palm of your hand to squeeze out any excess cake. Gently push the cake out of the cookie cutter. Chilling your dough ahead of time makes this process easier.
2. Set them aside on a sheet pan and place in the fridge while you prepare the candy melts.
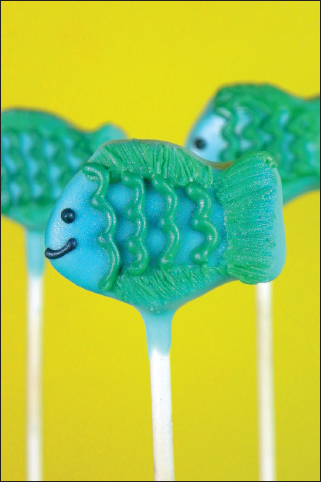
3. Melt the light blue candy melts according to the directions indicated on the package.
4. Remove the cake from the fridge. Dip the sticks into the light blue candy melts and insert them halfway into the cake.
5. Once the candy melts have fully set and the cake is back at room temperature, the pops are ready to be dipped. Fully submerge the pops into the light blue candy melts, tap off any excess, and allow to set.
6. Prepare the green and black candy melts in small plastic bags and snip the corners off. With the green melts pipe a line on the top, tail, and bottom fins. Brush on the candy melts with the stiff-bristle paintbrush to create the illusion of a fin. Once that sets, pipe on the scales. Use the black melts to pipe on an eye and a mouth.
7. Once the candy melts have fully set, dry dust the pops with a blue pearl dust with a soft-bristle paintbrush.