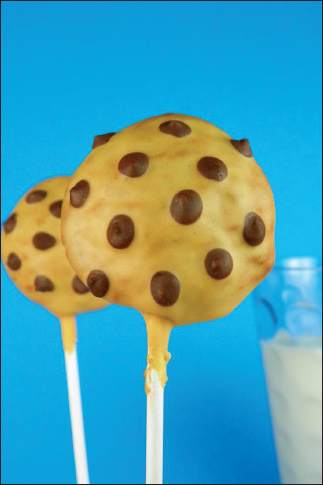
Chocolate Chip Cookie Cake Pops . . . .
Supplies
• Cake filling of your choice
• Peanut butter candy melts
• Chocolate candy melts
• Brown petal dust
Tools
• Digital scale
• Sheet pans
• Microwave-safe bowls
• Lollipop sticks
• Plastic bag
• Soft-bristle paintbrush
• Aluminum foil
1. Begin by hand weighing the cake into one-ounce portions. Roll them into balls and, with the palm of your hand, flatten them to resemble cookies. Take a piece of aluminum foil and crumple it into a compact ball. Roll the ball of foil all over the cake to create the baked texture.
2. Set them aside on a sheet pan and place in the fridge while you prepare the candy melts.
3. Melt the peanut butter and chocolate candy melts according to the directions indicated on the package. Place the chocolate candy melts in a small plastic bag, snip off the corner, and set aside for use later.
4. Remove the cake from the fridge. Dip the sticks into the candy melts and insert them halfway into the cake.
5. When the cake is ready to dip, fully submerge the pops into the candy melts and tap off any excess. Once the excess has been fully tapped off, randomly pipe on the melted chocolate for chocolate chips. Allow the pops to fully set.
6. Once the pops have fully set, dry dust the whole pop with brown petal dust to create a baked look, focusing mainly around the edges.
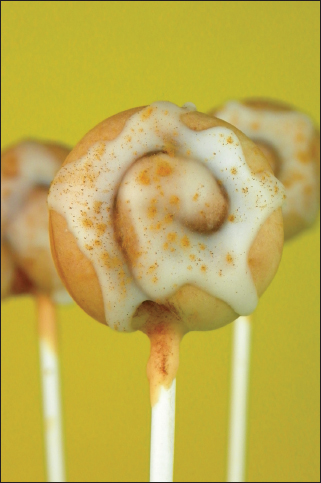
Cinnamon Roll Cake Pops . . . .
Supplies
• Cake filling of your choice
• Peanut butter candy melts
• Brown petal dust
• Royal icing
• Cinnamon
Tools
• Digital scale
• Sheet pans
• Microwave-safe bowls
• Lollipop sticks
• Soft-bristle paintbrush
1. Begin by hand weighing the cake into one-ounce portions. Roll them into balls and, with the palm of your hand, flatten them slightly. Take a lollipop stick and, starting near the bottom, press it against each cake to create a spiral indentation. The indentations will look rough and will need to be softened with your fingertips. Set cakes aside on a sheet pan and place in the fridge while you prepare the candy melts and royal icing.
2. Melt the peanut butter candy melts according to the directions indicated on the package.
3. Remove the cake from the fridge. Dip the sticks into the peanut butter candy melts and insert them halfway into the cake.
4. While the candy melts set and the cake returns to room temperature, prepare the royal icing to a flooding consistency. When the cake is ready to dip, fully submerge the pops into the candy melts and tap off any excess. Allow to set in a stand.
5. Once the pops have fully set, lightly dry dust the whole pop with brown petal dust to create a baked look. Focus the dust heavily around the spiral to make it darker than the rest of the pop.
6. When you finish dusting, apply a small amount of royal icing on top and tap the pop to make it spread out. Sprinkle on cinnamon and allow the royal icing to fully set.
Frosted Sugar Cookie Cake Pops . . . .
Supplies
• Cake filling of your choice
• White candy melts
• Light blue candy melts
• Nonpareils
• Yellow color dust
• Brown color dust

Tools
• Digital scale
• Sheet pans
• Microwave-safe bowls
• Lollipop sticks
• Soft-bristle paintbrush
• Small pallet knife
1. Begin by hand weighing the cake into one-ounce portions. Roll them into balls and slightly flatten on top. Set aside on a sheet pan and place in the fridge while you prepare the candy melts.
2. Melt the white and light blue candy melts according to the directions indicated on the package.
3. Remove the cake from the fridge. Dip the sticks into the white candy melts and insert them halfway into the cake.
4. Once the candy melts have fully set and the cake is back at room temperature, the pops are ready to be dipped. Fully submerge the pops into the white candy melts and tap off any excess. Allow to fully set in a stand.
5. Once the candy melts have set, lightly dust the pops with the brown and yellow dust to give them a light golden color.
6. Allow the light blue candy melts to cool as much as possible, stirring occasionally until they reach the consistency of a thick frosting. Using a small pallet knife, frost the top of the pop and sprinkle on the nonpareils. If the candy melts fully cool before the sprinkles can stick, quickly pass the pop over a low open flame to soften the candy melts. Allow the pops to set.
Note
If you want to avoid dry dusting the pops, use peanut butter candy melts and white chocolate to achieve the proper tone.
Supplies
• Cake filling of your choice
• Candy melts of your choice
• Sanding sugar of your choice
Tools
• Digital scale
• Sheet pans
• Microwave-safe bowls
• Lollipop sticks
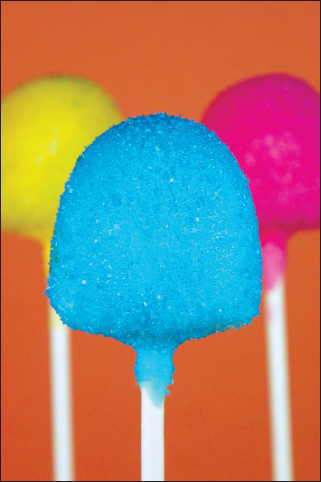
1. Begin by hand weighing the cake into one-ounce portions. Shape them to look like gumdrops and set them aside on a sheet pan. Place in the fridge while you prepare the candy melts.
2. Melt the colored candy melts of your choosing according to the directions indicated on the package.
3. Remove the shaped cake from the fridge. Dip the sticks into the candy melts and insert them halfway into the cake.
4. Once the candy melts have fully set and the cake is back at room temperature, you are ready to dip the pops. Fully submerge the pops into the candy melts and tap off any excess.
5. While the pops are still wet, pour the sanding sugar over the pop to cover any exposed candy melts. Use the same colored sugar as the candy melts used.
6. Place them in a stand and allow them to fully set.
Supplies
• Cake filling of your choice
• White candy melts
• Red food coloring
• Green food coloring
• Yellow food coloring
• Blue food coloring
• Vodka or lemon juice
Tools
• Digital scale
• Sheet pans
• Microwave-safe bowls
• Lollipop sticks
• Stiff-bristle paintbrush
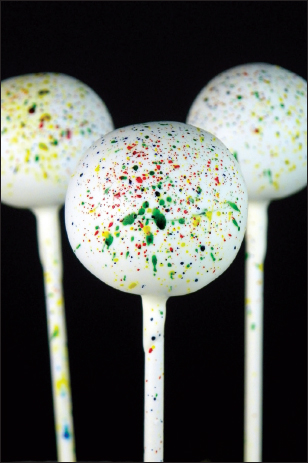
1. Begin by hand weighing the cake into one-ounce portions. Roll them into balls and set aside on a sheet pan. Place in the fridge while you prepare the candy melts.
2. Melt the white candy melts according to the directions indicated on the package.
3. Remove the cake balls from the fridge. Dip the sticks into the candy melts and insert them halfway into the cake balls.
4. Once the candy melts have fully set and the cake is back at room temperature, you are ready to dip the pops. Fully submerge the pops into the candy melts and tap off any excess. Place in a stand and allow them to fully dry.
5. Mix together small amounts of each food coloring with vodka or lemon juice. Dip the tip of a stiff-bristle paintbrush in the food coloring and flick the bristles with your fingertip to fling the colors onto the pops.
6. Allow the food color on the pops to fully dry.
Note
Using water-based food coloring is ideal as it will dry without remaining tacky like gel- and oil-based colors do. Also try using bright white candy melts to allow the colors to pop.
Supplies
• Cake filling of your choice
• Peanut butter candy melts
• Chocolate candy melts
• Brown petal dust
• Yellow fondant

Tools
• Digital scale
• Sheet pans
• Microwave-safe bowls
• Lollipop sticks
• Plastic bag
• Soft-bristle paintbrush
• Pasta machine
1. Begin by hand weighing the cake into one-ounce portions. Roll it into a log and cut it into three equal portions. Roll the three equal portions into balls and flatten them with the palm of your hand. Stack them together and lightly press down on the top of the stack. Set them aside on a sheet pan and place in the fridge while you prepare the candy melts.
2. Melt the peanut butter candy melts according to the directions indicated on the package.
3. Remove the cake from the fridge and add a drop of the peanut butter melts in between each layer of cake. Dip the sticks into the candy melts and insert them completely through the first two layers of cake and halfway through the third layer of cake.
4. Once the candy melts have fully set and the cake is back at room temperature, you are ready to dip the pops. Fully submerge the stems of the pops into the candy melts and tap off any excess. Place in a stand and allow to fully dry.
5. With a soft-bristle brush, lightly brush brown petal dust to give the pops a cooked look.
6. Roll out the fondant on the thickest setting of a pasta machine and cut out small squares. Set them aside and prepare the chocolate candy melts in a small plastic bag. Snip off the corner of the bag, pipe the chocolate candy melts on top, and allow to spill over the sides. While still wet, place the small yellow squares on top.
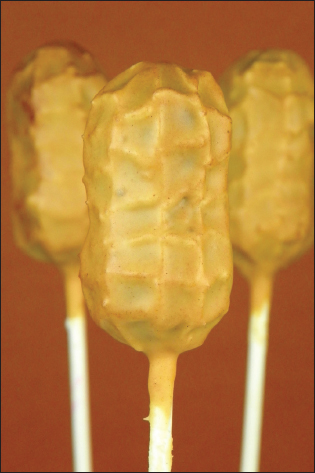
Supplies
• Cake filling of your choice
• Peanut butter candy melts
• Royal icing
• Brown petal dust
Tools
• Digital scale
• Sheet pans
• Microwave-safe bowls
• Lollipop sticks
• Piping bags
• #2 piping tip
• Soft-bristle paintbrush
1. Begin by hand weighing the cake into one-ounce portions. Shape them to look like peanuts and set aside on a sheet pan. Place in the fridge while you prepare the candy melts and royal icing.
2. Melt the peanut butter candy melts according to the directions indicated on the package.
3. Remove the cake from the fridge. Dip the sticks into the candy melts and insert them halfway into the cake.
4. While the candy melts set and the cake comes back to room temperature, prepare the royal icing to medium consistency. The icing should be firm enough to hold its shape but soft enough to pipe using a #2 piping tip. Fill a piping bag fitted with a #2 tip with the royal icing. Pipe vertical lines going from the tops of the pops to the bases. Then pipe a series of randomly placed horizontal lines between the vertical ones. Allow the pops to sit for at least 10 minutes before dipping so the royal icing can harden slightly.
5. When the cake is ready to dip, fully submerge the pops into the candy melts, tap off any excess, and allow to set.
6. Once the pops have fully set, dry dust them with brown petal dust to highlight the craters.
Supplies
• Cake filling of your choice
• White candy melts
• Green sanding sugar
• Yellow sanding sugar
• Red sanding sugar
• Edible white sugar sheets

Tools
• Digital scale
• Sheet pans
• Microwave-safe bowls
• Lollipop sticks
• Stiff-bristle paintbrush
1. Begin by hand weighing the cake into one-ounce portions. Shape them into cones with rounded tops and set aside on a sheet pan. Place in the fridge while you prepare the candy melts.
2. Melt the white candy melts according to the directions indicated on the package.
3. Remove the cake from the fridge. Dip the sticks into the candy melts and insert them halfway into the cake.
4. Once the candy melts have fully set and the cake is back at room temperature, you are ready to dip the pops. Fully submerge the pops into the candy melts, tap off any excess, and allow to set.
5. When the pops have set, paint on the white candy melts around a third of the rounded top with a stiff-bristle paintbrush. Sprinkle on the red sanding sugar and let set. When the candy melts have hardened, repeat the steps for the remaining two colors.
6. Once all three colors has been added, to create the ice of the snow cone you will need to cut the edible white sugar sheets to wrap around the bases of the pops. Glue them in place with candy melts.