
Supplies
• Cake filling of your choice
• White candy melts
• Blue candy melts
• Red fondant
• Mini confetti sprinkles
• Nonpareils
Tools
• Sheet pans
• Microwave-safe bowls
• Lollipop sticks
• Plastic bag
• Pasta machine
• 1½ x ¾ inch round cookie cutter
• ¾ inch numerical fondant cutters
1. Stuff the cookie cutter with the cake mixture, using the palm of your hand to squeeze out any excess cake. Gently push the cake out of the cookie cutter. Chilling your dough ahead of time makes this process easier.
2. Set them aside on a sheet pan and place in the fridge while you prepare the candy melts.
3. Melt the white candy melts according to the directions indicated on the package.
4. Remove the cake from the fridge. Dip the sticks into the candy melts and insert them halfway into the cake. Set on a stand to dry.
5. While the candy melts are drying and the cake comes to room temperature, roll out the fondant using a pasta machine on the thickest setting and cut out any number you wish.
6. When the cake is ready to dip, fully submerge the pops into the candy melts and tap off any excess. While still wet, place the fondant number in the center and sprinkle on the sprinkles. Allow to fully set.
7. Once the pops have fully set, in a small plastic bag place the melted blue candy melts and snip off the corner. Pipe a beaded boarder around the cake. It is best to use candy melts with a thicker consistency for this step.
Brush Embroidery Cake Pops . . . .
Supplies
• Cake filling of your choice
• White candy melts
• Royal icing
• Food coloring

Tools
• Sheet pans
• Microwave-safe bowls
• Lollipop sticks
• Stiff-bristle paintbrush
• Piping bags
• #3 piping tip
• #2 piping tip
• Digital scale
1. Prepare a batch of royal icing, divide it in half, and color half using any food coloring. Fill a piping bag that has a #3 tip with the colored icing and set aside. With the remaining white icing, fill a piping bag fitted with a #2 piping tip.
2. Hand weigh the cake into one-ounce portions. Roll them into balls, set aside on a sheet pan, and place in the fridge while you prepare the candy melts.
3. Melt the white candy melts according to the directions indicated on the package. Remove the cake from the fridge. Dip the sticks into the candy melts and insert them halfway into the cake.
4. Once the candy melts have fully set and the cake is back at room temperature, the pops are ready to be dipped. Fully submerge the pops into the white candy melts and tap off any excess. Set aside to fully dry.
5. Once the pops have dried, pipe four curved lines with the colored icing for the outline of a flower. Before the icing hardens, drag it inwards toward the center of the flower with the paintbrush. Pipe smaller curved lines for another layer of petals and repeat. Once you have piped and created a few flowers, dot the centers of each flower and pipe a swirl next to each one. Allow the icing to fully harden before covering.
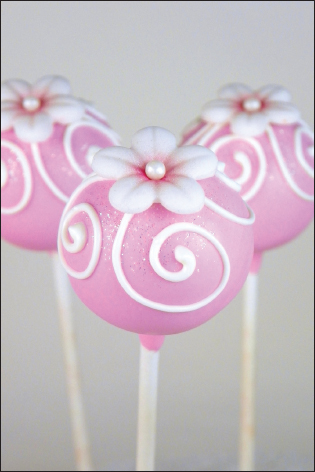
Supplies
• Cake filling of your choice
• Pink candy melts
• White candy melts
• Sugar pearls
• Disco dust
• Pink pearl dust
• Fondant
Tools
• Impression mat
• Digital scale
• Sheet pans
• Microwave-safe bowls
• Lollipop sticks
• Plastic bag
• Toothpick
• Stiff-bristle paintbrush
• Pasta machine
• 1 inch flower plunger
1. Roll out fondant ahead of time using the thickest setting on a pasta machine. Cut out flowers using the flower plunger, pressing firmly into the impression mat. Set aside and let dry.
2. Once the fondant flowers are dry, using a small paintbrush dust the centers with the pink pearl dust. Melt some white candy melts and add a dot of it to the center of the flowers with a toothpick. Attach a sugar pearl and allow to set.
3. Hand weigh the cake into one-ounce portions. Roll them into balls and set aside on a sheet pan. Place in the fridge while you prepare the candy melts.
4. Melt the pink candy melts according to the directions indicated on the package.
5. Remove the cake from the fridge. Dip the sticks into the candy melts and insert them halfway into the cake.
6. Once the candy melts have fully set and the cake is back at room temperature, the pops are ready to be dipped. Fully submerge the pops into the pink candy melts and tap off any excess.
7. While still wet, dust the tops with disco dust by tapping the paintbrush onto the pops. Allow to set in a stand.
8. In a small plastic bag, place the melted white candy melts, snip the corner off, pipe on top four swirls, and attach the fondant flowers to the center.
Supplies
• Cake filling of your choice
• White candy melts
• Pink fondant
• Green fondant

Tools
• Pasta machine
• Sheet pans
• Microwave-safe bowls
• Lollipop sticks
• Plastic bag
• 1½ x ¾ inch medium-size round cookie cutter
• ⅝ x ¾ inch small-size round cookie cutter
• 2¼ inch square cookie cutter
• ⅞ inch leaf plunger
1. Stuff the round cookie cutters with the cake mixture, using the palm of your hand to squeeze out any excess cake. Gently push the cake out of the cookie cutters. Chilling your dough ahead of time makes this process easier.
2. Set them aside on a sheet pan and place in the fridge while you prepare the candy melts.
3. Melt the white candy melts according to the directions indicated on the package.
4. Remove the cake from the fridge. Dip the sticks into the candy melts and insert them completely through the larger circles, exposing at least ¼ of the sticks. Dip the tip of the sticks into the candy melts then attach the smaller round circle on top.
5. While the candy melts are drying and the cake comes to room temperature, roll out the pink and green fondant using a pasta machine. For each pop, cut out two leaves using the leaf plunger. Cut squares out of the pink fondant using the square cookie cutter and cut each into ¾ inch wide stripes. Fold the strips in half horizontally and roll to create a rose. Set aside.
6. When the cake is ready to dip, fully submerge the pops into the candy melts and tap off any excess. Allow to fully set.
7. Once the pops have fully set, in a small plastic bag prepare the white candy melts and snip off the corner. Pipe swags around the top and bottom tiers. Once the swags have dried, pipe a beaded border around the edges of both tiers. Using thicker consistency melts works best for this.
8. Once the candy melts have set, attach the leaves and rose to the tops of the pops.