The smell of smoke curls up from every corner of Austin, whether it’s coming from a neighbor’s backyard or the barbecue trailer down the street. It’s a thin blue smoke, typically created by smoldering oak logs, and its scent is a hallmark of Austin just as much as live music, bats, and the University of Texas Long-horns. It wouldn’t be entirely out of the question to FOLLOW YOUR NOSE to amazing barbecue in this city.
For a long time, the most famous barbecue in Texas was just outside of Austin proper. Renowned restaurants like Louie Mueller Barbecue in Taylor, City Market in Luling, and the famed Lockhart trio of Kreuz Market, Black’s Barbecue, and Smitty’s Market are all an easy drive from Austin.
But in 2009, everything changed. Aaron Franklin’s story is now the stuff of barbecue legend: Charming guy from Bryan, Texas, in square hipster glasses opens a barbecue trailer by the side of the freeway. Fueled by dozens of shots of espresso and the best post oak Central Texas has to offer, he made some maddeningly good barbecue.
Franklin Barbecue indeed proved to be just the beginning. It was now abundantly clear not only that Austinites wanted to eat high-quality craft barbecue, but that smoked meat fanatics were willing to fly into town and wait in long lines for the privilege. And in the years that followed, pitmasters got to work: Stiles Switch BBQ & Brew opened in 2011; La Barbecue and Micklethwait Craft Meats opened in 2012; Kerlin BBQ opened in 2013. And that’s just a small sampling. The result? Today Austin is a destination for barbecue fans from around the world.
As for what’s smoking? The holy trinity of TEXAS BARBECUE: brisket, ribs, and hot guts sausage, all three dressed up in little more than salt, pepper, and smoke.
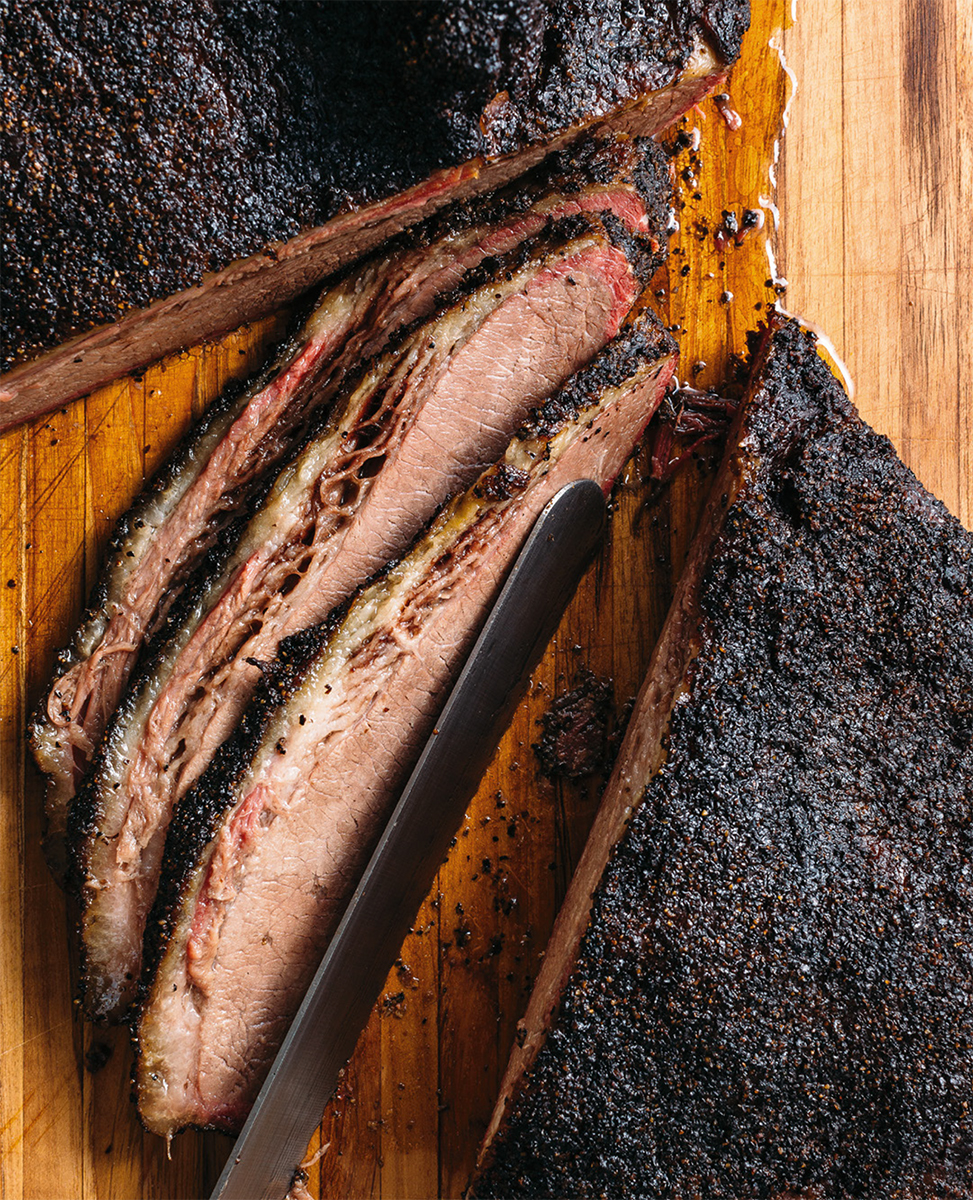
Brisket is the most famous of these, a notoriously tricky cut of meat to smoke properly. But when you hit that sweet spot, when the fat renders properly and a bark sets up on the outside, when the tough meat finally gives in to hours and hours of low, smoky heat, it is the very FINEST thing to eat in the entire Lone Star State.
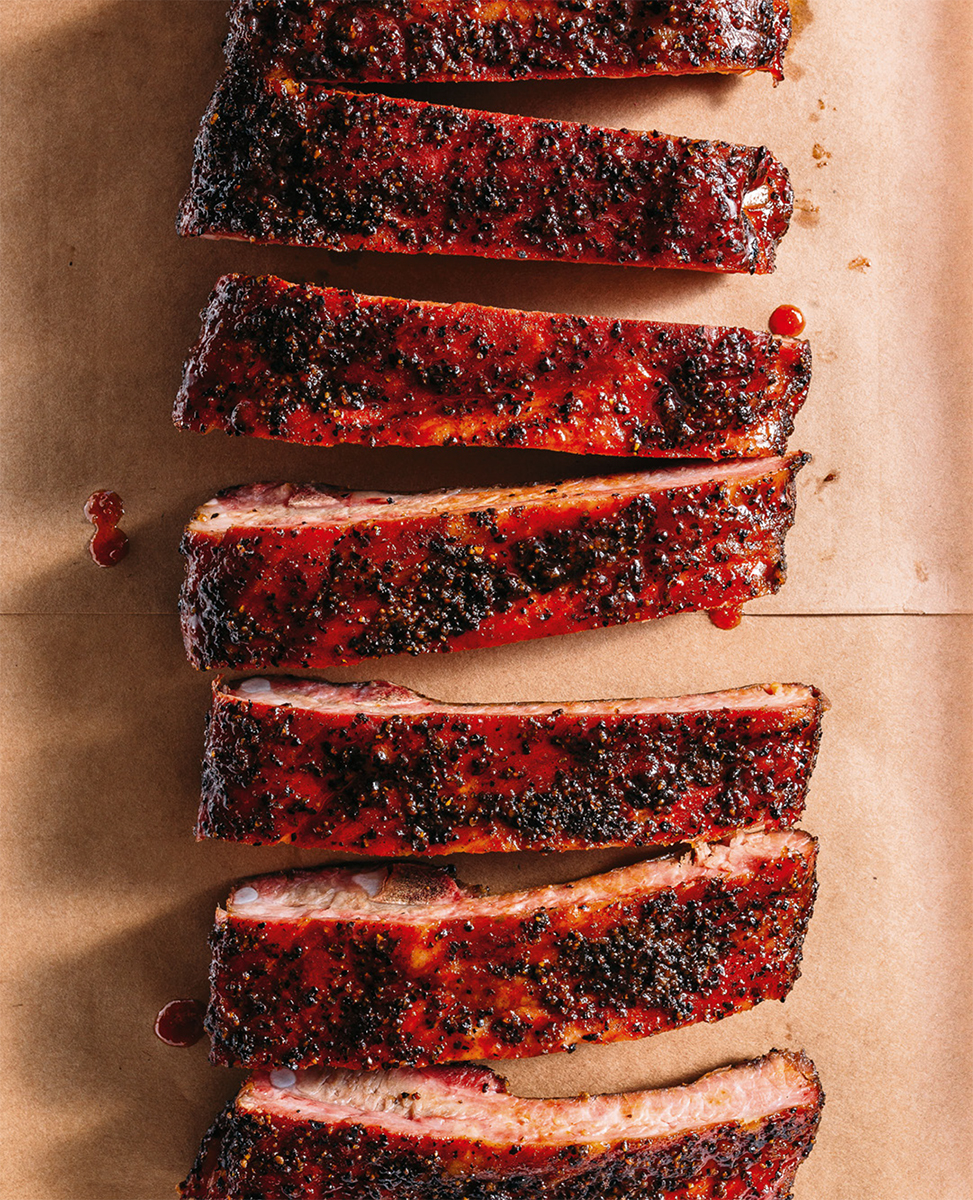
Ribs are either pork or beef. Pork ribs are cooked until tender but not falling-off-the-bone, lending themselves gorgeously to a light salt-and-pepper rub. Beef ribs are the gonzo option of Texas barbecue: I’m not joking when I say they are often the size of a small cat. Believe me when I say you’ll be fine with one to share.
HOT GUTS SAUSAGE is my personal favorite. Here, hot means spicy and guts means natural casings—Texans aren’t ones to mince words. They’re typically made with coarse-ground beef (sometimes mixed with pork) and the very best versions snap when you bite into them. When cooked, they’re often loaded with spicy red grease, so roll up your sleeves and grab some extra napkins.
Texas barbecue isn’t limited to these. You’ll also see pork shoulder; pork steaks; Czech, German, and Polish sausage; chicken; turkey (do not sleep on the turkey—sometimes it’s the best thing on the menu!); mutton; and even more creative options like smoked beets.
On the side, you’ve got old-school sliced white sandwich bread—often Texas brand Mrs. Baird’s, rarely but deliciously homemade—that is doled out by the half loaf. You’ve got onions and pickles, which you shouldn’t skip, as they’re your allies in cutting the rich fat of the meat. There will be sauce, either peppery and thin or thick and sweet, and its use is a controversial but personal decision everyone must make for him- or herself.
There are sides from coleslaw to potato salad, beans to mac ’n’ cheese. There might also be sandwiches loaded with chopped beef (brisket mixed with sauce) or sliced sausage, and baked potatoes piled high with the same. Beer is often BYO, although more and more Austin barbecue joints serve local brews such as Live Oak or Austin Beerworks. And for dessert, of course, there’s pie and banana pudding (see chapter 8).
Hope you saved room.
It all starts with the smoker. The least frustrating way to develop your barbecue skills is to use the highest-quality offset smoker you can afford. But it will cost you more than those cheap, shiny black smokers you see parked outside the supermarket. Potentially a lot more.
The cheaper the pit, the thinner the metal, and the more the temperature will fluctuate over the course of your cook. “If you have a thin-walled pit,” explains Bill Kerlin of Kerlin BBQ, “it’s going to be constant frustration trying to keep the temperatures consistent.” The thicker the metal on your pit, the more it will cost, but the better it will hold a consistent temperature—perhaps the trickiest barbecue skill to master. In other words, you get what you pay for.
These recipes were tested on a mid-level store-bought metal offset smoker. I didn’t mess with my pit in any way, although a quick internet search will lead you to all kinds of modifications you can make to improve smokers. You can also use these recipes with a vertical or ceramic kamado smoker. Whatever you use, follow the manufacturer’s instructions for using your pit.
Central Texas barbecue is most often smoked with oak, although hickory and pecan are also used (mesquite is common in South and West Texas, too). Traditionally you’d smoke with an all-wood fire, but I’ve found that using a mixture of charcoal and wood (chunks/small logs of wood, not chips) can help even out the temperature and make things easier on beginners. When you’re just starting out, use charcoal to manage the temperature and use wood for flavor.
I’m not going to sugarcoat this: Learning to smoke barbecue can be a frustrating process. Briskets will take longer to smoke than you want; ribs will dry out; you will run out of charcoal before the cook is done; your thermometer will break; your guests will drink too much beer before food is served. Don’t despair. The only way to learn how to smoke barbecue properly and reliably is to keep practicing.
– A chimney starter.
– A long grill lighter.
– Aluminum pans and heavy-duty aluminum foil.
– A good thermometer, ideally digital, for the meat.
– A good thermometer, ideally digital, to measure the temperature of the smoking chamber.
– A long (12-inch/30.5-cm) slicing knife.
– An empty can (a 28-ounce/794-g tomato can works well) to put under the smoker to catch grease. Your smoker probably has a hole drilled in the bottom where the grease drips out; the empty can goes under this.
– Some means of moving the meat around: long tongs or rubber-coated gloves. (Lance Kirkpatrick of Stiles Switch recommends buying thermal gloves at a restaurant supply store, and then slipping disposable food service gloves over them. “We do everything by touch,” he says, “and that way you can just grab the brisket.”)
– Closed-toe shoes. Do not—do not—smoke meat in flip-flops.
Prepare coals in a chimney starter according to instructions. Dump the lit coals in the firebox portion of the offset smoker. Nestle a couple logs in the coals to get the smoke started. Shut the door of the firebox, then open the firebox vent and the lid of the smokestack slightly.
You should start to see billowy white smoke come out of the smokestack. You do not want to cook with this smoke, or your meat will taste ashy and bitter. Wait for it to subside; in its place you’ll soon start to see the famous thin blueish smoke rise out of the stack. This is the GOOD STUFF.
Generally I recommend waiting to put your meat on the smoker until you’ve maintained the required temperature for about half an hour. This way you know you’ve got it stabilized for a little while, and that bitter white smoke will have burned off.
Keep the interior of the smoker humid. Put a small empty can or disposable foil pan filled with water in the smoker next to the firebox, and replenish the water as it evaporates during the smoke. This will do all kinds of helpful things during the smoking process, from helping to maintain an even temperature to getting you over the dreaded cooking stall (more on that later).
Lance Kirkpatrick, of Stiles Switch, explains that “Central Texas–style barbecue is fat side up, and you never flip it over.” Typically you want to place the thickest part of the meat closest to the firebox, with the fatty side up. You also want to take the internal temperature in the thickest part of the meat.
The trickiest part to smoking meat—the biggest hurdle to overcome—is learning how to maintain a consistent temperature. Mastering this skill is the difference between jiggly, glistening, wondrous barbecue and terrible dried-out chunks of meat cardboard.
The ultimate goal is to keep the temperature within about a 10-degree window of the recipe’s recommended temperature, all the while keeping an eye out for that good, thin blue smoke. Got a lot of what Kirkpatrick calls “smoky white smoke”? He says that means “you’re suffocating your fire and you need to let it breathe more. That’s a big mistake a lot of rookies make.” Time to crack those vents.
Otherwise, if the temp starts going down, add charcoal a little bit at a time until the temp starts going back up. Add wood when you need more smoke. You’ll get a feel for it as you go. And remember, “More smoke is NOT always better,” says Kirkpatrick. “Less smoke is usually better.”
Most of the recipes call for you to smoke the meat until it reaches a specific internal temperature. Some recipes estimate how long this will take, but if you’re a beginner smoker, everything will likely take longer than you think it will, because you’re not yet skilled in maintaining that necessary even temperature.
So plan ahead, and start early. Daniel Vaughn, of Texas Monthly, advises, “If you think your brisket’s going to take twelve hours to cook, well, don’t start it twelve hours before you want to serve it. Start it sixteen, seventeen hours before you want to serve it.” Part of this is because the meat will need to rest (see here), but it’s always best to budget extra time.
When you’re smoking larger cuts of meat—brisket, pork shoulder—there will come a time when progress will seem to halt entirely. The temperature of the meat will be going up at a good clip, and then, boom: the dreaded stall hits and suddenly you’re stuck at the same temperature. For a while. Maybe hours. There are scientific reasons for this—for more, check out the books mentioned in the barbecue library on this page—but mostly it’s just a huge pain.
Purists will keep on trucking at this point, smoking through the stall, but to speed things up a bit, you can wrap the meat in traditional butcher paper, or parchment, or foil. (Individual recipes will recommend different wrapping material.) This will get you through the stall in time for dinner.
The larger the cut of meat you’re smoking, the more important it is to let it rest. A brisket will need to rest until its internal temperature reaches 140 or 150°F (60 or 66°C), or as long as three hours, which is how long Kirkpatrick rests the briskets at Stiles Switch. Pork shoulder, as Bill Kerlin makes it, only needs about half an hour.
Vaughn explains why resting is important: “If you cut into it early, all that collagen that you worked so hard to break down into gelatin is super hot and still liquid. It will just flow right out onto the cutting board and you’re never going to get it back.” Don’t let that happen!
You can rest barbecue wrapped in butcher paper on the counter for an hour or so. If you really want to get serious about things, rest meat in a Cambro or a cooler you’ve purchased explicitly for barbecue. Warning: This cooler will smell like barbecue forever, so you don’t want to have brisket in it one week and beers the next. I have a cheap $20 cooler, and I put a disposable foil pan in the bottom of it to rest big cuts.
This is not a good place to start. A good place to start would be something that is harder to mess up, something like turkey breast (this page) or sausage (this page). But brisket is king in Texas, and so it comes first.
That said, mastering brisket is worth the time you put into it. Just ask Daniel Vaughn, who told me, “You should be able to do better than your local barbecue joint once you’ve gotten the principles down. You have just one brisket to focus on.”
Traditionally, Central Texas barbecue is seasoned with just salt and pepper. You can go that route if you want, or add a tablespoon each of any/all of the following: paprika, chile powder, cumin, or granulated garlic powder. Your call. Do note that if you don’t live in a barbecue region, you might have to call ahead and order a whole brisket from your butcher.
Smoking the brisket will take at least twelve hours plus time to rest, so please prepare accordingly. If I plan to serve a brisket at 7 p.m. for dinner, I take it out of the refrigerator at 5 a.m. that day. At the latest.
Serves 10 to 12.
2 tablespoons salt
2 tablespoons coarse-ground black pepper
1 packer-cut brisket (about 12 pounds/5.4 kg)
The night before you smoke the brisket, combine the salt, pepper, and optional seasonings together to prepare the rub. Trim the fat to between ¼ and ½ inch (6 and 12 mm) all over the brisket. Pat the meat dry and rub it generously with the seasoning, then set it on a sheet pan and cover it with plastic or foil. Refrigerate until morning.
On the day of the smoke, take the brisket out of the refrigerator and let it come to room temperature while you get the fire going.
Prepare a smoker to around 225°F (107°C). Once you’ve held it at that temperature for about 30 minutes, place the brisket directly on the grates of the smoker, fat side up, with the thicker end closer to the fire.
Leave it alone for a while, while keeping the smoker’s temperature at 225°F (107°C). After a few hours, you can check it periodically to take the internal temperature of the brisket, but otherwise don’t mess with it too much.
At first, the meat’s temperature will rise pretty steadily. But at a certain point, you’ll notice that the internal temperature of the brisket stops going up, somewhere around 160°F (71°C). This is called the stall. If you wrap the brisket at this point, it will help you get through the stall. (Some people consider this cheating. You can skip this step if you like, but it will take longer.) You can wrap the brisket in butcher paper, which is what the pros do, or you can wrap it in parchment paper (not waxed paper) or foil. Make sure it’s fully wrapped, and put it back in the smoker.
Cook the brisket for several more hours, until the internal temperature of the meat reaches 200°F (93°C). Some pitmasters recommend going even higher, to 205°F (96°C), if you can wait that long.
Take the brisket off the smoker and let it rest for at least 1 hour at room temperature, or longer in a cooler or Cambro.
Slice and serve. With sauce (this page) or not.
“When you start, the brisket is limp.
It would just fall over your hand as you pick it up. As it cooks, it starts to shrink and tighten up. It’s pulling in that heat, that smoke, and it’s getting real tight. It’s kind of like if you were to step into a hot bath. You tense up at first, until you get used to the temperature, then you kind of loosen up.
You don’t want any bounce back when you go to tap it. If you touch it and it’s like a watermelon, you have a long time to go. If you can start to get a little press in, but it wants to give you a bounce back, you need to cook it a little longer. It’s done when you’re almost able to put your thumb through it.”
—Lance Kirkpatrick, Stiles Switch
You can smoke whatever kind of sausage you like, but the Texas hot guts sausage is traditional. This spicy, coarse-ground beef (and sometimes pork) sausage is the pride of Elgin, Texas, a small town just east of Austin. You can buy hot guts sausage from Elgin’s Southside Market at many Texas grocery stores, or online directly from South-side. (If you’re feeling feisty, make your own kielbasa, this page.)
A properly smoked Texas hot guts sausage snaps when you bite into it—and drips grease down your forearms. Sausages are a great addition to the smoker when you’re cooking a bigger piece of meat, like a brisket. They cook quickly, don’t take up much room, and you can serve them to your hungry friends when they get antsy that the brisket’s not done yet.
1 to 2 sausage links per person, either store-bought Texas hot guts sausage or From-Scratch Kielbasa (this page)
Prepare a smoker to 250°F (120°C).
Smoke the sausages until their internal temperature reaches 160°F (71°C), about 1 hour. No need to flip. Rest them in a cooler if you’re waiting on other meat to finish; otherwise they only need to rest for 10 minutes or so at room temperature before you can eat them.

Tom Micklethwait and his crew smoke all kinds of meat, but this tiny, acorn-adorned trailer is known for its house-made sausages. These can range from pork belly andouille to jalapeño cheddar to good old-fashioned Texas hot links.
I’m partial to the kielbasa, a spicy sausage that mixes pork and beef. If you don’t like it spicy you can skip the chile flakes, but make sure you include the curing salt, a necessary sausage ingredient you can buy online. Make sure your equipment and ingredients are super clean and chilled when making sausage.
Makes around 20 (6-inch/15-cm) sausage links.
4 pounds (1.8 kg) pork shoulder, cut into 1-inch (2.5-cm) chunks
1 pound (455 g) beef brisket, cut into 1-inch (2.5-cm) chunks
1½ tablespoons salt
½ teaspoon pink curing salt, such as Prague Powder No. 1
3 tablespoons coarse-ground black pepper
2 tablespoons minced garlic
1 tablespoon yellow mustard powder
½ teaspoon grated nutmeg
¼ teaspoon ginger powder
¼ cup finely chopped fresh sage
1 tablespoon red chile flakes
⅓ cup (75 ml) pineapple nectar (or substitute pineapple juice)
4 ounces (115 g) natural (hog) sausage casings
Place the meat in the freezer until thoroughly chilled but not frozen, about 30 minutes.
Combine the salt, curing salt, black pepper, garlic, mustard powder, nutmeg, ginger, sage, chile flakes, and pineapple nectar in a large bowl and add the meat, making sure the meat is thoroughly covered in the seasonings. Run the meat mixture through a meat grinder with a ¼-inch (6-mm) grinding disc, according to the manufacturer’s instructions.
Prepare the casings: Run cold water through them to open them up and check for holes. Place them in a bowl of cold water.
Add about ½ cup (120 ml) cold water to a sheet pan and place it in front of a sausage stuffer. Fit one of the casings over the nozzle of the stuffer and put the meat mixture in the canister. Begin gently pushing the meat mixture through the stuffer, letting the stuffed sausage coil onto the sheet pan. When the casing is full, twist it off into 6-inch (15-cm) links. Repeat until you’ve used up the meat mixture.
Smoke according to the instructions on this page. These sausages can also be boiled or roasted or grilled, as you wish.
Texas-style pit smoking is a craft that takes time and practice to master. It is not learned in a day (or in a brief chapter in a cookbook). These are the very basics, and they’ll get you started, but if you get serious about things you might consider taking a deeper dive into the genre. May I recommend the following books:
Franklin Barbecue:
A Meat-Smoking Manifesto, by Aaron Franklin and Jordan Mackay
Legends of Texas Barbecue Cookbook, by Robb Walsh
Meathead: The Science of Great Barbecue and Grilling, by Meathead Goldwyn and Greg Blonder
texasmonthly.com/bbq-home, for Daniel Vaughn’s insights into the preparation of barbecue as well as its history, and for restaurant recommendations
The sleeper hit of barbecue, smoked turkey is more delicious than it has any right to be. You will be nervous about putting this bare turkey breast on your smoker, seemingly naked and destined to dry out, but don’t be. Your turkey will end up juicy and delicious—Ali Clem, of La Barbecue, even says it’s her favorite thing they serve.
Serves 6.
1 whole boneless turkey breast (3 to 4 pounds/.3 to 1.8 kg)
1 tablespoon salt
1 teaspoon black pepper
Prepare a smoker to 250°F (120°C).
Tuck the outside edges of each turkey lobe under to make a nice, round, uniform ball. Tie the ball with twine so it will smoke evenly.
Combine the salt and pepper in a small bowl and sprinkle the seasoning evenly over the turkey ball.
Once you’ve held the smoker at 250°F (120°C) for about 30 minutes, place the turkey in the smoker and cook until it reaches an internal temperature of 165°F (74°C), about 2 hours, or 30 minutes per pound (455 g). Let the smoked turkey rest for 30 minutes, then slice thinly and serve.
Lance Kirkpatrick, pitmaster at Stiles Switch, acknowledges that “there are dozens if not hundreds of ‘recipes’ for pork ribs that mostly differ in the ingredients used for the rub, and whether the ribs are dry or wet.” At Stiles Switch, he keeps it simple, and says this “ensures your best effort each time.”
So go crazy with the rubs—or don’t. Either way, this method will get you where you’re going.
Makes as many ribs as you have hungry friends (or room on your smoker).
Salt
Black pepper
Pork ribs, your choice of cut (Stiles Switch uses spareribs)
Liberally salt and pepper both sides of the ribs and refrigerate overnight.
Prepare a smoker to 250°F (120°C).
Place the ribs bone side down, with the thicker end of the rack pointed toward the firebox. Cook for 1 hour, then turn the ribs so the thinner end of the ribs points toward the firebox. Cook for another 40 minutes, then turn again.
At this point, start checking the ribs every 20 minutes. You’ll know they’re done when they have some give—they’ll flop over the side of a pair of tongs when you lift them off the pit.
Wrap the ribs and let them rest for at least 30 minutes before serving.
Note: Kirkpatrick recommends starting with a simple salt-and-pepper rub and then playing with chili powder, garlic, paprika, and flavored salts. If you like a wet rib, he recommends spritzing the ribs with apple cider vinegar or apple juice during cooking. If you like sweet ribs, try sprinkling with brown sugar toward the end of the cook—if you do it at the beginning, the sugar will burn.
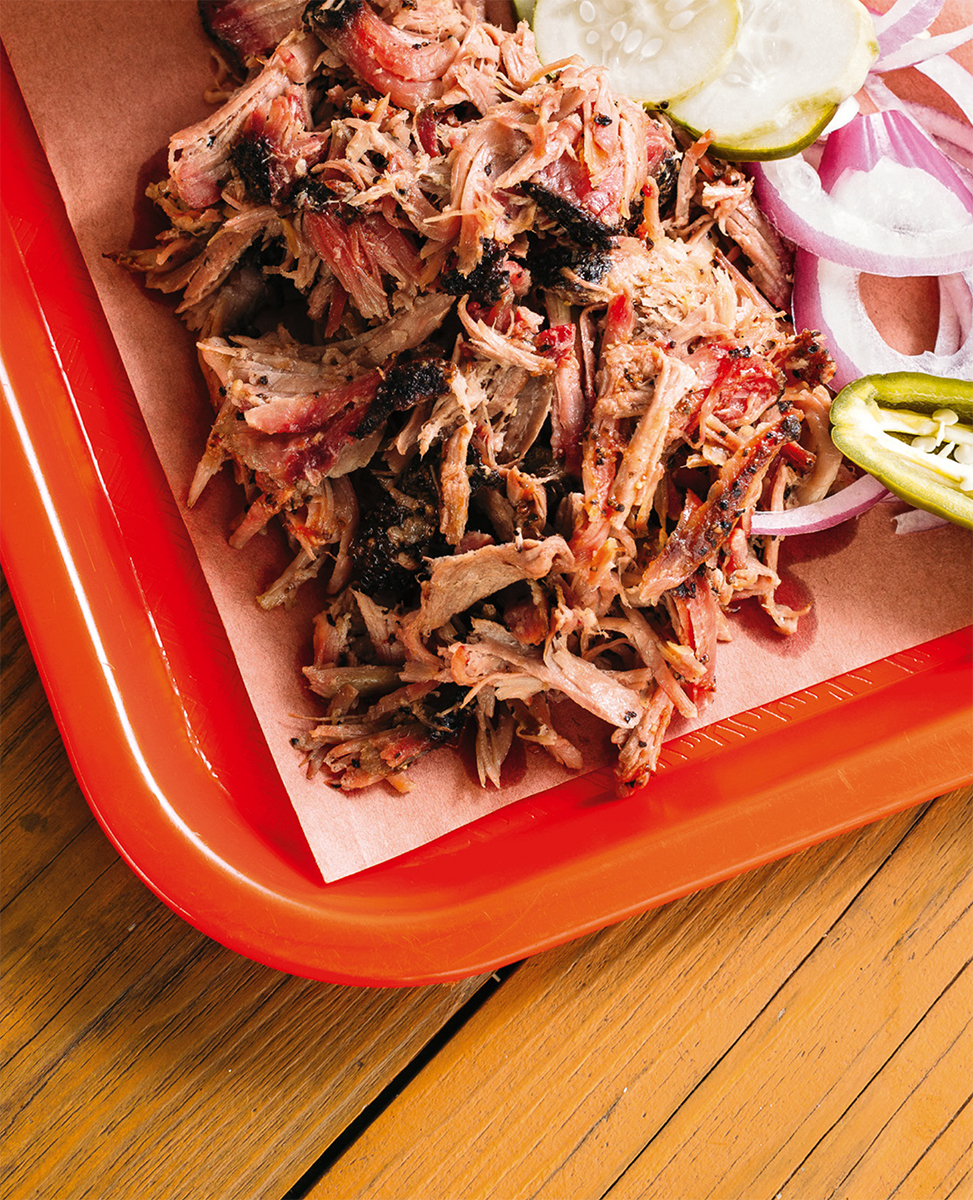
Pork shoulder is not traditionally associated with Texas barbecue. But Bill Kerlin, of Kerlin BBQ, makes his as Texan as he can: “No crazy rubs, no injections, no marinating, just salt and pepper. Just keep it simple.”
Kerlin mixes the pulled pork with simple pan drippings instead of barbecue sauce, so you can revel in the pure joy of meat seasoned with only salt, pepper, and smoke.
Serves 10 to 12.
¼ cup (75 g) salt
½ cup (55 g) black pepper
1 bone-in pork butt (8 to 10 pounds/3.6 to 4.5 kg)
¼ cup (60 ml) vegetable oil
Mix the salt and pepper together. Lightly coat the pork with oil and then rub the salt-and-pepper mixture all over it. Refrigerate the meat for at least 3 hours, but ideally overnight.
Prepare a smoker to 275°F (135°C).
Place the pork in the smoker with the fat cap up. Smoke for 4 to 5 hours, or until a bark forms over the surface of the meat and the fat cap splits. You should be able to see some of the lighter-colored fat peeking through the crack.
At this point, place the pork in an aluminum pan, cover it with foil, and seal. (The pan allows you to catch the drippings.) Return it to the pit and cook until the meat is soft and the bone pulls away easily; the internal temperature of the meat will be about 205°F (96°C).
Let the pork rest, covered, for 30 to 45 minutes, or until cool enough to handle.
Pull or chop the pork, discarding any large pieces of fat that haven’t rendered, and mix the meat with the drippings from the pan.
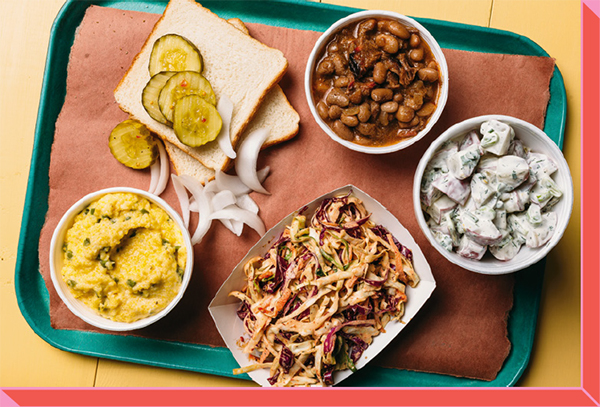
Smoked meat is definitely the star of the barbecue show, but it always helps to have a few killer sides in your pocket, too. You’ll want sliced pickles, sliced white onion, and white bread available for your guests, as well as barbecue sauce for those who like it. You may also want slices of cheddar cheese, pickled jalapeños, and hot sauce, especially if people are making sandwiches.
Potato salad and coleslaw are probably the most common prepared sides. You might also see beans, macaroni and cheese (this page), corn dishes, greens, and other salads made with cucumbers or green beans. Here are some of the best sides the Austin barbecue world has to offer—bring any of these to a pal’s cookout and you’ll be sure to get invited back.
This is how I make barbecue sauce when I’m not thinking about it too hard. It’s just the right combination of spicy, sweet, and tangy without going over the top—perfect for showcasing that meat you worked so hard on. (For an even simpler version, check out the sauce that goes with Jacoby’s Meatloaf, on this page.)
Makes about 2 quarts (2 L). You can freeze the leftovers for your next barbecue.
4 tablespoons (115 g) unsalted butter
1 cup (125 g) finely chopped onion
4 garlic cloves, finely chopped
1 large can (7 ounces/199 g) whole chipotle peppers in adobo sauce, chopped, sauce reserved
1 can (28 ounces/794 g) crushed tomatoes
1 beer (12 ounces/360 ml) of your choice
½ cup (120 ml) ketchup
¼ cup (60 ml) apple cider vinegar
¼ cup (55 g) brown sugar
Salt and black pepper
In a medium saucepan over medium heat, melt the butter. Add the onion and garlic and sauté until the onion is translucent, about 5 minutes. Add the chipotles, reserved chipotle sauce, tomatoes, beer, ketchup, vinegar, and brown sugar. Bring to a boil, then lower the heat to a simmer. Simmer the sauce to let the flavors combine (and cook the alcohol off) until slightly thickened, about 20 minutes. Season with salt and black pepper to taste.
Note: If you like, you can mix the meat drippings from your barbecue into the sauce as well.
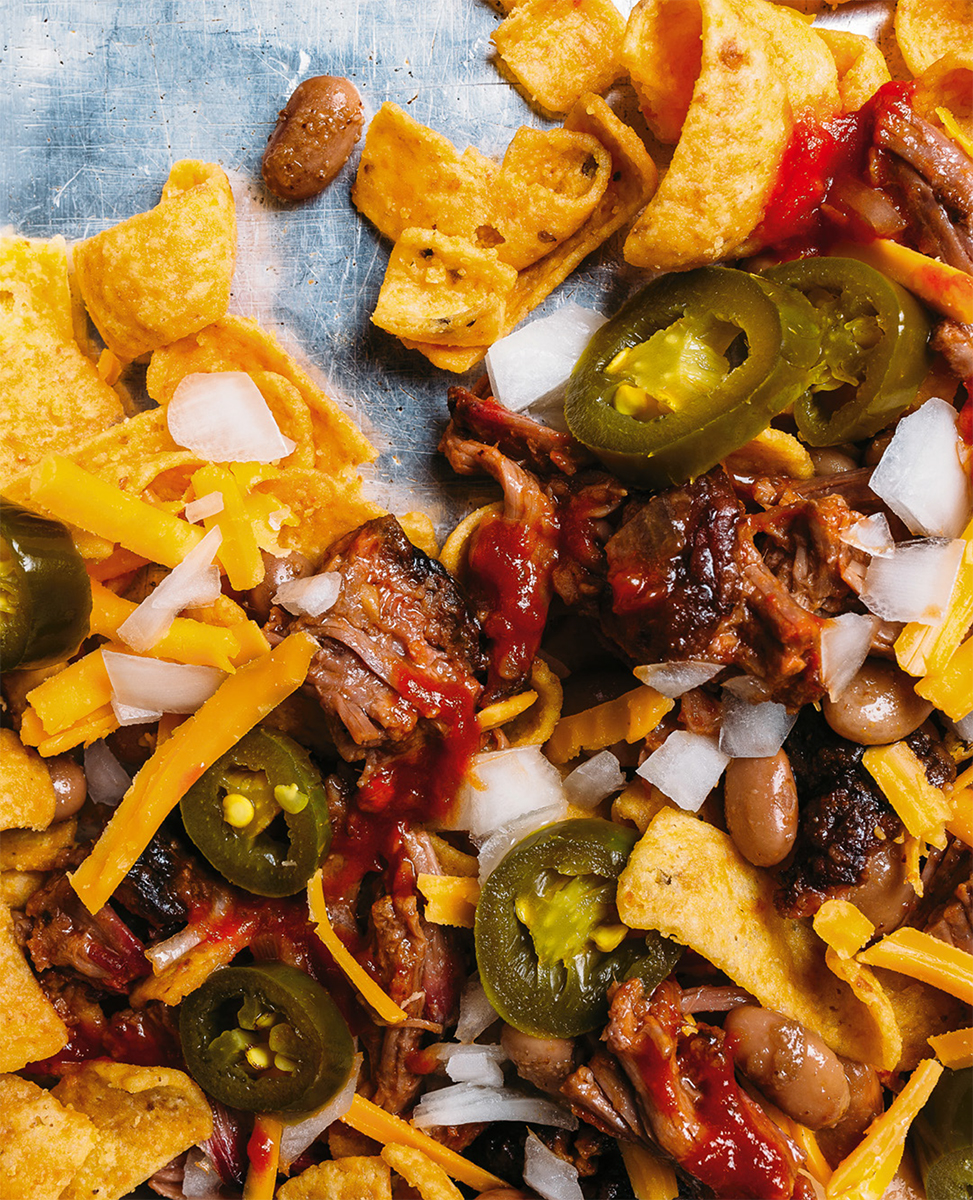
The Frito pie is a thing of great and humble beauty: basic corn chips topped with (in this case) brisket, beans, and cheese. Feel free to go nuts with the toppings—avocado is good, as is chopped cilantro, hot sauce, or anything else you’d put on nachos. The Frito pie may be humble, but restrained it is not.
Serves 2 to 4 as an appetizer, or 1 really hungry person as a main.
1 cup (150–200 g) chopped smoked brisket (this page) or other leftover barbecue
¼ cup (60 ml) barbecue sauce (this page)
2 cups (60 g) Fritos corn chips
½ cup (85 g) cooked pinto beans (this page)
¼ cup (30 g) shredded cheddar cheese
¼ cup (35 g) finely chopped onion
¼ cup (35 g) sliced pickled jalapeños (this page or store-bought)
Mix the brisket and sauce together.
Note: Sometimes you’ll see this mixture on Texas barbecue menus as “chopped beef.”
Place the Fritos in the bottom of a shallow bowl. Top the chips with beans first, then the chopped beef, then the cheese. Add a sprinkle of onion and pickled jalapeños and serve.
Spicy, smoky, and orange, this chipotle slaw is as iconic as La Barbecue’s meats. Well, almost. You’ll want to make this ahead of time so it can chill for a bit, but make it the same day you plan to serve it or it will get soggy.
Makes 1 large, party-size bowl, about 10 cups (2.4 L).
1 cup (240 ml) mayonnaise
1 small can (3½ ounces/100 g, or about ⅓ cup/75 ml) whole or diced chipotle peppers in adobo sauce
1 teaspoon paprika
1 teaspoon salt
1 teaspoon granulated garlic powder
2 teaspoons black pepper
1 head green cabbage, quartered, cored, and thinly sliced (about 6 cups/565 g)
½ head purple cabbage, quartered, cored, and thinly sliced (about 3 cups/280 g)
2 carrots, peeled and grated (about 1 cup/110 g)
In a food processor or blender, blend the mayonnaise, chipotles and their sauce, paprika, salt, granulated garlic, and black pepper until smooth.
Combine the cabbages and carrots in a large bowl. Add the dressing and toss until the vegetables are coated. Refrigerate until thoroughly chilled, at least 1 hour. Serve cold.
Grits aren’t necessarily a traditional side for Texas barbecue, but who cares when they’re this good? These grits get their flavor from mellowing chopped jalapeños in a combination of butter, cream cheese, and gorgonzola. Super decadent, they’re easily one of the most beloved barbecue sides in town.
Serves 6 to 8 as a side.
6 tablespoons (85 g) unsalted butter
4 ounces (115 g) cream cheese
2 ounces (55 g) gorgonzola cheese
10 jalapeños, stemmed, seeded, and chopped
5 cups (1.2 L) vegetable or chicken stock
3 cups (720 ml) half-and-half
Salt
2 cups (275 g) coarse-ground yellow grits
1 cup (115 g) shredded sharp cheddar cheese
In a large pot over low heat, melt the butter, cream cheese, and gorgonzola together, stirring constantly. Add the jalapeños and cook until softened, about 5 minutes.
Add the stock and half-and-half and bring to a simmer. Add a good-size pinch of salt.
Add the grits gradually, stirring constantly to prevent lumps. Return to a simmer, stir in the cheddar, and cover. Remove from the heat. Let rest, with the lid on, for 20 minutes. Season to taste and serve.
This is a basic recipe for pinto beans from Stiles Switch. You can swap out the pintos for another variety of beans—black beans are nice—and replace the chile powder with whatever seasonings or spice blends you like. Cooked, crumbled bacon or, as noted below, leftover barbecue makes a fine addition too. These beans are the base for the refried beans (this page) in the Tex-Mex chapter, and a necessary ingredient in Frito pie (this page).
Serves 6 to 8 as a side.
1 pound (455 g) dried pinto beans
2 tablespoons vegetable oil
1 cup (110 g) chopped onion
2 tablespoons granulated garlic powder
2 tablespoons New Mexico (Anaheim) chile powder
1 teaspoon ground cayenne
1 cup (125 g) chopped smoked brisket (this page; optional)
Salt
Sort through the beans and rinse them well.
Heat a Dutch oven or heavy pot over medium heat and add the oil. Add the onion and cook until translucent, 3 to 5 minutes. Add the granulated garlic, chile powder, and cayenne, and sauté until fragrant, about 1 minute more.
Add the rinsed and drained beans to the pot and cover them with water by a couple of inches. Bring to a boil, then lower the heat to a simmer. Cook, partially covered, until the beans are tender and the liquid is slightly thickened, about 2 hours. If using the brisket, add it to the pot about 30 minutes before the beans are done. Season with salt to taste and serve.
It’s pretty common to serve potato salad with Texas barbecue, but this isn’t really a typical potato salad. While it keeps the traditional mayonnaise base, the addition of pickled jalapeños, dill, and scallions does a lot to perk up this salad, making it a hit at parties.
Bill Kerlin explains, “Originally we had started with a mustard potato salad, which was good. But it was just too common. The idea for the jalapeño and dill was because that’s what we were growing in our garden.” While it’s plenty tempting to eat this right when it’s done, don’t skip the chilling step—it makes the dish.
Makes 1 large party-size bowl, about 10 cups (2.4 L).
5 pounds (2.3 kg) red potatoes, skin on
Salt
1 cup (240 ml) sour cream
1 cup (240 ml) mayonnaise
Black pepper
2 bunches scallions, thinly sliced
1 cup (50 g) chopped fresh dill
1 cup (140 g) chopped pickled jalapeños (this page or store-bought)
Put the potatoes in a pot full of cold, salted water. Bring the water to a boil and cook the potatoes until they are soft, about 20 minutes. Drain, then let cool to room temperature. Cut the potatoes into ½-inch (12-mm) cubes.
In a small bowl, whisk the sour cream and mayonnaise together. Season this dressing to taste with salt and pepper.
Combine the potatoes, scallions, dill, and jalapeños in a large bowl and mix well, then pour the dressing over the vegetables. Toss just until the dressing is evenly distributed.
Chill in the refrigerator overnight, ideally, or until thoroughly chilled, at least 1 hour. Serve cold.