Java development environments have two basic approaches. On the one hand, you can use a sophisticated integrated development environment (IDE) such as JavaBeans or Eclipse. These tools combine a full-featured source editor that lets you edit your Java program files with integrated development tools, including visual development tools that let you create applications by dragging and dropping visual components onto a design surface.
At the other extreme, you can use just the basic command-line tools that are available free from Oracle’s Java website (http://java.oracle.com
). Then you can use any text editor you want to create the text files that contain your Java programs (called source files
), and compile and run your programs by typing commands at a command prompt.
As a compromise, you may want to use a simple development environment, such as TextPad. TextPad is an inexpensive text editor that provides some nice features for editing Java programs (such as automatic indentation) and shortcuts for compiling and running programs. It doesn’t generate any code for you or provide any type of visual design aids, however. TextPad is the tool I used to develop all the examples shown in this book. For information about downloading and using TextPad, see Book 1, Chapter 3
.
Downloading and Installing the Java Development Kit
Before you can start writing Java programs, you have to download and install the correct version of the Java Development Kit (JDK) for the computer system you’re using. Oracle’s Java website provides versions for Windows, Solaris, and Unix. The following sections show you how to download and install the JDK.
Downloading the JDK
To get to the download page, point your browser to http://java.oracle.com/technetwork/java
. Then follow the appropriate links to download the JDK 9 for your operating system.
When you get to the Java download page, you find links to download the JDK or the JRE. Follow the JDK link; the JRE link gets you only the Java Runtime Environment, not the complete Java Development Kit.
The JDK download comes in two versions: an online version that requires an active Internet connection to install the JDK and an offline version that lets you download the JDK installation file to your computer and install it later.
I recommend that you use the offline version. It installs faster, and you can reinstall the JDK later if you need to without having to download it again.
The exact size of the offline version depends on the platform, but most versions are between 50MB and 60MB. As a result, the download takes a few hours if you don’t have a high-speed Internet connection. With a cable, DSL, or T1 connection, the download takes less than five minutes.
Installing the JDK
After you download the JDK file, you can install it by running the executable file you downloaded. The procedure varies slightly depending on your operating system, but basically, you just run the JDK installation program file after you download it, as follows:
On a Windows system, open the folder in which you saved the installation program and double-click the installation program’s icon.
On a Linux or Solaris system, use console commands to change to the directory to which you downloaded the file and then run the program.
After you start the installation program, it prompts you for any information that it needs to install the JDK properly, such as which features you want to install and what folder you want to install the JDK in. You can safely choose the default answer for each option.
Perusing the JDK folders
When the JDK installs itself, it creates several folders on your hard drive. The locations of these folders vary depending on your system, but in all 32-bit versions of Windows, the JDK root folder is in the path Program Files\Java
on your boot drive. On 64-bit versions of Windows, the root folder will be either Program Files\Java
or Program Files (x86)\Java
. The name of the JDK root folder also varies, depending on the Java version you’ve installed. For version 1.9, the root folder is named jdk-9
.
Table 2-1
lists the subfolders created in the JDK root folder. As you work with Java, you’ll refer to these folders frequently.
The Java license that you agreed to when you downloaded the JDK, on the outside chance that you enjoyed it so much the first time, you want to read it again. (If you work for Microsoft, you probably should
read it again, at least twice.)
The source code for the Java API classes. This folder is created only if you unpack the src.zip
file (which may be named src.jar
). After you get your feet wet with Java, looking at these source files can be a great way to find out more about how the API classes work.
Setting the path
After you install the JDK, you need to configure your operating system so that it can find the JDK command-line tools. To do that, you must set the Path
environment variable — a list of folders that the operating system uses to locate executable programs. To do this on a Windows 7 or earlier system, follow these steps. You must be logged in as an administrator to make the changes described in this procedure. On Windows 8, Java installs as a desktop application that works like the Windows 7 configuration.
Click the Start menu, then right-click Computer.
This brings up the System Properties page.
Click the Advanced System Settings link.
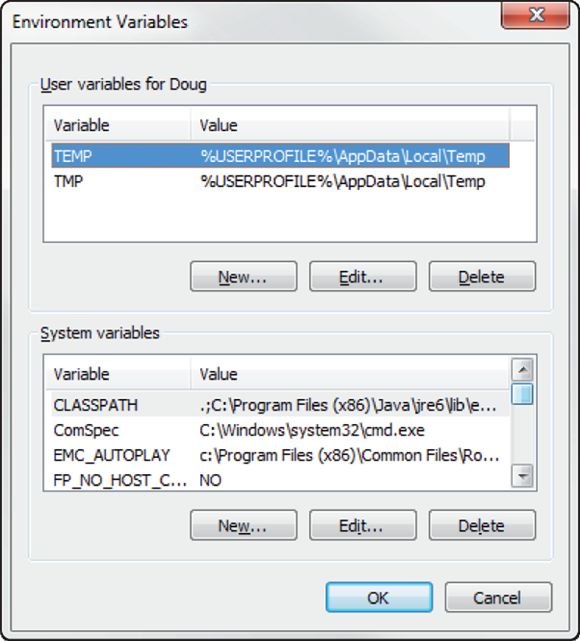
Click the Environment Variables button.
The Environment Variables dialog box appears, as shown in Figure 2-1
.
In the System Variables list, scroll to the Path variable, select it, and then click the Edit button.
A little dialog box pops up to let you edit the value of the Path
variable.
Add the JDK bin
folder to the beginning of the Path
value.
Use a semicolon to separate the bin
folder from the rest of the information that may already be in the path.
Note:
The name of the bin
folder may vary on your system, as in this example:
The first OK gets you back to the Environment Variables dialog box; the second OK gets you back to the System Properties dialog box; and the third OK closes the System Properties dialog box.
For Linux or Solaris, the procedure depends on which shell you’re using. For more information, consult the documentation for the shell you’re using.
Using Java’s Command-Line Tools
Java comes with several command-line tools that you can run directly from a command prompt. The two most important are javac
, the Java compiler used to compile a program, and java
, the runtime command used to run a Java program. These tools work essentially the same way no matter what operating system you’re using.
Compiling a program
You can compile a program from a command prompt by using the javac
command. Before you can do that, however, you need a program to compile. Follow these steps:
Using any text editor, type the following text in a file, and save it as HelloApp.java
:
public class HelloApp { public static void main(String[] args) { System.out.println("Hello, World!"); } }
Pay special attention to capitalization. If you type Public
instead of public
, for example, the program won’t work. (If you don’t want to bother with typing, you can download the sample programs from this book’s website at www.dummies.com/go/javaaiofd5e
.)
Save the file in any directory you want.
Open a command prompt, use a cd
command to change to the directory you saved the program file in, and then enter the command javac HelloApp.java
.
This command compiles the program (javac
) and creates a class file named HelloApp.class
.
Assuming that you typed the program exactly right, the javac
command doesn’t display any messages at all. If the program contains any errors, however, you get one or more error messages onscreen. If you typed Public
instead of public
despite my warning earlier in this section, the compiler displays the following error message:
C:\java\samples>javac HelloApp.java HelloApp.java:1: error: class, interface, or enum expected Public class HelloApp ^ 1 error C:\java\samples>
The compiler error message indicates that an error is in line 1 of the HelloApp.java
file. If the compiler reports an error message like this one, your program contains a coding mistake. You need to find the mistake, correct it, and compile the program again.
Compiling more than one file
Normally, the javac
command compiles only the file that you specify on the command line, but you can coax javac
into compiling more than one file at a time by using any of the techniques I describe in the following paragraphs:
If the Java file you specify on the command line contains a reference to another Java class that’s defined by a java
file in the same folder, the Java compiler automatically compiles that class too.
Suppose you have a java
program named TestProgram
, which refers to a class called TestClass
, and the TestClass.java
file is located in the same folder as the TestProgram.java
file. When you use the javac
command to compile the TestProgram.java
file, the compiler automatically compiles the TestClass.java
file too.
You can list more than one filename in the javac
command. The following command compiles three files:
You can use a wildcard to compile all the files in a folder, like this:
javac *.java
If you need to compile a lot of files at the same time but don’t want to use a wildcard (perhaps you want to compile a large number of files but not all the files in a folder), you can create an argument file,
which lists the files to compile. In the argument file, you can type as many filenames as you want, using spaces or line breaks to separate them. Here’s an argument file named TestPrograms
that lists three files to compile:
You can compile all the programs in this file by using an @
character followed by the name of the argument file on the javac
command line, like this:
javac @TestPrograms
Using Java compiler options
The javac
command has a gaggle of options that you can use to influence the way it compiles your programs. For your reference, I list these options in Table 2-3
.
Outputs messages about what the compiler is doing.
-deprecation
Outputs source locations where deprecated APIs are used.
-classpath <path>
Specifies where to find user class files.
-cp <path>
Specifies where to find user class files.
-sourcepath <path>
Specifies where to find input source files.
-bootclasspath <path>
Overrides locations of bootstrap class files.
-extdirs <dirs>
Overrides locations of installed extensions.
-endorseddirs <dirs>
Overrides location of endorsed standards path.
-d <directory>
Specifies where to place generated class files.
-encoding <encoding>
Specifies character encoding used by source files.
-source <release>
Provides source compatibility with specified release.
-target <release>
Generates class files for specific virtual-machine version.
-version
Provides version information.
-help
Prints a synopsis of standard options.
-X
Prints a synopsis of nonstandard options.
-J<flag>
Passes <flag>
directly to the runtime system.
To use one or more of these options, type the option before or after the source filename. Either of the following commands, for example, compiles the HelloApp.java
file with the -verbose
and -deprecation
options enabled:
Don’t get all discombobulated if you don’t understand what all these options do. Most of them are useful only in unusual situations. The options you’ll use the most are
-classpath
or -cp
:
Use this option if your program makes use of class files that you’ve stored in a separate folder.
-deprecation
:
Use this option if you want the compiler to warn you whenever you use API methods that have been deprecated. (Deprecated
methods are older methods that once were part of the Java standard API but are on the road to obsolescence. They still work but may not function in future versions of Java.)
-source
:
Use this option to limit the compiler to previous versions of Java. Note, however, that this option applies only to features of the Java language itself, not to the API class libraries. If you specify -source 1.4
, for example, the compiler won’t allow you to use new Java language features that were introduced in a version later than 1.4, such as generics, enhanced for
loops, or Lambda expressions. But you can still use the new API features that were added with version 1.5, such as the Scanner
class.
-help
:
Use this option to list the options that are available for the javac
command.
Running a Java program
When you successfully compile a Java program, you can run the program by typing the java
command followed by the name of the class that contains the program’s main
method. The JRE loads, along with the class you specify, and then runs the main method in that class. To run the HelloApp
program, for example, type this command:
C:\java\samples>java HelloApp
The program responds by displaying the message "Hello, World!"
.
The class must be contained in a file with the same name as the class, and its filename must have the extension .class
. You usually don’t have to worry about the name of the class file because it’s created automatically when you compile the program with the javac
command. Thus, if you compile a program in a file named HelloApp.java
, the compiler creates a class named HelloApp
and saves it in a file named HelloApp.class
.
Understanding error messages
If Java can’t find a filename that corresponds to the class, you get a simple error message indicating that the class can’t be found. Here’s what you get if you type JelloApp
instead of HelloApp
:
C:\java\samples>java JelloApp Exception in thread "main"
java.lang.NoClassDefFoundError: JelloApp
This error message simply means that Java couldn’t find a class named JelloApp
.
Specifying options
Like the Java compiler, the Java runtime command lets you specify options that can influence its behavior. Table 2-4
lists the most commonly used options.
Runs the server virtual, which is optimized for server systems.
-classpathdirectories and archives
Lists the directories or JAR or Zip archive files used to search for class files.
-cp <search path>
Does the same thing as -classpath
.
-D name=value
Sets a system property.
-verbose
Enables verbose output.
-version
Displays the JRE version number and then stops.
-showversion
Displays the JRE version number and then continues.
-?
or -help
Lists standard options.
-X
Lists nonstandard options.
-ea
or -enableassertions
Enables the assert
command.
-ea classes or packages
Enables assertions for the specified classes or packages.
-esa
or -enablesystemassertions
Enables system assertions.
-dsa
or -disablesystemassertions
Disables system assertions.
Using the javap command
The javap
command is called the Java disassembler
because it takes class files apart and tells you what’s inside them. You won’t use this command often, but using it to find out how a particular Java statement works is fun sometimes. You can also use it to find out what methods are available for a class if you don’t have the source code that was used to create the class.
Here’s the information you get when you run the javap HelloApp
command:
C:\java\samples>javap HelloApp Compiled from "HelloApp.java" public class HelloApp{ public HelloApp(); public static void main(java.lang.String[]); }
As you can see, the javap
command indicates that the HelloApp
class was compiled from the HelloApp.java
file and that it consists of a HelloApp
public class and a main
public method.
You may want to use two options with the javap
command. If you use the -c
option, the javap
command displays the actual Java bytecodes created by the compiler for the class. And if you use the -verbose
option, the bytecodes (plus a ton of other fascinating information about the innards of the class) are displayed.
If you become a big-time Java guru, you can use this type of information to find out exactly how certain Java features work. Until then, you probably should leave the javap
command alone except for those rare occasions when you want to impress your friends with your in-depth knowledge of Java. (Just hope that when you do, they don’t ask you what the aload
or invokevirtual
instruction does.)
Using Java Documentation
Before you get too far into figuring out Java, don’t be surprised if you find yourself wondering whether some class has some other method that I don’t describe in this book — or whether some other class may be more appropriate for an application you’re working on. When that time comes, you’ll need to consult the Java help pages.
Complete documentation for Java is available on the Oracle Java website at http://download.java.net/jdk98/docs
. Although this page contains many links to documentation pages, the two you’ll use the most are the Java SE API documentation pages and the Developer’s Guides pages. The following sections describe these two links.
Java SE API Docs
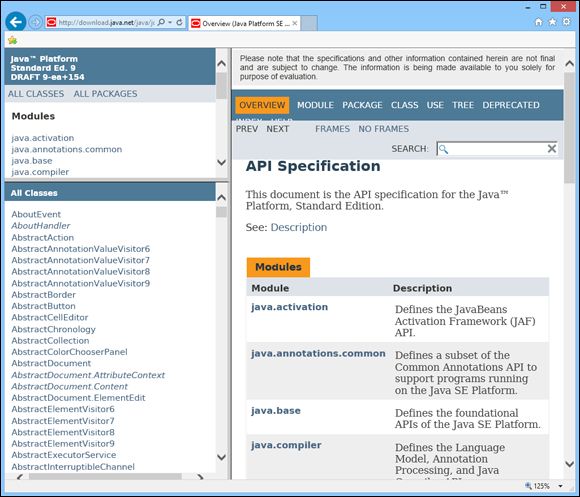
The API and documentation links at http://download.java.net/java/jdk98/docs/api/index.html
take you to the complete documentation for all currently supported versions of the Java API, in English as well as Japanese. Figure 2-2
shows the English Java SE 8 API documentation page.
FIGURE 2-2:
The documentation page for Java SE API 9 (English version).
You can use this page to find complete information for any class in the API. By default, all the Java classes are listed in the frame that appears in the bottom-left corner of the page. You can limit this display to the classes in a particular package by choosing the package from the menu in the top-left corner of the page.
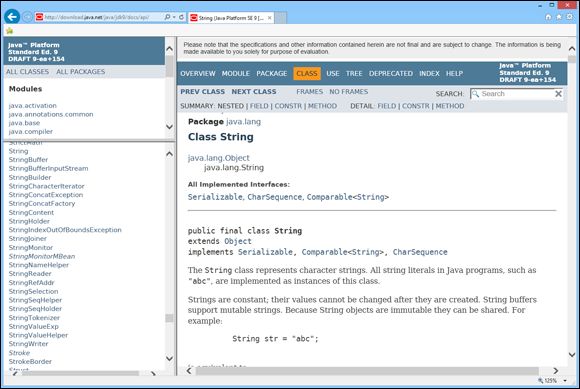
Click the class you’re looking for in the class list to call up its documentation page. Figure 2-3
shows the documentation page for the String
class. If you scroll down this page, you find complete information about everything you can do with this class, including an in-depth discussion of what the class does, a list of the various methods it provides, and a detailed description of what each method does. In addition, you find links to similar classes.
FIGURE 2-3:
The documentation page for the String class.
Java Language Specification
If you’re interested in learning details about some element of the Java language itself (rather than the information about a class in the API class library), visit the Java Programming Language reference page at http://docs.oracle.com/javase/specs/index.html
. That link takes you to a set of pages that describes — in sometimes excruciating and obscure detail — exactly how each element of the Java language works.
Frankly, this documentation isn’t that much help for beginning programmers. It was written by computer scientists for
computer scientists. You can tell just by looking at the table of contents that it isn’t for novices. The first chapter is called “Introduction” (that’s not so bad), but Chapters 2 and 3
are titled “Grammars” and “Lexical Structure,” respectively, and matters just get more arcane from there.
That’s why you’re reading this book, after all. You won’t even find a single sentence more about lexical structure in this book (other than this one, of course). Even so, at some time in your Java journeys, you may want to get to the bottom of the rules that govern such strange Java features as anonymous inner classes. When that day arrives, grab a six-pack of Jolt Cola, roll up your sleeves, and open the Java Language Specification pages.
 Downloading Java from the Oracle website
 As a compromise, you may want to use a simple development environment, such as TextPad. TextPad is an inexpensive text editor that provides some nice features for editing Java programs (such as automatic indentation) and shortcuts for compiling and running programs. It doesn’t generate any code for you or provide any type of visual design aids, however. TextPad is the tool I used to develop all the examples shown in this book. For information about downloading and using TextPad, see Book 1, Chapter 3
.
As a compromise, you may want to use a simple development environment, such as TextPad. TextPad is an inexpensive text editor that provides some nice features for editing Java programs (such as automatic indentation) and shortcuts for compiling and running programs. It doesn’t generate any code for you or provide any type of visual design aids, however. TextPad is the tool I used to develop all the examples shown in this book. For information about downloading and using TextPad, see Book 1, Chapter 3
.
 Pay special attention to capitalization. If you type
  The class must be contained in a file with the same name as the class, and its filename must have the extension
  You may want to use two options with the