Working with Packages and the New Java Module System
IN THIS CHAPTER
Creating packages for your classes
Archiving your packages in JAR files
Documenting your classes with JavaDocs
Using the Java Module System
This chapter shows you what to do with the classes you create. Specifically, I show you how to organize classes into neat packages. Packages enable you to keep your classes separate from classes in the Java API, allow you to reuse your classes in other applications, and even let you distribute your classes to others, assuming other people might be interested in your classes. If that’s the case, you probably won’t want to send those people all your separate class files. Instead, bundle them into a single file called a JAR file. That’s covered in this chapter too.
I then show you how to use a feature called JavaDocs that lets you add documentation comments to your classes. With JavaDocs, you can build professional-looking documentation pages automatically. Your friends will think you’re a real Java guru when you post your JavaDoc pages to your website.
Finally, I show you how to use a new feature of Java 9 called the Java Module System, which provides an improved way of working with packages that avoids some of the more common pitfalls of the old Java package system.
Working with Packages
A package
is a group of classes that belong together. Without packages, the entire universe of Java classes would be a huge, unorganized mess. Imagine the thousands of classes that are available in the Java API combined with millions of Java classes created by Java programmers throughout the world and all thrown into one big pot. Packages let you organize this mass into smaller, manageable collections of related classes.
Importing classes and packages
When you use import
statements at the beginning of a Java source file, you make classes from the packages mentioned in the import
statements available throughout the file. (I cover import
statements in Book 2, Chapter 1
, but it doesn’t hurt to repeat it here.)
An import
statement can import all the classes in a package by using an asterisk wildcard. Here all the classes in the java.util
package are imported:
import java.util.*;
Alternatively, you can import classes one at a time. Here just the ArrayList
class is imported:
import java.util.ArrayList;
Note:
You don’t have to use an import
statement to use a class from a package. But if you don’t use an import
statement, you must fully qualify
any references to the class. For example, you can use the ArrayList
class without importing java.util
:
java.util.ArrayList = new java.util.ArrayList();
Because fully qualified names are a pain to always spell out, you should always use import
statements to import the packages or individual classes your application uses.
You never have to explicitly import two packages:
java.lang
:
This package contains classes that are so commonly used that the Java compiler makes them available to every program. Examples of the classes in this package are String
, Exception
, and the various wrapper classes, such as Integer
and Boolean
. (For complete documentation on this
package and all of the other Java packages described in this book, refer to http://download.java.net/jdk8/docs/api
.)
The default package:
This package contains classes that aren’t specifically put in some other package. All the programs I show in this book up to this point rely on the default package.
For simple program development and experimentation, using the default package is acceptable. However, if you start work on a serious Java application, create a separate package for it and place all of the application’s classes there. You find out how to do that in the next section.
You can’t import the default package, even if you want to. Suppose you have two packages — the default package and the com.lowewriter.util
package. The default package’s code contains the statement import com.lowewriter.util.*
. That’s okay. But the default package doesn’t have a name — at least it has no name that you can use inside a program. The com.lowewriter.util
package’s code can’t contain a statement like this one:
Creating your own packages to hold your classes is easy. Well, relatively easy, anyway. You must go through a few steps:
Pick a name for your package.
You can use any name you wish, but I recommend you follow the established convention of using your Internet domain name (if you have one), only backwards. I own a domain called LoweWriter.com
, so I use the name com.lowewriter
for all my packages. (Using your domain name backwards ensures that your package names are unique.)
Notice that package names are in all-lowercase letters. That’s not an absolute requirement, but it’s a Java convention that you ought to stick to. If you start using capital letters in your package names, you’ll be branded a rebel for sure. And since Java is case-sensitive, a package named com.lowewriter
is a different package from one named com.LoweWriter
.
You can add additional levels beyond the domain name if you want. For example, I put my utility classes in a package named com.lowewriter.util
.
If you don’t have a domain all to yourself, try using your e-mail address backwards. For example, if your e-mail address is SomeBody@SomeCompany.com
, use com.somecompany.somebody
for your package names. That way
they are still unique. (If you ever want to distribute your Java packages, you should register a domain name. Nothing says “Amateur” like a package name that starts with com.gmail
. And, although a package name created from a backwards e-mail address is almost sure to be unique, there is a small chance that it won’t be.)
Choose a directory on your hard drive to be the root of your class library.
You need a place on your hard drive to store your classes. I suggest you create a directory such as c:\javaclasses
.
This folder becomes the root directory
for your Java packages.
Create subdirectories within the root directory for your package name.
For example, for the package named com.lowewriter.util
, create a directory named com
in the c:\javaclasses
directory (assuming that’s the name of your root). Then, in the com
directory, create a directory named lowewriter
. Then, in lowewriter
, create a directory named util
. Thus, the complete path to the directory that contains the classes for the com.lowewriter.util
package is c:\javaclasses\com\lowewriter\util
.
Add the root directory for your package to theClassPathenvironment variable.
The exact procedure for doing this depends on your operating system. You can set the ClassPath
by double-clicking System from the Control Panel. Click the Advanced tab, and then click Environment Variables.
Be careful not to disturb any directories already listed in the ClassPath
. To add your root directory to the ClassPath
, add a semicolon followed by the path to your root directory to the end of the ClassPath
value. For example, suppose your ClassPath
is already set to this:
.;c:\util\classes
Then you modify it to look like this:
.;c:\util\classes;c:\javaclasses
Here I added ;c:\javaclasses
to the end of the ClassPath
value.
Save the files for any classes you want to be in a particular package in the directory for that package.
For example, save the files for a class that belongs to the com.lowewriter. util
package in c:\javaclasses\com\lowewriter\util
.
Add a package statement to the beginning of each source file that belongs in a package.
The package
statement simply provides the name for the package that any class in the file is placed in. For example:
package com.lowewriter.util;
The package statement must be the first non-comment statement in the file.
An example
Suppose you’ve developed a utility class named Console
that has a bunch of handy static methods for getting user input from the console. For example, this class has a static method named askYorN
that gets a Y or N from the user and returns a boolean value to indicate which value the user entered. You decide to make this class available in a package named com.lowewriter.util
so you and other like-minded programmers can use it in their programs.
Here’s the source file for the Console
class:
package com.lowewriter.util; import java.util.Scanner; public class Console { static Scanner sc = new Scanner(System.in); public static boolean askYorN(String prompt) { while (true) { String answer; System.out.print("\n" + prompt + " (Y or N) "); answer = sc.next(); if (answer.equalsIgnoreCase("Y")) return true; else if (answer.equalsIgnoreCase("N")) return false; } } }
Okay, so far this class has just the one method (askYorN
), but one of these days you’ll add a bunch of other useful methods to it. In the meantime, you want to get it set up in a package so you can start using it right away.
So you create a directory named c:\javaclasses\com\lowewriter\util
(as described in the preceding section) and save the source file to this directory. Then you compile the program so the Console.class
file is stored in that directory too. And you add c:\javaclasses
to your ClassPath environment variable.
Now you can use the following program to test that your package is alive and well:
import com.lowewriter.util.*; public class PackageTest { public static void main(String[] args) { while (Console.askYorN("Keep going?")) { System.out.println("D'oh!"); } } }
Here the import
statement imports all the classes in the com.lowewriter.util
package. Then, the while
loop in the main
method repeatedly asks the user if he or she wants to keep going.
Putting Your Classes in a JAR File
A JAR file
is a single file that can contain more than one class in a compressed format that the Java Runtime Environment can access quickly. (JAR
stands for Java archive.
) A JAR file can have just a few classes in it, or thousands. In fact, the entire Java API is stored in a single JAR file named rt.java
. (The rt
stands for runtime.
) It’s a pretty big file — over 35MB — but that’s not bad, considering that it contains more than 12,000 classes.
JAR files are created by the jar
utility, which you find in the Java bin
directory along with the other Java command-line tools, such as java
and javac
. JAR files are similar in format to Zip files, a compressed format made popular by the PKZIP program. The main difference is that JAR files contain a special file, called the manifest file,
that contains information about the files in the archive. This manifest is automatically created by the jar
utility, but you can supply a manifest of your own to provide additional information about the archived files.
JAR files are the normal way to distribute finished Java applications. After finishing your application, you run the jar
command from a command prompt to prepare the JAR file. Then, another user can copy the JAR file to his or her computer. The user can then run the application directly from the JAR file.
JAR files are also used to distribute class libraries. You can add a JAR file to the ClassPath environment variable. Then the classes in the JAR file are automatically available to any Java program that imports the package that contains the classes.
jar command-line options
The jar
command is an old-fashioned Unix-like command, complete with arcane command-line options that you have to get right if you expect to coax jar
into doing something useful.
The basic format of the jar
command is this:
jar options jar-file [manifest-file] class-files…
The options specify the basic action you want jar
to perform and provide additional information about how you want the command to work. Table 8-1
lists the options.
Indicates that the jar
file is specified as an argument. You almost always want to use this option.
v
Verbose output. This option tells the jar
command to display extra information while it works.
0
Doesn’t compress files when it adds them to the archive. This option isn’t used much.
m
Specifies that a manifest file is provided. It’s listed as the next argument following the jar
file.
M
Specifies that a manifest file should not be added to the archive. This option is rarely used.
Note that you must specify at least the c
, u
, x
, or t
option to tell jar
what action you want to perform.
Archiving a package
The most common use for the jar
utility is to create an archive of an entire package. The procedure for doing that varies slightly depending on what operating system you’re using. However, the jar
command itself is the same regardless of your operating system. Here’s the procedure for archiving a package on a PC running any version of Windows:
Open a command window.
The easiest way to do that is to choose Start ⇒ Run, type cmd
in the Open text box, and click OK. On Windows 8, right-click the Start button, and then choose Command Prompt on the menu that appears.
If you have trouble running the jar
command in Step 3, you may need to open the command prompt in Administrator mode. To do so, click the Start menu, type cmd
, right-click cmd.exe
at the top of the Start menu, and choose Run as Administrator.
Use a cd
command to navigate to your package root.
For example, if your packages are stored in c:\javaclasses
, use this command:
cd \javaclasses
Use a jar
command that specifies the options cf
, the name of the jar file, and the path to the class files you want to archive.
For example, to create an archive named utils.jar
that contains all the class files in the com.lowewriter.util
package, use this command:
jar cf utils.jar com\lowewriter\util\*.class
To verify that the jar file was created correctly, use the jar
command that specifies the options tf
and the name of the jar file.
For example, if the jar
file is named utils.jar
, use this command:
jar tf utils.jar
This lists the contents of the jar file so you can see what classes were added. Here’s some typical output from this command:
As you can see, the utils.jar
file contains the Console class, which is in my com.lowewriter.util
package.
That’s all!
You’re done. You can leave the jar
file where it is, or you can give it to your friends so they can use the classes it contains.
Adding a jar to your classpath
To use the classes in an archive, you must add the jar
file to your ClassPath
environment variable. I describe the procedure for modifying the ClassPath
variable in Windows XP earlier in this chapter, in the section “Creating your own packages
.” So I won’t repeat the details here.
To add an archive to the ClassPath variable, just add the complete path to the archive, making sure to separate it from any other paths already in the ClassPath
with a semicolon. Here’s an example:
.;c:\javaclasses\utils.jar;c:\javaclasses
Here I added the path c:\javaclasses\utils.jar
to my ClassPath
variable.
Starting with Java 1.6, you can add all the jar
files from a particular directory to the ClassPath
in one fell swoop. For example, imagine that your c:\javaclasses
directory contains two jar
files — utils.jar
and extras.jar
. To add both jar
files to the ClassPath, use a forward slash (/
) followed by an asterisk:
.;c:\javaclasses/*
The forward slash looks strange, especially when combined with the back slash in c:\javaclasses
. But that’s the way you use a ClassPath
wildcard.
The first path in a ClassPath
variable is always a single dot (.
), which allows Java to find classes in the current directory.
Also, be aware that Java searches the various paths and archive files in the ClassPath
variable in the order in which you list them. Thus, with the ClassPath.;c:\javaclasses\utils.jar;c:\javaclasses
, Java searches for classes first in the current directory, then in the utils
archive, and finally in the c:\javaclasses
directory.
Running a program directly from an archive
With just a little work, you can set up an archive so that a Java program can be run directly from it. All you have to do is create a manifest file
before you create the archive. Then, when you run the jar
utility to create the archive, you include the manifest file on the jar
command line.
A manifest file
is a simple text file that contains information about the files in the archive. Although it can contain many lines of information, it needs just one line to make an executable jar
file:
Main-Class: ClassName
The class name is the fully qualified name of the class that contains the main
method that is executed to start the application. It isn’t required, but it’s typical to use the extension .mf
for manifest files.
For example, suppose you have an application whose main class is GuessingGame
, and all the class files for the application are in the package com.lowewriter.game
. First, create a manifest file named game.mf
in the com\lowewriter\game
directory. This file contains the following line:
Main-Class: com.lowewriter.game.GuessingGame
Then run the jar
command with the options cfm
, the name of the archive to create, the name of the manifest file, and the path for the class files. Here’s an example:
jar cfm game.jar com\lowewriter\game\game.mf com\lowewriter\game\*.class
Now you can run the application directly from a command prompt by using the java
command with the -jar
switch and the name of the archive file. Here’s an example:
java -jar game.jar
This command starts the JRE and executes the main
method of the class specified by the manifest file in the game.jar
archive file.
If your operating system is configured properly, you can also run the application by double-clicking an icon for the jar
file.
Using JavaDoc to Document Your Classes
One last step remains before you can go public with your hot new class library or application: preparing the documentation for its classes. Fortunately, Java provides a tool called JavaDoc
that can automatically create fancy HTML-based documentation based on comments in your source files. All you have to do is add a comment for each public class, field, and method; then run the source files through the javadoc
command; voilá!
you have professional-looking, web-based documentation for your classes.
The following sections show you how to add JavaDoc comments to your source files, how to run the source files through the javadoc
command, and how to view the resulting documentation pages.
Adding JavaDoc comments
The basic rule for creating JavaDoc comments is that they begin with /**
and end with */
. You can place JavaDoc comments in any of three different locations in a source file:
Immediately before the declaration of a public class
Immediately before the declaration of a public field
Immediately before the declaration of a public method or constructor
A JavaDoc comment can include text that describes the class, field, or method. Each subsequent line of a multiline JavaDoc comment usually begins with an asterisk. JavaDoc ignores this asterisk and any white space between it and the first word on the line.
The text in a JavaDoc comment can include HTML markup if you want to apply fancy formatting. You should avoid using heading tags (<h1>
and so on) because JavaDoc creates those, and your heading tags just confuse things. But you can use tags for boldface and italics (<b>
and <i>
) or to format code examples (use the <pre>
tag).
In addition, you can include special doc tags
that provide specific information used by JavaDoc to format the documentation pages. Table 8-2
summarizes the most commonly used tags.
Provides information about the author, typically the author’s name, e-mail address, website information, and so on.
@version
Indicates the version number.
@since
Used to indicate the version with which this class, field, or method was added.
@param
Provides the name and description of a method or constructor .
@return
Provides a description of a method’s return value.
@throws
Indicates exceptions that are thrown by a method or constructor.
@deprecated
Indicates that the class, field, or method is deprecated and shouldn’t be used.
To give you an idea of how JavaDoc comments are typically used, Listing 8-1
shows a class named Employee
with JavaDoc comments included. (This Java file also includes a class named Address
, which is required for the Employee
class to work. For the sake of brevity, I do not provide JavaDoc comments for the Address
class.)
LISTING 8-1
An Employee Class with JavaDoc Comments
package com.lowewriter.payroll; /** Represents an employee. * @author Doug Lowe * @author www.LoweWriter.com * @version 1.5 * @since 1.0 */ public class Employee { private String lastName; private String firstName; private Double salary; /** Represents the employee's address. */ public Address address; /** Creates an employee with the specified name. * @param lastName The employee's last name. * @param firstName The employee's first name. */ public Employee(String lastName, String firstName) { this.lastName = lastName; this.firstName = firstName; this.address = new Address(); } /** Gets the employee's last name. * @return A string representing the employee's last * name. */ public String getLastName() { return this.lastName; } /** Sets the employee's last name. * @param lastName A String containing the employee's * last name. */ public void setLastName(String lastName) { this.lastName = lastName; } /** Gets the employee's first name. * @return A string representing the employee's first * name. */ public String getFirstName() { return this.firstName; } /** Sets the employee's first name. * @param firstName A String containing the * employee's first name. */ public void setFirstName(String firstName) { this.firstName = firstName; }
/** Gets the employee's salary. * @return A double representing the employee's salary. */ public double getSalary() { return this.salary; } /** Sets the employee's salary. * @param salary A double containing the employee's * salary. */ public void setSalary(double salary) { this.salary = salary; } } public class Address implements Cloneable { public String street; public String city; public String state; public String zipCode; }
Using the javadoc command
The javadoc
command has a few dozen options you can set, making it a complicated command to use. However, you can ignore all these options to create a basic set of documentation pages. Just specify the complete path to all the Java files you want to create documentation for, like this:
javadoc com\lowewriter\payroll\*.java
The javadoc
command creates the documentation pages in the current directory, so you may want to switch to the directory where you want the pages to reside first.
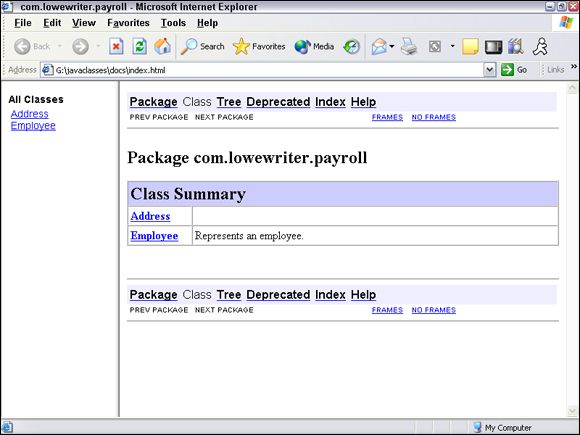
After you run the javadoc
command, you can access the documentation pages by starting with the index.html
page. To quickly display this page, just type index.html
at the command prompt after you run the javadoc
command. Or you can start your browser, navigate to the directory where you created the documentation pages, and open the index.html
page. Either way, Figure 8-1
shows an index page that lists two classes.
If you think this page looks familiar, that’s because the documentation for the Java API was created using JavaDocs. So you should already know how to find your way around these pages.
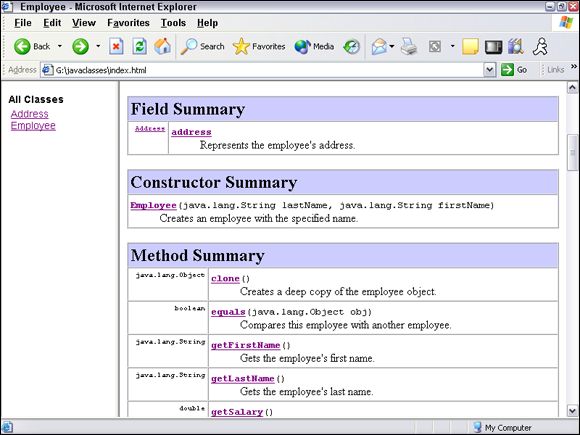
To look at the documentation for a class, click the class name’s link. A page with complete documentation for the class comes up. For example, Figure 8-2
shows part of the documentation page for the Employee
class. JavaDocs generated this page from the source file shown in Listing 8-1
.
Java packages as described so far in this chapter have served Java programmers well since the very first version of Java, introduced back in 1995. Packages were state-of-the-art when Java was first released, but they’ve been showing their age now for several years. For example, developers often have problems managing packages for large applications that use a large numbers of packages, especially when those packages require different versions of Java.
Another problem with packages is that they don’t provide an easy way to create a lightweight application whose runtime contains only those portions of Java that are actually needed. This can limit Java’s ability to run on devices with limited resources, such as embedded controllers or smartphones.
The Java Module System, new with Java 9, is designed to address these two issues and a few other more subtle problems with the old package system. The Java Module System, also known as Project Jigsaw, has been in development now for more than six years. It was originally planned to be released with Java 7 in 2011, but it wasn’t finished in time so it was deferred to Java 8. When Java 8 rolled out in 2014, Project Jigsaw still wasn’t finished, so it was deferred to Java 9. The release of Java 9 was delayed several times so that Project Jigsaw could be finished, and the good news is that the Java Module System is finally here!
The fact that Project Jigsaw took so long to develop is a testament to the importance of the project. The Project Jigsaw developers wanted to make sure that they got it right, and also that the Java Module System would in no way break any existing applications that rely on the time-tested Java package system. In fact, the Java Module System is designed to work right alongside existing Java packages, so you don’t have to convert any of your existing Java code to Project Jigsaw until you’re ready and willing to do so.
With that in mind, the following sections introduce you to the basics of the Java Module System.
Understanding modules
A module
is a new way of grouping classes in a way that explicitly lists which other modules the module depends on and what specific public types (that is, classes and interfaces) within the classes contained in the module are to be made available for other modules to use. To be more specific:
A module must explicitly list its dependencies
— that is, what other modules are required for the module to compile and run. For example, if one or more of the classes in the module require database access, the module must explicitly indicate that it requires the Java database module (known as java.sql
).
A module must also explicitly list the visibility
of any packages contained within the module. As you already know, you can create public types within a traditional package, and those public classes are available throughout the package and also externally to the package. With modules, public types in a package are visible outside of the module only if the package is explicitly listed as an exported type.
If this sounds complicated, don’t worry — it isn’t. Like traditional packages, modules are stored in JAR files. A JAR file that contains a module is called a modular JAR file.
The only difference between a modular JAR file and a regular JAR file is that a modular JAR file contains a special class called module-info.class
. The module-info.class
class file identifies the module’s dependencies (that is, what other modules are required) and the packages that are visible to other modules. All this is done by means of a source file called module-info.java
, which is explained in the next section.
The module-info.java file
The module-info.java
file is a Java source file that defines a module. The module is defined by using a combination of several new Java language elements that are introduced by Java 9.
Here is a simple module-info.java
file that does creates a module but does not define any dependencies or exported packages:
module com.lowewriter.payroll {}
In this example, the name of the module is com.lowewriter.payroll
. Note that modules are named just like packages, typically using the reverse-domain notation. In other words, for this example, I used my own personal domain (lowewriter.com
) in reverse, followed by the name of the module.
To specify that the module is dependent on another module, you add a requires
statement that specifies the name of the module. For example, if the module will require database access, it will need the standard java.SQL
module:
You can also add exports
statements to export packages that are contained in the module. When you export a package, any public classes or interfaces within the package are visible to other modules. For example:
In this example, any public classes or interfaces defined by the package com.lowewriter.payrolldb
are visible to other modules.
Setting up folders for a module
Getting the source folders set up for a module is similar to setting up the folders for a package, but with the added requirement that the module-info.java
file must be in the root folder for the module. Typically, the root folder for the module is named the same as the module, using the dots. For example, the root folder for the com.lowewriter.payroll
module is com.lowewriter.payroll
.
The module-info.java
file lives within the root folder. In addition, the path to packages that are a part of the module typically follow the same convention as for normal packages. Thus, within the module root folder is a folder named com
, within the com
folder is a folder named lowewriter
, and within the lowewriter
folder is a folder named payroll
. The java
files for the payroll package are within the payroll
folder.
Assuming that there are two source files for the payroll
package (named Address.java
and Employee.java
), the complete folder structure including the source files for the payroll example looks like this:
com.lowewriter.payroll module-info.java com lowewriter payroll Address.java Employee.java
Maybe now the exports
command in the module-info.java
file makes more sense:
exports com.lowewriter.payroll;
Notice that the path from the module root to the source files for the package correspond to the package name.
Compiling a module
To compile a module, you can use the javac
command from a command prompt, specifying the name of all the source files you want to compile. First, navigate to the root folder for the module (in this case, C:\java9\com.lowewriter.payroll
). Then use a javac
command like this one:
This command will create a module-info.class
file in the module’s root folder as well as .class
files for all Java source files in com\lowewriter\payroll
. For this example, two class files will be created in the com\lowewriter\payroll
folder: Address.class
and Employee.class
.
Creating a modular JAR file
The final step for creating a Java module is to assemble the compiled class files (including module-info.class
) into a module JAR file. You can do that by using the jar
command, like this:
jar cf com.lowewriter.payroll.jar *.class com\lowewriter\payroll\*.class
In this example, cf
means to create a Jar file. The cf
is followed by the class files to include. To keep the command simple, I used wildcards to include all the class files in the module root folder and all the class files in the com\lowewriter\payroll folder
.
You can verify that the Jar file contains the correct contents by running the jar
command with the tf
option followed by the name of the Jar file. For example:
As you can see, the jar tf
command indicates that the Jar file contains three classes as expected: module-info.class
and the two com.lowewriter.payroll
classes.
There is a lot more to learn about the Java Module System that’s beyond the scope of this book, but this should be enough to get you started with it. For more information, search the web for Java Module System.
You’ll find plenty of good information from Oracle and other sources about the advanced details of working with modules for larger applications.
 Creating packages for your classes
 Finally, I show you how to use a new feature of Java 9 called the Java Module System, which provides an improved way of working with packages that avoids some of the more common pitfalls of the old Java package system.
 You can’t import the default package, even if you want to. Suppose you have two packages — the default package and the
  You can add additional levels beyond the domain name if you want. For example, I put my utility classes in a package named
  The package statement must be the first non-comment statement in the file.