As you know, the essence of using a computer is running programs, which often produce documents. In OS X, however, there’s a third category: a set of weird, hybrid entities that Apple calls widgets. They appear, all at once, on a virtual desktop (Figure 5-13)—the leftmost of the ones in Mission Control, unless you’ve moved your desktops around.
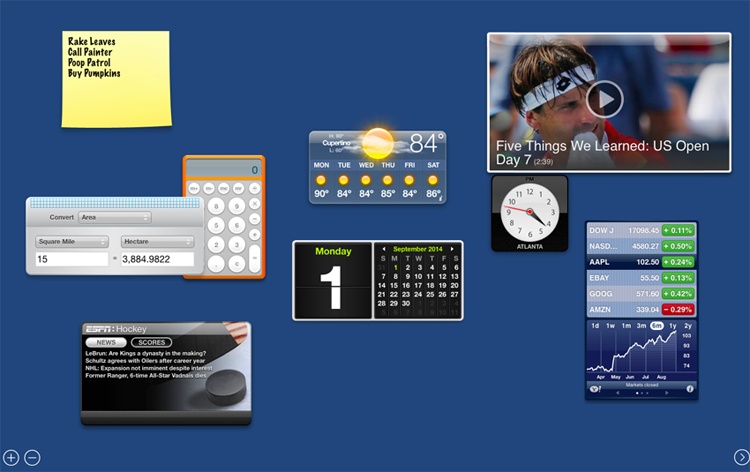
Figure 5-13. The Dashboard is a fleet of mini-programs that convey or convert all kinds of useful information, on a Spaces screen all their own. You get rid of the Dashboard either by pressing the same key again (F4 or whatever), by swiping three fingers to the right on your trackpad, or by clicking anywhere except on a widget.
(Yes, the information modules of your Today panel (Today Tab) are also called widgets. But those are much newer—and they may even be a sign that the Dashboard’s days are numbered. For now, however, these duplicate features coexist.)
Note
Apple thought that parking the Dashboard widgets on their own little virtual screen was a convenient place to keep them. They do, after all, feel like they constitute a separate little software world.
But if you can also make widgets appear in front of whatever window you have open. To do that, open  →System Preferences. Click Mission Control, and then turn off Show Dashboard as a Space. From now on, Dashboard widgets appear as a constellation of little app windows on top of whatever else you were doing.
Here, for example, is how you can find them:
If your F4 key bears the Dashboard logo (
 ), then press it.
Note
On recent Macs, F4 bears a Launchpad icon (
 ) instead. On the very oldest Yosemite-capable Macs, the Dashboard keystroke is usually F12. Or, on laptops where F12 is the key, you have to hold down the fn key (lower-left corner).
In all of these cases, you can change the Dashboard keystroke to whatever you like, as described below.
Swipe to the left with three fingers on your trackpad—repeatedly, if necessary—until you reach the far-left “desktop.” (On the Magic Mouse, swipe with two fingers.)
Open Mission Control; click the Dashboard thumbnail at the top left of the screen.
Dashboard is an actual program, with an icon of its own in your Applications folder. You can open it with a double-click or by using any of the usual program-opening tricks.
In any case, you now see the display shown in Figure 5-13. Welcome to the Dashboard.
These weird, hybrid entities aren’t really programs or documents. What they most resemble, actually, are little Web pages. They’re meant to display information, much of it from the Internet, and they’re written using Web programming languages like HTML and JavaScript.
Mastering the basics of Dashboard won’t take you long at all:
To move a widget, drag it around the screen. (Click anywhere except on a button or a control.)
To close a widget, press the Option key as you move the mouse across the widget’s face. You’ll see the
 button appear at the widget’s top-left corner; click it.
To open a closed widget, click the big
 button at the bottom of the screen. Now the Widget browser appears (Figure 5-14), as described in the following section. Open the widget you want by clicking its icon.
To hide one of Apple’s widgets, or to delete one you’ve installed yourself, use the Widget browser described next.
Note
As mentioned, the Dashboard may be on its way to the great software graveyard in the sky; Yosemite’s new Notification Center widgets do almost exactly the same thing. But for now the Dashboard is still yours to enjoy.
The Widget browser screen appears when you click the big button at the bottom of the Dashboard. As shown in Figure 5-14, it’s simply a master collection of every widget on your Mac, even the ones that you haven’t dragged onto the main Dashboard screen. Its goal in life: managing all your other widgets.
For example, you can enter icon-deleting mode by holding your cursor down on any one of them; they all start wiggling—and displaying the button at the top-left corner.
Note
Even in wiggling-icon mode, you’re not allowed to delete Apple’s widgets—only ones you’ve downloaded and installed yourself.
But what you’ll do here most often is simply click a widget’s icon to install it onto the main Dashboard screen.
(To close the browser without pulling a new icon out of it, click anywhere on the background.)
The Widget browser also harbors the godlike power of the More Widgets button, described later in these pages.
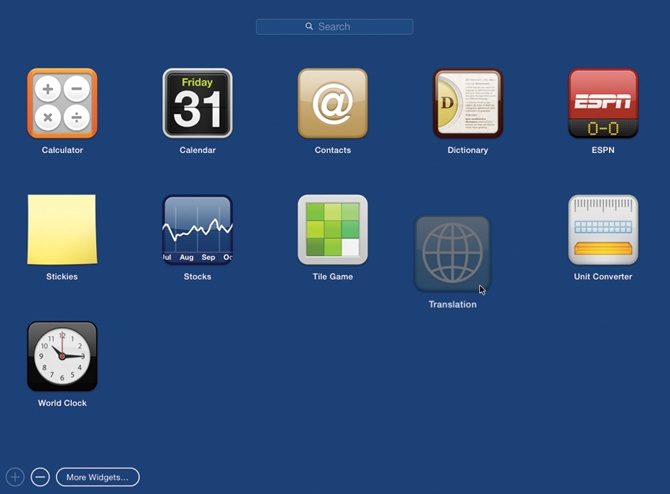
Figure 5-14. The Widget browser works exactly like the Launchpad. Move widget icons around by dragging. Drag one widget on top of another to create a folder. Search using the box at the top of the screen. Start them wiggling, for ease of mass deletion, by holding your cursor down on any icon, or by clicking the big — button. Read pages 170–174 again, taking care to mentally substitute the word “widget” for “app.”
Dashboard is crawling with cool tips and tricks. Here are a few of the biggies:
To refresh a certain widget—for example, to update its information from the Internet—click it and press ⌘-R. The widget instantly twist-scrambles itself into a sort of ice-cream swirl (you’ve got to see it to believe it) and then untwists to reveal the new data.
You can open more than one copy of the same widget. Just click its icon more than once in the Widget browser. You wind up with multiple copies of it on your screen: three World Clocks, two Stock Trackers, or whatever. That’s a useful trick when, for example, you want to track the time in more than one city, or when you maintain two different stock portfolios.
If you keep the Shift key pressed when you click the big
button, the Widget browser fades in in gorgeous slow motion. Aren’t you just glad to be alive?
To change the Dashboard keystroke to something other than F4 or F12, choose →System Preferences and then click Mission Control.
Here you’ll discover that you can choose almost any other keyboard combination to summon and dismiss the Dashboard, or even choose a screen corner that, when your mouse lands there, acts as the Dashboard trigger. This works exactly as described on Screen corners.
Here’s a rundown of the 15 standard widgets that come preinstalled. True, they look awfully simple, but some of them harbor a few secrets.
Here’s your basic four-function pocket calculator, with one-number memory storage. Begin by clicking to make it active; once it is, any typing you do on the number keys gets intercepted by this little calculator. (Using the keyboard is much faster than clicking the onscreen numbers.)
There’s not a lot to this calculator. If you need scientific and hexadecimal features, or even square root functions, use the regular Calculator described on App Store.
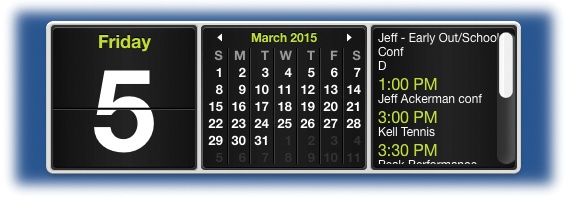
Sure, you can always find out today’s date by clicking the clock on your menu bar. But this one is so much nicer looking. And besides, you can use this calendar to look ahead or back, or to check your schedule for the day. As you click this widget, it cycles through three degrees of expansion; see Figure 5-15.


The concept is to give you faster access to your own address book. (Trudging off to the actual Contacts program takes way too long when you just want to look up a number.) It’s filled with clickable shortcuts. For example:
Search box. Type a few letters of somebody’s name here. As you type, the widget fills with matching names from the Contacts program.
Tip
Actually, it shows you entries with text that match any part of each person’s “card,” not just names. For example, you could type 212 to find everyone with that area code, or cherr to find someone whose name you’ve forgotten—but you know she lives on Cherrystone Avenue.
When you spot the name of the person you’re looking for, click it to open that person’s full Rolodex card.
Phone number. Click it to fill your screen with the phone number, big enough to see from outer space. Or at least from across the room as you dial the number on your desk phone.
Email address. Click to fire up your email program, complete with a fresh outgoing message already addressed to this person. All you have to do is type your message and click Send.
Mailing address. Clicking the mailing address fires up your Web browser and takes you to Apple’s Maps program, already opened up to a map that reveals the pinpoint location of the specified address. Very, very slick.
Apple has provided about 65,000 different ways to access its built-in dictionary/thesaurus (like the Dictionary app or Spotlight), and here’s another one. Just type the word you want and press Return. Instantly, a handy definitions panel drops down. Use the  and
and  buttons in the upper-left corner to walk through your most recent lookups and the pop-up menu to specify whether you want to search the dictionary, the thesaurus, or the Apple terminology glossary.
Tip
See how the first letter of your word appears in a special rounded tab at the left edge of the panel? If you click that letter, you get to see the word you looked up in its alphabetical context among all the other words in the dictionary. It’s a neat way to check for additional word forms, to see if perhaps you’ve misspelled the word, or to scrabble your way out of a tight situation when you’re playing the word game Ghost with someone.
This widget shows the current or final scores of college and professional sports games. (If the game hasn’t started yet, you see the start time.) Click the  button to choose the sport you want to track. Click the News button to see headlines—and click a headline to visit ESPN’s full article online.
This handy widget (Figure 5-16) lets you find out which flights fly between which cities—and if the flight is already en route, it shows you where it is on the map, how high it’s flying, how fast, and whether it’s going to be on time.
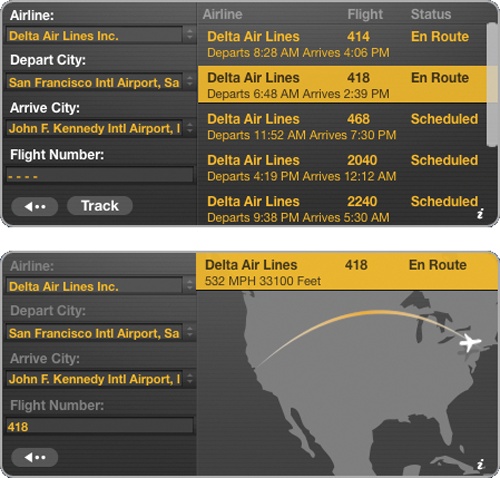
Figure 5-16. Top: Most of the time, Flight Tracker is like a teeny, tiny travel agent, capable of showing you which flights connect to which cities. But if one of the flights is marked “Enroute,” then double-click it. Bottom: You see an actual map of its progress, as shown here. You also get to see its speed and estimated arrival status (early, late, or on time), and even which terminal it will use upon landing. If you click the plane, you can zoom in on it.
This may look like a small window, but there’s a lot going on here:
Flight Finder. If you’re planning a trip, the widget can show you a list of flights that match your itinerary. Use the pop-up menus to specify the arrival and departure cities, and which airline you want to study, if any. (Actually, it’s usually faster to type the name of the city into the box, if you know how to spell it, or, better yet, its three-letter airport code.) Then click Find Flights or press Return.
After a moment, the right side of the screen becomes a scrolling list of flights that match your query. You can see the flight number, the departure and arrival times, and the name of the airline.
This is a great tool when a friend or relative is flying in and you’re unsure of the flight number, airline, or arrival time.
Flight Tracker. Most of the time, the status column of the results says “Scheduled,” meaning that you’re looking at some future flight. Every now and then, however, you get lucky and it says “Enroute.” This is where things get really fun: Double-click that row of results to see the plane’s actual position on a national or international map (Figure 5-16, bottom).
Yosemite’s new, steroid-enhanced Spotlight feature is the quickest way to look up local movie-theater listings without having to endure the hassle of the newspaper, the hellish touch-tone labyrinth of a phone system, or the flashing ads of a Web site. But Dashboard’s original movie-lookup widget is still around, too.
When you open this widget, a miniature poster changes to a different current movie every 3 seconds. At any point, you can click the poster itself to see something like Figure 5-17.
In the left column, you get a scrolling list of movies in your area. Click one of them to see, at bottom, all the details: release date, rating, length, cast, genre, a plot synopsis, and a link to the preview (trailer). (After you’ve watched the trailer, go back to the list by clicking the left-pointing arrow button at the lower-left corner of the widget.)
The center column lists the theaters near you where the selected movie is playing. Click a theater to see the movie showtimes in the right column.
Tip
So how does the widget know what’s “near you”? Because you’ve told it. You’ve clicked the button to flip the widget around to the back, where you can input your Zip code or your city and state.
Incidentally, you’re not stuck with this “Choose a movie, and we’ll show you the theaters” view. See at the top left, where the titles “Movies” and “Theaters” appear? Click Theaters to reverse the logic. Now you’re in “Choose a theater, and we’ll show you what movies are playing there” mode. This view is much better when, for example, there’s only one theater nearby and you want to know what your options are there.
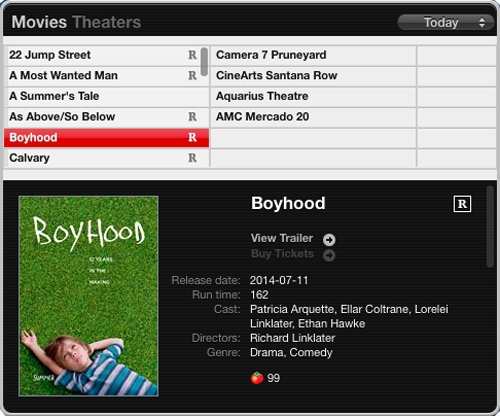
Figure 5-17. The Movies widget starts out with a slideshow of movie posters. But on the back, shown here, you can read about current movies in theaters, find out which theaters they’re in, and see today’s showtimes. The pop-up menu at upper right lets you see the schedule for today, tomorrow, and the following four days.
Stickies is a virtual Post-it note widget that lets you type out random scraps of text—a phone number, a Web address, a grocery list, or whatever.
Of course, OS X already comes with a Stickies program. So why did Apple duplicate it in Dashboard? Simple—because you can call this one up with a press of your Dashboard keystroke, making it faster to open.
On the other hand, the Stickies widget isn’t quite as flexible as the Stickies application. For example, you can’t resize the Stickie. And to add a second or a third note, you have to open the Widget browser and then click the Stickies icon for each new page.
On the other other hand, this Stickies isn’t quite as bare bones as you might think. If you click the little button at the bottom-right corner, the note spins around to reveal, on the back, a choice of paper colors, fonts, and font sizes.
Hey, day traders, this one’s for you. This widget lets you build a stock portfolio and watch it rise and fall throughout the day (Figure 5-18, top right).
To set up your portfolio, click the little button at the bottom of the window. The widget flips around, revealing the configuration page on the back:
Add a stock to your list by typing its name or stock abbreviation into the box at the top; then click the
 button or press Return. If there’s only one possible match—Microsoft, for example—the widget adds it to the list instantly. If there’s some question about what you typed, or several possible matches, you’ll see a pop-up menu listing the alternatives so you can click the one you want.
Remove a stock from the list by clicking its name and then clicking Remove.
Tip
Ordinarily, the widget displays the ups and downs of each stock as a dollar amount (“+.92” means up 92 cents, for example). But if you turn on “Show change as a percentage,” then you see these changes represented as percentages of their previous values.
But why bother? Once you’re looking at the actual stock statistics, you can switch between dollar and percentage values just by clicking any one of the red or green up/down status buttons.

Figure 5-18. More of Apple’s built-in widgets. Clockwise from top left: Translation, Stocks, Tile Game, and Weather.
Click Done to return to the original stock display. Here’s your list of stocks, their current prices (well, current as of 20 minutes ago), and the amount they’ve changed—green if they’re up, red if they’re down. Click a stock’s name to see its chart displayed at the bottom. (You control the time scale by clicking one of the little buttons above the graph: “1d” means one day, “3m” means three months, “1y” means one year, and so on.)
Finally, if you double-click the name of the stock, you fly into your Web browser to view a much more detailed stock-analysis page for that stock, courtesy of Quote.com.
For generations, Microsoft Windows had its Solitaire game—and for generations, the Mac has had the Tile Game. The idea, of course, is to click the squares of the puzzle, using logic to rearrange them back into the original sequence, so that the put-together photograph reappears.
Tip
The widget starts you out with a handsome photo of Yosemite National Park (the standard desktop picture, in fact). But you can substitute any photo you like.
To pull this off, begin by exiting the Dashboard. Go find the photo you prefer (on the desktop or in iPhoto, for example). Now begin dragging it in any direction. While the mouse is still down, press F4 (or whatever your Dashboard keystroke is) and drop the dragged graphic directly on the Tile Game puzzle. You’ve just replaced the existing graphic with your new one. (Figure 5-18 shows an example.)
The first time you use the Tile Game, click inside it to trigger the animated tile-scrambling process. Click a second time to stop the scrambling; in other words, Apple leaves it up to you to decide just how difficult (how scrambled) the puzzle is.
And what should you do if you get frustrated and give up, or if you miss the old photo? Just open the Widget bar and open a fresh copy of the Tile Game.
The next time you travel, go somewhere that has wireless Internet access wherever you go (yeah, right). You’ll be able to use this module to translate your utterances—or those of the natives—to and from 13 languages.
Just choose the language direction you want from the “from” and “to” pop-up menus, and then type a word, sentence, or paragraph into the Translate From box. In a flash, the bottom of the window shows the translation, as shown at top left in Figure 5-18. (Don’t click the curvy double-headed arrow button to perform the translation; that button means “Swap the ‘to’ and ‘from’ languages.”)
Of course, these translations are performed by automated software robots on the Web. As a result, they’re not nearly as accurate as what you’d get from a paid professional. On the other hand, when you’re standing in the middle of a strange city and you don’t know the language—and you desperately need to express yourself—what Dashboard provides may just be good enough.
Tip
Your first instinct may be to assume that this module is designed for translating things you want to say into the local language. However, you may find it even more useful for translating foreign-language paragraphs—from email or Web pages, for example—into your own language so that you can read them.
Yosemite’s Spotlight feature (Chapter 3) is, in general, the best and fastest way to convert units—meters, grams, inches, miles per hour, and so on. But Dashboard did it first.
From the upper pop-up menu, choose the kind of conversion you want: Temperature, Area, Weight, or whatever. (Take a moment to enjoy the clever graphic at the top of the window that helps identify the measurement you’ve selected.)
Use the lower pair of pop-up menus to specify which units you want to convert to and from, like Celsius to Fahrenheit. Then type in either the starting or ending measurement. To convert 48 degrees Celsius to Fahrenheit, for example, type 48 into the Celsius box. You don’t have to click anything or press any key; the conversion is performed for you instantly and automatically as you type.
This famous Dashboard module shows a handy current-conditions display for your city (or any other city) and, if you choose, even offers a six-day forecast (Figure 5-18, lower left).
Before you get started, the most important step is to click the button at the lower-right corner. The widget flips around, and on the back panel, you’ll see where you can specify your city and state or Zip code. You can also specify whether you prefer degrees Celsius or degrees Fahrenheit and whether you want the six-day forecast to show both highs and lows. (It ordinarily shows only the highs.) Click Done.
Now the front of the widget displays the name of your town, today’s predicted high and low, the current temperature, and a graphic representation of the sky conditions (sunny, cloudy, rainy, and so on). Click anywhere to reveal the six-day forecast.
Tip
Evidently, the Weather widget team members at Apple were really proud of their artwork. Lest you miss out on seeing all the beautiful weather graphics, they’ve given you a secret keystroke that reveals all 19 of the gorgeous and witty sky-weather graphics.
All you have to do is hold down ⌘ and Option as you click repeatedly on the widget. You’ll see that, for the town of Nowhere, the weather changes every time you click.
Web Clip lets you make your own widgets with one click. This particular widget, however, is nothing more than a little ad for the Web Clip feature—and a reminder that you must start your Web Clip adventure in Safari, not Dashboard. See Web Clips.
Sure, this clock shows the current time, but your menu bar does that. The neat part is that you can open up several of these clocks—click World Clock in the Widget bar repeatedly—and set each one to show the time in a different city. The result looks like the row of clocks in a hotel lobby, making you look Swiss and precise.
To specify which city’s time appears on the clock, click the button at the lower-right corner. The widget flips around, revealing the pop-up menus that let you choose a continent and city.
Thousands of new widgets, written by other people, are available on the Web: games, chat and email notifiers, gas-price reporters, calculators and translators, news and sports updaters, finance and health trackers, and on and on.
To see Apple’s current list of goodies, use one of these tactics:
Either way, you go to the Apple Dashboard downloads page. Some of the most intriguing widget offerings include the Yahoo Local Traffic widget (gives you the traffic conditions in your area), Air Traffic Control (identifies wireless AirPort base stations within range of your laptop), and TV Tracker (shows what you could be watching on TV right now instead of working). There are also FedEx package trackers, joke-of-the-day widgets, comic-strip-of-the-day widgets, and many other varieties.
When you download a widget, OS X asks if you’re sure you want to install it. If you confirm, OS X downloads it and then displays it proudly in the Widget browser. Click it to open. (Behind the scenes, it’s been copied into your Home→Library→Widgets folder. Only you will see that Dashboard widget, because it’s been copied into the Widgets folder of your account. Anyone else who has an account on this Mac won’t see it.)
You can also make a Dashboard widget of your own.
Web Clips exploit an inescapable characteristic of widgets: An awful lot of them exist to deliver real-time information from the Web—weather, stocks, flights, and so on.
But what if your interest isn’t snowstorms, stocks, or sports? What if it’s The New York Times front page? Or the bestselling children’s books on Amazon? Or the most-viewed video on YouTube? Or some cool Flash game?
That’s the beauty of Web Clips, a joint venture of Dashboard and the Safari Web browser. They let you turn any section of any Web page into a Dashboard widget that updates itself every time you open it. It’s like having a real-time keyhole peek at all your favorite Web sites at once.
Here’s how you go about creating a do-it-yourself widget:
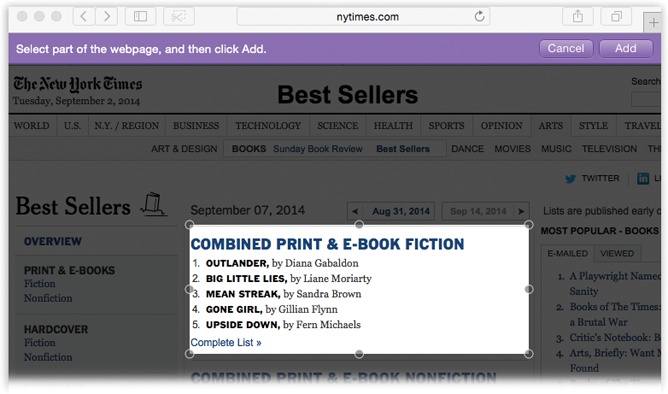
In Safari, go to the Web page that contains the information you want to snip. Choose File→Open in Dashboard.
The screen goes dark, with only a small window of white. As you move your cursor around the page, the white rectangle conveniently snaps to fit the various rectangular sections of the page (Figure 5-19).
Figure 5-19. Drag the little round handles to make the white box just big enough to surround the part of the page you want to enshrine. Or drag inside the box to move the whole thing.
Your job is to make a frame around the part of the page that usually shows the information you want. If the Web site ever redesigns its pages, it’ll wreck your widget—but what the heck; it takes only 5 seconds to make it again.
Adjust the corner or side handles to enclose the piece of page you want. When you’re finished, click Add or press Return.
Now Dashboard’s Widget browser opens automatically. But wait—what’s this? There’s a new widget here that wasn’t here before.
At this point, you can dress up your widget, adding a little polish to this raw clipping you’ve ripped out of a Web page. Click the
button that appears when you move your mouse to the lower-right corner. The widget flips around to reveal the controls shown in Figure 5-20.Here you can click one of the frame styles to give your widget a better-looking border.
If you click Edit, the widget flips around to face you again, and here’s where it gets weird: You can reposition your widget’s contents as though they were a window on a Web page that’s visible behind it. Drag the widget contents in any direction within the frame, or resize the frame using the lower-right resize handle. Click Done.
You can make as many Web Clip widgets as you want.
But here’s a big screaming caution: If you close one of these homemade widgets, it’s gone forever (or at least until you recreate it). Web Clips are never represented as icons on the Widget bar, as ordinary widgets are. Ah, well—easy come, easy go, right?
Note
If you’re of the programmer persuasion—if you’re handy in JavaScript and HTML, for example—it’s much easier to write custom widgets than ever before. (Not just Web Clips widgets, but real widgets.)
All you need is Dashcode, an easy-to-use widget-assembly environment. It’s part of Apple’s Xcode software programming toolkit, which is a free download from the Mac App Store. You’ll find tutorials and examples by typing dashcode tutorial into Google.
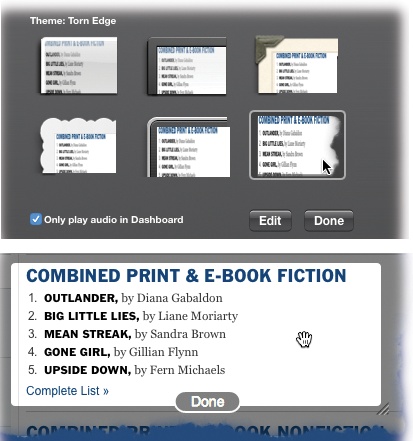
Figure 5-20. Top: Click a frame style to give your widget better-looking edges. If the widget plays sound, it keeps playing sound when you close the Dashboard unless you turn on “Only play audio in Dashboard.” Bottom: Click Edit to return to the front of the widget, where you can adjust its position on the underlying Web page.