OS X can run two different kinds of programs, each with different characteristics: Cocoa and Carbon.
The explanation involves a little bit of history and a little bit of logic. To take full advantage of Mac OS X’s considerable technical benefits, software companies had to write new programs for it from scratch. So what should Apple have done—sent out an email to the authors of the 18,000 existing Mac programs, suggesting that they throw out their programs and rewrite them from the bottom up?
At most big software companies, that suggestion would wind up on the Joke of the Week bulletin board.
Instead, Apple gave software companies a choice:
Update the existing programs (Carbon). If programmers were willing to put some effort into getting with the OS X program, they could simply adapt, or update, their existing software.
The resulting software looks and feels almost like a true OS X program—you get the crash protection, the good looks, the cool-looking graphics, the Save sheets, and so on—but behind the scenes, the bulk of the computer programming is the same as it was in Mac OS 9. These are what Apple calls Carbonized programs, named for the technology (Carbon) that permits them to run on OS X.
For years, many famous Mac programs were simply Carbonized: Photoshop versions before CS3, FileMaker before version 11, Microsoft Office before version 2011, and so on. Believe it or not, the Finder itself was a Carbon program until Snow Leopard (Mac OS X 10.6) came along. After six years, Apple finally rewrote the Finder from scratch as a true-blue Cocoa program.
Most Carbonized programs don’t offer all the features available to OS X, however. In the following pages, you’ll discover which OS X goodies you sacrifice when using programs adapted this way.
On the other hand, such software offers a feature that software companies like a lot: A Carbon program is a lot easier to write concurrently with a Windows version of the same software. A Cocoa program, by contrast, is almost certainly locked into Macintosh-Only Land.
Write new programs from scratch (Cocoa). As OS X became more popular, more software companies created programs exclusively for it. The geeks call such programs Cocoa applications. Although they look exactly like Carbonized programs, they feel a little bit more smooth and solid. And they offer a number of special features that Carbonized programs don’t offer.
These days, almost every name-brand program is a true Cocoa application, including Photoshop, Microsoft Office, FileMaker, iMovie, iPhoto, Safari, Messages, TextEdit, Stickies, Mail, Contacts, and so on.
UP TO SPEED: The Color Picker
Here and there—in System Preferences, iMovie, TextEdit, Microsoft Office, and many other programs—OS X offers you the opportunity to choose a color for some element: for your desktop background, a window, and so on.
The dialog box that appears offers a miniature color lab that lets you dial in any color in the Mac’s rainbow—several color labs, actually, arrayed across the top, each designed to make color choosing easier in certain circumstances:
Color wheel. Drag the scroll bar vertically to adjust the brightness, and then drag your cursor around the ball to pick the shade.
Color sliders. From the pop-up menu, choose the color-mixing method you prefer. CMYK stands for cyan, magenta, yellow, and black. People in the printing industry will feel immediately at home, because these four colors are the component inks for color printing. (These people may also be able to explain why K stands for black.)
RGB is how a TV or computer monitor thinks of colors: as proportions of red, green, and blue light. Grayscale means shades of gray, like a black-and-white TV. And HSB stands for hue, saturation, and brightness—a favorite color-specifying scheme in scientific circles.
In each case, just drag the sliders to mix up the color you want, or type in the percentages of each component.
Color palettes. This option presents canned sets of color swatches. They’re primarily for programmers who want quick access to the standard colors in OS X. The Web Safe Colors list is useful for Web designers, too; they can use it to ensure that the colors they choose will display properly on other computers.
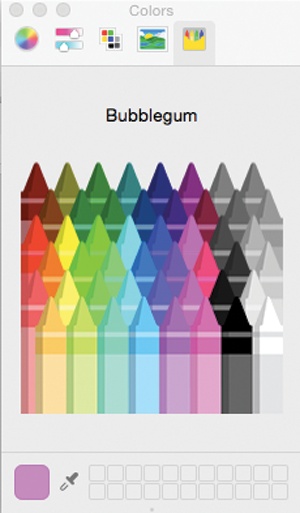
Image palettes. Here’s the visible rainbow arrayed yet another way: in cloudy, color-arranged streaks. (Cool tip: If you drag a graphics file directly into the dialog box, it appears in the spectrum’s place. That’s a handy trick if you’re trying to identify the color of a certain spot of an image, for example. And don’t miss the pop-up button at the bottom of the dialog box, which offers a few other stunts.)
Crayons. Now this is a good user interface. You can click each crayon to see its color name: Mocha, Fern, Cayenne, and so on. (Some interior decorator in Cupertino had a field day naming these crayons.)
In any of these color pickers, you can also “sample” a color that’s outside the dialog box—a color you found on a Web page, for example. Just click the magnifying-glass icon and then move your cursor around the screen. You’ll see the sliders and numbers change inside the dialog box automatically when you click.
Finally, note that you can store frequently used (or frequently admired) colors in the tiny palette squares at the bottom. To do that, drag the big rectangular color swatch (next to the magnifying glass) directly down into one of the little squares, where it will stay fresh for weeks.
If you don’t have space for all the colors you want at the bottom of the window, you can drag the small circular dot down to make room for more.
Here are some of the advantages Cocoa programs offer. May it clear up any confusion you have about why certain features seem to be present only occasionally.
Note
The following features appear in almost all Cocoa programs. That’s not to say that you’ll never see these features in Carbonized programs; the occasional Carbon program may offer one of these features or another. That’s because programmers have to do quite a bit of work to bring them into Carbon applications—and almost none to include them in Cocoa ones.
The Mac has always been the designer’s preferred computer, and OS X only strengthens its position. For one thing, OS X comes with over 200 beautiful fonts that Apple licensed from commercial type companies.
When you use a Carbon program, you usually access these fonts the same way as always: using a Font menu. But when you use a Cocoa program, you get the Font panel, which makes it far easier to organize, search, and use your font collection. Chapter 15 describes fonts, and the Font panel, in more detail.
In general, Cocoa programs automatically sharpen up their text when you view it on a Retina Display—Apple’s name for super-high-resolution screens like the one on its latest MacBook laptops. Text in Carbonized programs, on the other hand, looks blotchy and awful until their software companies make the effort to make them Retina-friendly.
You may remember from Chapter 1 that the title bar of every Finder window harbors a secret pop-up menu. When you Control-click it (or right-click it, or two-finger click it, or ⌘-click it), you’re shown a little folder ladder that delineates your current position in your folder hierarchy. You may also remember that the tiny icon just to the left of the window’s name is actually a handle you can drag to move a folder into a different window.
In Cocoa programs, you get the same features in document windows, as shown back in Figure 2-5 (Dragging from the Title Bar). By dragging the tiny document icon next to the document’s name, you can perform stunts—like dragging that little icon to the desktop or to the Dock icon of a different program for opening—right from your document’s title bar.
For the most part, it’s possible to ignore the Unix that beats within the heart of OS X. But every now and then, a little reminder pokes its head up through the fields of gradient gray—and here’s one of them.
Although you’ll never see it mentioned in the instruction manuals for Cocoa applications (if there even were such things as instruction manuals anymore), most of them respond to certain keystrokes left over from the NeXT operating system, which was OS X’s ancestor. If you’re a card-carrying member of KIAFTMA (the Keyboard Is Always Faster Than the Mouse Association), you’ll love these additional keyboard navigation strokes:
Control-A. Moves your insertion point to the beginning of the paragraph. (Mnemonic: A = beginning of the Alphabet.)
Control-E. Deposits your insertion point at the end of the paragraph. (Mnemonic: E = End.)
Control-D. Forward delete (deletes the letter to the right of the insertion point).
Control-K. Instantly deletes all text from the insertion point to the right end of the line. (Mnemonic: K = Kills the rest of the line.)
UP TO SPEED: Where Your Free Hour of Battery Life Came From
Some of the features Apple works hardest on are things you’ll never even see.
One big category: technologies designed to save battery power. Since 75 percent of new Macs are laptops, battery life is a big, big deal.
Here are some of these behind-the-scenes juice-preservation techniques in recent OS X versions, bearing the names Apple has given them:
App Nap. When a program’s window is completely covered up by other windows, the Mac slows down that background app. (Ditto for Safari background tabs.)
Slower means less power-hungry—as much as 23 percent, Apple says. (If the app is doing something in the background, like downloading or playing music, then App Nap doesn’t kick in.) The instant you bring the program to the foreground, it snaps back to full speed.
Timer Coalescing. OS X attempts to consolidate processing tasks and feed them to your Intel chip in bursts. That way, the processor earns tiny micro-vacations—idle time. More idle time means less power use. Your savings this time: as much as 72 percent.
iTunes HD Playback Efficiency. By reducing the frequency of hard-drive access during iTunes video and audio playback, Apple says the Mac uses up to 35 percent less energy.
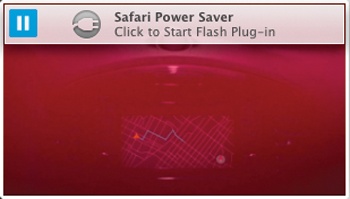
Safari Power Saver. Flash videos and animations are famous battery hogs. So when Safari spots a Flash video off at the edges of a Web page—on the side or the top, for example—it concludes that what you’ve got here is an ad. And it stops the ad from playing until you click on it. (You see a banner on the video that says “Safari Power Saver. Click to start Flash Plug-In.”)
Apple says all of its power-saving features together can extend a MacBook Pro’s battery charge by as much as an hour. Not bad for a free system-software upgrade, eh?
Control-O. Inserts a paragraph break, much like Return, but leaves the insertion point where it was, above the break. This is the ideal trick for breaking a paragraph in half when you’ve just thought of a better ending for the first part.
Control-T. Moves the insertion point one letter to the right—and, along with it, drags whichever letter was to its left. (Mnemonic: T = Transpose letters.)
Option-Delete. Deletes the entire word to the left of the insertion point. When you’re typing along in a hurry and discover that you’ve just made a typo, this is the keystroke you want. It’s much faster to nuke the previous word and retype it than to fiddle around with the mouse and the insertion point just to fix one letter.
Four additional keystrokes duplicate the functions of the arrow keys. Still, as long as you’ve got your pinky on that Control key…
Figure 5-32. The beauty of being able to select multiple blobs of text is that you can format all of them simultaneously (making them bold, for example) with one click. You can also copy the selected portions; when you paste them into a different document, you get a tidy excerpt containing only the parts you wanted, all run together.
By holding down certain keys while dragging through text in a Cocoa program, you gain some wild and wacky text-selection powers (especially useful in, for example, TextEdit and Pages):
Highlight only one column out of several by Option-dragging. Instead of highlighting all the text, margin to margin, you get only the text within your selection rectangle.
Highlight several passages simultaneously by ⌘-dragging. Each time you ⌘-drag, you highlight another block of text, even though the earlier blocks are still selected (see Figure 5-32).
The ⌘ key unlocks a slick trick in Cocoa programs: It lets you operate the buttons and controls of an inactive background window without bringing it to the front. You can operate a background window’s resize box, buttons, pop-up menus, and scroll bars, all while another window is in front of it. In fact, you can even drag through text in a background window—and then drag-and-drop it into the foreground window. (Freaky!) In every case, the secret is simply to keep ⌘ pressed as you click or drag.