In its never-ending efforts to bring the best of the iPad to the Mac, Apple has built the Share button into many spots. It’s a quick, one-click way to send something (text, link, photo, video) to somebody else (by email, Twitter, Facebook, text message, AirDrop).
If you’ve seen an iPhone or iPad, then you’ve probably seen this Share icon:  . On the Mac, this button, or a command that just says Share, pops up in all kinds of programs: the Finder’s shortcut menus. Quick Look panels. The Open File dialog box in Apple programs. OS X programs like Contacts, Notes, Preview, Safari, Photo Booth, TextEdit, iPhoto, and so on. Other companies can add it to their programs, too, or install new commands into the Share menu for transmitting stuff to new channels.
To use this feature, select or open some text, a photo, a video, a file icon, a Web link, or something else that you want to send to friends. When you click this button or command, you’re offered various ways to share the selected item. The choices vary according to the program you’re using, but here are some examples:
Email. The Mac copies the selected material into a new, outgoing email message, or attaches the selected file to an outgoing message. Just add a few explanatory notes, address the message, and send.
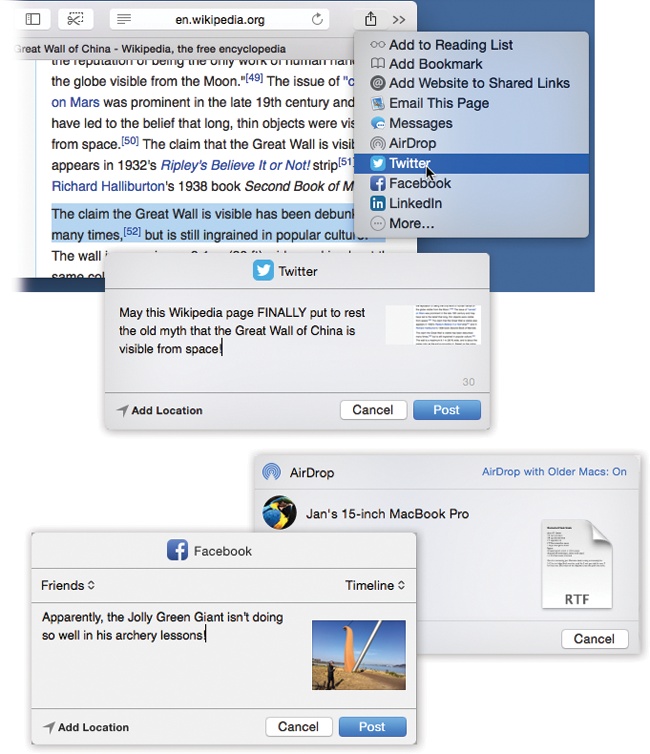
Twitter. Opens up the Twitter share sheet pictured in Figure 6-15. A counter helps you keep your message under the legal limit of 140 characters. Explain what your linked item is about, and then click Post.
Facebook. Attaches the selected photo, video, or text to the Facebook share sheet shown at bottom in Figure 6-15. This tiny box offers two pop-up menus. The one at top left lets you specify who gets to see this post: Only Me, Friends, Friends and Networks, Everyone, or one of your Facebook lists, if you’ve set them up. If you’re posting a photo or video, a second pop-up menu at top right lets you indicate what album you want this item to land in—your Timeline or an existing photo album.
Messages. Puts the selected material into an outgoing message, ready to send as a text message or an iMessage (Chapter 20). Just address and send.
AirDrop. As you can read on AirDrop, AirDrop lets you shoot Finder files to nearby Macs, iPhones, and iPads—wirelessly, without having to fuss with passwords, file sharing, mounting disks, and so on.
In the Finder, right-click (or two-finger click) the file icon (or icons) that you want to send to another Mac. From the shortcut menu, choose AirDrop. In a flash, you get the AirDrop share sheet shown in Figure 6-15, lower right. It lists every nearby Mac, iPhone, or iPad. Click the one you want, and then click Send; if the other guy clicks Accept, then the file is on its way to his Apple gadget.
Vimeo. When you select a video (in the Finder, for example), you have the option of posting it to Vimeo, which is a lot like YouTube but smaller and with a more mature tone. You’re asked for a name, description, and tags (keywords) for your video, and you’re given the option to keep it private (rather than public). When you click Send, the movie goes on its way. After the upload, a tiny status box appears, showing you the link that takes you to the newly posted video; click the
 to jump to it in your Web browser.
Figure 6-15. Top: Here’s how you might tweet a link to a page from Safari. Choose Twitter from the
button; type a comment; click Post. Bottom: Other share sheets you might encounter. Lower left: posting a photo to Facebook. (Note the tiny pop-up menus. One lets you control who sees this post; the other specifies where it goes—which album, for example.) Lower right: sending a file using AirDrop. Keyboard fans: For Twitter or Facebook, press Shift-⌘-D to “click” the Send or Post button.Flickr. You can post a photo from your Mac directly to this popular photo-sharing site, even from the Finder. You’re asked to provide a title and description for the photos, and then off it goes to your online Flickr account. After the upload, the tiny status box shows you the link.
All the online services mentioned here—Twitter, Facebook, Flickr, Vimeo—require free accounts. And using the Share button assumes that you’ve entered your account name and password in System Preferences→Internet Accounts. Once you’ve recorded your account info there, it’s stored; you can use the corresponding Share options in any program without having to log in again.
This list of options in the Share menu isn’t complete; you may find other oddball options in the Share menus of certain programs. For example, in Photo Booth, you also get choices like Add to iPhoto, Set Buddy Picture, Set Account Picture, or Change Twitter Profile Picture—all handy things to do with a picture you’ve just taken with your Mac’s built-in camera.
New in Yosemite: You get to choose which options appear in your Share menu, and in which order they appear.
For that, you can thank the new pane in System Preferences called Extensions. (One quick way to open it: From the Share menu itself, choose More.) If you click Share Menu in the left-side list, you’re treated to a System Preferences box where you can turn off the Share-menu options you never use. You can also drag items’ names up or down, so that the most useful ones appear at the top of the Share menu from now on. (You’re not allowed to turn off the Big Three: Mail, Messages, and AirDrop.) For more on Extensions, see Scheduled Startup and Shutdown.