To set up Boot Camp, you need the proper ingredients:
A copy of Windows 7 or later. OS X requires the Home Premium, Pro, or Ultimate editions of Windows 7—or any version of Windows 8 or 8.1. In all cases, it has to be the 64-bit version of Windows, and it has to be a full installation copy—not an upgrade version.
A DVD copy of Windows is fine—if your Mac has a DVD drive. Since it probably doesn’t, you need an electronic copy of Windows, which you can download as a simulated disk called an ISO disk image. (You can also make an ISO out of a DVD copy of Windows—for example, at a friend’s house. A friend with a DVD drive.)
At least 10 gigs of free hard drive space on your built-in hard drive, or a second internal drive. (You can’t install Windows on an external drive using Boot Camp.)
The keyboard and mouse that came with your Mac. You can also use a generic USB keyboard and mouse; what you can’t use is a non-Apple cordless keyboard and mouse.
A USB flash drive or USB hard drive. You have to use Disk Utility (Disk Utility) to format it using the MS-DOS (FAT) formatting scheme. This drive will hold the drivers your Mac needs once it’s running in Windows. So let’s call this the “drivers drive.”
A DVD drive, or a second USB flash drive. If you have Windows on a disc, then of course you also need a DVD drive for your Mac. If you plan to use the ISO disk image version of Windows, you need a second USB flash drive (8 gigabytes or bigger) to hold the Windows image. Let’s call this one the “Windows flash drive.”
At least 30 gigabytes of free space on your Mac’s internal hard drive. Windows is not svelte.
Before you begin, Apple strongly recommends that you back up your Mac, make sure it’s running the latest version of Yosemite, and ensure that you have the latest version of Boot Camp (visit www.apple.com/support/bootcamp). If you’re using a laptop, plug it in for the surgery.
To begin, connect the drivers drive to your Mac.
Open your Applications→Utilities folder. Inside, open the program called Boot Camp Assistant.
Click Continue. You arrive at the Select Tasks screen (Figure 8-1), where you have three options:
Create a Windows 7 or later install disk. This checkbox means “Use the ISO image of Windows, because I don’t have a DVD drive.” When you click Continue, Boot Camp Assistant will copy the ISO image to your Windows flash drive.
If you plan to install Windows from its DVD, on the other hand, you can leave this off (if, indeed the option appears at all).
Download the latest Windows support software from Apple. One of Boot Camp’s primary jobs is to teach Windows to recognize and operate all your Mac’s hardware components: keyboard, trackpad, camera, WiFi, and so on. And, as you may know, Windows does that by requiring an installed driver (software nugget) for each one of these components. Well, guess what? Out of the box, Windows does not know about any Apple hardware elements. Surprise, surprise.
So your first job is to create an installation disk that contains these drivers. That’s the purpose of the drivers drive.
Install Windows 7 or later version. This option will guide you through partitioning (subdividing) your hard drive, and installing Windows onto one of the partitions.

Once you click Continue, the Mac downloads the Windows drivers it will need; allow 10 or 20 minutes, depending on your Internet speed.
When those setup tasks are complete, Boot Camp Assistant now asks you to partition, or subdivide, your hard drive. You’re setting aside a certain amount of space that will hold your copy of Windows and all the PC software you decide to install. This partitioning process doesn’t involve erasing your whole hard drive; all your stuff is perfectly safe. (You can’t install Boot Camp if your hard drive is already partitioned—except for OS X’s own Recovery partition, of course.)
The dialog box offers a Divide Equally button, but it also lets you drag a space-divider handle to divide up your drive space between the Mac and Windows sides; see Figure 8-2.
Note
Most people choose to dedicate a swath of the main internal hard drive to the Windows partition. But if you have a second internal hard drive, you can also choose one of these options: “Create a Second Partition” (the Boot Camp Assistant carves out a Windows partition from that drive) and “Erase Disk and Create a Single Partition for Windows” (just what it says).
When you click Install, you’re in for another 10 or 20 minutes of waiting, as your Mac subdivides your main hard drive.
Now your Mac restarts. At this point, Apple steps back and Microsoft takes charge; the usual Windows installation process gets under way.
Begin by choosing your preferred language, time and currency formats, and text-input method. Click Next.
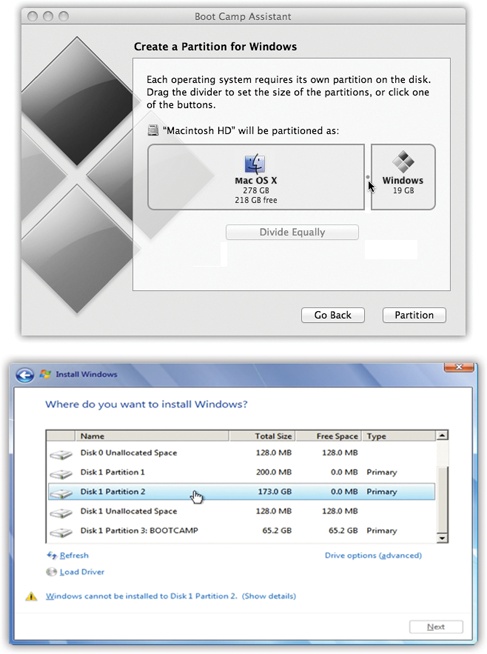
Figure 8-2. Top: How much hard drive space do you want to dedicate to your “PC”? It’s not an idle question; whatever you give Windows is no longer available for your Mac. Apple recommends that for Windows 8 or 8.1, the Windows partition should be at least 30 gigabytes. Drag the handle between the Mac and Windows sides of this diagram. Bottom: Choose the partition called “Disk 1 Partition 3 BOOTCAMP.” (The number may be different, but it will say “BOOTCAMP.”) Then click “Drive options (advanced),” click Format, click OK, and finally click Next. Your Windows partition is now formatted (it uses the NTFS formatting scheme, if anybody asks).
On the next screen, click Install Now. After some more waiting, you’re asked to enter your Windows serial number (product key), and then agree to whatever Microsoft’s lawyers say.
Now comes the only even remotely tricky part: At this point, Microsoft’s installer asks which partition you want to put Windows on. It’s really important to pick the right one. Play your cards wrong, and you could erase your whole Mac partition.
See Figure 8-2, bottom, for guidance.
Now your Mac looks just like a PC that’s having Windows installed. Be patient; sit around for half an hour as the Windows installer flits about, restarts, does what it has to do.
When it’s all over, a crazy, disorienting sight presents itself: your Mac, running Windows. There’s no trace of the desktop, Dock, or  menu; it’s Windows now, baby.
Walk through the Windows setup screens, creating an account, setting the time, and so on.
At this point, your Mac is actually a true Windows PC. You can install and run Windows programs, utilities, and even games; you’ll discover that they run really fast and well.
But as Windows veterans know, every hardware feature of Windows requires a driver—a piece of software that tells the machine how to communicate with its own monitor, networking card, speakers, and so on. And it probably goes without saying that Windows doesn’t include any drivers for Apple’s hardware components.
That’s why, at this point, you need the drivers drive you created earlier. It contains all the drivers for the Mac’s graphics card, Ethernet and WiFi networking, audio input and output, built-in camera, brightness and volume keys,  key, multitouch trackpad gestures, and Bluetooth transmitter. (It also installs a new Control Panel icon and system tray pop-up menu.)
When you insert this disc or flash drive, the drivers installer opens and begins work automatically. (If it doesn’t, double-click the setup.exe file in the WindowsSupport or Boot Camp folder.)
Click past the Welcome and License Agreement screens, and then click Install. You’ll see a lot of dialog boxes come and go; just leave it alone. Don’t click any Cancel buttons. If you get a complaint that the software hasn’t passed Windows Logo testing, click Continue Anyway.
Tip
If the installation seems to stall, Windows may be waiting for you to click OK or Next in a window that’s hidden behind other windows. Inspect the taskbar and look behind open windows.
When it’s all over, a dialog box asks you to restart the computer; click Restart. When the machine comes to, it’s a much more functional Windows Mac. (And it has an online Boot Camp Help window waiting for you on the screen.)
Note
Once you’re running Windows, you might wonder: How am I supposed to right-click? I don’t have a two-button mouse or two-button trackpad!
Yes, you do. See The Complicated Story of the Function Keys for a panoply of options.
From now on, your main interaction with Boot Camp will be telling it what kind of computer you want your Mac to be today: a Windows machine or a Mac.
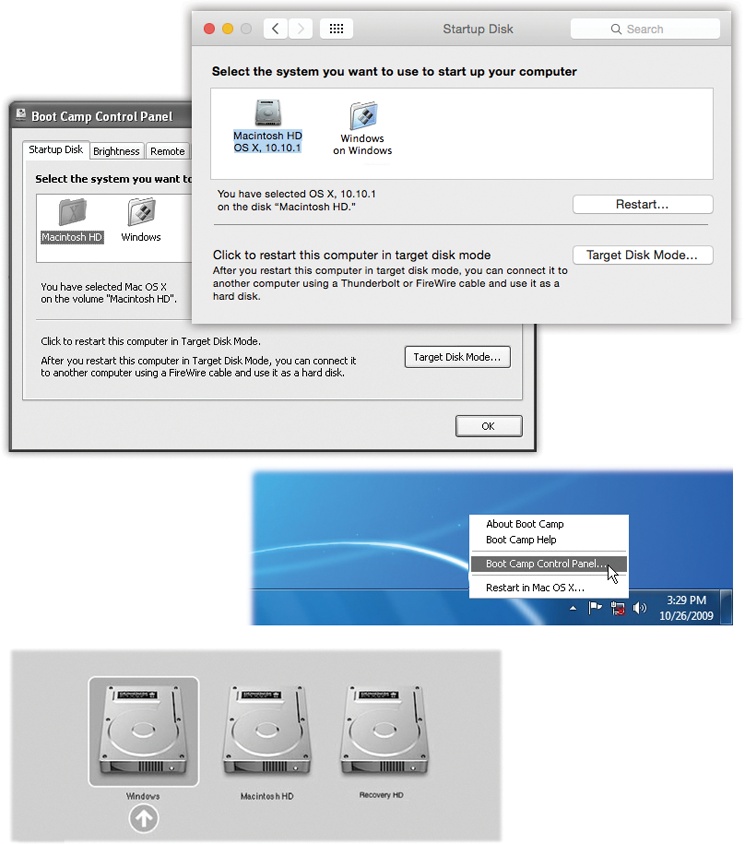
Figure 8-3. Top: To choose your preferred operating system—the one that always starts up unless you intervene—choose →System Preferences. Click Startup Disk, and then click the icon for either OS X or Windows. Next, either click Restart (if you want to switch right now) or close the panel. The identical controls are available when you’re running Windows, thanks to the new Boot Camp Control Panel. Middle: To open the Boot Camp control panel, choose its name from its icon in the Windows system tray. Bottom: This display, known as the Startup Manager, appears when you press Option during startup. It displays all the disk icons or partitions that contain bootable operating systems. Click the one you want, and then click the up-arrow button.
Presumably, though, you’ll prefer one operating system most of the time. Figure 8-3 (top and middle) shows how you specify your favorite.
Tip
If you’re running Windows and you just want to get back to OS X right now, you don’t have to bother with all the steps shown in Figure 8-3. Instead, click the Boot Camp system-tray icon and, from the shortcut menu, choose Restart in OS X.
From now on, each time you turn on the Mac, it starts up in the operating system you’ve selected.
If you ever need to switch—when you need Windows just for one quick job, for example—press the Option key as the Mac is starting up. You’ll see something like the icons shown in Figure 8-3 (bottom).
Now, if you really want to learn about Windows, you need Windows 7: The Missing Manual or Windows 8.1: The Missing Manual.
But suggesting that you go buy another book would be tacky. So here’s just enough to get by.
First of all, a Mac keyboard and a Windows keyboard aren’t the same. Each has keys that would strike the other as extremely goofy. Still, you can trigger almost any keystroke Windows is expecting by substituting special Apple keystrokes, like this:
Windows keystroke | Apple keystroke |
|---|---|
Ctrl+Alt+Delete | Control-Option-Delete |
Alt | Option |
⌘ | |
Backspace | Delete |
Delete (forward delete) | |
Enter | Return |
Num lock | Clear (laptops: fn-F6) |
Print Screen | F14 (laptops: fn-F11) |
Print active window | Option-F14 (laptops: Option-fn-F11) |


The keyboard shortcuts in your programs are mostly the same as on the Mac, but you have to substitute the Ctrl key for the ⌘ key. So in Windows programs, Copy, Save, and Print are Ctrl+C, Ctrl+S, and Ctrl+P.
Similarly, the Alt key is the Windows equivalent of the Option key.
Tip
You know that awesome two-finger scrolling trick on Mac laptops? It works when you’re running Windows, too.
If you really want to understand how your Mac keyboard corresponds to your old PC keyboard, don’t miss Apple’s thrilling document on the subject at http://support.apple.com/kb/HT1167.
When you’ve started up in one operating system, it’s easy to access documents that “belong” to the other one. For example:
When you’re running OS X, you can get to the documents you created while you were running Windows, which is a huge convenience. Just double-click the Windows disk icon (called NO NAME or Untitled), and then navigate to the Documents and Settings→[your account name]→My Documents (or Desktop).
You can only copy files to the Mac side, or open them without the ability to edit them.
When you’re running Windows, you can get to your Mac documents, too. Click Start→Computer. In the resulting window, you’ll see an icon representing your Mac’s hard drive partition. Open it up.
You can see and open these files. But if you want to edit them, you have to copy them to your Windows world first—onto the desktop, for example, or into a folder. (The Mac partition is “read-only” in this way, Apple says, to avoid the possibility that your Mac stuff could get contaminated by Windows viruses.)
Tip
If you did want to edit Mac files from within Windows, one solution is to buy a $50 program called MacDrive (www.mediafour.com). Another solution: Use a disk that both OS X and Windows “see,” and keep your shared files on that. A flash drive works beautifully for this. So does a shared drive on the network.