The Accessibility panel (formerly Universal Access) is designed for people who type with one hand, find it difficult to use a mouse, or have trouble seeing or hearing. Accessibility is a huge focus for Apple. In fact, there’s a whole Apple Web site dedicated to explaining all these features: www.apple.com/accessibility. Here, though, is an overview of the noteworthiest features, broken down according to the tabs at the left side.
If you have trouble seeing the screen, then, boy, does OS X have features for you.
Invert colors swaps the colors of the screen, so that text appears white on black—an effect that some people find easier to read. (This option also freaks out many Mac fans who turn it on by mistake. They think the Mac’s expensive monitor has just gone loco. Now you know better.)
Use grayscale banishes all color from your screen. This is another feature designed to improve text clarity, but it’s also a dandy way to see how a color document will look when printed on a monochrome laser printer.
Differentiate without color is intended for color-blind people, but it’s fairly pointless. The only thing it affects is the “unavailable” status indicators (like “Away” and “Out to lunch”) in Messages. They’re denoted by red squares instead of circles.
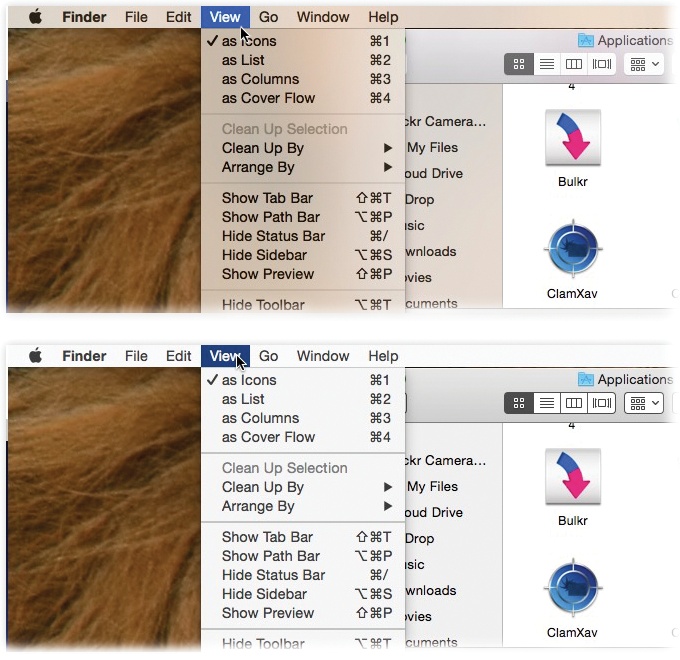
Figure 9-3. When you turn on “Reduce transparency,” those semi-transparent menu bars, window edges, and panels (top) become opaque (bottom). The translucence is a trademark feature of Yosemite, but it doesn’t actually help you use the Mac; plenty of people find opaque menus and windows less visually confusing.
Increase contrast (Figure 9-3) affects two aspects of Yosemite’s design. First, it darkens the lines that form buttons, sliders, and checkboxes on the screen, making them easier to distinguish. Second, it turns on the next checkbox, Reduce transparency.
Reduce transparency eliminates all of Yosemite’s translucency; see Figure 9-3.
Display contrast. As you drag this slider toward Maximum, OS X’s gray shades gradually bleach out, becoming closer and closer to pure black and white, which may be easier to see if you have limited vision.
The Cursor size slider is a godsend not only to people with failing vision, but also to anyone using one of Apple’s large, super-high-resolution screens; as the pixel density increases, the arrow cursor gets smaller and smaller. This slider lets you make the arrow cursor larger—much larger, if you like—making it much easier to see.
This feature, shown in Figure 9-4, lets you enlarge the area surrounding your cursor in any increment. It’s incredibly useful incredibly often, especially if you have over-40 eyes.
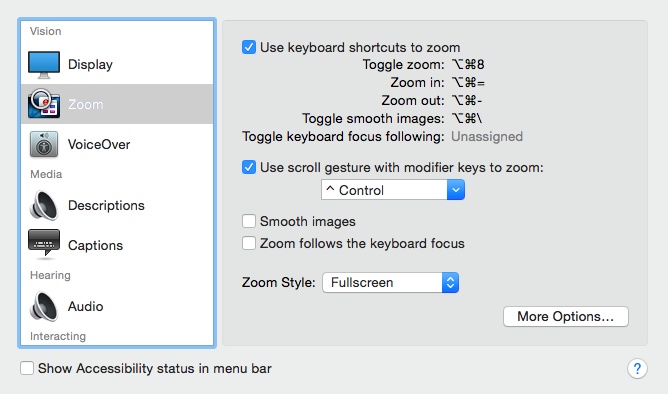
Figure 9-4. You’ll be amazed at how much you can zoom using this Accessibility pane. In fact, there’s nothing to stop you from zooming in so far that a single pixel nearly fills the entire monitor. (That may not be especially useful for people with limited vision, but it can be handy for graphic designers learning how to reproduce a certain icon, dot by dot.)
You can start enlarging things in either of two ways:
From the keyboard. To set this up, turn on “Use keyboard shortcuts to zoom.”
With the trackpad or mouse wheel. To prepare, turn on “Use scroll gesture with modifier keys to zoom.”
In either case, nothing visible has happened yet.
Now look at the Zoom Style control. If it’s set to Fullscreen, then zooming magnifies the entire screen. (And that, as many Apple Genius Bar employees can tell you, freaks out a lot of people who don’t know what’s happened.) If it’s set to Picture-in-picture, then zooming will produce a movable rectangular magnifying lens (Figure 9-5).
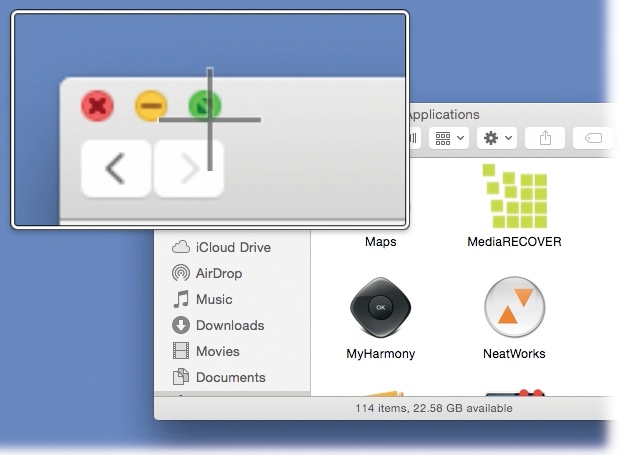
Figure 9-5. This inset window makes it easier for you to keep your bearings. It zooms into the screen only within this inset window.
All right; you’re ready to zoom. Next time you need to magnify things, do this:
From the keyboard. Press Option-⌘-8. You’ve either opened up the magnifying lens or magnified the entire screen. The magnification is 200 percent of original size. At this point, you can increase or decrease the amount of zooming by pressing Option-⌘-plus (the = key) or Option-⌘-minus (the - key). With each press, the entire screen image gets larger or smaller, creating a virtual monitor that follows your cursor around the screen.
Using the trackpad or mouse wheel. While pressing the Control key, drag two fingers up your trackpad, or turn your mouse wheel upward. The amount of dragging or turning controls the degree of magnification.
Once you’re zoomed in, you can pan around inside the lens (or pan the entire virtual giant screen) by dragging with two fingers on your trackpad. The lens moves to follow your cursor; in Picture-in-picture mode, the whole screen scrolls when your cursor hits the edge of the magnified area.
Or, if you turn on “Zoom follows the keyboard focus,” then the area of magnification jumps when you press the Tab key to highlight different areas of whatever program you’re using.
You have a huge array of customization options. For example, you can substitute the Option or ⌘ key, if Control isn’t working out for you. And you can turn on a pixel-smoothing feature that adds a certain blurriness to the zoomed-in image (“Smooth images”).
If you click More Options, you find yet another raft of choices. What you see here depends on whether you’ve chosen Fullscreen or Picture-in-picture zoom mode. In Fullscreen, you get choices like these:
Maximum Zoom, Minimum Zoom. Turns out that pressing Option-⌘-8 isn’t the only way to turn on zooming. These sliders establish starting points for two other magnification keystrokes: a large zoom that you’ll get when you press Option-⌘-plus, and a smaller degree of zoom when you press Option-⌘-minus. (At either point, you can adjust the zoom in either direction by pressing Option-⌘-plus or Option-⌘-minus again.)
Show preview rectangle when zoomed out. If you turn this option on, a black rectangle appears on the screen at all times when you haven’t magnified the screen. It shows you what part of the screen image will fill your monitor when you press the “zoom-in” keystroke, Option-⌘-8. (This rectangle appears only if you’ve changed the Maximum Zoom slider to something larger than 1x.)
When zoomed in… specifies how you want to scroll around within your zoomed-in screen image. The first setting, “Continuously with pointer,” is actually pretty frustrating; the whole screen shifts around whenever you move the cursor. (“So the pointer is at or near the center of the screen” is very similar.) “Only when the pointer reaches an edge” is a lot less annoying and lets you use the cursor (to click buttons, for example) without sending the entire screen image darting away from you.
When Picture-in-picture is turned on, the More Options are different. They offer these choices:
Magnification. Use this slider to specify the initial amount of zoom. (You can always zoom in more or less by pressing Option-⌘-plus or Option-⌘-minus.)
Window position. If you choose Stationary, then the lens remains parked on the screen. You can’t move or resize it—at least not once you’ve left the Options dialog box.
Tip
You can change its size and position for good, though, by clicking Adjust Size and Location in the corner of the Options dialog box. You’ll be offered the chance to drag the little inset window (Figure 9-5) to move it, or drag its edges to change its shape. When you like the result, click OK.
“Follow mouse cursor” makes the inset window follow your cursor around, as though you’re moving a high-tech magnifying glass over a map. And if you choose “Tiled along edge,” then the lens becomes much bigger—in fact, it becomes an enormous rectangular swath at the left side of your screen. The image scrolls as you move your cursor around.
Cursor style. Within the magnification lens, your cursor can look like it always does, or it can take on the look of a big crosshairs (
 ) for more precision.
Invert colors turns your screen into a color negative: black is white, blue is yellow, and so on—within the magnification “lens,” for greater clarity.
Enable temporary zoom. This one’s great. It means that at any time, in any program, you can summon the magnified lens at your cursor location by holding down your Control and Option keys together. (It works only if Zoom is turned on.) It’s a great way to dip into a magnified view of something on your screen, briefly.
Speak items under mouse after delay. Just what it says. Use the slider to adjust the pause before the Mac speaks aloud whatever text your mouse rests on.
VoiceOver makes the Mac read out loud every bit of text that’s on the screen. See VoiceOver.
This new option, “Play video descriptions when available,” is for Internet movies that come, or may someday come, with a narration track that describes the action for the blind.
This option controls the look of subtitles in movies, TV shows, videos, and podcasts you’ve bought, rented, or streamed from Apple. (Subtitles are an option in iTunes, QuickTime, and DVD Player.)
When you first click Captions, you can see that Apple has supplied you with three different caption styles—Default, Classic, and Large Text; each has its own font, color, and background color. If you click the button, though, you can whip up a new subtitle style to your own taste; you get an insane number of font, size, opacity, and color options.
A few videos have been subtitled specifically for deaf people. Those subtitles, called closed captioning or SDH (Subtitles for the Deaf and Hard of Hearing), are the same thing as regular subtitles, except that they also identify nonspoken sounds (“Glass breaking”) and who’s speaking (“Captain Picard: Engage!”). If you’d prefer to see these SDH captions instead of the regular ones, turn on “Prefer Closed Captions and SDH.”
If you have trouble hearing the Mac’s sounds, the obvious solution is to increase the volume, which is why this panel offers a link to the Sound Preferences pane.
Audio is especially important when the Mac tries to get your attention by beeping. For those situations, turn on “Flash the screen when an alert sound occurs” (an effect you can try out by clicking the Test Flash Screen button). Now you’ll see a white flash across the entire monitor whenever the Mac would otherwise beep—not a bad idea on laptops, actually, so that you don’t miss beeps when you’ve got the speakers muted.
The “Play stereo audio as mono” option is intended for people with hearing loss in one ear. This way, you won’t miss any of the musical mix just because you’re listening through only one headphone.
This panel offers two clever features designed to help people who have trouble using the keyboard.
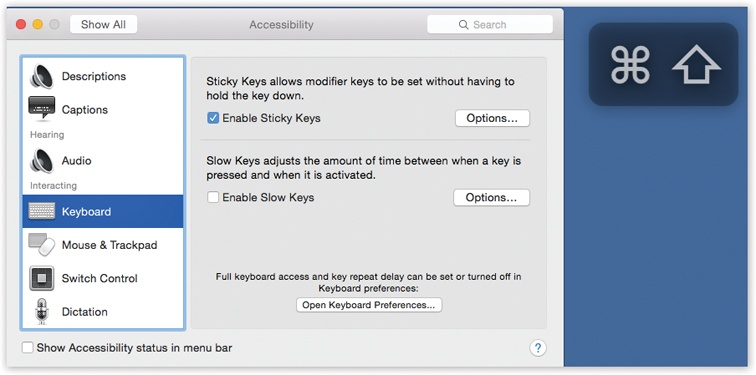
Sticky Keys lets you press multiple-key shortcuts (involving keys like Shift, Option, Control, and ⌘) one at a time instead of all together.
To make Sticky Keys work, first turn on Enable Sticky Keys. Then go to work on the Mac, triggering keyboard commands as shown in Figure 9-6.
If you press a modifier key twice, meanwhile, you lock it down. (Its onscreen symbol gets brighter to let you know.) When a key is locked, you can use it for several commands in a row. For example, if a folder icon is highlighted, you could double-press ⌘ to lock it down—and then type O (to open the folder), look around, and then press W (to close the window). Press the ⌘ key a third time to “un-press” it.
Tip
The checkbox called “Press the Shift key five times to turn Sticky Keys on or off” (click Options to see it) gives you the flexibility of turning Sticky Keys on and off at will, without even taking a trip to System Preferences. Whenever you want to turn on Sticky Keys, press the Shift key five times in succession. You’ll hear a special clacking sound effect alerting you that you just turned on Sticky Keys. (Repeat the five presses to turn Sticky Keys off again.)
Slow Keys, on the other hand, doesn’t register a key press at all until you’ve held down the key for more than a second or so—a feature designed to screen out accidental key presses.
If you click Options and then turn on “Use click key sounds,” you’ll hear a little typing sound each time you press a key—but none of these key presses registers unless you hold the key down for a moment. (Use the Acceptance Delay slider to govern this threshold.)
You hear a different sound when the Mac actually accepts the key press—and, of course, you see the letter you typed appear onscreen.
Mouse Keys is designed to help people who can’t use the mouse—or who want more precision when they can. It lets you click, drag, and otherwise manipulate the cursor by pressing the keys on your numeric keypad. (It’s not very useful on keyboards that don’t have separate numeric keypads, like laptops.)
When Mouse Keys is turned on, the 5 key acts as the clicker—hold it down for a moment to “click the mouse,” do that twice to double-click, and so on. Hold down the 0 key to lock down the mouse button, and the period key to unlock it. (The amount of time you have to hold them down depends on how you’ve set the Initial Delay slider.)
Move the cursor around the screen by pressing the eight keys that surround the 5 key. (For example, hold down the 9 key to move the cursor diagonally up and to the right.) If you hold one of these keys down continuously, the cursor, after a pause, begins to move smoothly in that direction—according to the way you’ve adjusted the sliders called Initial Delay and Maximum Speed.
Tip
The checkbox, in Options, called “Press the Option key five times to turn Mouse Keys on or off” saves you the trouble of opening System Preferences.
If you do have a trackpad, you can find some happy surprises hiding behind the Trackpad Options button. Here you can adjust your Mac’s response when you scroll by dragging across the trackpad—do things keep scrolling a little after you lift your finger (“inertia”)?
You can also enable trackpad dragging, which means moving things across the screen without having to keep the trackpad button down. To drag, tap twice (don’t fully click); leave your finger touching the trackpad on the second tap. At this point, your “mouse button” is down. Swipe across the trackpad to move the object. (If “with Drag Lock” is turned on, then the “mouse button” remains down until you repeat the double-tap business. In “without Drag Lock” mode, one tap ends the dragging.)
Apple has also made the Mac available to people whose physical skills are limited to very simple gestures, like puffing on an air pipe, pressing a foot switch, blinking an eye, or turning the head, for example. A hardware accessory called a switch lets you operate certain gadgets this way.
When you turn on Enable Switch Control, you’re asked to authenticate; a row of icons then appears on a floating bar. More importantly, the Mac sequentially highlights one object on the screen after another; you’re supposed to puff, tap, or blink at the right moment to say, “Yes, this one.”
If you don’t have a physical switch apparatus, you can use the one that came with your keyboard: the space bar (the factory setting). Each time the Mac is highlighting the button, control, or key you want, tap the space bar.
You can specify how fast the sequential highlighting proceeds, whether or not it pauses on the screen’s first item, how many times the highlighting cycles through each screenful, and so on.
For details on adding your own switch and customizing how it works, read http://support.apple.com/kb/PH18393.
Confusingly enough, OS X offers two different features called Dictation. One of them is text-to-speech—where the Mac types what you’re saying. That feature is described on Dictation.
This Dictation feature, new in Yosemite, lets you control the Mac by speaking commands. Yosemite understands dozens of commands for selecting and formatting text, navigating and editing documents, and operating the Mac itself (quitting apps, searching with Spotlight, opening documents, and so on). You can create your own commands, too.
To make all this work, you have to turn on Enhanced Dictation. That feature is primarily designed to let you speak-to-type without an Internet connection (Enhanced Dictation); but as a handy side effect, it also makes possible the new speak-commands feature. If Enhanced Dictation isn’t already turned on, the Mac lets you know (“Enhanced Dictation must be enabled”) and offers you a button that lets you go turn it on (“Open Dictation & Speech Preferences”).
Once that’s done, you’re ready to speak some commands. To make the Mac start listening, tap the fn key twice. (You can change that keystroke if you like; see Redefining a Keystroke.)
The “listening” button appears, as shown at left in Figure 9-7. Say, “Show commands” to open a list of commands you can say (Figure 9-7, right).
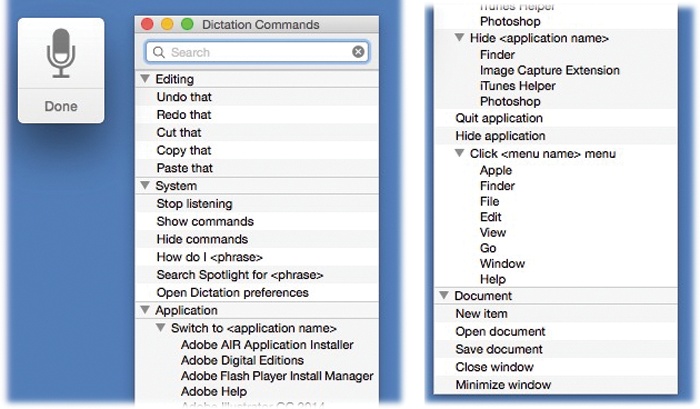
Figure 9-7. The list of commands (shown here split because it’s so tall) changes according to the app you’re using, but here are some typical examples: “Select previous sentence.” “Bold that.” “Go to the beginning.” “Press Escape key.” “Undo that.” “Uppercase that.” “Insert date.” “Search Spotlight for ‘salary estimates.’”
If you’ve turned on “Enable advanced commands” (there’s no reason not to), you open up another batch of possibilities. Now you can control programs and documents, too, with commands like these: “Switch to Safari.” “Quit Calendar.” “Click File menu.” “Save document.” “Close window.”
You may discover that you’re triggering some commands accidentally. In that case, you can turn off a command in the list (in System Preferences→Accessibility→Dictation). Click the command, and then click the – button below it.
The button is there so that you can add to the list of commands the Mac recognizes.
When you click , you’re offered three boxes to fill in:
When I say. Type what you’re going to say to trigger this command. It has to include at least two words; otherwise, the Mac might think you’re speaking text you want typed out. Don’t use proper names and words that the Mac might confuse with similar-sounding ones.
While using. Specify which program you want this command to work in (or leave it set to Any Application).
Perform. From this pop-up menu, specify what you want the Mac to do. It can open a file, open an app, run an Automator workflow, paste a certain blob of text, or “press” a certain keystroke.
For example, suppose you want to create a command that types out your mailing address when you’re composing email. In the “When I say” box, type “Paste my address.” In the “While using,” choose Mail. From the Perform pop-up menu, choose Paste Text; then type your mailing address into the text box.
When you click Done, your new command is ready to use, and it appears at the top of the command list at left.
Speaking to control your Mac doesn’t quite have the flexibility or accuracy of, say, the computer in Star Trek. Then again, the Mac’s spoken-command feature can save you time, is easy to set up and use, and has the distinct advantage of not being fictional.