The previous pages have described setting up a Mac so people at other computers can access its files. There’s an easy, limited way (use the Public folder) and a more elaborate way (turn on sharing settings for each folder individually).
Now comes the payoff to both methods: sitting at another computer and connecting to the one you set up. There are two ways to go about it: You can use the Sidebar, or you can use the older, more flexible Connect to Server command. The following pages cover both methods.
Suppose, then, that you’re seated in front of your Mac, and you want to see the files on another Mac on the network. Proceed like this:
In the Shared category of the Sidebar at the left side of the window, icons for all the computers on the network appear. See Figure 14-9.
Figure 14-9. Macs appear in the Sidebar with whatever names they’ve been given in System Preferences→Sharing. Their tiny icons usually resemble the computers themselves. Other computers (like Windows ones) look like generic PCs.
Tip
The same Sidebar items show up in the Save and Open dialog boxes of your programs, too, making the entire network available to you for opening and saving files.
If you don’t see a certain Mac’s icon here, it might be turned off, it might not be on the network, or it might have File Sharing turned off.
Note
Or it might not have the right file-sharing type turned on. To check, open System Preferences→Sharing; click Sharing, and then Options. You’ll see checkboxes for AFP and SMB; your computers can’t see each other if they don’t have one of these options in common.
If you don’t see any computers at all in the Sidebar, then your computer might not be on the network. Or maybe you’ve turned off the checkboxes for Connected Servers and Bonjour Computers in Finder→Preferences→Sidebar.
Tip
If the other Mac is just asleep, it still shows up in the Sidebar, and you can wake it up to get at it. How is that possible? Through the miracle of the Wake for Network Access feature described on Auto-Wake for Network Access.
If there are a lot of computer icons in the Sidebar, or if you’re on a corporate-style network that has the sub-chunks known as workgroups, you may also see an icon called All. Click it to see the full list of network entities that your Mac can see: not just individual Mac, Windows, and Unix machines, but also any “network neighborhoods” (limbs of your network tree). For example, you may see the names of network zones (clusters of machines, as found in big companies and universities).
Or, if you’re trying to tap into a Windows machine, open the icon representing the workgroup (computer cluster) that contains the machine you want. In small office networks, it’s usually called MSHOME or WORKGROUP. In big corporations, these workgroups can be called almost anything—as long as it’s no more than 15 letters long with no punctuation. (Thanks, Microsoft.)
If you do see icons for workgroups or other network “zones,” double-click until you’re seeing the icons for individual computers.
Note
If you’re a network nerd, you may be interested to note that OS X can “see” servers that use the SMB/CIFS, NFS, FTP, and WebDAV protocols running on OS X Server, Unix, Linux, Novell NetWare, and Windows servers (NT, 2000, XP, Vista, and Windows 7 or 8). But the Sidebar reveals only the shared computers on your subnet (your local, internal office network). (It also shows Back to My Mac if it’s set up; see Variations on Screen Sharing.)
2. Click the computer whose files you want to open.
In the main window, you now see the Public Folder icons for each account holder on that computer: Mom, Dad, Sissy, whatever, as shown in Figure 14-9. (They may have shared other folders with you, too.) If you have an account on the other computer, you’ll see a folder representing your stuff, too. At this point, you’re considered a guest.
Note
This amount of access depends on a setting in System Preferences→Users & Groups. Click the Guest account to see it: “Allow guests to connect to shared folders.” That checkbox is usually turned on—but it’s something to check if you can’t seem to connect.
From here, the remaining instructions diverge, depending on whether you want to access other people’s stuff or your stuff. That’s why there are two alternative versions of step 3 here:
3a. If you want to access the stuff that somebody else has left for you, double-click that person’s Public folder.
Instantly, that folder’s contents appear in the Finder window.
In this situation, you’re only a guest. You don’t have to bother with a password. On the other hand, the only thing you can generally see inside the other person’s account folder is his Public folder.
Tip
Actually, you might see other folders here—if the account holder has specifically shared them and decided that you’re important enough to have access to them.
One thing you’ll find inside the Public folder is the Drop Box folder. This folder exists so that you can give files and folders to the other person. You can drop any of your own icons onto the Drop Box folder—but you can’t open the Drop Box folder to see what other people have put there. It’s one-way, like a mail slot in somebody’s front door.
If you see anything else at all in the Public folder you’ve opened, then it’s stuff the account holder has copied there for the enjoyment of you and your networkmates. You’re not allowed to delete anything from the other person’s Public folder or make changes to anything in it.
You can, however, open those icons, read them, or even copy them to your Mac—and then edit your copies.
Tip
Every now and then, you’ll click the name of a Mac in the Finder Sidebar, hoping to see its contents—and instead of seeing a list of the shared Public folders, you get a Not Connected or Connection Failed message at the top of your window.
In that case, go to the shared Mac and do this: Open System Preferences→Sharing. Click File Sharing, then Options. Turn off “Share files and folders using SMB.” Close System Preferences. Often, that’s all it takes to make your Mac visible and connectable from other Macs on the network. (If not, then try restarting the shared Mac to make the SMB change stick.)
3b. To access your own Home folder on the other Mac, click the Connect As button (Figure 14-10). Sign in as usual.
When the “Connect to the file server” box appears, you’re supposed to specify your account name and password (from the Mac you’re tapping into). This is the same name and password you’d use to log in if you were actually sitting at that machine.
Type your account name (long or short version) and password. And if you didn’t set up a password for your account, leave the password box empty.

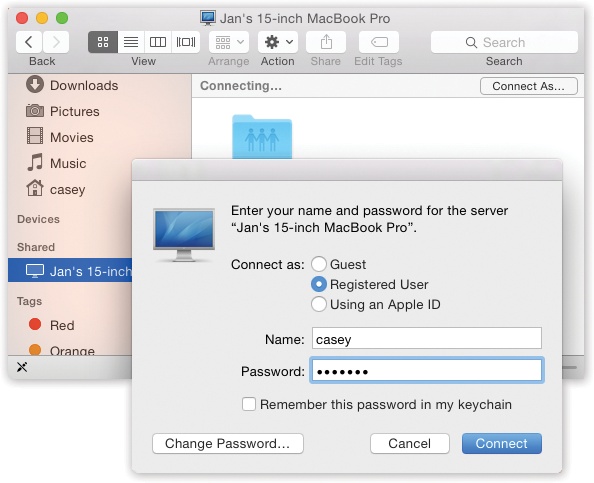
Figure 14-10. You can sign into your account on another Mac on the network (even while somebody else is using that Mac in person). Click Connect As and then enter your name and password. Turn on “Remember this password in my keychain” to speed up the process for next time. The Change Password button lets you change your account password on the other machine. No matter which method you use to connect to a shared folder or disk, its icon shows up in the Sidebar.
Tip
The dialog box shown in Figure 14-10 includes the delightful and timesaving “Remember this password in my keychain” option, which makes the Mac memorize your password for a certain disk so you don’t have to type it—or even see this dialog box—every darned time you connect. (If you have no password, though, the “Remember password” doesn’t work. You’ll have to confront—and press Return to dismiss—the “Connect to the file server” box every time.)
When you click Connect (or press Return), the other Mac’s icon shows up in your Sidebar, and its contents appear in the main window. (The other Mac’s icon may also show up on the desktop, if you’ve turned on the “Connected Servers” option in Finder→Preferences→Sidebar.)
Tip
Once you’ve connected to a Mac using your account, the other Mac has a lock on your identity. You’ll be able to connect to the other Mac over and over again during this same computing session, without ever having to retype your password.
In the meantime, you can double-click icons to open them, make copies of them, and otherwise manipulate them exactly as though they were icons on your own hard drive. Depending on what permissions you’ve been given, you can even edit or trash those files.
Tip
There’s one significant difference between working with “local” icons and working with those that sit elsewhere on the network. When you delete a file from another Mac on the network, either by pressing the Delete key or by dragging it to the Trash, a message appears to let you know that you’re about to delete that item instantly and permanently. It won’t simply land in the Trash “folder,” awaiting the Empty Trash command.
You can even use Spotlight to find files on that networked disk. If the Mac across the network is running Leopard or a later OS X version, in fact, you can search for words inside its files, just as though you were sitting in front of it. If not, you can still search for text in files’ names.
The Sidebar method of connecting to networked folders and disks is practically effortless. It involves nothing more than clicking your way through folders—a skill that, in theory, you already know.
But the Sidebar method has its drawbacks. For example, the Sidebar doesn’t let you type in a disk’s network address. As a result, you can’t access any shared disk on the Internet (an FTP site, for example), or indeed anywhere beyond your local subnet (your own small network).
Fortunately, there’s another way. When you choose Go→Connect to Server, you get the dialog box shown in Figure 14-11. You’re supposed to type in the address of the shared disk you want.
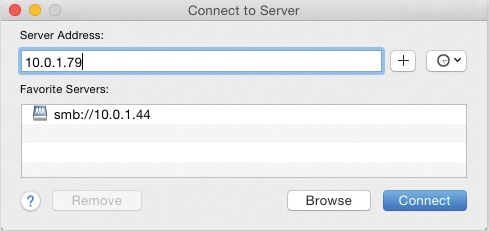
Figure 14-11. The Sidebar method of connecting to shared disks and folders is quick and easy, but it doesn’t let you connect to certain kinds of disks. The Connect to Server method entails plodding through several dialog boxes, but it can find just about every kind of networked disk.
For example, from here you can connect to the following:
Everyday Macs on your network. If you know the IP address of the Mac you’re trying to access (you geek!), you can type nothing but its IP address into the box and then hit Connect. Or you can just type its Bonjour name, something like this: afp://upstairs-PowerMac.local/.
Tip
To find out your Mac’s IP address, open the Network pane of System Preferences. There, near the top, you’ll see a message like this: “WiFi is connected to Tim’s Hotspot and has the IP address 192.168.1.113.” That’s your IP address.
To see your Bonjour address, open the Sharing pane of System Preferences. Click File Sharing. Near the top, you’ll see the computer name with “.local” tacked onto its name—and hyphens instead of spaces—like this: Little-MacBook.local.
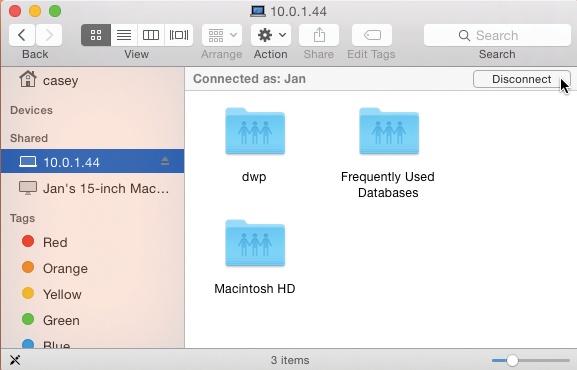
After you enter your account password and choose the shared disk or folder you want, you’re connected exactly as though you had clicked Connect As (Figure 14-10).
The next time you open the Connect to Server dialog box, OS X remembers that address, as a courtesy to you, and shows it pre-entered in the Address field.
Macs across the Internet. If your Mac has a permanent (static) IP address, the computer itself can be a server, to which you can connect from anywhere in the world via the Internet. Details on this procedure are in Chapter 21.
Windows machines. Find out the PC’s IP address or computer name, and then use this format for the address: smb://192.168.1.34 or smb://Cheapo-Dell.
After a moment, you’re asked to enter your Windows account name and password, and then to choose the name of the shared folder you want. When you click OK, the shared folder’s contents appear in the window, ready to use, and the computer’s icon appears in your Sidebar. (More on sharing with Windows PCs later in this chapter.)
NFS servers. If you’re on a network with Unix machines, you can tap into one of their shared directories using this address format: nfs://Machine-Name/pathname, where Machine-Name is the computer’s name or IP address, and pathname is the folder path to the shared item you want.
FTP servers. OS X makes it simple to bring FTP servers onto your screen, too. (These are the drives, out there on the Internet, that store the files used by Web sites.)
In the Connect to Server dialog box, type the FTP address of the server you want, like this: ftp://www.apple.com. If the site’s administrators have permitted anonymous access—the equivalent of a Guest account—that’s all there is to it. A Finder window pops open, revealing the FTP site’s contents.
If you need a password for the FTP site, however, you’re now asked for your name and password.
Tip
You can eliminate that password-dialog-box step by using this address format: ftp://yourname:yourpassword@www.apple.com.
Once you type it and press Return, the FTP server’s icon appears in the Sidebar. Its contents appear, too, ready to open or copy.
WebDAV server. This special Web-based shared disk requires a special address format, something like this: http://Computer-Name/pathname.
In each case, once you click OK, you may be asked for your name and password.
And now, some timesaving features in the Connect to Server box:
Once you’ve typed a disk’s address, you can click
 to add it to the list of server favorites. The next time you want to connect, you can just double-click its name.
The clock-icon pop-up menu lists Recent Servers—computers you’ve accessed recently over the network. If you choose one of them from this pop-up menu, you can skip having to type in an address.
Tip
Like the Sidebar network-browsing method, the Connect to Server command displays each connected computer as an icon in your Sidebar, even within the Open or Save dialog boxes of your programs. You don’t have to burrow through the Sidebar’s Network icon to open files from them, or save files onto them.
When you’re finished using a shared disk or folder, you can disconnect from it as shown in Figure 14-12.
In OS X, you really have to work if you want to know whether other people on the network are accessing your Mac. You have to choose System Preferences→Sharing→File Sharing→Options. There you’ll see something like, “Number of users connected: 1.”
Maybe that’s because there’s nothing to worry about. You certainly have nothing to fear from a security standpoint, since you control what they can see on your Mac. Nor will you experience much computer slowdown as you work, thanks to OS X’s prodigious multitasking features.
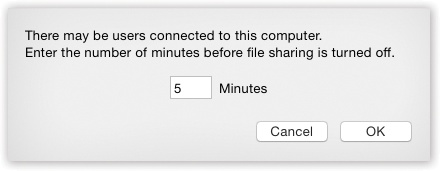
Figure 14-13. This dialog box asks you how much notice you want to give your coworkers that they’re about to be disconnected.
Still, if you’re feeling particularly antisocial, you can slam shut the door to your Mac. Just open System Preferences→Sharing and turn off File Sharing.
If anybody is, in fact, connected to your Mac at the time (from a Mac), you, the door-slammer, get to see the dialog box in Figure 14-13, which sends a little warning message to whomever’s connected to your Mac.
If nobody is connected right now, your Mac instantly becomes an island once again.