For most people, pictures are extremely important data. iCloud takes the worry out of maintaining your collection by making sure they’re backed up and available online.
In System Preferences→iCloud, click Options to see two on/off checkboxes. “My Photo Stream” and “iCloud Photo Sharing” are the master switches for Photo Streams and iCloud Photo Sharing.
Every time a new photo enters your life—when you take a picture with an i-gadget, for example, or import one onto your Mac—it gets added to your Photo Stream. In other words, it appears automatically on all your other iCloud machines. Here’s where to find them:
iPhone, iPad, iPod Touch. Open your Photos app. There it is: a listing called My Photo Stream. It shows the most recent 1,000 photos you’ve taken with any of your other i-gadgets, or that you’ve imported to your computer from a scanner or digital camera (Figure 17-9).
Now, Apple realizes that your i-gadget doesn’t have nearly as much storage available as your Mac; you can’t yet buy an iPad with 750 gigabytes of storage. That’s why, on your iPhone/iPad/iPod, your Photo Stream consists of just the last 1,000 photos. (There’s another limitation, too: The iCloud servers store your photos for 30 days. As long as your gadgets go online at least once a month, they’ll remain current with the Photo Stream.)
Once a photo arrives, you can save it to your Camera Roll, where it’s permanently saved. See Figure 17-9.
On the Mac. In iPhoto, your Photo Stream photos appear in a new album called, of course, Photo Stream. (On a Windows PC, you’d get a Photo Stream folder in your Pictures folder.)
You don’t have to worry about that 30-day, 1,000-photo business. Once pictures appear here, they’re here until you delete them.
This, in its way, is one of the best features in all of iCloudland, because it means you don’t have to sync your iPhone over a USB cable to get your photos onto your computer. It all happens automatically, wirelessly over WiFi.
Figure 17-9. Left: Why, look! It’s photos you imported onto your Mac at home. How’d they get here on the iPhone? iCloud! Middle: To rescue one of these photos from the 1,000-photo rule, open it. Then tap the
 button. Right: Finally, tap Save to Camera Roll (bottom row, center). Now, even after that photo disappears from the Photo Stream, having been displaced by the 1,001st incoming photo, you’ll still have your permanent copy.
Apple TV. When you’re viewing your photos on an Apple TV, a new album appears there called Photo Stream. There they are, ready for showing on the big plasma.

The term “iCloud Photo Sharing,” introduced in 2014, is what used to be called a shared Photo Stream. It lets you send photos or videos to other people’s gadgets. After a party or some other get-together, you could send your best shots to everyone who attended; after a trip, you could post your photographic memories for anyone who might care.
The lucky recipients can post comments about your pix, click a “like” button to indicate their enthusiasm, or even submit pictures and videos of their own. It’s like having a tiny Instagram network of your very own, consisting solely of people you invite.
Photo Sharing does have certain requirements:
iPhone, iPad, or iPod Touch with iOS 7 or later. The On switch is in Settings→iCloud→Photos; turn on iCloud Photo Sharing.
A Mac with OS X Mavericks (10.9) or later and iPhoto 9.5 or Aperture 3.5 or later. Open System Preferences→iCloud. Make sure Photos is turned on; click Options and confirm that Photo Sharing is on, too.
A PC with Windows 7 or later. The On switch is in the iCloud Control Panel for Windows (a free download from Apple’s Web site).
An Apple TV (2nd generation) with Software Update 6.0 or later.
Instructions for working with iCloud Photo Sharing—for every kind of computer and handheld gadget—await at http://help.apple.com/icloud/#mmc0cd7e99.
It’s a bit pointless to describe the steps for creating shared albums in iPhoto or Aperture on the Mac, since Apple intends to kill off both programs and replace them with a new one, simply called Photos. But to give you a flavor of the process, here are the steps to share some of your photographic masterpieces with your adoring fans in iPhoto:
Select the photos and videos you want to share. Click
 , then iCloud, then click “New photo stream.”
A dialog box appears, called New Photo Stream. You’re being asked for the email addresses of your lucky audience members.
Specify the invitees.
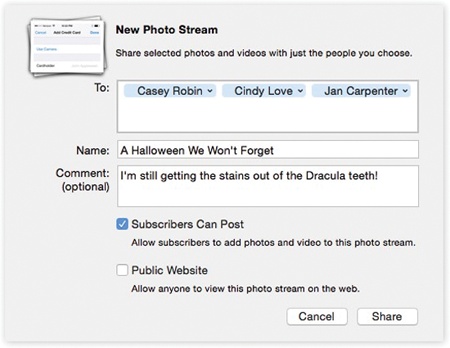
Figure 17-10. If you turn on Subscribers Can Post, your subscribers will be able contribute photos and videos to your album. That’s a fantastic feature for an event where there was a crowd: a wedding, show, concert, picnic, badminton tournament. Now everyone who was there can enhance the gallery with shots taken from their own points of view with their own phones or cameras. And if you turn on Public Website, then even people who aren’t members of the Apple cult will be able to see these photos. The invitees will get an email containing a Web address. It links to a hidden page on the iCloud Web site that contains your published photos.
Enter their addresses in the “To:” box just as you would address an outgoing email. For your convenience, a list of recent sharees appears below the “To:” box.
Also name the stream (“Chris’s Wedding” or whatever). Add a comment, if you like. And see Figure 17-10 for guidance on setting up the checkbox options.
Click Share.
Your Mac gets busy uploading the photos, and your recipients are invited by email to see them.
Later, you can adjust these settings. In iPhoto, click iCloud (in the left-side column); click the icon of your shared album; and then click Info at the bottom of the screen.
If learning the difference between My Photo Stream and iCloud Photo Sharing isn’t hard enough, then hold onto your lens cap. In 2015, Apple will introduce yet another online photo feature: the iCloud Photo Library.
The idea this time is that all your Apple gadgets will keep all your photos and videos backed up online and synced. All your photos and videos are always backed up, and always accessible from any of your gadgets.
Remember, though, your entire iCloud account comes with only 5 gigabytes of free storage. If you start backing up your photo library to it, too, you’ll almost certainly have to pay to expand your iCloud storage.
iCloud Photo Library began life in 2014 as a beta (test) program for iPhones and iPads—but it won’t be available for Macs until the Photos app arrives in 2015.
Tip
Even if you’re using, say, an iPhone to post your iCloud Photo Library, there is a way to see your photos on a Mac: at iCloud.com. You can click Photos to view your photos and videos, no matter what machine you’re using. The Moments and Albums tabs here correspond to the tabs in the phone’s Photos app. Click a photo to open it full size, whereupon the icons at the top of the screen let you delete, download, or “favorite” it.
Apple offers an email address as part of each iCloud account. Of course, you already have an email account. So why bother? The first advantage is the simple address: YourName@me.com. (It may look like what you’ve got is YourName@icloud.com, but mail sent to YourName@me.com comes to exactly the same place. These addresses are aliases of each other.)
Second, me.com addresses are integrated into OS X’s Mail program, as you’ll see in Chapter 18. You can also read your me.com email from any computer anywhere in the world, via the iCloud.com Web site, or on your iPhone/iPod Touch/iPad.
Besides, it’s always great to have a backup account, one you never enter on Web sites so that it never gets overrun with spam. Or vice versa: Let this be your junk account, the address you use for online forms. Either way, it’s great to have a second account.
To make things even sweeter, your me.com or icloud.com mail is completely synced. Delete a message on one gadget, and you’ll find it in the Deleted Mail folder on another. Send a message from your iPhone, and you’ll find it in the Sent Mail folder on your Mac. And so on.
iCloud began life as a synchronization service. It can keep your calendar, address book, reminders, notes, bookmarks, and documents updated and identical on all your gadgets: Mac, PC, iPhone, iPad, iPod Touch. Also your Web passwords and credit card numbers. And all your photos, too, rounded up from all your Apple gadgets.
It’s a huge convenience—almost magical. It’s one of the great payoffs of living within Apple’s ecosystem of gadgets. It offers both a huge convenience factor—all your stuff is always on all your gadgets—and a safety/backup factor, since you have duplicates everywhere.
It works by storing the master copies of your stuff—email, notes, contacts, calendars, Web bookmarks, and documents—on the Web. (Or “in the cloud,” as the product managers would say.)
Whenever your Macs, PCs, or i-gadgets are online—over WiFi or cellular—they connect to the mother ship and update themselves. Edit an address on your iPhone, and shortly thereafter you’ll find the same change in Contacts (on your Mac) and Outlook (on your PC). Send an email reply from your PC at the office, and you’ll find it in your Sent Mail folder on the Mac at home. Add a Web bookmark anywhere and find it everywhere else. Edit a spreadsheet in Numbers on your iPad and find the same numbers updated on your Mac.
Actually, there’s even another place where you can work with your data: on the Web. Using your computer, you can log into www.icloud.com to find Web-based clones of Calendar, Contacts, and Mail.
Figure 17-8 shows the on/off switches for these sync features. They include:
Contacts, Calendars. There’s nothing as exasperating as realizing that the address book you’re consulting on your home Mac is missing somebody you’re sure you entered—on your phone. This option keeps all your address books and calendars synchronized. Delete a phone number on your computer at home, and you’ll find it gone from your phone. Enter an appointment on your iPhone, and you’ll find the calendar updated everywhere else.
Reminders. This option refers to the to-do items you create in the phone’s Reminders app; very shortly, those reminders will show up on your Mac (in Reminders, Calendar, or BusyCal) or PC (in Outlook). How great to make a reminder for yourself in one place and have it reminding you later in another one!
Safari. If a Web site is important enough to merit bookmarking while you’re using your phone, why shouldn’t it also show up in the Bookmarks menu on your desktop PC at home, your Mac laptop, or your iPad? This option syncs your Safari Reading List, too.
Notes. This option syncs the notes from your phone’s Notes app into the Notes app on the Mac, the email program on your PC, your other i-gadgets, and, of course, the iCloud Web site.
Keychain. The iCloud Keychain keeps all your online name/password combinations synchronized across all your Apple machines, so you don’t have to memorize them or even type them as you log into various sites. Credit card numbers, too. See Saved Passwords: The iCloud Keychain.
To set up syncing, turn on the checkboxes for the items you want synced. That’s it. There is no step 2.