To send an email, click  in the toolbar or press ⌘-N. The New Message form, shown in Figure 18-6, opens. Here’s how you go about writing a message:
In the To field, type the recipient’s email address.
If somebody is in your Contacts, type the first couple of letters of the name or email address; Mail automatically completes the address. (If the first guess is wrong, then type another letter or two until Mail revises its guess.)
Tip
If Mail constantly tries to autofill in the address of someone you don’t really communicate with, you can zap that address from its memory by choosing Window→Previous Recipients. Click the undesired address, and then click Remove From List.
As in most dialog boxes, you can jump from blank to blank (from To to Cc, for example) by pressing Tab. To send this message to more than one person, separate the addresses with commas: bob@earthlink.net, billg@microsoft.com, and so on.
Tip
If you send most of your email to addresses within the same organization (like reddelicious@apple.com, grannysmith@apple.com, and winesap@apple.com), Mail can automatically turn all other email addresses red. It’s a feature designed to avoid sending confidential messages to outside addresses.
To turn this feature on, choose Mail→Preferences, click Composing, turn on “Mark addresses not ending with,” and then type the “safe” domain (like apple.com) into the blank.
To send a copy to other recipients, enter their addresses in the Cc field.
Cc stands for carbon copy. Getting an email message where your name is in the Cc line implies: “I sent you a copy because I thought you’d want to know about this correspondence, but I’m not expecting you to reply.”
Tip
If Mail recognizes the address you type into the To or Cc box (because it’s someone in your Contacts, for instance), then the name turns into a shaded, round-ended box button. In addition to looking cool, these buttons sprout a
 when you point to them; when you click there, you get a list of useful commands (including Show Contact Card).
These buttons are also drag-and-droppable. For example, you can drag one from the To field to the Cc field, or from Contacts to Mail.
Type the topic of the message in the Subject field.
It’s courteous to put some thought into the subject line. (Use “Change in plans for next week,” for instance, instead of “Yo.”) On the other hand, don’t put the entire message into the subject line, either.
Specify an email format.
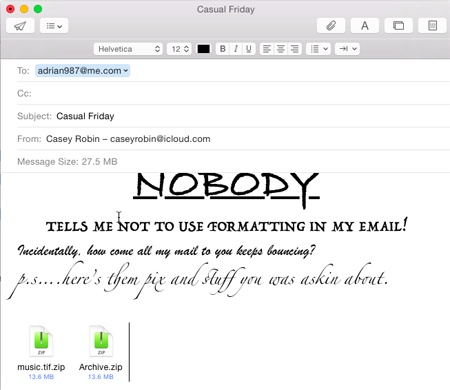
There are two kinds of email: plain text and formatted (which Apple calls Rich Text). Plain text messages are faster to send and open, are universally compatible with the world’s email programs, and are greatly preferred by many veteran computer fans. And even though the message itself is plain, you can still attach pictures and other files. (If you want to get really graphic with your mail, you can also use the Stationery option, which gives you preformatted message templates to drop in pictures, graphics, and text. Flip to Stationery for more on using stationery.)
Resourceful geeks have even learned how to fake some formatting in plain messages: They use capitals or asterisks instead of bold formatting (*man* is he a GEEK!), and pseudo-underlines for emphasis (I _love_ Swiss cheese!).
By contrast, formatted messages sometimes appear without any formatting at all in some email programs.
To control which kind of mail you send on a message-by-message basis, choose from the Format menu either Make Plain Text or Make Rich Text. To change the factory setting for new outgoing messages, choose Mail→Preferences; click the Composing icon; and choose from the Message Format pop-up menu.
(But note: Even if you choose Rich Text, Mail sends a plain text message if you don’t actually use a formatting command—choose a new font, size, or whatever.)
Type your message in the message box.
You can use all standard editing techniques, including dictation, copy and paste, drag-and-drop, and so on. If you selected the Rich Text style of email, you can use word processor–like formatting (Figure 18-6).
As you type, Mail checks your spelling, using a dotted underline to mark questionable words. You can read much more about OS X’s built-in spelling/grammar checker (and typing expander) in Chapter 6.
If you’re composing a long email message, or if it’s one you don’t want to send until later, press ⌘-S or choose File→Save. You’ve just saved the message in your Drafts folder. It’ll still be there the next time you open Mail. To reopen a saved draft later, click the Drafts icon in the mailboxes column and then double-click the message you want to work on.
Click Send
 (or press Shift-⌘-D).
Mail sends the message.
Tip
To resend a message you’ve already sent, click it and then choose Message→Send Again, or press Shift-⌘-D.
If you’d rather have Mail place each message you write in the Outbox folder instead of connecting to the Net when you click Send, choose Mailbox→Take All Accounts Offline. While you’re offline, Mail refrains from trying to connect, which is a great feature when you’re working on a laptop at 39,000 feet and didn’t feel like paying for WiFi. (Choose Mailbox→Take All Accounts Online to reverse the procedure.)
Sending little text messages is fine, but it’s not much help when you want to send somebody a photograph, a sound, or a Word document. To attach a file to a message you’ve written, use one of these methods:
Drag the icons you want to attach directly off the desktop (or out of a folder) into the New Message window. There your attachments appear with their own hyperlinked icons (visible in Figure 18-6), meaning that your recipient can simply click to open them.
UP TO SPEED: Bcc, Reply-To, and Priority
A blind carbon copy is a secret copy. This feature lets you send a copy of a message to somebody secretly, without any of the other recipients knowing that you did so. To view this field when composing a message (if it’s not already visible), choose View→Bcc Address Field.
You can use the Bcc field to quietly signal a third party that a message has been sent. For example, if you send your coworker a message that says, “Chris, it bothers me that you’ve been cheating the customers,” you could Bcc your supervisor to clue her in without getting into trouble with Chris.
The Bcc box is useful in other ways, too. Many people send email messages (corny jokes, for example) to a long list of recipients. You, the recipient, have to scroll through the long list of names the sender placed in the To or Cc field.
But if the sender used the Bcc field to hold all the recipients’ email addresses, you won’t see anybody else’s names at the top of the email. In the To box, you might see the sender’s name, or “undisclosed recipients,” or nothing at all. (Spammers have also learned this trick, which is why it usually looks like you’re the only recipient of a junk message when there are actually millions of other people who received the same message.)
Another hidden field you can add to your messages is Reply-To. (Choose View→Reply-To Address Field.) That field has one simple purpose: to make the recipient’s email program reply to a different email address than the one you sent the message from.
For example, if your business email address isn’t working but you absolutely have to send a field report to your boss, you can send the message from your personal email account but put your business address in the Reply-To field. That way, when your boss emails you back to congratulate you, the email goes to your business account.
Finally, if you click the
 on the left side of an email message, you can enable one more hidden header option: Priority. (It’s the pop-up menu with an exclamation mark in it.) If you turn on the checkbox next to that pop-up menu and click OK, all your email messages let you set how important they are on a three-tiered scale.
The good part about this system is that it lets your recipient see that an email you’ve sent is, for example, urgent. The bad part is that not every email program displays the priority of email—and even if your recipient’s email program does display your message’s priority, there’s no guarantee that it’ll make him respond any faster.
Tip
Exposé was born for this moment. Hit ⌘-F3 to make all open windows flee to the edges of the screen, revealing the desktop. Root around until you find the file you want to send. Begin dragging it; without releasing the mouse, press ⌘-F3 again to bring your message window back into view. Complete your drag into the message window.
Mail makes it look as though you can park the attached file’s icon (or the full image of a graphics file) inside the text of the message, mingled with your typing. Don’t be fooled, however; on the receiving end, all the attachments will be clumped together at the end of the message (unless your recipient also uses Mail or you’ve sent pictures with Stationery).
Drag the icons you want to attach from the desktop onto Mail’s Dock icon. Mail dutifully creates a new outgoing message, with the files already attached.
Click the
 on the New Message toolbar, choose File→Attach Files, or press Shift-⌘-A. The Open File sheet appears so you can find the files you want to include. (You can choose multiple files simultaneously in this dialog box. Just ⌘-click or Shift-click them as though you were selecting them in a Finder window.)
Once you’ve selected them, click Choose File (or press Return). You return to the New Message window, where the attachments’ icons appear, ready to ride along when you send the message.
To remove an attachment, drag across its icon to highlight it, and then press the Delete key. (You can also choose Message→Remove Attachments.)
You’re about to discover what may be one of the best new features in the history of email.
Since the dawn of email, we, the downtrodden masses, have been told over and over again: Don’t attach big files! Anything over about 5 megabytes is too big for most email systems. Best case, your entire message will bounce back to you; worst case, you’ll clog the recipients’ inboxes so that they can’t receive any more mail.
So the world has slogged along with crude workarounds—sites like SendThisFile.com, or services like Dropbox that require signup and software installation.
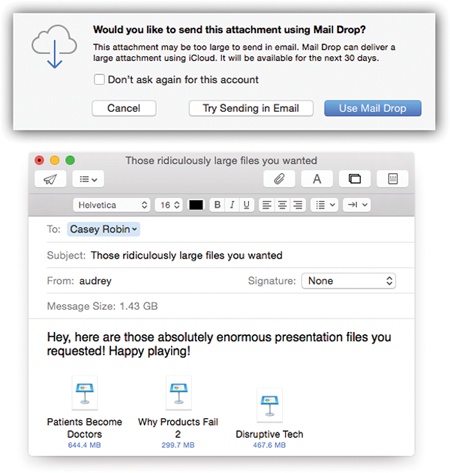
Figure 18-7. There’s no reason not to use Mail Drop. In fact, there’s no reason not to turn on “Don’t ask again for this account,” too. From now on, Mail Drop will work just like magic—invisibly. You can attach a bunch of files to a single message, as long as the grand total is under 5 gigabytes. Their icons show up right in the body of the message.
If you use Mail in OS X, you’ll probably never have to think about the file sizes of your attachments again. Go ahead—attach a whole video. Attach a gigantic Photoshop document, or several, or dozens. Attach a gigantic Keynote or PowerPoint file. Your file-size limit is now 5 gigabytes—about 1,000 times what it used to be.
The first time you attach a big file to an outgoing message and then click Send, Mail offers the message shown in Figure 18-7.
Note
Mail Drop is an iCloud feature. It works only if your Mac is currently signed into your iCloud account. (The files you send don’t count toward your iCloud storage limit, though.)
Behind the scenes, Mail Drop uploads your file to iCloud’s computers, where it sits there for 30 days, waiting for your recipient to get a clue and download it.
If the recipient also has Yosemite Mail, the attachment is quietly auto-downloaded in the background, so that it’s on his Mac already when he opens the message. He’ll click, it’ll open, and he’ll probably never even consider the miracle of what just happened.
If you’re sending to any other computer or mail program, your message contains an indication of the file’s 30-day expiration date, and a “Click to download” link. (Clicking it opens the recipient’s Web browser, where the file begins to download immediately.) It’s one extra step, and a little waiting—but that’s what people get for not drinking the Apple Kool-Aid.
And now, Apple’s entirely reasonable fine print and limits:
Mail Drop allows you to send a maximum of 200 messages a day, or messages to more than 1,000 recipients a day from your iCloud account. A single message sent via iCloud can have a maximum of 100 recipients.
iCloud’s online holding tank for Mail Drop attachments doesn’t hold more than 1 terabyte of files. In other words, once you’ve Mail Dropped that many attachments, you won’t be able to send any more until those files have been downloaded (or 30 days have elapsed on some of them).
Mail Drop is fantastic.
This is the Second Big New Deal in Yosemite Mail: You can now mark up PDF and graphics attachments at the moment of sending them. You can add your signature to a contract, circle a typo on a document, draw arrows on a diagram, and so on.
All this magic awaits in the Markup toolbar—but finding this new toolbar is a bit trickier than all the Yosemite marketing materials would suggest.
First, you have to attach a graphic—a photo, PDF file, or other kind of image—using any of the tricks described on Attaching Files to Messages.
Once the image appears in your outgoing message, click to select it. At that point, the tiny icon appears in its upper-right corner; from it, choose Markup (Figure 18-8).
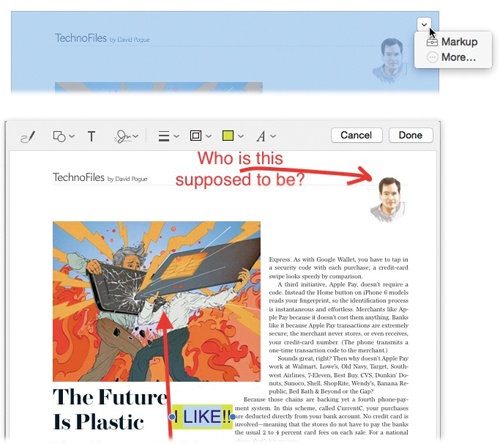
Figure 18-8. Top: This button doesn’t appear until you attach a graphic and then select it. Bottom: The buttons on this toolbar let you draw and type on your image. Don’t miss the  tool, which auto-perfects your attempts to draw lines, circles, and angles.
What you’ll quickly discover is that this entire markup feature is shared, pixel for pixel, with the markup feature in your Preview program. And it’s described in detail on Marking Up, Signing, and Drawing on Attachments.
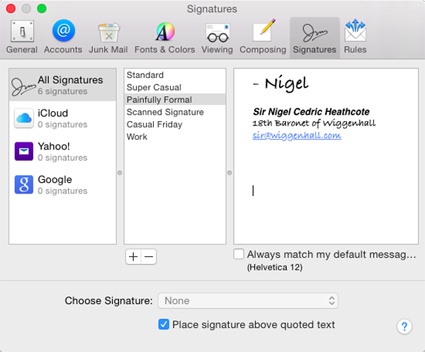
Signatures are bits of text that get stamped at the bottom of your outgoing email messages. A signature might contain a name, a postal address, a pithy quote, or even a scan of your real signature, as shown in Figure 18-9.
You can customize your signatures by choosing Mail→Preferences→Signatures. Here’s what you should know:
To build up a library of signatures that you can use in any of your accounts: Select All Signatures in the leftmost pane, and then click the
 button to add each new signature (Figure 18-9). Give each new signature a name in the middle pane, and then customize the signatures’ text in the rightmost pane.
Tip
If you ever get tired of a signature, you can delete it forever by selecting All Signatures→[your signature’s name], clicking the
 button, and then clicking OK.
Figure 18-9. After naming your signature in the middle pane and typing the text on the right, don’t miss the Format menu, which you can use to dress up your signature with colors and formatting. You can even paste a graphic (like a scan of your handwritten signature) into the box. Click OK. (You can use formatted signatures only when sending Rich Text messages.)
To make a signature available in one of your email accounts: Drag the signature’s name from the middle pane onto the name of the account in the leftmost pane. In other words, you can make certain signatures available to only your work (or personal) account, so you never accidentally end up appending your secret FBI contact signature to the bottom of a birthday invitation you send out.
To assign a particular signature to one account: In the left pane, click an account; pick from the Choose Signature pop-up menu. Each time you compose a message from that account, Mail inserts the signature you selected.
Tip
To make things more interesting for your recipients, pick At Random; Mail selects a different signature each time you send a message. Or, if you’re not that much of a risk-taker, choose In Sequential Order; Mail picks the next signature in order for each new message you write.
Remember that you can always change your signature on a message-by-message basis, using the Signature pop-up menu in any new email message.
To use the signature feature as a prefix in replies: Turn on “Place signature above quoted text.” If you turn on this setting, your signature gets inserted above any text that you’re replying to, rather than below. You’d use this setting if your “signature” said something like, “Hi there! You wrote this to me!”