Mail puts all incoming email into your Inbox; the statistic after the word Inbox lets you know how many messages you haven’t yet read. New messages are also marked with light-blue dots in the main list.
Tip
The Mail icon in the Dock also shows you how many new messages you have waiting; it’s the number in the red circle. In Mail→Preferences→General, you can specify which mailbox it’s tallying up—or have it tally up all of them.
Click the Inbox folder to see a list of received messages. If it’s a long list, press Control-Page Up and Control-Page Down to scroll. (Page Up and Page Down without the Control key scroll the message pane instead.)
Tip
If you ⌘-click more than one mailbox folder, you can combine them (and their total-message counts) into one unified messages list.
Click the name of a message once to read it in the message window, or double-click a message to open it into a separate window. (If a message is already selected, pressing Return also opens its separate window.)
When you click the name of a message in the messages list (or press the  and
and  keys to highlight successive messages in that list), you see the message itself, along with any attachments, in the message pane.
Tip
Instead of reading your mail, you might prefer to have OS X read it to you, as you sit back in your chair and sip a strawberry daiquiri. Highlight the text you want to hear (or choose Edit→Select All), and then choose Edit→Speech→Start Speaking. To stop the insanity, choose Edit→Speech→Stop Speaking.
At the top of a message, you see its header—date, subject, addresses, and some handy buttons that don’t appear until you point to them (Figure 18-11).
Once you’ve viewed a message, you can respond to it, delete it, print it, file it, and so on. The following pages should get you started.

Figure 18-11. If you point to the header without clicking, you get to see the ghosts of four useful buttons: Trash, Reply, Reply All, and Forward.
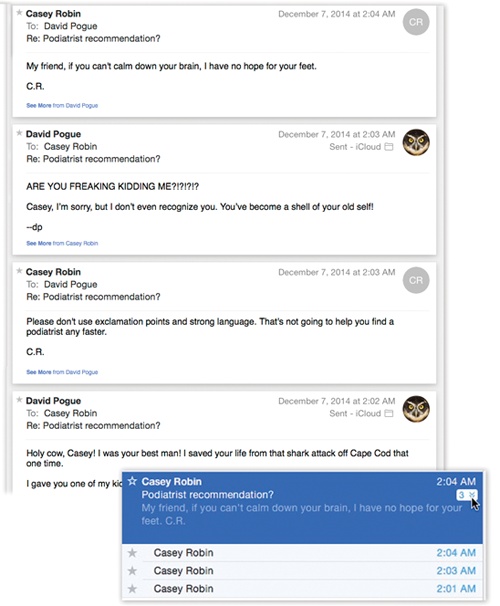
Threading is one of the most useful mail-sorting methods to come along in a long time. It groups all messages that are part of the same back-and-forth conversation as a single item in the main messages list. (In this discussion, let’s call that one item the main message. In Mail, it’s always the most recent message in the conversation.)
Less sophisticated email programs figure out which messages go together by matching only their subject lines. But Mail is much smarter; it also studies the message headers, senders, recipients, and dates. Even if someone changes the subject line along the way, Mail still knows that a conversation is a conversation.
As shown in Figure 18-12, Conversation view, as Apple calls it, hides all the usual awful indents, repetitions, forwards of forwards, and so on. You see only neatly numbered scrolling blocks, each representing the newly added text in each back-and-forth.
To turn on threading, choose View→Organize by Conversation. Each main message in the messages list sprouts a little numbered badge, like “3 ,” to indicate messages that have been clustered together (Figure 18-12, bottom).
Note
When Organize by Conversation is turned on, you might be wondering: What happens to chronological order? In other words, if the messages in a certain thread took place over several days or weeks, where does Mail wind up listing them when it sorts your messages list by date?
Answer: They’re all clumped together in the main message—the most recent message. That is, if the messages on a certain topic arrived July 1, 4, 7, and 11, you’ll find all four grouped with the July 11 message. They’re essentially pulled out of the chronological list to join the latest one, for your reviewing pleasure.
Here are some powerful ways to use threading:
View all the messages in a conversation by clicking the main message in the messages list. In the message pane, you see all the back-and-forths, minus all the duplication and the replies to replies.
Expand a list of the messages in a conversation by clicking the small gray number-of-messages badge—or by clicking the main message and then pressing the
 key. A tiny message-conversation list sprouts out of the one listed message, as shown in the inset in Figure 18-12. (Or you can make all conversations display their sub-messages like this; to do that, choose View→Expand All Conversations.)
Once you’ve expanded the mini-list, you can walk through it by pressing the up/down arrow keys.
Figure 18-12. In Mail’s version of threading, called Conversation view, the back-and-forths are represented extremely concisely. All the duplication and redundancy is hidden. (You can see it, if you really want to, by clicking the See More link at the bottom of each message.) Lower right: Click the tiny number, as shown here by the cursor, to view a list of the messages within the clump.
The messages from the current mailbox are numbered—those are the big gray digits in the upper-right corner. Those numbers help you figure out where you are in all the back-and-forths.
Examine messages from multiple mailboxes. Normally, conversations display only messages held in the same mailbox, but that’s not especially convenient when you want to see, for example, both messages you’ve received (from your Inbox) and your replies (from your Sent box). To work around that problem, turn on “Include related messages” in Mail→Preferences→Viewing. These options mean, “Include messages in other mailboxes, too, like Sent messages—not just this one mailbox.” Now your conversations seamlessly combine related messages from all mailboxes.
Move all the messages in a conversation to a new mailbox by dragging the main message. You might find this useful, for example, when you’ve just finished a project and want to file away all the email related to it quickly. You can even delete all the messages in a thread at once by deleting its main entry.
Send someone all the messages in a thread by selecting the main message and then clicking Forward as usual. Mail automatically copies all the messages of the thread into a new message, putting the oldest at the top. You might find this useful, for instance, when you want to send your boss all the correspondence you’ve had with someone about a certain project.
Manipulate an individual message in a conversation by first clicking it in the message-reading pane. For example, if you have five messages in a conversation, and you want to forward only the juicy one, which happens to be message #2, click #2 and then use the Forward command—or Reply, Delete, or whatever. (You can also click one of the four light-gray buttons that appear when you point to the message header—Delete, Reply, Reply All, Forward.)
Tip
In Mail→Preferences→Viewing, you’ll find a bunch of fine-tuning tweaks that apply to conversations. For example, you can ask that messages that are part of the same conversation show up highlighted in a color you choose—even when conversation grouping is turned off. And you can request that, when a conversation message is clicked in the messages list, the resulting messages are shown in reverse chronological order—oldest at the top.
When you choose the Message→Add Sender to Contacts command, Mail memorizes the email address of the person whose message is on the screen. In fact, you can highlight a huge number of messages and add all the senders simultaneously using this technique.
Thereafter, you’ll be able to address a new message to somebody just by typing the first few letters of her name or email address.
Data detectors are described on Data Detectors. They’re what you see when OS X recognizes commonly used bits of written information: a physical address, a phone number, a date and time, a flight number, and so on. With one quick click, you can send that information into the appropriate OS X program, like Calendar, Contacts, the Flight Tracker widget in Dashboard, or your Web browser (for looking an address up on a map).
This is just a public-service reminder that data detectors are especially useful—primarily useful, in fact—in Mail. Watch for the dotted rectangle that appears when you point to a name, address, date, time, or flight number.
Just as you can attach files to a message, so can people send files to you. Sometimes they don’t even bother to type a note; you wind up receiving an empty email message with a file or two attached. Only the presence of the file’s icon in the message body tells you there’s something attached.
Mail stores downloaded files in a hidden folder on your hard drive. To bring them out into the open, you must proceed in one of these ways:
Click the Quick Look button in the message header. Instantly, you’re treated to a nearly full-size preview of the file’s contents. Yes, Quick Look has come to email. It works exactly as described in Chapter 1.
Click the Save button in the message header to save it to your Downloads folder, nestled within easy reach in the Dock. (It’s a pop-up menu, which is handy if there’s more than one attachment. You can either save all attachments at once, or choose from the pop-up menu to save them individually.)
Drag the attachment icon (it appears at the bottom of the message) out of the message window and onto any visible portion of your desktop or any visible folder window.
Double-click the attachment’s icon, or single-click the blue link underneath the icon. If you were sent a document (a photo, Word file, or Excel file, for example), it now opens in the corresponding program.
Right-click (or two-finger click) the attachment’s icon at the bottom of the message. From the shortcut menu, you can open it, save it, Quick Look it, and so on.
To answer a message, click the Reply  button on the message toolbar (or choose Message→Reply, or press ⌘-R). If the message was originally addressed to multiple recipients, you can send your reply to everyone simultaneously by clicking Reply All
  instead (Shift-⌘-R).
A new message window opens, already addressed. As a courtesy to your correspondent, Mail places the original message at the bottom of the window, set off by a vertical bar, as shown in Figure 18-13.
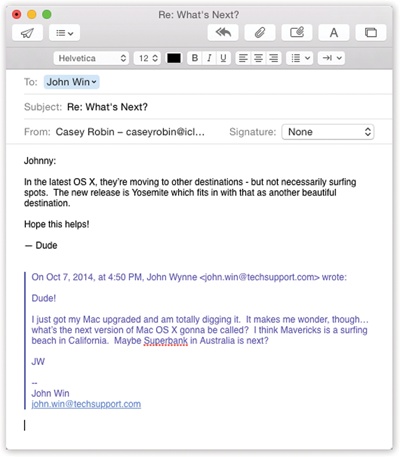
Figure 18-13. If you highlight some text before clicking Reply, Mail pastes only that portion of the original message into your reply. That’s a great convenience to your correspondent, who now knows exactly which part of the message you’re responding to.
In Mail messages formatted with Rich Text (not to be confused with Rich Text Format word processing format, which is very different), a reply includes the original message, marked in a special color (which you can change in Mail→Preferences) and with a vertical bar to differentiate it from the text of your reply. (In plain-text messages, each line of the reply is >denoted >with >brackets, although only your recipient will see them.)
The original sender’s name is automatically placed in the To field. The subject is the same as the original subject with the addition of “Re:” (shorthand for Regarding). You’re now ready to type your response.
At this point, you can add or delete recipients, edit the subject line or the original message, attach a file, and so on.
Tip
Use the Return key to create blank lines in the original message. Using this method, you can splice your own comments into the paragraphs of the original message, replying point by point. The brackets preceding each line of the original message help your correspondent keep straight what’s yours and what’s hers.

Instead of replying to the person who sent you a message, you may sometimes want to pass the note on to a third person.
To do so, click the Forward  toolbar button (or choose Message→Forward, or press Shift-⌘-F). A new message opens, looking a lot like the one that appears when you reply. You may wish to precede the original message with a comment of your own, along the lines of: “Frank: I thought you’d be interested in this joke about your mom.”
UP TO SPEED: All the Little Symbols
The left edge of the messages list shows little symbols that let you know at a glance how you’ve processed certain messages. The most common one is, of course, the light-blue dot ( ), which means “new message.” (After reading a message, you can mark it once again as an unread message by choosing Message→Mark→As Unread [Shift-⌘-U]—or by right-clicking (or two-finger clicking) the message’s name and then choosing Mark→As Unread from the shortcut menu.)
You might also see these symbols, which represent messages you’ve replied to (), forwarded ( ), redirected (
 ), or flagged (
 ).
).
A well-guarded secret, however, is that the “replied to” and “forwarded” symbols aren’t just indicators—they’re also buttons.
When you see one of these symbols next to your original message, click it to jump straight to your reply (or forwarded message). You’re spared the trouble of having to search through all your mailboxes.
Incidentally, you may have noticed that Mail marks a message as having been read the moment you click it. You can change it back to unread by using its shortcut menu—but there’s also a more permanent workaround.
If you hide the message pane by double-clicking the divider bar to its right (or, in classic view, above it), Mail no longer marks messages “read” just because you clicked them in the list.
Finally, address it as you would any outgoing piece of mail.
A redirected message is similar to a forwarded message, with one useful difference: When you forward a message, your recipient sees that it came from you. When you redirect it, your recipient sees the original writer’s name as the sender. In other words, a redirected message uses you as a low-profile relay station between two other people.
Treasure this feature. Plenty of email programs don’t offer a Redirect command at all. You can use it to transfer messages from one of your own accounts to another, or to pass along a message that came to you by mistake.
To redirect a message, choose Message→Redirect, or press Shift-⌘-E. You get an outgoing copy of the message—this time without any quoting marks. (You can edit redirected messages before you send them, too, which is perfect for April Fools’ Day pranks.)
Sometimes there’s no substitute for a printout. Choose File→Print, or press ⌘-P to summon the Print dialog box.
Mail lets you create new mailboxes (mail folders) in the mailboxes list. You might create one for important messages, another for order confirmations from Web shopping, still another for friends and family, and so on. You can even create mailboxes inside these mailboxes, a feature beloved by the hopelessly organized.
Mail even offers smart mailboxes—self-updating folders that show you all your mail from your boss, for example, or every message with “mortgage” in its subject. It’s the same idea as smart folders in the Finder or smart playlists in iTunes: folders whose contents are based around criteria you specify (Figure 18-14).
The commands you need are all in the Mailbox menu. For example, to create a new mailbox folder, choose Mailbox→New Mailbox, or click the  button at the bottom of the column. To create a smart mailbox, choose Mailbox→New Smart Mailbox.
Mail asks you to name the new mailbox. If you have more than one email account, you can specify which one will contain the new folder. (Smart mailboxes, however, always sit outside your other mailboxes.)
Tip
If you want to create a folder inside a folder, use slashes in the name of your new mailbox. (If you use the name Cephalopods/Squid, for example, then Mail creates a folder called Cephalopods, with a subfolder called Squid.) You can also drag the mailbox icons up and down in the drawer to place one inside another.
None of those tricks work for smart mailboxes, however. The only way to organize smart mailboxes is to put them inside a smart mailbox folder, which you create using Mailbox→New Smart Mailbox Folder. You might do that if you have several smart mailboxes for mail from your coworkers (“From Jim,” “From Anne,” and so on) and want to put them together in one collapsible group to save screen space.
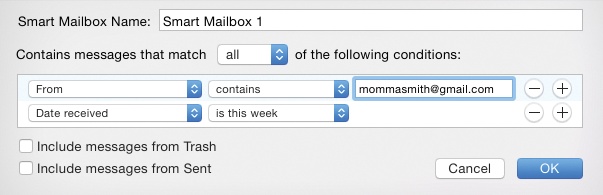
Figure 18-14. Mail lets you create self-populating folders. In this example, a smart mailbox will automatically display all messages from Momma Smith that you’ve received in the past week.
When you click OK, a new icon appears in the mailboxes column, ready for use.
You can move a message (or group of messages) into a mailbox folder in any of three ways:
Drag it out of the messages list onto a mailbox icon.
Highlight one or more messages, and then choose from the Message→Move To submenu, which lists all your mailboxes.
Right-click (or two-finger click) a message, or one of several that you’ve highlighted. From the resulting shortcut menu, choose Move To, and then, from the submenu, choose the mailbox you want.
Of course, the only way to change the contents of a smart mailbox is to change the criteria it uses to populate itself. To do so, double-click the smart mailbox icon and use the dialog box that appears.
Sometimes you’ll receive email that prompts you to some sort of action, but you may not have the time (or the fortitude) to face the task at the moment. (“Hi there… it’s me, your accountant. Would you mind rounding up your expenses for 1999 through 2011 and sending me a list by email?”)
That’s why Mail lets you flag a message, summoning a little flag icon in a new column next to the message’s name. In fact, you can use seven differently colored flags.
These indicators can mean anything you like—they simply call attention to certain messages.
Once you’ve applied some flags, you can use their power in all kinds of ways. For example, you can view all of them in one place—in the Flagged folder that appears near the top of the mailboxes list.
You can also sort your mail list by flag color (choose Sort by→Flags at the top of the messages list). You can search for flagged messages using the search box. Better yet, you can view all messages with a certain flag color—magically rounded up from all your different accounts and mailboxes—by clicking the corresponding icon in the Flagged folder of the mailboxes list.
Tip
Just in case you don’t find “Red,” “Orange,” “Yellow,” and so on to be the most descriptive possible flag names, you can change them.
First, though, make sure you’ve applied a couple of flags to different messages already. That’s necessary to make the Flagged mailbox appear in the mailboxes list. If you open the flippy triangle, you’ll see the names of the flags you’ve applied so far. You can change a flag’s name just the way you’d name a file—start by double-clicking it.
To flag a message in this way, select the message (or several messages) and then choose one of the colored flags in the Message→Flag submenu. Or right-click (or two-finger click) the message’s name in the list and, from the shortcut menu, choose one of the seven flag colors. (To clear the flags, repeat the procedure, but use the Message→Flag→Clear Flag command instead.)
If you’re using only one flag to simply mean “flag this,” and you don’t need all the colors, you can also press Shift-⌘-L.
The box in the upper-right corner of the main mail window is Mail’s own private Spotlight—a fast, powerful search command. That’s essential when you have to deal with masses of email (see Figure 18-15).
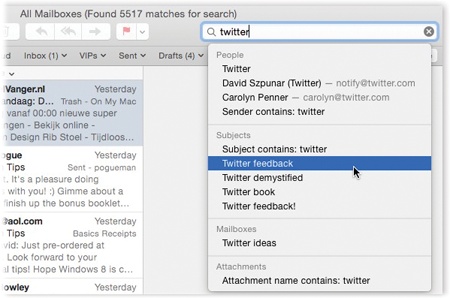
Figure 18-15. You can jump to the search box by clicking or by pressing Option-⌘-F. As you type, Mail shrinks the list of messages—and simultaneously displays a list of suggestions. You can fine-tune your results using the mailbox buttons you’ve installed on the Favorites bar. To return to the full messages list, click the tiny  at the right side of the search box.
This search box incorporates the same pop-up suggestions lists and “search tokens” as regular file searching in the Finder. Here’s how it works:
Press Option-⌘-F (or click in the search box).
The cursor jumps up there.
Start typing what you’re looking for.
As you type, the messages list changes to show only the matching messages from all your mail folders.
If you see the message you’re looking for, great. Click it, and off you go.
But this initial search is a pretty broad one. Mail is rounding up messages that match your search term in any way. If you type veg, you see messages from Murray Vegelstein, messages from vegan@militanteaters.org, and messages with the subject line “HOT DEALS IN VEGAS.” All of them in one big stew.
To help you sort through it, Mail produces a Suggestions list, which sprouts from the search box. As in the Finder, it’s Mail’s way of asking what sort of thing your search term is. Is it a person? A subject? The status of a message? A date? Figure 18-15 shows the idea.
Click the suggestion you want.
Mail filters the list. For example, if you click Murray Vegelstein, you’ll see only the messages to or from Murray.
The search token is the little bubble that appears in the search box after you’ve clicked one of the suggestions. You can click the little
 in the search token to change it. For example, if you’ve clicked somebody’s name, that pop-up menu says To, From, or Entire Message (including the header and the body).
You can also type more into the search box to add another search token. For example, the first token might limit the search to messages from one person; you could then create another one that limits the search to a certain date.
Tip
Once you’ve built up a complicated search like this, save yourself the effort next time by saving that search. Click the Save button just below the search box. You get the Smart Mailbox dialog box, already filled out with the search setup you’ve specified. All you have to do is give it a name and click OK to transform your search into a smart mailbox that you can open anytime.
You’ve done a lot of refining of this search. But you still haven’t limited your results by account or folder. Mail is showing you results from either all mailboxes, or from only the most recent mailbox you’ve searched. Fortunately, your Favorites bar has now sprouted two new buttons: one called All, and one that names the folder you most recently clicked.
Click a button on the Favorites bar to change which mailbox is being searched.
The results list updates itself.
Tip
If you ⌘-click several mail folders before you search, you can limit the search to that particular set of mailboxes. (In that case, you see a button on the Favorites bar called Selected Mailboxes.)
When you’re finished hunting around, you can empty out the search box, and get back to your regularly scheduled lists of email, by clicking any other mailbox, or by clicking the  button at the right end of the search box.
A few last notes on searching:
The Mail search is almost exactly like Finder searching, right down to the saved-search mechanism. See Chapter 3 for details.
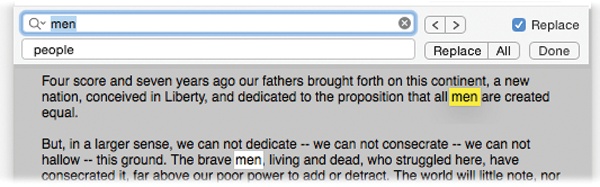
You can also search for certain text within an open message. Choose Edit→Find→Find (or press ⌘-F) to bring up the Find dialog box (Figure 18-16).
As with regular Spotlight, Mail matches your search term by looking only at the beginnings of words. Searching for flag will find messages that contain the words flagstone and flagellum, but not Redflag Incorporated.
In Mail→Preferences→General, you can specify whether or not you want Mail to include the Trash folder, Junk folder, and encrypted messages when you search all mailboxes.
Sometimes it’s junk mail. Sometimes you’re just done with it. Either way, it’s a snap to delete a selected message, several selected messages, or a message that’s currently before you on the screen. You can press the Delete key, click the Delete  button on the toolbar, choose Edit→Delete, or drag messages out of the list window and into your Trash mailbox—or even onto the Dock’s Trash icon.
All these commands move the messages to the Trash folder. If you like, you can then click its icon to view a list of the messages you’ve deleted. You can even rescue messages by dragging them back into a mailbox (back to the Inbox, for example).
Mail doesn’t vaporize messages in the Trash folder until you “empty the trash,” just like in the Finder. You can empty the Trash folder in any of several ways:
Click a message (or several) within the Trash folder list, and then click the Delete
icon on the toolbar (or press the Delete key). Now those messages are really gone.Choose Mailbox→Erase Deleted Items (Shift-⌘-Delete). (If you have multiple accounts, choose Erase Deleted Items→In All Accounts.)
Right-click (or two-finger click) the Trash mailbox icon, and then choose Erase Deleted Items from the shortcut menu. Or choose the same command from the
 pop-up menu at the bottom of the window.
Wait. Mail will permanently delete these messages automatically after a week.
If a week is too long (or not long enough), you can change this interval. Choose Mail→Preferences, click Accounts, and select the account name from the list at left. Then click Mailbox Behaviors, and change the “Permanently erase deleted messages when” pop-up menu. If you choose Quitting Mail from the pop-up menu, Mail will take out the trash every time you quit the program.
Mail offers another—and very unusual—method of deleting messages that doesn’t involve the Trash folder at all. Using this method, pressing the Delete key (or clicking the Delete toolbar button) simply hides the selected message in the list. Hidden messages remain hidden, but they don’t go away for good until you use the rebuild mailbox command described in the box on Rebuilding Your Mail Databases.
If this arrangement sounds useful, choose Mail→Preferences; click Accounts and select the account from the list on the left; click Mailbox Behaviors; and then turn off the checkbox called “Move deleted messages to a separate folder” or “Move deleted messages to the Trash mailbox.” (The checkbox’s wording depends on what kind of account you have.) From now on, messages you delete vanish from the list.
They’re not really gone, however. You can bring them back, at least in ghostly form, by choosing View→Show Deleted Messages (or pressing ⌘-L). Using this system, in other words, you never truly delete messages; you just hide them.
At first, you might be concerned about the disk space and database size involved in keeping your old messages around forever like this. Truth is, OS X is perfectly capable of maintaining many thousands of messages in its mailbox databases—and with the sizes of hard drives nowadays, a few thousand messages aren’t likely to make much of a dent.
Meanwhile, there’s a huge benefit to this arrangement. At some point, almost everyone wishes he could resurrect a deleted message—maybe months later, maybe years later. Using the hidden-deleted-message system, your old messages are always around for reference. (The downside to this system, of course, is that SEC investigators can use it to find incriminating mail that you thought you’d deleted.)
When you do want to purge these messages for good, you can always return to the Mailbox Behaviors dialog box and turn the “Move deleted mail to a separate folder” checkbox back on.
There’s one final option for getting unwanted messages out of your hair: archiving. It just means “Get it out of my sight for now.” Archiving sweeps the selected message into a folder called Archived, where it will stay until you deal with it further (by moving or deleting it). There’s one of these folders per account.
To archive a selected message, a group of selected messages, or a conversation, choose Message→Archive, or click the Archive icon on the toolbar.
Time Machine (Chapter 6) keeps a watchful eye on your Mac and backs up its data regularly—including your email. If you ever delete a message by accident or otherwise make a mess of your email stash, you can duck into Time Machine right from within Mail.
But not everybody wants to use Time Machine, for personal reasons—lack of a second hard drive, aversion to software named after H.G. Wells novels, whatever.
Yet having a backup of your email is critically important. Fortunately, there’s a second good way to back up your email—export it, like this:
In the mailboxes column, choose which mailbox or mailboxes you want to archive.
If you have multiple mailboxes in mind, ⌘-click each one until you’ve selected all the ones you want.
At the bottom of the Mail window, open the
pop-up menu and choose Export Mailbox(es).You can also get to this command by choosing Mailbox→Export Mailbox.
In the box that appears, navigate to the place you want to stash this cache of valuable mail, like a server, a flash drive, or a folder. Click Choose.
Your exported mailboxes are saved to the location you’ve chosen. You can now go back to work writing new messages.
Later, if you need to pull one of those stashes back into duty, choose File→Import Mailboxes. Choose the Apple Mail option and then navigate back to the place where you stored your mailboxes.
Once you know how to create folders, the next step in managing your email is to set up a series of message rules (filters) that file, answer, or delete incoming messages automatically based on their contents (such as their subject, address, and/or size). Message rules require you to think like the distant relative of a programmer, but the mental effort can reward you many times over. Message rules turn Mail into a surprisingly smart and efficient secretary.
Here’s how to set up a message rule:
Choose Mail→Preferences. Click the Rules icon.
The Rules pane appears, as shown at top in Figure 18-17.
Click Add Rule.
Now the dialog box shown at bottom in Figure 18-17 appears.
Use the criteria options (at the top) to specify how Mail should select messages to process.
For example, if you’d like the program to watch out for messages from a particular person, you would set up the first two pop-up menus to say “From” and “Contains,” respectively.
To flag messages containing loan, $$$$, XXXX, !!!!, and so on, set the pop-up menus to say “Subject” and “Contains.”
You can set up multiple criteria here to flag messages whose subjects contain any one of those common spam triggers. (If you change the “any” pop-up menu to say “all,” then all the criteria must be true for the rule to kick in.)
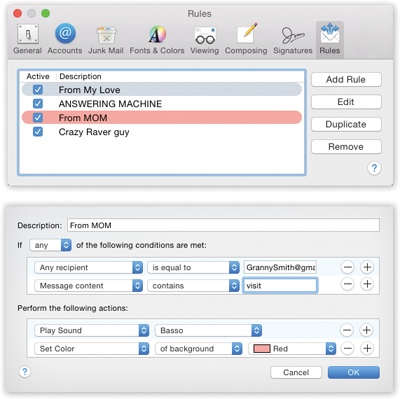
Figure 18-17. Top: Mail rules can screen out junk mail, serve as an email answering machine, or call important messages to your attention. All mail message rules you’ve created appear in this list. (The color shading for each rule is a reflection of the colorizing options you’ve set up, if any.) Bottom: Double-click a rule to open the Edit Rule dialog box, where you can specify what should set off the rule and what it should do in response.
Specify which words or people you want the message rule to watch for.
In the text box to the right of the two pop-up menus, type the word, address, name, or phrase you want Mail to watch for—a person’s name, or $$$$, in the previous examples.
In the lower half of the box, specify what you want to happen to messages that match the criteria.
If, in steps 1 through 4, you’ve told your rule to watch for junk mail containing $$$$ in the subject line, here’s where you can tell Mail to delete it or move it into, say, a Junk folder.
With a little imagination, you’ll see how the options in this pop-up menu can do absolutely amazing things with your incoming email. Mail can colorize, delete, move, redirect, or forward messages—or even play a sound when you get a certain message.
By setting up the controls as shown in Figure 18-17, for example, you’ll have specified that whenever your mother sends something to you that mentions a visit, you’ll hear a specific alert noise as the email is highlighted in a bright red, so it will jump out at you in the Inbox.
In the very top box, name your mail rule. Click OK.
At this point, Mail offers to apply your freshly minted rule to all the messages that are in the mailboxes that are currently selected. It’s your one chance to go back in time—because from now on, the rule will apply only to new messages. Click either Apply or Don’t Apply.
Now you’re back to the Rules pane (Figure 18-17, top). Here you can choose a sequence for the rules you’ve created by dragging them up and down. Here, too, you can turn off the ones you won’t be needing at the moment, but may use again one day.
Tip
Mail applies rules as they appear, from top to bottom, in the list. If a rule doesn’t seem to be working properly, it may be that an earlier rule is intercepting and processing some messages before the “broken” rule even sees them. To fix this, try dragging the rule (or the interfering rule) up or down in the list.