When you open Messages for the first time, you’re invited to enter (or sign up for) your iCloud or Apple account (Figure 20-1). Take the opportunity to set this up; you’ll be glad you did.
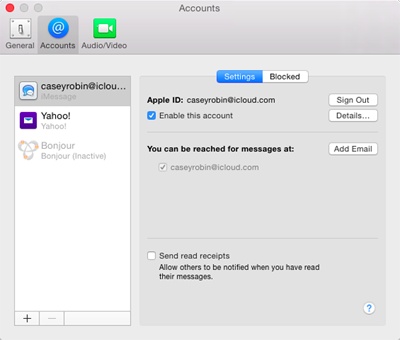
Figure 20-1. Left: The first time you open Messages, you’re supposed to enter your Apple ID (your iCloud, .mac, or .me address) and password. That way, you can join in the thrill of iMessaging. Right: You can also set up your account for other popular chat networks.
If you click Not Now (and then click Skip in the “Are you sure?” box), then you’re offered the chance to sign in to a different chat service:
Google, Yahoo, AOL. Click your choice, click Continue, and then enter your name and password. (If you’re an America Online member, then your existing screen name and password work for AIM purposes.) Click Set Up.
Jabber. Click “Other messages account.” On the next screen, from the pop-up menu, choose Jabber. Enter your Jabber name and password, and then click Create.
Note
Jabber is a chat network whose key virtue is its open-source origins. In other words, it wasn’t masterminded by some corporate media behemoth; it’s an all-volunteer effort, joined by programmers all over the world (see Internet Radio and Podcasts). There’s no one Jabber chat program (like Yahoo Messenger). There are dozens, available for OS X, Windows, Linux, Unix, iPhone, and so on. They can all chat with one another across the Internet in one glorious frenzy of typing.
Facebook. Yes, you can use Messages to chat with other people on Facebook, using Facebook’s own message service.
The trick is to follow the steps above for entering a Jabber account. But in the Account Name box, type your Facebook name (with a period instead of a space), followed by @chat.facebook.com. So if your name is Casey Robin, you’d type casey.robin@chat.facebook.com.
Enter your Facebook password. Leave everything else alone. Click Create.
If you don’t have an account of those types, it’s easy enough to get one. Sign up for a free account at the relevant company’s Web site (at gmail.com or yahoo.com, for example).
You can also input account information later—the setup assistant isn’t your only opportunity. You can do it in either of two places:
In System Preferences, click Internet Accounts, described in Chapter 9.
In Messages, choose Messages→Preferences, click the Accounts button, and click the
 button.
Once you’ve set up your accounts, you can activate or deactivate them in Messages→Preferences→Accounts. You might want to deactivate an account when, for example, you don’t want to be bugged by the rabble on that particular service.
Oh—and if you’re setting up your iCloud account, in readiness for all that iMessages goodness, you have a few more options (Figure 20-2).
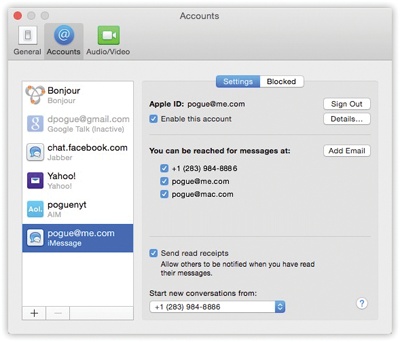
Figure 20-2. You have to specify an email address to anchor your iMessages life. You can specify more than one, actually (click the button under “You can be reached for messages at”). If you do that, you should also choose one that Messages will use as your return address (the “Caller ID” address). Turn on “Enable this account” to make it work. Turn on “Send read receipts” if you want your correspondents to know when you’ve read their messages.
Note
If you’re on AOL’s AIM service or Yahoo’s Messenger service, why would you want to use Messages instead of those companies’ dedicated chat programs? Easy: Because Messages is a nice, cleanly designed program that’s free of advertisements, chatbots, and clunky interface elements.
On the other hand, there are some great chat apps that Messages can’t touch. One is the popular Adium, a single program that works with Messages’ chat services and many others, including ICQ. And then, of course, there’s Skype, the granddaddy of all chat programs, which offers audio and video chats like Messages, but also connects to Skype running on Windows, iPhones, Android phones, and so on.
As noted above, most chats begin when you choose a correspondent’s name from your Contacts.
But Messages also comes with a traditional chat-program Buddy List. It’s like an address book whose names appear only in Messages—for people you don’t need cluttering up your main Contacts list (Figure 20-3).
It’s a unified Buddies list, too. It houses the chat “addresses” for all your chat partners from all the different chat services, in a single list.
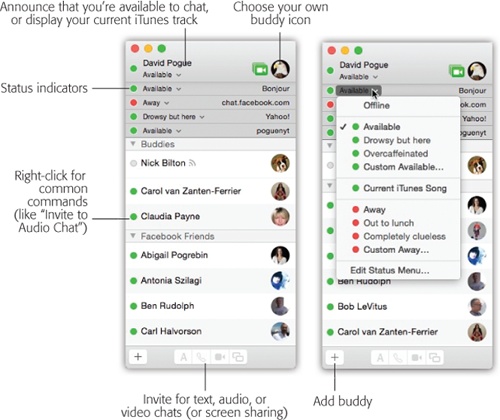
Figure 20-3. Left: The Buddies list combines all your contacts from all chat services. Each chat account has its own status menu at the top. Right: You can also choose Edit Status Menu to set up more creative alternatives to “Available” and “Away.”
Tip
If you like, you can restore Messages to the old way of doing things, where each service (AIM, Yahoo, and so on) had its own separate buddy list window. To do that, choose Messages→Preferences→General; turn off “Show all my accounts in one list.” Now you can use the Window menu to reveal each service’s buddy list separately.
A tiny icon appears next to each name in your list, indicating that person’s availability to chat—and what kinds of multimedia chats are available. A phone icon means “equipped for an audio chat”; a camcorder means “equipped for a video chat.” The little colored dots mean “available” (green), “away” (red), “idle” (orange), and “undetermined—probably on a cellphone” (gray). A little  icon means you’re chatting with someone on a cellphone.
If you don’t see your buddy list when you open Messages (Figure 20-3), choose Window→Buddies.
Adding a buddy to this list entails knowing that person’s account name/address (for example, bunnyface23@aim.com or harold1968@yahoo.com).
Once you have it, click the in the bottom-left corner of the Buddies window; from the shortcut menu, click Add Buddy.
Down slides a sheet attached to the buddy list window, offering a window into your Contacts program (Chapter 18). Using the “Add to” pop-up menu, choose the service you want to use for chatting with this person (Yahoo, Google, AIM, whatever).
If your companion’s chat address is already in Contacts, then double-click the person’s name, or click it and then click Add.
If not, then enter your pal’s chat address in “Account name.” Enter this person’s real first and last names in the appropriate boxes, if you like.
Tip
Just to make things more complicated—er, flexible—Messages lets you organize buddies into groups, like Work, Family, and Fantasy Badminton League. Use the “Add to group” pop-up menu here to specify which group you want—or just choose Buddies to leave the new person in the general sloshing bucket of humanity.
When everything looks good, click Add.
Using the pop-up menu just below your name (Figure 20-2, right), you can display your current mental status to other people’s chat programs. You can announce that you’re Available, Away, On the Phone, Drunk, and so on. (You have to choose Edit Status Menu for that last one.)
Better yet, if you have music playing in iTunes, you can tell the world what you’re listening to by choosing Current iTunes Song. (Your buddy can even click that song’s name to open its screen on the iTunes Store, all for instant purchase gratification.)
For some people, by far the juiciest status option is Invisible (available for me.com and AIM accounts only). It’s like a Star Trek cloaking device for your onscreen presence. Great for stalkers!
Tip
You can also add a Messages menulet to the top of your screen. Choose Messages→Preferences→General, and turn on “Show status in menu bar.” From now on, you can change your status even when Messages isn’t running. If other people see you as anything besides Offline or Invisible, they can send you a message—and Messages will open automatically.
In View→Sort Buddies, you can rearrange your buddies as they’re listed in the buddy list (by availability, name, or manually—drag the names up and down).
If you want a more space-efficient view of your buddy list, go to the View menu and turn off Show Buddy Pictures, Show Audio Status, or Show Video Status. You can turn off Buddy Groups here as well, if you’d prefer to see your buddies in one undivided list.
See the heading in the buddy list called Bonjour? You can’t add names to your Bonjour list; anyone who’s on the network and running Messages appears there automatically.
Bonjour is a slick network-recognition technology. It means that you can communicate with other Macs on your own office network without signing up for any account at all—and without being online.
This is a terrific feature when you’re sitting around a conference table, idly chatting with colleagues using your wireless laptop (and the boss thinks you’re taking notes). It’s also handy when you want to type little messages throughout the day to a family member downstairs, or to a roommate 15 feet away.
Chatting and videoconferencing work identically on all of these networks. Keep that in mind as you read the following pages.