There is magic in yeast. I have baked scores of breads and rolls, but even now I still get a thrill to see it convert ordinary flour and liquids into something beautiful and tasty. Yeast is a living organism and, as such, responds well to a bit of pampering. However, it is easily satisfied and will reward the slightest effort well.
BUDGETING YOUR TIME
Yeast doughs are easy to make, and the process of kneading and shaping is a relaxing one. However, they require two fairly long resting periods in addition to the initial kneading and subsequent shaping. Large panned loaves are shaped very quickly, but freeform versions such as Festive Dutch Spiced Loaf (Duivekater) and Aniseed Plait take a little more time. The smaller items vary and the Majorcan and Filipino coiled rolls (Ensaimadas and Enseymadas) will take longer than, say, Tennis Rolls or Chestnut Buns. It is always a good idea to read through the recipe first to see exactly what is involved, and set aside enough time to do it. There is a pleasant side benefit: the resting times will allow you to catch up with a multitude of other tasks while waiting.
TOO LITTLE OR TOO MUCH YEAST
You can never really use too little yeast; it will simply take longer for it to work sufficiently to lift the dough. Many bakers even feel that a longer rising time improves the flavour and keeping qualities of bread. It is very easy – and quite pointless – to use too much yeast. The dough will billow out beautifully but uncontrollably, producing an unpredictable texture and a strong, yeasty flavour.
EASY-BLEND (ACTIVE DRY) YEAST
These recipes all specify easy-blend or instant yeast, which is very fine and easily incorporated into the other dry ingredients. Fresh yeast and coarse-grained dried yeast need to be sponged first before adding them to the dry ingredients and are not interchangeable with easy-blend here. Easy-blend can also be sponged.
SPONGING
Sponging means mixing the yeast with enough warm liquid and a little flour and sugar to give it a head start before adding it to the other ingredients. This is useful in cases where the dough is enriched with a generous amount of sugar, butter and eggs, as the combination can prove too rich and the yeast has to put up too much of a fight to grow properly. Never add salt to the sponge as it will retard the growth of the yeast cells, which defeats the purpose. Yeast thrives in a warm, damp atmosphere and it will come to life and start feeding on the sugars in the sponge. When the cells become active and grow, large bubbles will appear on the surface of the sponge – it is then ready to be used.
The recipes say ‘warmed’ milk or water. If the liquid is too cool or cold, it will take a very long time for the yeast to start to work. On the other hand, if the liquid is too hot, cells will be killed and the yeast will be effectively deactivated. The perfect temperature is somewhere between lukewarm to blood temperature: 25–37°C/77–98.6°F. Don’t worry; there’s no need to mess about with thermometers. The easiest way to check is to plunge a finger into the liquid – it should feel warm without causing any discomfort. That’s all there is to it. If anything at all, err on the cooler side.
WHY ‘ABOUT’?
Recipes often say ‘about … ml/fl oz’. The reason for this is partly explained in Ingredients, under Flour (pp. 15–18). No two flours are the same. Even the same variety of wheat planted under different climatic conditions can vary, and this affects the way the flour absorbs liquids, which is why these recipes do not offer a clearly defined amount. Strong (bread) flour comes from hard wheat and has greater powers of absorption than other kinds of flour, such as plain (all-purpose) flour, which will have a tendency to turn sticky with the same proportion of liquid. It is always best to add all of the liquid to the dry ingredients before you start to knead, but use the two following tips if you run into minor difficulties. If you find that the dough is too firm and needs more liquid, knead it in 1 teaspoon at a time until you get the desired consistency. You can add an extra 1–2 tablespoons of flour if the dough is too sticky to handle, but adding too much will change the texture, particularly of richer breads.
OVERKNEADING AND UNDERKNEADING
Strong (bread) flour has a high gluten content and this will provide elasticity. However, it will not do that on its own and must be kneaded well to encourage the gluten to develop and stretch, forming a web to trap carbon dioxide and make the dough rise. If you underknead, there will be less development and the dough will not rise evenly to its full potential. There is such a thing as overkneading, but this rarely happens. In fact, it is almost impossible to overknead by hand, as you will feel the texture and stop – besides, you will be tired long before that stage is reached. However, it could happen if you leave the dough unattended in the mixer for a long time. The dough breaks down after the gluten has been overworked and turns into a sticky unusable mass that cannot support itself when baked.
MIXER OR HAND?
A heavy-duty mixer fitted with a dough hook makes light work of kneading: the dough is ready when it leaves the sides of the bowl and forms a smooth ball. However, doughs usually respond well to the warmth generated by your hands and most will allow themselves to be easily manipulated. Very soft doughs and stickier types, such as rye-based doughs, are best kneaded in a mixer, but can also be kneaded by hand. They will just require a little more patience – and a large bowl because they will stick to most other potential work surfaces. A flexible plastic scraper will help to bring the dough together at regular intervals and make it easier to handle. Even in the case of firmer doughs, it is easier, when kneading by hand, to mix the ingredients together in a bowl and moisten them into a lumpy dough before turning the whole thing out onto a work surface to continue. When kneading, use the heel of your hand to press the dough and stretch it, folding it back on itself and changing position several times. Kneading times vary, so pay attention to the texture described in the recipe. In general, the dough should be smooth and supple and free of lumps.

WORK SURFACE
Cold surfaces like marble and granite are unsuitable for kneading yeast doughs as they will ‘shock’ the warm dough and reduce the temperature too much. A wooden worktop or large pastry board makes a good surface. Failing that, use a thick silicone mat to insulate the dough against the cold. A large silicone mat also happens to be my favourite kneading, rolling and shaping aid. This has the great advantage of being virtually non-stick, eliminating the need to add too much extra flour. In fact, it usually needs no extra flour at all unless the dough is extremely sticky. It also makes clearing up less of a chore because you simply carry the mat to the sink and rinse it, with minimal mess. This simple piece of equipment makes a baker’s life even more enjoyable.
RISING AND PROVING
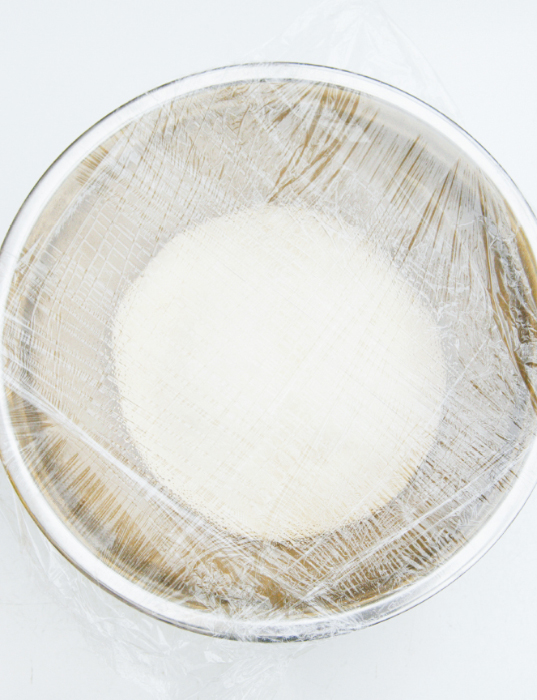
In general, yeast doughs need to rise twice. Some professional bakers may even give their special breads extra rises. Rising conditions the dough, and you will notice that even hard-to-handle doughs improve in texture and suppleness after the first rise. It is absolutely essential that rising takes place in a draught-free place. Warmth is desirable but less important in this case, as the dough will also rise in a cooler environment (even the refrigerator), simply taking longer to do so. Keep the dough away from direct heat, or it will over-ferment. The covered bowl or baking tin can be placed near a warm (but not too hot) radiator, in an airing cupboard or on a rack in a warming drawer at an extremely low setting. Failing that, leave it on the worktop at room temperature and be patient. The second rise or proof takes place after the bread has been shaped and put in a suitable tin and, as the yeast is well and truly active by this time, it is faster than the initial one. If the bread is not covered properly, a skin will form on its surface. A sheet of oiled clingfilm (plastic wrap) will prevent this from happening. If the surface of the bread has been dusted with flour, however, do not oil the clingfilm; the flour will keep it from sticking. Always cover the dough loosely because it will need room to expand.
Knocking back means deflating the dough. You press it down and re-knead it lightly to redistribute the gases. In so doing, you give the yeast new feeding grounds and possibilities for expansion. This will improve the texture of the finished loaf. Loaves are generally shaped by creating a flat sheet that is rolled up into a ‘sausage’ and put into the baking tin. A rolling pin is not really necessary; you can easily flatten the dough to the required shape and size with your hands. Once you have rolled the dough into a ‘sausage’ shape, pinch the seam to seal and place the ‘sausage’ in the tin with the seam at the bottom.
SLASHING
Some loaves are slashed, and this is not always purely a decorative measure. Pretty though the cuts may be, their main purpose is to allow controlled expansion. Use a very sharp knife so that you do not tear the dough.
OVEN TEMPERATURES
Baking temperatures for yeast breads are usually quite high compared with those for cakes. This blast of heat gives the loaf an extra impulse to rise a little more and then set rapidly into what will be its finished shape. The extra rising in the oven is referred to as ‘oven spring’. The main goal is to kill the yeast as quickly as possible as soon as it has reached its peak. If the temperature is too low to start with, the dough will keep on rising for too long and will over-rise. The loaf will look untidy and the texture will be uneven. Richer doughs are baked at slightly lower temperatures so that the sugar and eggs cannot make the crust darken too quickly and burn. However, they set more quickly, due to the eggs. If you notice that your loaf is browning too much on one side, turn it around to give the lighter side a chance to catch up. The temperatures advised here should not make your loaves burn, but if you find that they are darkening too quickly after the first half of the baking time, reduce the temperature slightly (by about 10%) or cover the top loosely with a piece of tinfoil.
COOLING AND KEEPING
Cooling on a wire rack allows excess moisture to evaporate, leaving the crust crisper. However, this period of crustiness is quite short because bread begins to go stale as soon as it leaves the oven. The internal moisture will have redistributed itself within a few hours, and even crisp crusts will soften. Many breads are good eaten slightly warm from the oven. If you want to wrap them to keep or freeze, always allow them to cool completely. Well wrapped in suitable material, they will freeze beautifully, so it is worthwhile to make two loaves instead of one or a full batch of rolls, even if your household is small.
It hardly costs any extra time to make two loaves instead of one, and the second loaf can be frozen for later. I sometimes add chopped walnuts to one loaf, but you can also try pumpkin and sunflower seeds. The recipe is easily halved if you prefer to make a single loaf.
250 g/9 oz/1⅔ cups strong white (bread) flour
500 g/1 lb 2 oz/generous 3 cups wholemeal flour
2¼ tsp easy-blend (active dry) yeast
3 tbsp brown sugar
1½ tsp salt
50 g/1¾ oz/scant ½ stick butter, melted and cooled slightly
about 450 ml/16 fl oz/scant 2 cups milk, warmed
75 g/2¾ oz/½ cup chopped walnuts per loaf or the same weight of sunflower and/or pumpkin seeds (optional)
2 x 450 g/1 lb loaf tins, greased
Put all the ingredients except the walnuts and seeds in a large bowl and mix to moisten the dry ingredients. Use a heavy-duty mixer fitted with a dough hook to knead thoroughly until smooth and supple. The dough should be medium-soft. Alternatively, turn out onto a floured surface or a non-stick silicone mat and knead until smooth and supple. Bring together in a ball and return to the bowl. Cover the bowl with clingfilm (plastic wrap) or a damp tea towel (dish towel) and set aside in a warm, draught-free place until doubled in size.
Knock back the dough and knead lightly until smooth again. Divide into 2 portions. Add the walnuts or seeds, if using. Roll or flatten each piece out to a rectangle that is as wide as your tin is long, to a thickness of about 1 cm/½ in.
Roll up the dough, starting at a short side, then pinch the seam to seal. Place it seam-side down in the tin and shape the other loaf in the same way. Cover both loaves loosely with lightly oiled clingfilm and leave in a warm, draught-free place until almost doubled in size.
Preheat the oven to 200°C/400°F/Gas Mark 6.
Bake the loaves for about 30 minutes. To test, remove the loaves from the tin. Tap sharply on the top and bottom; they should sound hollow. Cool on a wire rack.
The loaves will keep for a few days if well wrapped and can also be frozen as soon as they have cooled.
Jamaican immigrants abroad often pine for this simple and familiar taste of home. Hard dough bread is traditionally a baker’s product and is made using a starter of a firm sponge dough that has been allowed to ripen overnight. As both the sponge and new dough are very stiff, they are passed several times through a dough brake with rollers designed to press them into each other. Bakers who cannot justify the expenditure and extra time involved prefer to use a straight dough, as in this recipe. It is a fairly plain bread, made from a few basic ingredients, and it is suitable for those who are lactose intolerant, because it is mixed with water instead of milk. Its crumb is characteristically dense and slightly chewy, with a sweetish taste. Leftovers make very good toast, especially eaten warm with butter.
750 g/1 lb 10 oz/5 cups strong white (bread) flour
2¼ tsp easy-blend (active dry) yeast
4 tbsp sugar
1 tbsp treacle or molasses
about 375 ml/12¾ fl oz/generous 1½ cups lukewarm water
1½ tsp salt
50 g/1¾ oz vegetable shortening
2 x 450 g/1 lb loaf tins, greased
Put all the ingredients in a large bowl. Mix well to moisten the dry ingredients and knead well until smooth and elastic. This is a very firm dough, so if you use a mixer, make sure it is a heavy-duty one that won’t stall. Alternatively, turn out onto a floured surface or a non-stick silicone mat and knead until smooth and supple. Bring together in a ball and return to the bowl. Cover the bowl with clingfilm (plastic wrap) or a damp tea towel (dish towel) and set aside in a warm, draught-free place until it is only about one-and-a-half times its original size. Do not allow it to double in volume.
Knock back the dough and knead lightly until smooth again. Divide into 2 portions and roll or flatten each piece out to a rectangle that is as wide as your tin is long, and with a thickness of about 1 cm/½ in.
Roll up the dough, starting at a short side, and pinch the seam to seal. Place it seam-side down in the tin and shape the other loaf in the same way. Cover both loaves loosely with lightly oiled clingfilm and leave in a warm, draught-free place until the loaves are once again one-and-a-half times their original size.
Preheat the oven to 200˚C/400˚F/Gas Mark 6.
Bake the loaves for about 30 minutes. To test, remove the loaves from the tin. Tap sharply on the top and bottom; they should sound hollow. Cool on a wire rack.
The loaves will keep for a few days if well wrapped and can also be frozen as soon as they have cooled.
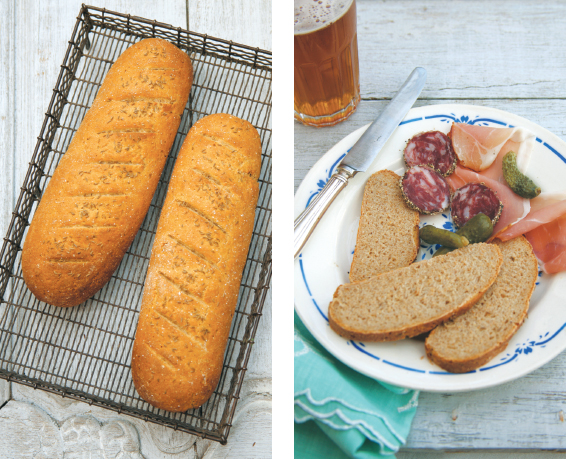
German bakers are the undisputed masters of rye-based breads and produce them in their pure form or in varying combinations with wheat. These range from simple loaves baked in modern commercial ovens to the absolutely delicious naturally leavened ones baked to perfection on the stone floor of wood-stoked ovens. The latter generally have a thick crust and instead of becoming stale, they seem to improve after a day or two when all the flavours have mellowed.
The following recipe is simplicity itself and produces a tasty loaf, with a slightly closer texture than pure wheaten bread. It does, though, contain a fair amount of wheat, which gives it more elasticity and makes it easier to handle. Its character will alter slightly, depending on the type of liquid used, and adding 1 tsp of caraway seeds will give it a twist. The buttermilk version is particularly delicious with cold cuts and keeps well. I always think of it as a cheat’s sourdough bread: it has the tanginess, without all the extra effort of nurturing starters and the like.
The dough can be shaped into freeform rectangular loaves or simple round ones. These are crusty when you remove them from the oven, but the crust will soften and become slightly chewy afterwards.
425 g/15 oz/scant 3 cups strong white (bread) flour
325 g/11½ oz/2 cups fine rye flour
2 tsp easy-blend (active dry) yeast
2 tsp brown sugar
1½ tsp salt
about 500 ml/17 fl oz/generous 2 cups buttermilk, milk or water, warmed
1 tsp caraway seeds (optional)
Put all the ingredients in a large bowl and mix well to moisten the dry ingredients. Use a heavy-duty mixer fitted with a dough hook to knead thoroughly until smooth and supple. It will be a fairly firm dough. Alternatively, turn out onto a floured surface or a non-stick silicone mat and knead until smooth and supple. The rye flour makes the dough a bit sticky and squelchy to start with, but the texture will improve as you continue kneading. Bring together in a ball and return to the bowl. Cover the bowl with clingfilm (plastic wrap) or a damp tea towel (dish towel) and set aside in a warm, draught-free place until doubled in size.
Grease a baking sheet.
Knock back the dough and knead lightly until smooth again. Divide into 2 equally sized portions.
For rectangular loaves, roll or flatten each piece out to a rectangle about 25 x 20 cm/ 9½ x 8 in and with a thickness of about 1 cm/½ in. Roll up the dough, starting at a short side for a squat loaf, or a long side for a slim one, and pinch the seam to seal. Place it seam-side down on the sheet and shape the other loaf in the same way.
For round loaves, shape each piece into a ball and flatten them slightly with your hand to a diameter of about 15 cm/6 in.
Cover both loaves loosely with lightly oiled clingfilm and leave in a warm, draught-free place until almost doubled in size.
Preheat the oven to 200˚C/400˚F/Gas Mark 6.
Make 6 or 7 parallel diagonal slashes on the top of each loaf and bake for about 30 minutes. To test, remove the loaves from the tin. Tap sharply on the top and bottom; they should sound hollow. Cool on a wire rack.
The loaves will keep for a few days if well wrapped and can also be frozen as soon as they have cooled.
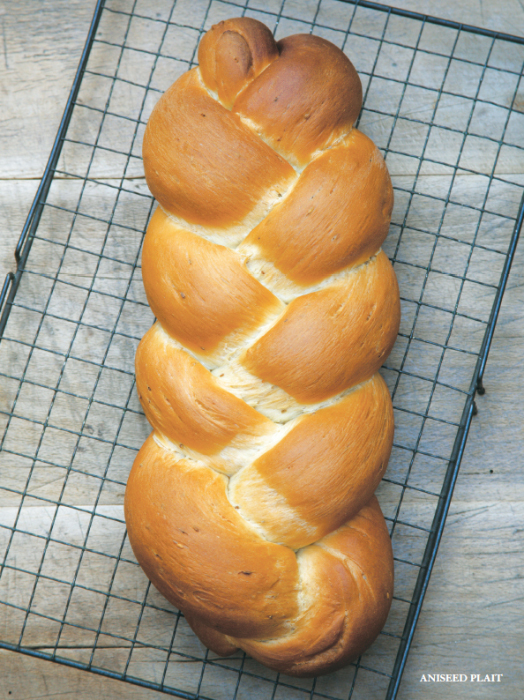
On the plantation at Skeldon, most families usually ate homemade breads and cakes, but my hopes were always raised when I saw the baker’s delivery boy from the neighbouring village, the carrier on his bicycle filled with breads such as this simple but delicious aniseed plait. While researching the history of Dutch baking, I was delighted to find that there is a similar loaf in the southern province of Zeeland. The chief difference between this loaf and the one of my childhood is that it usually contains some nutmeg and a hint of mace and it is baked in a tin. Nowadays, I often bake a hybrid version with the optional mace and nutmeg. Well wrapped, this will keep for a few days and also makes good toast.
Serve this sliced, with butter and a slice or two of mature cheese.
2 tsp whole aniseed (anise), bruised
500 g/1 lb 2 oz/3⅓ cups strong white (bread) flour
scant 2 tsp easy-blend (active dry) yeast
3 tbsp sugar
1 tsp salt
about 250 ml/9 fl oz/1 cup milk, warmed
50 g/1¾ oz/scant ½ stick butter, melted and cooled
1 egg, lightly beaten
¼ tsp freshly grated nutmeg and a pinch of ground mace (optional)
To bruise the aniseed, simply put the seeds in a mortar and bang them with a pestle.
Put the flour, yeast, sugar, salt, aniseed and spices (if using) in a large bowl. Add the milk, butter and egg and mix with a spoon or spatula until the dry ingredients are well moistened.
If you are kneading by hand, turn out onto a floured surface or a silicone mat and knead until elastic. Alternatively, use a heavy-duty mixer fitted with a dough hook and knead until elastic. This dough needs to be a little stiffer than for a panned loaf because it must hold its shape during baking. Shape into a ball and place in a large bowl. Cover with clingfilm (plastic wrap) or a tea towel (dish towel) wrung out in hot water, and leave in a warm, draught-free place until doubled in bulk.
Grease a baking sheet.
Knock back the risen dough and knead lightly until once more smooth and elastic. Divide the dough into 3 equal portions. Shape each portion into a rope about 50 cm/20 in long, making the middle of the rope a little thicker and the ends tapering. Pinch the tips of the three ropes together at the top to seal and plait the strands a little loosely, pinching the bottom ends to seal. Place diagonally on the baking sheet. Cover loosely with lightly oiled clingfilm and leave in a warm, draught-free place until doubled in bulk. This step is very important because if the loaf has not been allowed to expand fully, it will burst in the oven.
Meanwhile, preheat the oven to 200˚C/400˚F/Gas Mark 6.
Bake for 30–35 minutes, or until brown. To test, remove the loaf from the tin. Tap sharply on the top and bottom; it should sound hollow. Cool on a wire rack.
Salara is a yeast cake made from white bread dough, spiralled with a filling of sweetened coconut. It is a very homely kind of cake, sold by many bakeries, and it used to be made by housewives in Guyana and some parts of the Caribbean when the weekly batch of bread was being baked. The filling is made from freshly grated coconut, which is usually coloured a vibrant red to contrast sharply with the enclosing dough. I prefer a more subdued pink tint, but you can omit it altogether if you prefer, though the loaf will then lose some of its visual appeal. Frozen grated coconut is widely available in Asian shops and larger mainstream supermarkets, but if you cannot find it, fine desiccated (dry, unsweetened) coconut makes a reasonable alternative.
Well wrapped, salara will keep for a day or two and may also be frozen for up to three months. I always find it to be at its best straight from the cooling rack!
500 g/1 lb 2 oz/3⅓ cups strong white (bread) flour
2 tsp easy-blend (active dry) yeast
3 tbsp sugar
¾ tsp salt
65 g/2¼ oz/generous ½ stick butter, melted and cooled slightly
1 egg, beaten
350 g/12 oz finely grated fresh coconut, thawed to room temperature if frozen, or 300 g/10½ oz/ 3 cups fine desiccated (dry, unsweetened) coconut, mixed with 6 tbsp warm water
100 g/3½ oz/½ cup granulated sugar
red food colouring (optional)
Put the ingredients for the dough in a large bowl and mix to moisten the dry ingredients. Use a heavy-duty mixer fitted with a dough hook to knead thoroughly until smooth and supple. This is a medium-soft dough. Alternatively, turn out onto a floured surface or a non-stick silicone mat and knead until smooth and supple. Bring together in a ball and return to the bowl. Cover the bowl with clingfilm (plastic wrap) or a damp tea towel (dish towel), and set aside in a warm, draught-free place until doubled in size.
In the meantime, mix the filling ingredients together in a bowl and set aside.
Grease two baking sheets.
Knock back the dough and knead until smooth again. Divide into two portions and roll each piece out to a rectangle about 35 x 25 cm/14 x 10 in.
Spread half of the filling on each rectangle, leaving 1 cm/½ in free along the two long sides and 6 cm/2½ in free along the short sides. Starting at a short side, fold the free 6 cm/ 2½ in of the dough inwards so that it overlaps, and keep on folding it over loosely so that you get a flat Swiss roll (jelly roll). Rolling it too tightly will make it burst as it bakes. Moisten the end slightly and pinch to seal. Make sure that the seam is under the roll, or the roll itself will open out while baking. Press the two ends to seal. Place on a baking sheet and cover loosely with lightly oiled clingfilm. Shape the other loaf in the same way, then place on the second baking sheet.
If your oven cannot take both sheets at the same time, leave one in a slightly cooler place so that it takes longer to prove. Leave until almost doubled in size.
Preheat the oven to 200˚C/400˚F/Gas Mark 6.
Bake for 30–35 minutes, or until golden brown. Cool on a rack and cut into thick slices to serve.
Some advice: bite through all the layers at the same time – and don’t turn the slice around so that the cut sides face up and down, or you will lose a lot of filling.

Potica is a yeast cake that is very popular in Eastern European countries. It is often made at home, with fillings varying from nuts to poppy seed and Turkish delight. This walnut version is usually made in autumn, when the walnut harvest is brought in. I hardly need mention that the quality of the walnuts is extremely important, especially in recipes for which they form a major component. Even a slight rancid taste will spoil the cake, so choose your nuts wisely. I love eating my version of it for breakfast, accompanied by a cup of milky coffee.
200 g/7 oz/1⅓ cups strong white (bread) flour
1 tsp easy-blend (active dry) yeast
3 tbsp granulated sugar
¼ tsp salt
55 g/2 oz/½ stick butter, melted and cooled
about 100 ml/3¼ fl oz/scant ½ cup milk, warmed
1 egg yolk
125 g/4½ oz/generous 1 cup walnuts
50 g/1¾ oz/¼ cup caster (superfine) sugar
¼ tsp ground cinnamon (optional)
4 tbsp warm milk
1 egg white
This dough is quite soft, but the texture will improve after the first rising and it will be easier to handle. The easiest thing to do is to use a mixer with a dough hook. Mix all the ingredients together in a large bowl and knead until the dough becomes smooth and leaves the sides of the bowl. If you are going to do this manually, it is a good idea to start with a wooden spoon and switch to your hands when the dough becomes more manageable. Knead for about 10 minutes, or until the dough becomes smooth. Shape the kneaded dough into a ball and return to the bowl. Cover with clingfilm (plastic wrap) or a damp tea towel (dish towel), and leave in a warm place until doubled in size.
For the filling, pulse the walnuts, caster sugar and cinnamon in a food processor until fine. Pour in the warm milk and egg white with the motor still running and pulse until homogenous. Set aside until you need it.
Knock back the dough and knead for about 5 minutes, or until it is smooth and supple.
Grease a baking sheet.
On a well-floured surface, roll the dough out to a rectangle about 35 x 25 cm/14 x 10 in. Spread the filling evenly on this, leaving about 2 cm/¾ in clear on all sides. Moisten this clear area with a little water, then roll up the dough from one short side. Do not roll it too tightly, or it will burst as it rises. However, try to make it more or less cylindrical in shape, because this is a soft dough and has a tendency to spread. Place the roll diagonally on the baking sheet. Cover with lightly oiled clingfilm and leave in a warm place until almost doubled in size.
Preheat the oven to 180˚C/350˚F/Gas Mark 4.
Bake for 35–40 minutes, or until light brown. Transfer carefully to a wire rack to cool.
Serve in slices. The potica will keep, well wrapped at cool room temperature, for about three days. It also freezes well. If you are not eating it freshly baked, you might like to heat each portion for a few seconds in the microwave. This brings out the flavours even better.
For a chocolate version, add 1 tbsp cocoa and 1 tbsp extra milk to the filling ingredients. Be warned, though, that this does tend to push the walnuts into the background.
This white loaf is kept moist and subtly flavourful with coconut milk instead of water or dairy milk. The butter can be replaced with vegetable shortening or another similar product to make it suitable for people who are lactose intolerant.
750 g/1 lb 10 oz/5 cups strong white (bread) flour
2¼ tsp easy-blend (active dry) yeast
3 tbsp sugar
1½ tsp salt
100 g/3½ oz/generous ¾ stick butter, melted and cooled slightly
350 ml/12 fl oz/1½ cups lukewarm coconut milk
2 x 450 g/1 lb loaf tins, greased
Put all the ingredients in a large bowl and mix to moisten the dry ingredients. Use a heavy-duty mixer fitted with a dough hook to knead thoroughly until smooth and supple. This is a medium-soft dough. Alternatively, turn out onto a floured surface or a non-stick silicone mat and knead until smooth and supple. Bring together in a ball and return to the bowl. Cover the bowl with clingfilm (plastic wrap) or a damp tea towel (dish towel), and set aside in a warm, draught-free place until doubled in size.
Knock back the dough and knead lightly until smooth again. Divide into 2 portions and roll or flatten each piece out to a rectangle that is as wide as your tin is long, with a thickness of about 1 cm/½ in.
Roll up the dough, starting at a short side, and pinch the seam to seal. Place it seam-side down in the tin and shape the other loaf in the same way. Cover both loaves loosely with lightly oiled clingfilm and leave in a warm, draught-free place until almost doubled in size.
Preheat the oven to 200˚C/400˚F/Gas Mark 6.
Bake in the oven for about 30 minutes. To test, remove the loaves from the tins. Tap sharply on the top and bottom; they should sound hollow. Cool on a wire rack.
The loaves will keep for a day or two if well wrapped and can also be frozen.
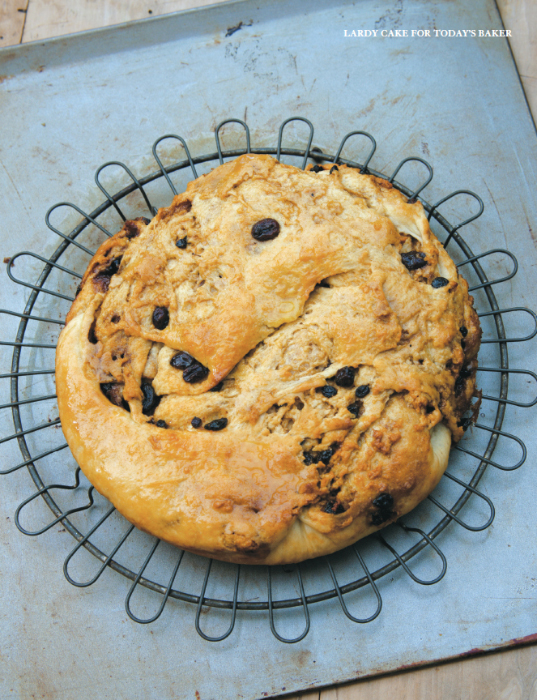
Lardy Cake is a traditional British yeast cake dating from around the second half of the nineteenth century. It has fallen from grace in recent years, regarded as a health hazard: it has been variously described as a ‘dietary nightmare’, ‘artery clogger’ and ‘lethal fattener’. The writer Elizabeth David even suggested that every Lardy Cake should carry a health warning. I suspect that many of its detractors would not hesitate to pour cream sauce over a huge steak on a regular basis, yet they begrudge the bit of butter that goes into an excellent cake. Perhaps they simply don’t like cakes. Of course, the name may be partly responsible for the image: the word ‘lard’ conjures up decidedly more negative images than butter, and some recipes used it with abandon. My version uses just enough butter for flavour and texture, and I am even inclined to stick a label on it saying ‘Healthy Choice’, especially if you treat it as a cake to be eaten and savoured instead of a bread to fill the stomach.
Lardy Cakes were traditionally harvest cakes. In small rural communities where sugar, spices and dried fruit were luxuries, they were made for special occasions. When a pig was slaughtered, every part was carefully used. The offal would be eaten fresh, hams and bacon laid away, and fat rendered to lard. Sprigs of rosemary might be added to some of the lard, especially if it was to be used for spreading on bread. Most, however, was put away in its pure form for cooking purposes during the coming months, and a pig’s bladder made an excellent receptacle. Due to the unaccustomed abundance, a Lardy Cake or something similar was almost certain to be made. It was made from plain bread dough but with sugar, spices and, perhaps, dried fruit. The Oxfordshire Lardy, for instance, does not contain dried fruit; the Wiltshire Lardy has only currants; and the Gloucestershire Lardy has both currants and raisins.
The dough is folded and rolled out much like puff pastry. Before being put into the oven, a cross-hatched pattern can be cut into the top. This touch is decorative but also practical because it was traditional to break the cake, not cut it. The cake turns out beautifully veined with the delicious filling, and crisp and sticky from sugar that has escaped and caramelized, adding to its rugged charm.
375 g/13 oz/2½ cups strong white (bread) flour
1½ tsp easy-blend (active dry) yeast
1 tbsp sugar
¾ tsp salt
35 g/1¼ oz/scant ⅜ stick butter, melted and cooled
about 200 ml/7 fl oz/¾ cup milk, warmed
100 g/3½ oz/⅞ stick butter, softened
75 g/2¾ oz/⅓ cup soft dark brown sugar
½ tsp ground cinnamon
¼ tsp freshly grated nutmeg
50–75 g/1¾–2¾ oz/⅓–½ cup currants or raisins, or a mixture (optional)
beaten egg, to glaze
Put all the ingredients in a large bowl and mix to moisten the dry ingredients. Use a heavy-duty mixer fitted with a dough hook to knead thoroughly until smooth and supple. Alternatively, turn out onto a floured surface or a non-stick silicone mat and knead until smooth and supple. Bring together in a ball and return to the bowl. Cover the bowl with clingfilm (plastic wrap) or a damp tea towel (dish towel), and set aside in a warm, draught-free place until doubled in size.
For the filling, beat all the ingredients together until creamy. Set aside.
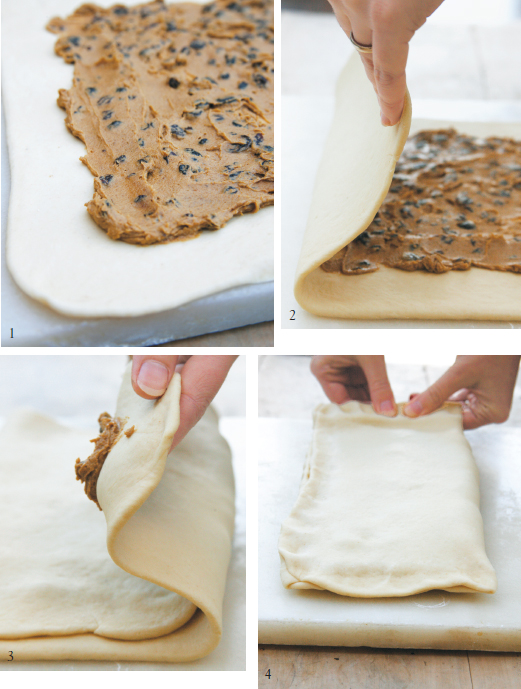
Knock back the risen dough and re-knead it briefly. On a lightly floured surface, roll it out to a rectangle about 50 x 25 cm/20 x 10 in. Spread the filling evenly on two-thirds of the dough sheet, leaving one outer third empty and about 4 cm/1½ in clear on all other sides (1). If using, sprinkle the dried fruit over this and press down to embed. Fold the empty third over the middle third and the remaining third over this (2 and 3). Pinch all the edges well to seal the filling in (4). Cover with a sheet of clingfilm and leave to rest for about 5 minutes to make it more manageable.
Give the dough parcel a quarter turn (90°) and roll it into a rectangle about 30 x 15 cm/ 12 x 6 in. Fold this into thirds again and leave to rest for 5 minutes. Repeat this procedure three more times, turning the dough by a quarter turn and rolling and folding. If you find that you are losing too much filling, omit the final turn.
I must warn you that this can be very messy work because the filling tends to ooze out in weak spots. Just patch it up as well as you can and continue to work. All these oozing bits will caramelize nicely as the cake bakes. Equally, though, you don’t want to lose too much of the filling, as the lamination will be less effective. After the final rolling and folding, grease the tin and put the dough packet into it, then flatten with your hands so that it fits as snugly as you can get it. Cover the tin with clingfilm and leave it in a warm place until almost doubled in size.
Meanwhile, preheat the oven to 180˚C/350˚F/Gas Mark 4.
Brush the dough with beaten egg, then lightly score a cross-hatched pattern onto the surface (if wished). Don’t cut too deeply, or too much filling will be able to escape. Place the baking tin on a baking sheet (to catch leaks) and bake for 25–30 minutes, or until brown. Remove from the oven, but leave in the tin for about 5 minutes. Then carefully release the clip and turn the cake upside down on a wire rack. Remove the bottom of the tin, which will probably still be attached to it, and leave to cool further.
Eat lukewarm or cold, cut into wedges or slices.
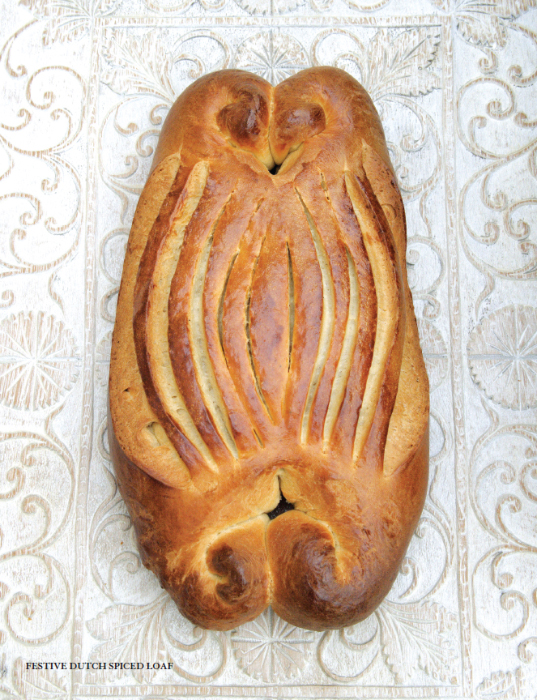
In former days, Dutch bakers rewarded loyal customers with a rich fruit loaf at Easter and another at Christmas. In the province of North Holland, particularly in the Zaandam area, the Christmas gift often took the shape of a Duivekater, a delicately spiced and beautifully decorated shinbone-shaped bread. It was also customary in wealthier households to present domestic servants with a Duivekater at the end of the year, along with their wages and a new pair of clogs.
The bread is now a speciality item, made by a handful of bakers in North Holland, where a considerable amount of bickering goes on as to who sells the genuine article – and who doesn’t. Quite a futile pastime, if you ask me, as the Duivekater goes back such a long way that it is impossible to define ‘genuine’.
The name is derived from Duive(l) and kater, literally ‘Devil’s tomcat’. Its original use was as a midwinter offering to pagan gods and natural forces, to induce them to keep the year’s crop safe from harm. The bread was probably buried in the appropriate field and may have replaced an animal or even human sacrifice, hence the evocative shape. Over the centuries, it became a more stylized affair with great visual appeal.
Jan Steen (1626–1679), best known for his generally merry depictions of Dutch life, incorporated Duivekaters into a few of his paintings, most notably in a large canvas of St Nicholas’ Eve and a smaller one of the Leiden baker Arend Oostwaert and his wife. In the painting of St Nicholas’ Eve, a large diamond-shaped loaf is propped up against a table in the foreground. The loaf displayed by the baker and his wife among the selection of their wares is an elongated one with the typical shinbone-shaped knobs at either end (see right). Both loaves are decorated with intricate cuts, which subsequently came to be known as ‘Jan Steen cuts’ and were copied by the more artistically minded bakers.
You don’t need to be a great artist to turn out a beautiful loaf, though. A few simple strokes with a sharp knife, scored onto the glazed surface of the bread, will produce an eye-catching result after baking. If you are hesitant about trying the freeform shape, the dough can also be baked in a suitable loaf tin and cuts can be made on the surface. In that case, make a slightly softer dough by adding a little extra milk. This is delicious eaten fresh, but connoisseurs advise leaving the well-wrapped loaf for a few days to allow the flavour to develop before slicing it thinly and serving with butter.
The Leiden Baker Arend Oostwaert and His Wife Catharina Keyserswaert, Jan Havicksz Steen, 1658. The baker’s wife holds up a large rusk, while pretzels and a variety of rolls and loaves frame the beautiful Duivekater propped against the wall.
500 g/1 lb 2 oz/3⅓ cups strong white (bread) flour
scant 2 tsp easy-blend (active dry) yeast
100 g/3½ oz/½ cup granulated sugar
¾ tsp salt
zest of ½ lemon
¼ tsp freshly grated nutmeg
½ tsp ground cardamom
about 200 ml/7 fl oz/generous ¾ cup milk, warmed
75 g/2¾ oz/⅔ stick butter, melted and cooled slightly
1 egg, lightly beaten
extra beaten egg for glazing
Put the flour, yeast, sugar, salt, lemon zest and spices in a large bowl. Add the milk, butter and beaten egg, and mix with a spoon or spatula until the dry ingredients are well moistened. If you are kneading by hand, turn out onto a floured surface or a silicone mat and knead until elastic. Alternatively, use a heavy-duty mixer fitted with a dough hook and knead until elastic. This dough needs to be a little stiffer than for a panned loaf because it must hold its shape during baking. Shape into a ball and place in a large bowl. Cover with clingfilm (plastic wrap) or a tea towel (dish towel) wrung out in hot water, and leave in a warm, draught-free place until doubled in bulk.
Grease a baking sheet.
Knock back the risen dough and transfer to a lightly floured surface. Knead until once more smooth and elastic. Roll out to an elongated oval shape, about 25 cm/10 in long. Make a cut at the top, about 10 cm/4 in long. Make a similar cut at the bottom. Place on the baking sheet. Twirl the cut pieces between your fingers to lengthen them a little. Coil them inwards into a spiral. You will have two spirals at the top and two at the bottom. Cover loosely with lightly oiled clingfilm and leave in a warm, draught-free place until almost doubled in bulk.
Preheat the oven to 180˚C/350˚F/Gas Mark 4.
Brush well with beaten egg and use a very sharp knife to score a decorative pattern into the top. A series of shallow semi-circles goes well with the shape. Start in the middle, making cuts the shape of a parenthesis – ( ) – and then make four or five parallel cuts on either side.
Bake for 30–35 minutes. The loaf should be a rich golden brown with the scored pattern much lighter. To test, tap the loaf sharply on the top and bottom; it should sound hollow. Cool on a wire rack.
Dutch fruit breads vary from region to region but share the characteristic of being well filled with fruit. The fruit is housed in a variety of doughs, ranging from wholemeal to rye and white flour, with varying combinations of these. They are stocked all week and, in addition, many bakers make a white fruit loaf filled with almond paste for the weekend crowd.
In the region of Twente, in the east of Holland, there is a very special loaf called a Krentenwegge, which can be more than 100 cm (40 in) long. Modern bakers sell it pre-packaged, a fixed number of slices or weight to a pack, and it is eaten as part of a bread-based meal or served with coffee. In Twente it is invariably served to the numerous guests who come to visit a newborn baby, replacing the ‘beschuit met muisjes’ (rusks with sugar-coated aniseed that look like minute mice) that are common in the rest of the country. Its symbolic use as a Kraamschudderswegge stretches back over several centuries. Kraamschudden is an expression for visiting a newborn baby, and literally means ‘cradle shaking’. An old and hospitable custom dictated that, in this area of often grinding poverty, neighbours clubbed together to buy the loaf that would be served to visitors. It cost them very little per time and they were secure in the knowledge that the favour would be returned whenever necessary. (This solidarity lies behind the expressions ‘Dutch treat’ and ‘going Dutch’, both of which have sadly now become derogatory.) The size of the loaf varied, of course, depending on how much money had been collected.
Nowadays huge tins may be used, but early loaves were baked on a sheet or on the oven floor, with the dough held in place by wooden planks and bricks, allowing the baker to regulate the size at will. The planks served as insulation and the loaf was baked slowly to succulent perfection and served slathered with butter. Those who were better off or happened to belong to an association of some kind might be presented with more than one loaf, and givers vied to outdo each other in terms of size and presentation. Old photographs show loaves being fetched ceremonially on long ladders decorated with garlands of flowers, underlining their great length, and a brass band was sometimes invited to accompany the bearers, especially if the recipient was someone of good social standing.
This well-filled fruit loaf stays moist for a few days and is a good breakfast bread. A forgotten piece in the corner of the bread bin, discovered after a few days, makes nice toast. If you double the recipe, the second loaf can be frozen for another time.
350 g/12 oz/2⅓ cups strong white (bread) flour
1¾ tsp easy-blend (active dry) yeast
2 tsp sugar
¾ tsp salt
½ tsp ground cardamom or zest of ½ lemon
55 g/2 oz/½ stick butter, melted and cooled slightly
1 egg, beaten
about 150 ml/5 fl oz/⅔ cup milk, warmed
100 g/3½ oz/⅔ cup currants
55 g/2 oz/⅓ cup sultanas (golden raisins)
2 tbsp dried cranberries
1 tbsp candied orange peel
450 g/1 lb loaf tin, greased
Place all the ingredients except the fruit in a large bowl. Mix to moisten the dry ingredients and knead thoroughly until smooth and supple. This may be done either by hand or using a mixer fitted with a dough hook, to make a soft dough. Bring the dough together in a ball, then cover the bowl with clingfilm (plastic wrap) or a damp tea towel (dish towel), and set aside in a warm, draught-free place until doubled in size.
Meanwhile, rinse the currants and sultanas in hot water. Drain the fruit, then pat dry with paper towels and leave in a warm place with the cranberries and orange peel until needed.
Knock back the risen dough and transfer to a lightly floured surface. Knead the fruit thoroughly into the dough. Roll or flatten the dough into a rectangle that is as wide as your tin is long, and about 1 cm/½ in thick. Roll up the dough, starting at a short side, and pinch the seam to seal.
Grease the tin. Place the dough roll seam-side down in the tin and remove any loose fruit from the surface, or it will burn while baking. Cover the loaf loosely with lightly oiled clingfilm and leave in a warm, draught-free place until almost doubled in size.
Preheat the oven to 200˚C/400˚F/Gas Mark 6.
Bake in the oven for about 30 minutes. To test, remove the loaf from the tin. Tap sharply on the top and bottom; it should sound hollow. Cool on a wire rack.
Rye flour makes moist and satisfying fruit loaves, and this kind of bread is often made in eastern Holland, in the area bordering on Germany. A similar mixture is baked into squat, round loaves for the annual horse market held in Zuidlaren on the third Tuesday in October. This is one of the oldest markets of its type in Europe and has been held since the thirteenth century. Few visitors leave without purchasing one or more of the loaves after they have tasted the lavishly buttered sample slices. This recipe is for freeform loaves that are easy to shape. They will keep well for a few days.
375 g/13 oz/2½ cups strong white (bread) flour
250 g/9 oz/1½ cups fine rye flour
2¾ tsp easy-blend (active dry) yeast
1½ tbsp sugar
1 tsp salt
55 g/2 oz/½ stick butter, melted and cooled
1 egg, lightly beaten
325 ml/11 fl oz/generous 1¼ cups milk, warmed
150 g/5½ oz/1 cup currants
150 g/5½ oz/generous ¾ cup sultanas (golden raisins)
75 g/2¾ oz/½ cup walnuts, coarsely chopped
2 tbsp crystallized (candied) orange peel
Place all the ingredients except the fruit and nuts in a large bowl. Mix to moisten the dry ingredients and knead thoroughly until smooth and supple. This may be done either by hand or using a mixer fitted with a dough hook. Rye flour is very slippery and will squelch between your fingers, but persevere: it improves with kneading. Bring the dough together in a ball and return to the bowl. Cover with clingfilm (plastic wrap) or a damp tea towel (dish towel), and set aside in a warm, draught-free place until doubled in size.
Meanwhile, rinse the currants and sultanas in hot water. Drain the fruit, then pat dry with paper towels and leave in a warm place with the walnuts and orange peel until needed.
Knock back the risen dough and transfer to a lightly floured surface. Knead the fruit and nuts thoroughly into the dough. Divide the dough in half and roll or flatten each piece into a rectangle about 25 x 20 cm/9½ x 8 in and about 1 cm/½ in thick. Roll up the dough, starting at a short side, and pinch the seam to seal.
Grease a baking sheet. Place the loaves side by side, seam-side down on the sheet, and remove any loose fruit from the surface or it will burn while baking. Cover loosely with lightly oiled clingfilm and leave in a warm, draught-free place until almost doubled in size.
Preheat the oven to 200˚C/400˚F/Gas Mark 6.
Make 6 or 7 parallel diagonal slashes in the top of each loaf and bake for about 30 minutes. To test, remove the loaves from the tin. Tap sharply on the top and bottom; they should sound hollow. Cool on a wire rack.
The loaves will keep for a few days if well wrapped and can also be frozen as soon as they have cooled.
The simit is one of the most ubiquitous street foods in Turkey, and whatever the time of day, people love to nibble or munch on the cheap but delicious sesame-coated rings. There is a vendor at practically every street corner, and boys on bicycles fitted with glass cases in front turn up regularly at open-air markets to ply their trade. Vendors collect their wares from specialist bakeries and return several times a day to replenish their stock.
There are two basic types: the chewy one that is similar to the bagel, and the softer and richer milk simit. The former is poached in a pekmez (pomegranate molasses) solution before being baked, and this gives it a dark and shiny crust and firm texture. The recipe below is for milk simit. Both kinds are generously coated with sesame seeds, and mahleb is often added to the dough for special occasions, giving the streets a festive aroma. Mahleb is a greatly prized flavouring in Turkey and Greece and comes from the tiny seeds of an indigenous black cherry (Prunus mahaleb). Its perfume has often been compared with almonds, but that sells it too short. It is far more complex, with hints of musk, citrus, vanilla and other heady fragrances – in short, a spice box in a seed. It is sold as powder or in kernel form and is not easy to obtain outside the region. If you get the opportunity, do try it, and if you have the choice, go for the kernels, which you can pound to a powder yourself; the ready-ground powder loses its freshness more quickly. A scant ½ tsp will give the dough below a hauntingly delicious flavour.
Note that this recipe creates mere babies compared with the ones you’ll find on the streets. But commercial bakers have cavernous ovens and long peels while most of us have to make do with domestic ovens and standard-sized baking sheets. Eat on the day of baking or freeze as soon as they have cooled.
250 g/9 oz/1⅔ cups strong white (bread) flour
½ tsp salt
1 tsp easy-blend (active dry) yeast
1 tbsp sugar
1 egg, beaten
35 g/1¼ oz/generous ¼ stick butter, melted
about 100 ml/3¼ fl oz/scant ½ cup milk
1 egg, beaten, for dipping
4–6 tbsp sesame seeds
½ tsp mahleb (optional)
Combine the flour, salt, yeast and sugar in a large bowl. Add the beaten egg, butter and milk and mix with a spatula to moisten the dry ingredients. Use a heavy-duty mixer fitted with a dough hook to knead thoroughly until smooth and supple. Alternatively, turn out onto a floured surface or a non-stick silicone mat and knead until smooth and supple. Bring together in a ball and return to the bowl. Cover the bowl with clingfilm (plastic wrap) or a damp tea towel (dish towel) and set aside in a warm, draught-free place until doubled in size.
Knock back the dough and knead briefly until once again elastic. Divide into 6 pieces. Shape each piece into a rope about 40 cm/16 in long; the longer the rope, the more elegant the finished simit. Shape each piece into a ring, with an overlap of about 3 cm/1¼ in. Pass your hand through the ring and roll the two ends, which are now overlapping, back and forth under your fingers to join them and seal the ring neatly and securely. Grease a baking sheet, then place each ring on the sheet.
Put the beaten egg into one dish and the sesame seeds into a second. Take one ring and dip it thoroughly into the egg. Then turn it around several times in the sesame seeds to coat well on both sides. Replace on the baking sheet. Space the rings neatly on the sheet. Cover loosely with clingfilm and leave in a warm, draught-free place until puffy but not quite doubled in bulk.
Meanwhile, preheat the oven to 225˚C/425˚F/Gas Mark 7.
Bake the rings for 12–15 minutes, or until golden brown. Cool on a wire rack.

Street stall in Konya (Turkey) selling simit and other rolls.
It’s a mystery how these sweetish lemon-flavoured Guyanese favourites came by their name, as they have absolutely no connection with the game. Professional bakers add minute quantities of lemon oil to the dough, but this is not widely available to home bakers. If you do find it, be very careful how you handle it, as it is very aggressive. A kind baker once offered me a few spoonfuls from her stock, but as soon as she poured it into a Styrofoam container, the container dissolved in front of our eyes. Lemon extract, or the freshly grated zest of an organic lemon, make excellent substitutes and the latter option is what I normally use.
This dough is very soft and a bit sticky and is best kneaded in an electric mixer fitted with a dough hook. If you are forced to knead it by hand, do so in the bowl to avoid having to add flour when it sticks to the work surface. The good news, however, is that the texture improves considerably after the first rising so that the rolls can be shaped without problem. Fresh from the oven, they have a soft brioche-like texture, but the flavour mellows properly by the next day. Eat them split and buttered, with optional cheese. They can also be wrapped and frozen as soon as they are cool.
550 g/1 lb 4 oz/3⅔ cups strong white (bread) flour
2 tsp easy-blend (active dry) yeast
75 g/2¾ oz/generous ⅓ cup granulated sugar
1 tsp salt
¼ tsp lemon oil, or 1½ tsp lemon extract, or zest of 1 lemon, preferably organic
75 g/2¾ oz/scant ¾ stick butter, melted and cooled slightly
1 egg + 1 yolk, beaten
about 250 ml/9 fl oz/1 cup milk, warmed
Put the flour, yeast, sugar and salt in a large bowl. If using fresh lemon zest, grate it over the flour. Add the remaining ingredients, including the lemon oil or extract (if using), then mix to moisten the dry ingredients. Knead thoroughly. This may be done either by hand, in the bowl, or using a mixer with a dough hook. This is a very soft dough that stays slightly sticky to the touch, so the mixer is the better option. Scrape the dough together in a ball. Cover the bowl with clingfilm (plastic wrap) or a damp tea towel (dish towel) and set aside in a warm, draught-free place until doubled in size.
Knock back the risen dough and transfer to a silicone mat or a very lightly floured surface. Divide the dough into 12 equal pieces and shape each piece into a neat ball. Arrange them on a greased baking sheet. Cover loosely with lightly oiled clingfilm and leave in a warm, draught-free place until almost doubled in size.
Meanwhile, preheat the oven to 200˚C/400˚F/Gas Mark 6.
Bake for 12–15 minutes, or until light brown. Remove from the baking sheet and transfer to a wire rack to cool.
Vatrouschki are sweet curd cheese buns of Russian origin, usually made with a yeast dough. They are similar to the Central European Kolatschen in shape, but vatrouschki are commonly made with cheese, whereas most Kolatschen are filled with jam or fruit purées. This recipe uses quark and makes light, guilt-free buns, but if you cannot find it in the shops, use another smooth curd cheese. Cream cheese can also be used for a richer if slightly less authentic article. They are best eaten fresh but may also be frozen.
350 g/12 oz/2⅓ cups strong white (bread) flour
1½ tsp easy-blend (active dry) yeast
2 tsp sugar
½ tsp salt
55 g/2 oz/½ stick butter, melted and cooled slightly
1 egg, beaten
150 ml/5 oz/⅔ cup milk, lukewarm
250 g/9 oz/1 cup quark or other smooth curd cheese
100 g/3½ oz/½ cup granulated sugar
2 tbsp flour
1 egg, well beaten
1 tsp vanilla extract or a pinch of lemon zest (optional)
1 egg, beaten, for glazing (optional)
Place all the ingredients for the dough in a large bowl and mix to moisten the dry ingredients. Use a heavy-duty mixer fitted with a dough hook to knead thoroughly until smooth and supple. Alternatively, turn out onto a floured surface or a non-stick silicone mat and knead until smooth and supple. Bring together in a ball and return to the bowl. Cover the bowl with clingfilm (plastic wrap) or a damp tea towel (dish towel) and set aside in a warm, draught-free place until doubled in size.
Meanwhile, mix all the filling ingredients together until well combined. Chill until needed.
Knock back the dough and re-knead lightly. Divide the dough into 8 pieces. Roll each piece into a ball between your palms. Grease a baking sheet, and place each ball on it, then flatten to a diameter of about 9 cm/3½ in and dust with flour. Press the bottom of a large tumbler or jam jar into the centre of the dough to make as deep an indentation as possible. You will need to do this a few times in order to make a fairly large well. The outer edge of the dough should not be more than 1.5 cm/¾ in wide. Leave to rest for about 15 minutes. This step is very important. If the centre has puffed up a lot, press it down gently again.
Spoon in the filling, trying not to let any drip over the sides. Leave for 10–15 minutes.
Meanwhile, preheat the oven to 180˚C/350˚F/Gas Mark 4.
If desired, carefully brush the dough edges with beaten egg. This gives an attractive sheen but is not absolutely necessary.
Bake for about 20 minutes. Transfer to a wire rack to cool.
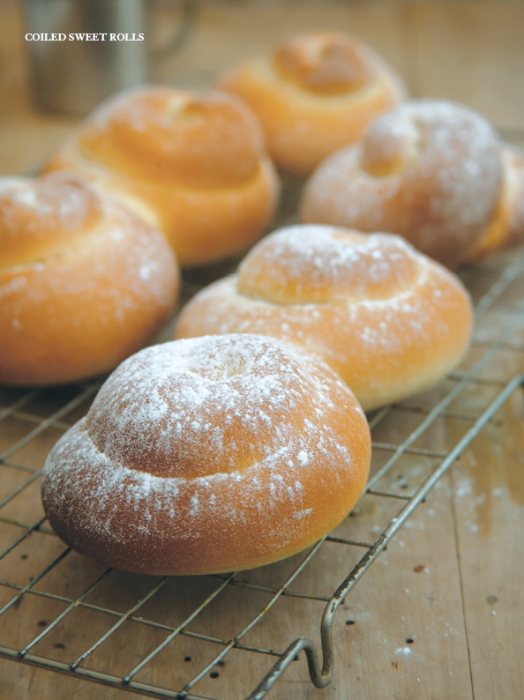
Saim is the Majorcan word for lard, so you could say that these coiled yeast cakes are Majorcan lardy cakes. I prefer to substitute butter for a variety of reasons, including flavour and allergic reactions, but if you are a fan of lard you could always do it the authentic way. Ensaimadas are sometimes made as one large cake, and some bakers sell them beautifully packaged in special boxes. The rolls are more common and are an ideal breakfast item. They are delicious when freshly baked but will also keep for a day or two. If you want to freeze a few, wrap them individually in clingfilm before putting them into a storage container. They can be thawed in the microwave. In fact, even if you are not using them from frozen, reheating them for a few seconds in the microwave helps to loosen the layers and brings out the buttery flavour.
300 g/10½ oz/2 cups plain (all-purpose) flour
1 tsp easy-blend (active dry) yeast
50 g/1¾ oz/¼ cup granulated sugar
scant ½ tsp salt
25 g/1 oz/¼ stick butter, melted
2 eggs, lightly beaten
about 5 tbsp milk, lukewarm
55 g/2 oz/½ stick butter, softened, or 4 tbsp lard
icing (confectioner’s) sugar, for dusting
Put the flour, yeast, sugar and salt in a large bowl. Add the melted butter, eggs and milk. Mix well with a spatula to moisten the dry ingredients. Use a heavy-duty mixer fitted with a dough hook to knead thoroughly until smooth and supple. Alternatively, turn out onto a floured surface or a non-stick silicone mat and knead until smooth and supple. Bring together in a ball and return to the bowl. Cover with clingfilm (plastic wrap) or a damp tea towel (dish towel) and set aside in a warm, draught-free place until doubled in size.
Knock back the dough and knead again for about 3 minutes. Divide the dough into 6 portions and cover them loosely with clingfilm. Lightly flour your work surface; a silicone mat works very well here. Take one portion and roll it out to a shape like the sole of a shoe or an elongated oval measuring roughly 30 x 10 cm/12 x 4 in.
Brush the dough with the softened butter, taking care not to go over the edges. From a long side, roll the dough up to form a cylinder and pinch all along the seam to seal. Roll this cylinder back and forth across your work surface, under your outstretched fingers, to neaten it and lengthen it to about 35 cm/14 in. Coil it into a loose spiral and tuck the end underneath. Grease a baking sheet, then put the spiral on it. Shape the other 5 pieces of dough.
Cover with lightly oiled clingfilm and leave in a warm place until almost doubled in size.
Meanwhile, preheat the oven to 200˚C/400˚F/Gas Mark 6.
Bake the rolls for about 10 minutes. Cool on a wire rack and dust with icing sugar.
This is an adaptation of a Filipino heirloom recipe. It was given to me by my friend Pia from Manila, who is a generous source of goodies and recipes. This is her grandmother’s recipe, and as she gave it to me she conjured up a picture of Spanish galleons coming into port in full sail with all kinds of European delicacies in their holds, including the red-waxed heads of well-aged Edam cheese, called queso de bola (ball cheese) locally. It was easy to imagine throngs of Filipinos on the wharves, eagerly awaiting the cheese so that they could dash off home and whip up a batch of these delicious buns.
The origin is undoubtedly Spanish: a descendant of the Majorcan ensaimadas. The Majorcan version is made from thinly stretched dough, generously coated with lard (the eponymous saim) and then coiled. This is the version the Filipinos originally learned to make, but when proper refrigeration became available the elite classes started making their enseymadas with butter instead of lard and the dough became richer and richer. However, there are still some pockets of traditional lard-based enseymadas remaining in places such as Bulacan. The combination of salty and sweet is much loved in the Philippines, and cheese is used in a number of sweet dishes. And as if the buns were not already rich and calorific, they are usually served with more butter, sugar and cheese on top. Although the classic enseymada always has cheese, I have also tasted a delicious variant filled with mashed ube (purple yam), another popular Filipino staple.
Like the Majorcan version, they are best eaten fresh but will also freeze well. Freeze and reheat in the same way.
375 g/13 oz/2½ cups plain (all-purpose) flour
75 g/2¾ oz/generous ⅓ cup granulated sugar
scant 1¾ tsp easy-blend (active dry) yeast
125 ml/4 fl oz/½ cup milk, warmed
100 ml/3½ fl oz/scant ½ cup water, warmed
3 egg yolks
¼ tsp salt
100 g/3½ oz/⅞ stick butter, softened
50 g/1¾ oz/scant ½ stick butter, melted
125 g/4½ oz well-aged Edam or Gouda cheese, finely grated
melted butter
grated cheese
caster (superfine) sugar
8 x 10-cm/4-in tins, greased *
This is a very rich dough, so it’s best to make a sponge first to help the yeast on its way before adding the butter and yolks.
Put 75 g/2¾ oz/½ cup flour together with the sugar and yeast in a large bowl. Stir the milk and water into the ingredients in the bowl. Cover the bowl with clingfilm (plastic wrap) or a damp tea towel (dish towel) and leave in a warm, draught-free place until bubbles appear on the surface.
Now whisk in the egg yolks. Add the salt and remaining flour a little at a time and beat well with a wooden spoon or spatula. When all of the flour has been absorbed, add the softened butter. The dough will be very soft. An electric mixer fitted with a dough hook makes short work of it. Alternatively, you can continue beating it with a wooden spoon for about 5 minutes if you don’t fancy getting your hands messy, or use one hand to work it really well in the bowl. When it’s smooth, scrape all the dough together into the centre of the bowl, then cover with clingfilm and leave in a warm, draught-free place until doubled in size.
Knock back the dough and beat it for a minute or so, then turn it out onto a well-floured surface. Divide into 8 pieces and cover them loosely with clingfilm. Roll each piece of dough out to a shape like the sole of a shoe or an elongated oval about 24 x 14 cm/ 9½ in x 5½ in, dusting with flour as necessary. A silicone mat is a blessing here.
Brush each piece of dough with melted butter and sprinkle with one-eighth of the grated cheese (15 g/½ oz). From a long side, roll the dough up to form a cylinder and pinch all along the seam to seal. Shape into a coil and place in the tin, seam-side down. If using individual tins, arrange them on a baking sheet and cover with lightly greased clingfilm. Leave in a warm, draught-free place until almost doubled in bulk.
Meanwhile, preheat the oven to 200˚C/400˚F/Gas Mark 6.
Bake for 15–20 minutes, or until golden brown. Cool on a wire rack.
If you like, brush with more melted butter and sprinkle with grated cheese and caster sugar before serving.
* I use small individual tins, which are 3 cm/1¼ in high with a diameter of 10 cm/4 in. You could use muffin or brioche tins, but don’t overfill them. The shaped buns should occupy half of the space in the tins, so portion your dough accordingly. This amount will fit in a 12-cavity muffin tin with fairly large cavities – the kind called a ‘Texas muffin tin’. Divide the dough correspondingly and bake for 12–15 minutes. If you want to try these enseymadas but lack a suitable tin, bake the original 8 buns on a sheet lined with baking parchment and shorten the baking time to 10–15 minutes so that they do not dry out.
I discovered these rings that look like elegant bagels in a Colombian bakery in New Jersey, and since then have never been able to drive by without stopping. They make a great snack and are best eaten fresh, but can also be frozen for later.
250 g/9 oz/1⅔ cups plain (all-purpose) flour
¼ tsp salt
¾ tsp easy-blend (active dry) yeast
2 tbsp granulated sugar
1 egg, beaten (reserve 1 tbsp)
25 g/1 oz/¼ stick butter, melted
about 100 ml/3½ fl oz/scant ½ cup milk
75 g/2¾ oz mature (sharp) dry cheese (such as Parmesan, Edam or Grana Padano), very finely grated
Combine the flour, salt, yeast and sugar in a large bowl. Add the beaten egg, butter and milk, then mix with a spatula to moisten the dry ingredients. Use a heavy-duty mixer fitted with a dough hook to knead thoroughly until smooth and supple. Alternatively, turn out onto a floured surface or a non-stick silicone mat and knead until smooth and supple. Bring together in a ball and return to the bowl. Cover the bowl with clingfilm (plastic wrap) or a damp tea towel (dish towel) and set aside in a warm, draught-free place until doubled in size.
Knock back the dough and knead in the grated cheese. Divide into 12 pieces. Shape each piece into a rope about 25–30 cm/10–12 in long, then shape into a ring with an overlap of about 3 cm/1¼ in. Pass your hand through the ring and roll the overlapping part with your fingers to seal it neatly and securely. Place the rings on 2 greased baking sheets, spacing them well apart. Cover loosely with clingfilm and leave in a warm, draught-free place for about 20 minutes.
Meanwhile, preheat the oven to 200˚C/400˚F/Gas Mark 6.
Bake for 8–12 minutes, or until golden brown. Cool on a wire rack.
Eat on the day of baking, or freeze as soon as they are cool.
These chunky and chocolaty buns make a pleasant change from the perennial cinnamon buns and are delicious with coffee or as a breakfast roll. They are not too sweet, which allows the chocolate flavour to come to the front.
350 g/12 oz/2⅓ cups strong white (bread) flour
1½ tsp easy-blend (active dry) yeast
2 tsp sugar
½ tsp salt
55 g/2 oz/½ stick butter, melted and cooled
1 egg, beaten
about 150 ml/5 fl oz/⅔ cup milk, lukewarm
100 g/3½ oz/⅔ cup hazelnuts
75 g/2¾ oz/generous ⅓ cup granulated sugar
25 g/1 oz/scant ¼ cup cocoa
50 g/1¾ oz/½ stick butter, very well softened
Place all the ingredients for the dough in a large bowl and mix to moisten the dry ingredients. Use a heavy-duty mixer fitted with a dough hook to knead thoroughly until smooth and supple. Alternatively, turn out onto a floured surface or a non-stick silicone mat and knead until smooth and supple. Bring together in a ball and return to the bowl. Cover the bowl with clingfilm (plastic wrap) or a damp tea towel (dish towel) and set aside in a warm, draught-free place until doubled in size.
For the filling, pulse all the ingredients except the butter in a food processor until the nuts are very finely chopped. Set aside until needed.
Knock back the dough and knead briefly until it is smooth. On a lightly floured surface, roll it out to a rectangle about 40 x 30 cm/16 x 12 in. Use a pastry brush or your fingers to spread the butter over the dough, leaving about 2 cm/¾ in clear on all sides. Sprinkle the filling evenly over this. It is a generous amount, but the butter will eventually absorb it. Roll up from one long end. Trim the roll so that it measures 36 cm/14 in and discard the end pieces. Cut the resulting log at intervals of 4 cm/1½ in, so that you end up with 9 pieces.
Grease and line a 20-cm/8-in square baking tin, then arrange the dough pieces in three rows of three. Cover loosely with clingfilm and leave it in a warm place until almost doubled in size. The buns will now be pressing cozily against each other; this slight over-crowding gives nice soft sides.
Meanwhile, preheat the oven to 180˚C/350˚F/Gas Mark 4.
Bake in the oven for 25 minutes, or until golden brown. Leave in the tin for about 5 minutes before turning out in its entirety onto a wire rack. Break the buns off as needed. That way, the sides stay softer for longer.
These Dutch buns have a delicious toffee flavour and come in two basic shapes. Coiled, they are called Zeeuwse Bolussen (Bolussen from Zeeland, a province in the south of Holland); the pretzel, or figure-of-eight, version is called Haagse Bolussen (Bolussen from The Hague). A few bakers enrich the dough with dried fruit, but I find that less is more in this case, the fruit just adding sweetness without delivering flavour.
The word ‘bolus’ is not Dutch in origin and was borrowed with the buns. There are two probable explanations for its appearance in the Dutch vocabulary and culinary repertoire. A similar roll may have been issued as rations to the Spanish soldiers stationed in the Low Countries during the Eighty Years War (1566–1648) and the word bears a striking similarity to the Spanish word for bun or bread roll: bollo. Another possible means of entry is also indirectly Spanish. Many Sephardic Jews sought refuge in Amsterdam when the pressure of the Inquisition became too much to bear, and they are thought to have introduced the coiled version of the roll. A variant made with preserved ginger is still the speciality of the few remaining kosher-style bakeries in Amsterdam.
When the rolls are removed from the oven, the sugar coating still has a bite to it. If you put the rolls in a plastic bag for a few hours, the sugar will soften to a very desirable state of stickiness.
500 g/1 lb 2 oz/3⅓ cups strong white (bread) flour
2½ tsp easy-blend (active dry) yeast
2 tbsp granulated sugar
1 tsp salt
125 g/4½ oz/generous 1 stick butter, melted
1 egg, lightly beaten
about 200 ml/7 fl oz/¾ cup milk, lukewarm
200 g/7 oz/1 cup, solidly packed soft light or dark brown sugar
2 tsp ground cinnamon
Put the flour, yeast, sugar and salt in a large bowl. Add the melted butter, egg and milk, and mix well with a spatula to moisten the dry ingredients. Use a heavy-duty mixer fitted with a dough hook to knead thoroughly until smooth and supple. Alternatively, turn out onto a floured surface or a non-stick silicone mat and knead until smooth and supple. Bring together in a ball and return to the bowl. Cover the bowl with clingfilm (plastic wrap) or a damp tea towel (dish towel) and set aside in a warm, draught-free place until doubled in size.
Mix the sugar with the cinnamon and scatter it onto a large extra baking sheet or a clean, washable tray. Set aside until needed.
Knock back the dough and knead for a few minutes until it is smooth again. Divide the dough into 15 equal portions and cover them loosely with clingfilm. Lightly flour your work surface; a silicone mat works very well here. Take one portion of dough and roll it out to make a rope about 35 cm/13½ in long. Put it in the tin or tray with the sugar and turn a few times to coat. Leave it to rest there as you make 14 more ropes in the same way. Turn the ropes in the tray from time to time and leave them there to ‘sweat’ in the sugar.
When you have made all of the ropes, you can start shaping them. For coils, coil each rope into a loose spiral and tuck the end underneath. Place on a baking sheet lined with baking parchment. For pretzels, fold the rope as if you were making a capital letter B and tuck the two end pieces under the straight left side so that they overlap each other slightly to make a small triangle where the middle bar of the B should be.
Scatter any remaining sugar over the rolls. Cover loosely with clingfilm and leave in a warm, draught-free place until almost doubled in size.
Meanwhile, preheat the oven to 200˚C/400˚F/Gas Mark 6.
Bake for 12–15 minutes, or until fully cooked through; don’t let them dry out unnecessarily.
Remove immediately from the baking paper and cool on a wire rack.
Eat fresh, or allow the sugar to soften a little as described above. If you want to freeze a few, wrap them individually in clingfilm before putting them into a freezer bag or storage container. They can be thawed in the microwave.
Canned chestnut purée is an excellent stock item for a baker’s pantry. You can use it European-style, pressed through a ricer or coarse sieve, as a garnish for ice cream and cakes; or, as in this Chinese-inspired recipe, as a sweet filling for buns.
250 g/9 oz/1⅔ cups strong white (bread) flour
¾ tsp easy-blend (active dry) yeast
2 tbsp granulated sugar
½ tsp salt
about 175 ml/6 fl oz/¾ cup milk, warmed
25 g/1 oz/¼ stick butter, melted and cooled slightly
200 g/7 oz unsweetened chestnut purée (about ½ can)*
65 g/2¼ oz/⅓ cup caster (superfine) sugar
about 1 tbsp milk
beaten egg, for glazing
For the dough, put the flour, yeast, sugar and salt into a large bowl. Add the warm milk and butter and mix well with a spatula to moisten the dry ingredients. Use a heavy-duty mixer fitted with a dough hook to knead thoroughly until smooth and supple. Alternatively, turn out onto a floured surface or a non-stick silicone mat and knead until smooth and supple. Bring together in a ball and return to the bowl. Cover the bowl with clingfilm (plastic wrap) or a damp tea towel (dish towel) and set aside in a warm, draught-free place until doubled in size.
For the filling, put the chestnut purée and caster sugar in a bowl. Add the milk and mix well to a smooth, malleable paste. Add a little more milk if necessary. Divide into 8 portions, then cover and set aside.
Knock back the dough and knead again briefly. Divide into 8 pieces. Take one piece of dough and flatten it with your hands to a rough circle with a diameter of about 10 cm/4 in. Alternatively, use a rolling pin, but hands are easier and quicker.
Put a portion of chestnut purée in the centre and coax the dough around the filling to encase it. Pinch the edges to seal well. Arrange on a greased baking sheet. Cover loosely with oiled clingfilm and leave until almost doubled again.
Meanwhile, preheat the oven to 200˚C/400˚F/Gas Mark 6.
Brush the dough with beaten egg and bake for 15–20 minutes. Cool on wire racks.
* If you can only get sweetened chestnut purée, use 265 g/9½ oz – the combined weight of the sugar and the unsweetened purée.
The dough for Fruit Loaf (see p. 90) can also be baked as buns that can be eaten fresh with butter and cheese or frozen for later. Make up the dough as described in the recipe for Fruit Loaf and follow the shaping and baking instructions given below.
Divide the dough into 12 equal pieces. Dust the pieces and your hands with flour and shape each piece into a ball, trying to get the fruit as well embedded as you can and covered with a layer of dough. Loose fruit on the surface will burn. Space well apart on a greased baking sheet and flatten each roll very slightly with the palm of your hand. Cover loosely with lightly oiled clingfilm (plastic wrap) and leave in a warm, draught-free place until almost doubled in size.
Meanwhile, preheat the oven to 200˚C/400˚F/Gas Mark 6.
Bake the buns for 15–20 minutes, or until browned but not dry. Remove from the baking sheet and transfer to a wire rack to cool.