Pastry is not as difficult to make as people seem to think. What is undoubtedly true, though, is that shortcrust pastry can be slightly temperamental compared to its more relaxed cousins. There are a few basic rules and once you pay attention to these, the pastry will practically make itself.
Shortcrust pastry does not like to be handled more than strictly necessary. Made from a basic ratio of half fat to flour, the fat must be rubbed in to coat the flour well before liquid is added. This technique also introduces air into the mixture and will lighten the texture. Fingertips make an excellent tool, but there are also metal pastry blenders with five or six parallel rows of curved cutters that can do the job equally well – and even better if you happen to have ‘hot hands’. Some people have better blood circulation than others and their hands are so warm that the butter starts to melt before it can be rubbed in properly. Hot-handed folk make good bread, though, if that is any consolation. The ingredients must be as cold as possible. Butter must be chilled and cut into cubes beforehand and the liquid (usually water) will need to be chilled in warmer climates. Once the liquid has been added to the butter and flour, the pastry should be given a few brief strokes to bring it together because overworking will encourage the gluten to develop and stretch. While this is desirable in the case of bread, it will not do your pastry any good: the finished product will not be ‘short’ and loose, but tough. The fat that is used will also influence the texture of shortcrust pastry. Butter gives the best flavour but, much as it pains me to say this, vegetable shortening can provide a looser texture. As shortening has no obvious flavour, it is best used in combination with butter.
Pastries with sugar, or other ingredients such as semolina or nuts, will allow themselves to be handled more without apparent ill effects. Work quickly and follow the instructions given in the recipe.
FOOD PROCESSOR
Most pastry can be made in the dry stage in a food processor, which gives excellent results, shortening the preparation time considerably. I always use the metal blade for this purpose. Some bakers add the liquid to the food processor and finish the pastry off right in there. In most cases, I prefer to do just the dry stage in the food processor and turn the mixture into a bowl, adding the liquids by hand. It makes it easier to control the process that way, and prevents the pastry from being overworked by the machine.
Most kinds of pastry, especially shortcrust pastry, benefit from a resting period. This allows the pastry to relax and makes it less likely to shrink in the oven, which is what would happen if you try to use it straight away. It is usually chilled or put in a cool place at this stage, allowing it to firm up and making it easier to handle. Always wrap the pastry well before putting it in the refrigerator. If you chill it too long, it will have to be left at room temperature for a short time until it becomes malleable again. If not, it will crack when you try to roll it out.
WORK SURFACE
Pastry is best rolled on a cold surface. Marble slabs and stainless steel or granite countertops are perfect. Wood is also fine, as long as the pastry has been chilled properly beforehand. Silicone mats are great for rolling out pastry because only a minimal amount of dusting flour will be needed. Some also come with pre-drawn circles, making it easy to check the diameter. When you roll out pastry, try not to add too much flour because this will also have a slightly toughening effect.
MESS-FREE ROLLING
My favourite way to roll out pastry, on whatever surface, is to use two large sheets of tightly stretched clingfilm (plastic wrap) to enclose it. This has multiple advantages. It is mess-free, it won’t stick to the surface, it needs no extra flour and the bottom sheet of clingfilm can be used to transport the pastry to its destination without breakage. You simply turn it upside down when the pastry is above the tin that needs to be lined and press it into the desired shape, removing the clingfilm only when everything is in place.
TRIMMING EDGES
If your tin is non-stick, use a plastic scraper to cut off excess pastry, or at the very least, the back of a knife. If not, you may end up damaging the coating.
KEEPING AND STORING
Pastry-based articles are always best eaten fresh. The pastry starts to soften when left to stand, especially if the filling is moist. Tarts and pastries with a filling of meat or cream cheese do usually need to be chilled, but all other pastries should be left on a plate, covered with clingfilm, at room temperature. If you do not plan to eat them by the next day, freeze them for later. Wrap them appropriately in clingfilm and put them in freezer bags or suitable containers.
The city of Gouda is famous for its caramel-filled wafers, or stroopwafels, and has also lent its name to these biscuits. These, and similar buttery treats, or koekjes, were taken by Dutch immigrants to the New World and they subsequently metamorphosed into what are known to Americans as cookies. This is a recipe to make when you want to give people the – false – impression that you have been slaving away in the kitchen for their benefit. Prepare the dough in advance and bake the cookies just before your guests are expected, and a warm and instant welcome will emanate from your oven.
250 g/9 oz/1⅔ cups plain (all-purpose) flour
½ tsp baking powder
⅛ tsp salt
150 g/5½ oz/scant 1½ sticks butter, softened
100 g/3½ oz/½ cup caster (superfine) sugar
1 egg yolk
zest of ½ lemon
Mix the flour with the baking powder and salt and set aside.
If possible, use the paddle attachment of a mixer to cream the butter and sugar together until lightened in colour. If you don’t have a mixer, use a wooden spoon and be very thorough. Beat in the egg yolk and lemon zest. Add the dry ingredients and knead lightly until it all comes together and stays together.
Transfer to a large sheet of baking parchment or greaseproof (waxed) paper and shape into a ‘sausage’. Use the paper to help you roll the ‘sausage’ into a neat cylinder about 28–30 cm/11–12 in long. Chill the dough in the paper for at least 1 hour, or until firm enough to slice. You can leave it overnight if necessary.
Preheat the oven to 180˚C/350˚F/Gas Mark 4. Line 2 baking sheets with baking parchment.
Remove the dough from the refrigerator and unwrap it. Use a sharp knife to cut rounds 1 cm/½ in thick. Neaten the edges with your fingers and space them evenly and well apart on the baking sheets.
Bake one sheet for 15 minutes, or until the outer edges are golden brown. Remove from the oven, and use a thin spatula to transfer the biscuits to a wire rack to cool and firm up. Cook the second batch.
Store in an airtight container.
These melt-in-the-mouth shortbread biscuits are made in many countries, from Northern Africa to the Balkans and India, and names and ingredients may vary. Their common characteristic is a pale creaminess and buttery flavour. Butter, plain or clarified, is the single constant and while plain flour is generally used, fine semolina is also often added for a crunchier texture. They may be flavoured with rose water, cardamom, cinnamon or chopped nuts.
Moroccan Jews make a walnut version for Purim. In Greece, where they are known as kourabithes, they are traditionally eaten at Christmas and a clove is sometimes stuck into the top to symbolize the gift of spices from the Three Wise Men.
125 g/4½ oz/scant 1 cup plain (all-purpose) flour
25 g/1 oz/scant ¼ cup cornflour (cornstarch)
¼ tsp salt
100 g/3½ oz/⅞ stick butter, softened
75 g/2¾ oz/¾ cup icing (confectioner’s) sugar, sifted, plus extra for dusting
16 blanched almonds
or 25 g/1 oz/¼ cup walnuts, finely chopped
or one of the flavourings listed above, to taste
Sift the flour with the cornflour and salt, and set aside.
Beat the butter until smooth. Add the icing sugar a little at a time, beating until light and fluffy. Add the flour mixture a little at a time with your choice of flavouring (unless you are using blanched almonds, which should be added later). Continue to beat until everything is well incorporated. An electric mixer fitted with a paddle (not a whisk) works very well.
Preheat the oven to 150˚C/300˚F/Gas Mark 2. Grease a baking sheet.
Divide into 2 portions and shape each one into a short ‘sausage’. Cut each ‘sausage’ into 8 equal pieces. Squish each piece once or twice in your hand to compact it, then roll into a ball between your palms. Place on the baking sheet and flatten slightly with your fingers; don’t worry about small cracks. Repeat with the rest of the dough and arrange the shortbreads with some space in between, as they spread a little while baking. If using blanched almonds, press an almond into the centre of each shortbread.
Bake for 25 minutes. These shortbreads stay creamy white; only the almond should colour a little. They will be soft and will firm up as they cool. If dusting with icing sugar, do this while they are still on the baking sheet. Then use a spatula to remove the shortbreads carefully and let them cool completely on a wire rack.
A polvorón will melt on the tongue and likely leave you clutching more than a few crumbs as the outer layer disintegrates. It lives up to its name: polvo is Spanish for ‘dust’. This treat is particularly associated with the Christmas season, and the best are made by the dwindling communities of Spanish nuns who carry on the ancient custom of producing sweets and baked delicacies to sell to the appreciative public.
The flour is toasted, giving the pastries a slightly nutty flavour. The method for shaping these pastries is a little unorthodox since there is a bowlful of crumbs to be dealt with instead of dough. Once you get over the initial surprise, though, it’s plain sailing. Commercial versions are often moulded mechanically and are usually wrapped in coloured squares of thin greaseproof (waxed) paper to keep them from falling apart. Lard is generally used in Spain, but butter gives an even better result, and chopped almonds or hazelnuts and other flavourings such as cinnamon or lemon zest are sometimes added.
The Filipinos borrowed the recipe from the Spanish colonists and changed it into a local sweet. The toasted flour is mixed with butter, sugar and powdered milk and pressed into little spring-loaded moulds for easy release. The result is eaten unbaked.
250 g/9 oz/1⅔ cups plain (all-purpose) flour
125 g/4½ oz/1¼ cups icing (confectioner’s) sugar
¼ tsp salt
125 g/4½ oz/generous 1 stick butter, softened
icing (confectioner’s) sugar, for dusting
Put the flour in a dry wok or similar vessel and toast it over medium heat. Use a wooden spatula to keep on moving the flour gently so that it doesn’t burn. The flour should only just darken to a creamy colour. This will take about 10 minutes. Remove from the heat, then stir it a little to decrease the temperature, and allow to cool.
Put the flour in a bowl and stir in the icing sugar and salt. Add the softened butter and mix well with both hands to a sandy mixture. All of the flour should be well coated with butter.
Preheat the oven to 180˚C/350˚F/Gas Mark 4. Grease a baking sheet.
Scoop up a small handful of the mixture with your fingers and compress the crumbs into a firm, ridged oval. Place it on the baking sheet and make the other cookies in the same way. Resist the temptation to neaten the inevitable untidy edges, or the whole thing may fall apart.
Bake for 10–12 minutes, or until just coloured. Remove from the oven and leave on the sheet to cool. As they cool, the polvorones will become firm, but the outer layer will retain the ‘dusty’ consistency it should. Some cooks sprinkle icing sugar over them, and this helps conceal irregularities. I find them to be sweet enough as they are and the cragginess has its own appeal.
Store in an airtight container. They will keep for several days.
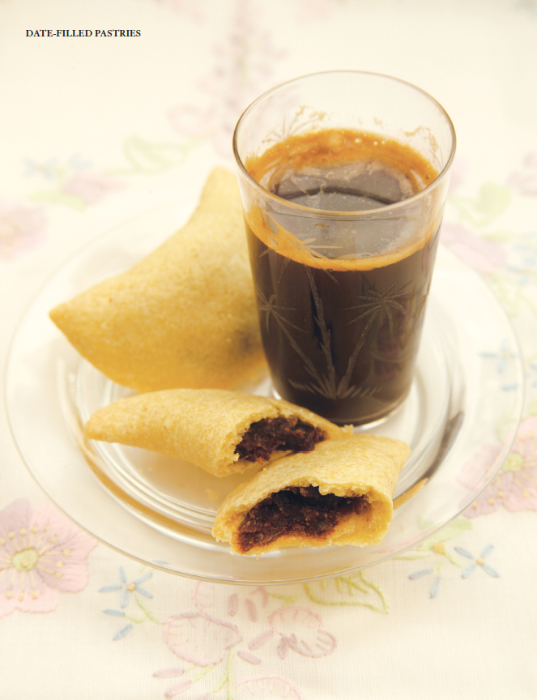
In the Middle East, dates are consumed in great quantities. They are eaten fresh; dried; stuffed with delicious titbits such as nuts; and of course, in pastries such as ma’amoul. The pastry can be made from semolina or a mixture of semolina and flour, as in this recipe. The pastry case sometimes contains rose water and eating one fresh from the oven, when the rose aroma is at its strongest, is marvellous. If you cannot get really good rose water, omit it and replace it with an extra tablespoonful of water. Fillings for ma’amoul range from dates to nuts and mixtures of the two. Cinnamon is usually used with stronger-tasting fillings like dates and walnuts, while more delicate flavours like almonds and pistachios might be heightened by a judicious addition of rose water.
Wooden moulds, looking like large scoops with a pattern carved into the bowl, are sold for moulding the pastries and these produce a lovely pattern, much like traditional Scottish shortbread (see picture on p. 12). The moulded kinds need to have a thick layer of drier pastry to retain their beauty. This recipe is for freeform pastries; it contains too much butter for a pattern to keep its shape well after baking. Eat them as soon as they have cooled or store in a cool place for up to a week.
350 g/12 oz/2 cups dates, chopped
100 ml/3½ fl oz/scant ½ cup water
1 tsp ground cinnamon
250 g/9 oz/1⅔ cups plain (all-purpose) flour
100 g/3½ oz/generous ½ cup fine semolina
175 g/6 oz/1½ sticks butter, chilled and cubed
4 tbsp water
1 tbsp rose water
Make the filling first. Place the dates and water in a saucepan. Simmer gently until all of the water is absorbed. Remove from the heat. Add the ground cinnamon and mix well. Set aside.
For the pastry, mix the flour and semolina in a large bowl. Rub in the butter with your fingertips. Add the water and rose water and use your fingertips to bring it together in a ball. Leave to rest in a cool place until the filling is cool.
Preheat the oven to 160˚C/325˚F/Gas Mark 3. Grease a baking sheet.
Divide the pastry into 24 pieces. Shape each piece into a ball and flatten between your palms. Pinch the edges with your fingers to make them thinner than the rest of the circle. This will ensure that the finished pastry has an even thickness. Place a spoonful of the filling in the centre. Pleat and pinch to seal the pastry for rounds, or fold over and press the edges to seal for half-moon shapes. Fill and seal the other pastries in the same way.
Arrange on the baking sheet and bake in the oven for about 25 minutes. The pastries should remain pale. Transfer to a wire cooling rack.
The Dutch are passionate about almond paste and use it in a wide variety of cookies, pastries and breads. These little cakes are absolutely delicious and very simple to make. I generally bake them in large batches and freeze them, individually wrapped, for lunchbox or teatime treats. Use coarse almond paste, preferably not the sticky canned stuff. You can make it yourself too, from equal quantities of ground almonds and granulated sugar with a pinch of lemon zest and enough beaten egg to bind the mixture. Leave in a covered jar in the refrigerator for a day or two to mature before using it.
250 g/9 oz/1 ⅔ cups plain (all-purpose) flour
1½ tsp baking powder
¼ tsp salt
zest of ½ lemon
125 g/4½ oz/½ cup caster (superfine) sugar
165 g/5¾ oz/1½ sticks butter, chilled and cubed
1 egg, beaten (reserve 1 tbsp)
300 g/10½ oz almond paste
12 blanched almonds
12-hole muffin tin
Check the almond paste to see if it is malleable. If not, add some extra beaten egg (not the reserved tbsp). Divide into 12 portions and set aside.
Put all the dough ingredients, except for the egg, in a food processor. Pulse for a few seconds until it looks like fine breadcrumbs, then transfer to a bowl. Alternatively, sift the flour, baking powder, salt and lemon zest together. Mix in the sugar and rub in the butter with your fingertips.
Reserve 1 tbsp beaten egg, then knead in the rest to make a supple dough. You may need to add a drop or two of water in cooler weather. If the weather is warm and the dough feels sticky, you can chill it briefly so that it becomes more manageable.
Preheat the oven to 180˚C/350˚F/Gas Mark 4. Grease the muffin tin and dust with flour.
Divide the dough into 12 portions. Roll each portion swiftly between your palms, using a dusting of flour as necessary, to form balls. Flatten each ball to a diameter of 6–7 cm/2½–2¾ in and put a portion of almond paste in the centre. Coax the dough around the almond paste and pinch to seal. If the dough breaks or tears, simply patch it with your fingers. The dough must contain the almond paste completely. Flatten slightly and place in the muffin tin, sealed-side down. Shape the rest in the same way. Flatten the cakes in the tin so that the tops are fairly flat.
Brush with the reserved egg and press an almond into the centre of each cake. Bake in the preheated oven for 20–25 minutes, or until golden and cooked through. Leave to rest in the tin for about 5 minutes. If you have greased and floured your tin well, a quick twist with your fingers should loosen the cakes. Transfer to a wire rack to cool.
These tartlets seem to have originated in Bad Ischler in Austria and are extremely popular in both that country and Hungary. They are made plain or with various kinds of nuts and the jam in the filling can vary, but they are always covered with a delicious chocolate glaze. They are not hard to make, but you do need patience and a gentle touch. Freshly made, they will be crisp but will start to soften after a few hours. Both textures have their charms. You could also bake the biscuits in advance and assemble the tartlets shortly before serving, to preserve the crispness. Remember to leave enough time for the chocolate to set.
225 g/8 oz/1½ cups plain (all-purpose) flour
⅛ tsp salt
75 g/2¾ oz/¾ cup icing (confectioner’s) sugar
150 g/5½ oz/scant 1½ sticks butter, softened
100 g/3½ oz/⅔ cup pistachios, ground
about 4 tbsp apricot jam (jelly), sieved (strained)
12–14 whole pistachios for garnishing
150 g/5½ oz/5½ squares dark chocolate, chopped
4 tbsp milk
Sift the flour with the salt and icing sugar. Add the butter and knead lightly to make a dough. Knead in the ground pistachios and shape the dough into a disc. Cover with clingfilm (plastic wrap) and leave to rest for about 1 hour at cool room temperature.
Preheat the oven to 180˚C/350˚F/Gas Mark 4. Line 2 baking sheets with baking parchment.
Roll the dough out on a lightly floured surface to a thickness of 3 mm/⅛ in and use a 6-cm/2½-in cutter to cut out 24–28 rounds. If the dough breaks while rolling, just press it back together again. Use a metal spatula or a thin plastic scraper to lift the rounds so that they stay in one piece and retain their shape. Arrange the rounds on the lined baking sheets. Re-knead the trimmings lightly and roll out again, as necessary.
Bake for 8–10 minutes, or until they just begin to turn golden brown around the edges. Carefully lift them off the baking sheet with a metal spatula and transfer to a cooling rack. They will still be quite soft but will firm up as they cool. Bake the second sheet of rounds as before.
When both batches have cooled, make the glaze. Put the chocolate and milk in a saucepan with a thick base over low heat and stir very gently until the chocolate has melted and the mixture is homogenous. Sandwich the biscuits with the jam and glaze the top of each pair generously with the chocolate mixture. Garnish with whole pistachios.
These are really Guyanese jam tarts – triangles filled with pineapple jam. (The locals call this fruit ‘pine’, hence the name.) In addition to being a homemade favourite, they are a pastry shop staple and the quality can vary greatly. You can whip them up in next to no time, so you have absolutely no excuse to buy an inferior product. If you make a double amount of pastry, you can bake a batch of Cheese Rolls (see p. 252) at the same time. See the recipe for Quick Pineapple Jam (opposite) if you feel like making your own.
250 g/9 oz/1⅔ cups plain (all-purpose) flour
¼ tsp salt
125 g/4½ oz/1 stick butter, chilled and cubed
about 4 tbsp cold water
12 tbsp pineapple jam (see recipe opposite)
beaten egg, for glazing
For the pastry, put the flour and salt in a large bowl. Rub in the butter until the mixture resembles fine breadcrumbs. This can also be done in a food processor: pulse until well blended, then transfer to a bowl.
Add enough water to make the ingredients all come together. Do this with your fingertips and don’t overwork the pastry. Shape into a ball, then wrap it in clingfilm (plastic wrap) and let it rest in a cool place for about 30 minutes.
Preheat the oven to 200˚C/400˚F/Gas Mark 6. Grease a baking sheet.
Divide the pastry into 12 pieces and shape them into balls. Roll each ball out to a 12-cm/5-in circle. Don’t worry if the edges are rough. Brush around the circumference of the pastry with water and put 1 tbsp jam in the centre of each circle. Fold the sides inwards to form a triangle, completely enclosing the jam. Gently press to seal well, or the jam will flow out and burn. Crimp the points of the triangle with a fork for a decorative and effective seal.
Brush with beaten egg and bake for 20 minutes, or until the tops are golden brown. Cool on a wire rack.
Eat within a day or freeze, well wrapped.
Special jam sugar is often sold in supermarkets, especially during the summer months when fruit surpluses abound. It makes life easy because it contains added pectin, which helps to thicken and set jams and jellies in a relatively short period of time. The only drawback is that you seldom get the clarity and depth of colour produced by using granulated sugar that requires a longer cooking time. You can make this recipe with granulated sugar, but it will take a lot longer and you will have to check several times for setting. Do this by pouring a teaspoonful of jam onto a cold plate, leaving it for a few seconds, then pushing it with your fingertip. If it has reached the right consistency, the surface will wrinkle but stay together. Overcooking will mean that you end up with a hard and sugary mass.
Fresh pineapple makes the tastiest jam, but canned gives an acceptable result. If you are using canned fruit, pineapple canned in its own juice is better than pineapple canned in syrup. The latter tends to be over-sweet.
500 g/1 lb 2 oz fresh or canned pineapple
500 g/1 lb 2 oz jam sugar (with added pectin)
juice of ½ lemon
Wash 2 jam jars and their lids thoroughly. Dry them well and place them on a folded tea towel (dish towel) on the countertop.
Chop the fruit coarsely, then purée it in a food processor. If you have a handheld blender, put the fruit in the pan and purée it there. Put the puréed pineapple, jam sugar and lemon juice in a large heavy-based saucepan and heat gently. Stir constantly to dissolve the sugar, then turn up the heat and bring the mixture to the boil. Keep stirring. Let it boil for 5 minutes, or according to the instructions on the packet of jam sugar. The mixture will thicken considerably – but not to a jamlike consistency; that happens after it has cooled.
Pour the hot jam into the clean, dry jam jars, filling them right up to the top. Screw on the lids and turn the jars upside down for 5 minutes, then turn them back the right way up and leave to cool completely. This takes several hours and the jam sets while it cools.
Store in a cool, dark place and keep opened jars in the refrigerator.
For the festival of the Harvest Moon, which usually falls in August, Chinese all over the world exchange moon cakes. Huge amounts of the delicious little cakes are busily ferried back and forth to family, friends and colleagues. They may be presented in boxes of 4, representing the moon’s phases – although some people consider 4 to be an inauspicious number, since it sounds like the Chinese word for ‘death’. Alternatively, they are presented in mounds of 13, representing the months of the lunar year. A square piece of paper is often put on the bottom of the box or under the cakes. This is a reminder of the prominent role moon cakes played in overthrowing the Mongol Yuan dynasty. As the legend goes, a group of Chinese activists hatched a plot to revolt on the 15th night of the 8th month. They needed to get word out without arousing suspicion, so pieces of paper with messages were hidden in the moon cakes, which were sent to the appropriate people. The unsuspecting Mongols were caught unawares and the Yuan dynasty brought to an abrupt end.
Traditional moon cakes are made with a special rich, thin pastry usually referred to as a ‘skin’. The pastry is filled and then moulded before being baked. Industrial bakeries use fully or semi-automated processes, but most small bakeries have their own distinctive and intricately carved wooden moulds, which may indicate the name of the bakery and the filling. The moulds can be round or rectangular, straight-sided or fluted and are generally about 5 cm/2 in, in diameter or length. The variety of fillings is truly astounding and often reflects the affluence and geographic location of the customer. The more traditional types are widespread and include red, yellow and black beans; Chinese red dates; lotus seed; and winter melon, often with shreds of pork and chopped nuts added. A salted duck egg yolk – a very acquired taste – is tucked into the centre to represent the moon, and baked cakes are usually quartered so that each piece has a visible bit of yolk. Malaysian Chinese prefer a less sweet cake than Hong Kong Chinese and the people of Shanghai go for a really sweet red bean cake. Malaysians use local and foreign ingredients to create their own specialities, and while the older generation may still prefer traditional flavours, screwpine leaf, durian and pineapple are also popular. Trends come and go, and in mainland China shark’s fin is becoming popular at the top end of the market. A ganache-filled cake has also made an appearance.
I confess to a lifelong addiction to bean cakes and never miss an opportunity to sample the offerings of Chinese bakeries anywhere. These bean cakes are made with a fantastically flaky pastry using a unique technique. They can be found wherever Chinese immigrants have settled and have become mainstream in places like Guyana and the Philippines. Fillings have been adapted to local tastes and availability, but the pastry has always retained its essential character. The pastry for each cake is assembled individually and can house traditional favourites like lotus seed, adzuki bean, black bean or red date paste, as well as taro and glutinous rice. In Guyana, a filling of black-eyed beans (black-eye peas) is standard; and in the Philippines, mung beans, yellow split peas and purple yam are popular. The purple yam, ube, is a shock to the uninitiated. Its natural colour is so vibrant that it suggests artificiality. Lard is generally the Chinese fat of choice, but I find it overpowering. And though I am usually one of the most fervent advocates of butter, I must admit that shortening is quite acceptable in this case. Butter makes a flavourful but closer-textured pastry, while shortening gives flakier layers, like the original lard would.
If you plan to make your own filling, you will need to start the day before. Note too, that the pastry for each cake needs to be shaped and rolled individually, so be sure to set aside enough time.
55 g/2 oz/½ stick soft butter or 4 tbsp sunflower or corn oil
275 g/9½ oz/scant 2 cups plain (all-purpose) flour
2 tbsp caster (superfine) sugar
about 8 tbsp cold water
200 g/7 oz/1⅓ cups plain (all-purpose) flour
125 g/4½ oz/generous 1 stick butter or vegetable shortening, softened
egg yolk, for glazing
500–600 g/1 lb 2 oz–1 lb 5 oz canned sweetened red bean paste or one of the following:
250 g/9 oz/1¼ cups dried black-eyed beans (black-eye peas)
125 g/4½ oz/generous ½ cup granulated sugar
55 g/2 oz/½ stick butter or 4 tbsp sunflower or corn oil
175 g/6 oz/scant 1¼ cups dried lotus seeds
200 g/7 oz/1 cup granulated sugar
50 g/1¾ oz/scant ½ stick butter or 3 tbsp sunflower or corn oil
If you’re not using canned paste, start making the filling the day before. These pastes can even be made a few days in advance and can also be frozen.
For black-eyed bean paste, rinse the beans and put them in a large bowl. Cover generously with water and leave for at least 8 hours, or overnight.
Drain the beans, then put them in a large pot with about 2 litres/3½ pints/8 cups water and bring to the boil. Cover and simmer until very tender – about 1 hour, depending on how fresh the beans are. Check the water level regularly so that the beans don’t boil dry.
Strain off the liquid and pass the beans through a sieve (strainer) – I use a rotary Moulinex vegetable purée-maker fitted with a medium disc. If you’ve done a thorough job, you should be left with only a few tablespoons of skins in the sieve.
Mix the beans with the sugar and butter and put in a heavy-based saucepan over medium heat. (I use a non-stick wok.) Keep stirring and cook for 15–20 minutes, or until it forms a thick paste. Set aside to cool. Stir before using.
For the lotus seed paste, rinse the seeds, put them in a large bowl and cover generously with water. Leave for at least 8 hours, or overnight.
Drain the seeds, then split them open and remove any green shoots (which are bitter).
Put the seeds in a large pot and cover with at least 1.5 litres/2¾ pints/6¼ cups water. Lotus seeds have a more pungent smell and a far longer cooking time than black-eyed beans. They will need about 2½ hours to become very tender.
To prepare the paste, proceed as for black-eyed bean paste.
Make the first pastry. If using butter, rub it into the flour, then add the remaining ingredients. Knead just long enough to make a smooth dough. Shape it into a ball, then cover with clingfilm (plastic wrap) and set aside for about 15 minutes at room temperature.
For the second pastry, mix the flour and soft fat together and knead lightly to make a loose dough. Divide this into 16 pieces and shape them into balls. Cover and set aside.
Divide the first pastry into 16 pieces. Press each piece flat in your palm to a rough circle about 9 cm/3½ in and fill with a pastry ball. Pleat and press edges to seal the second pastry into the first. You should have a small ping-pong ball. Make 15 more balls in this way.
Flatten the balls and roll each one out on a lightly floured surface to a rough circle with a diameter of about 12 cm/5 in. Fold the top third of the pastry towards the middle and fold the bottom third over this. Fold this strip in thirds too so that you get a small square.
Preheat the oven to 180˚C/350˚F/Gas Mark 4. Grease 2 baking sheets.
Roll out the squares to make 10–12 cm/4–5 in square-ish shapes and fill with the paste of your choice. Moisten around the circumference with a finger dipped in water and pleat and pinch the edges to seal well. Flatten each cake with the rolling pin to about 7.5 cm/3 in and arrange on a baking sheet. Make the other cakes in the same way.
Brush with beaten egg yolk and make two parallel rows of holes in the top with a fork. Bake for 20–25 minutes, or until the tops are golden. Cool on a wire rack.
These are crisp when just made, but are equally delicious as they soften.
Pictured overleaf.
In Asian countries, delicacies made from rice abound. Market stalls and roadside vendors often have several rice-based treats on display: intriguing balls, discs, cylinders and more, wrapped in banana leaves or greaseproof paper, rolled in shredded coconut, sprinkled with aniseed, some with a filling inside the rice and others left plain. Most are made from glutinous rice that is soaked and then pounded to the right consistency and the variety of rice is a key element. Locals seem to prefer chewiness to lightness, but Western palates tend to feel more comfortable with a less chewy product.
For this recipe, non-glutinous rice flour will give a light and fluffy result. It was inspired by a recent trip to the Philippines, where such cakes are described as puto and can be made in slabs or as individual cakes. Made with rice flour, they are quick and easy and not too sweet. Serve freshly made, with some shredded or grated coconut on the side. They can be eaten as a breakfast cake, snack or dessert, or even an accompaniment to an Asian gravy-based dish.
You will need a steamer for this recipe, preferably one that holds 8 foil muffin cases or small metal moulds. Have the boiling water ready for steaming, because the batter is whipped up in next to no time.
125 g/4½ oz/scant 1 cup non-glutinous rice flour
90 g/3¼ oz/scant ½ cup granulated sugar
⅛ tsp salt
1½ tsp baking powder
200 ml/7 fl oz/generous ¾ cup coconut milk
1 egg, beaten
shredded or grated coconut, for serving
Prepare the steamer and make sure that the water is boiling. If you’re not using disposable foil cases, grease and flour the moulds.
Mix the dry ingredients together in a bowl. Whisk in the coconut milk and egg, then beat until all the dry ingredients are well incorporated.
Pour the batter into the cases or moulds. If using disposable cases, these will be about three-quarters full.
Steam for 10 minutes, or until cooked.
Serve with some coconut on the side.
Conkie and its relatives are popular all over the Caribbean and in neighbouring Latin American countries. Made from seasoned cornmeal, boiled or steamed in banana leaves, they come in countless variants and under a variety of names, each reflecting the local population and the way it has adopted the recipe. In the English-speaking Caribbean alone, there are several names pointing to an African heritage. Conkie is itself an Anglicization and the alternative pronunciation of kanki is also popular in Guyana, suggesting Assante and Fante linguistic origins. By the same token, dokono, dukuna and even duckanoo – all popular in the smaller islands, Jamaica and Belize – have West African equivalents that refer to maize bread, particularly sweet ones. Jamaicans often use the graphic description ‘blue drawers’, as the banana leaf changes from green to blue while cooking.
The basic conkie may be made from cornmeal, raisins, spices and sugar, and Caribbean inventiveness has yielded mixtures of cornmeal with sweet potato, banana, coconut and pumpkin. Banana leaves are the usual packaging, or corn husks, and a few islanders use the leaves of the sea grape (Coccoloba uvifera) to create a dolma-like parcel. Climbing up the culinary ladder, one soon finds pastelles and hallacas, as well as the whole range of tamales. Tamales, exceedingly popular in Mexico, can be found in countless sizes and types. There are tiny norteños, sacahuiles 100 cm (40 in) long, and tamales with plain breadlike fillings, spicy meat or poultry centres or even sweet ones; they are usually steamed or boiled in corn husks, but regional variants use banana or other leaves. In addition to the plain pémi (from French pain de mie), Trinidad boasts an elaborate meat-filled pastelle (from Spanish pastel, cake), which resembles the Venezuelan hallaca.
Venezuelans would have us believe that the hallaca is the queen of its type. It is a festive dish, eaten on holidays, especially during the Christmas period. It is enormously time-consuming to prepare, especially if the cornmeal is to be freshly ground with a mortar and pestle, and many families make an event of it, involving everyone in some way. The cornmeal is kneaded into a dough with stock, often tinted red with annatto. The guiso, or filling, consists of several kinds of meat and poultry, onion, peppers, hard-boiled eggs and various other seasonings along with what would originally have been imported European luxury products: capers, stuffed olives, prunes, gherkins and almonds. It has taken on an almost religious significance for Venezuelans living abroad, and much as diaspora Jews will say ‘Next year in Jerusalem’ at the Passover table, many a Venezuelan expatriate will sigh a similar sentiment when eating hallacas at Christmas.
This recipe is for the plainer Guyanese conkie. I generally use tinfoil as a wrapping and it works very well, particularly as I’m not a fan of the leafy flavour. Many ethnic grocers stock frozen banana leaves, so if you would like to try that, make neat parcels with strips of leaf and tie them up with string.
You will need a steamer. If you don’t have one, you can also boil the parcels, but make sure that they are completely sealed so that the filling won’t get soggy.
300 g/10½ oz pumpkin (or slightly under-ripe banana), chopped into small pieces
100 g/3½ oz grated coconut
150 g/5½ oz/scant 1 cup fine cornmeal
100 g/3½ oz/½ cup granulated sugar
1 tsp vanilla extract
¼ tsp finely ground black or white pepper
55 g/2 oz/½ stick butter, melted
100 ml/3½ fl oz/scant ½ cup milk
75 g/2¾ oz/½ cup raisins or sultanas (golden raisins)
Put all the ingredients, except the dried fruit, in a food processor and pulse until everything is well mixed, then mix the dried fruit in with a spoon.
Cut tinfoil into 16 pieces about 25 x 20 cm/10 x 8 in and fold in half so that you get a thicker sheet 20 x 12.5 cm/8 x 5 in.
Put 2 generous tablespoons of the filling in the centre and fold the edges over several times to seal well.
Steam or boil for 20 minutes. Eat warm or cold as a snack.
Scholars speculate that steamed buns may have been borrowed from neighbouring countries to the west of China, but they have been a standard part of the Chinese culinary repertoire for at least 2000 years, since the early Han dynasty. They were originally indigenous to northern China, where rice was considered a luxury and wheat products were more common.
The buns are now eaten all over China and are made in a variety of shapes. The recipe below is for the simplest shape, with a few alternative suggestions. They can also be made into intricate patterns, such as Snails and Silver Thread Rolls. The Snail requires shreds of dough to be rolled and stretched into slender ropes and then massed together and twisted around a finger to create an elongated coil. Silver Thread Rolls use similar ropes, enclosing them in an outer layer of dough to create a distinctively textured and structured roll. The filled rolls come in yet more shapes, among them the Peach, signifying longevity.
These buns can be eaten warm as an accompaniment to Asian or Western food. The slight sweetness balances salty and sharp flavours well.
Remember that this dough needs to rise twice.
300 g/10½ oz/2 cups plain (all-purpose) flour
1 tbsp sugar
1½ tsp easy-blend (active dry) yeast
1½ tsp baking powder
1 tbsp oil
about 150 ml/5 fl oz/⅔ cup warm water
Make a firm dough from all the ingredients. Knead well, then shape into a ball and leave in a covered bowl in a warm, draught-free place until doubled in size.
Cut 6 or 12 squares from greaseproof (waxed) paper.
Knock back the risen dough and knead again very briefly, then divide into 6 or 12 portions. Shape each portion into a neat round bun and place on a small square of greaseproof paper, then place in the steamer basket. Leave in a warm, draught-free place until almost doubled in size.
If you don’t have enough steamer capacity to steam all at the same time, leave some in a slightly cooler (but draught-free) place to delay the rising process.
Steam the small buns for 10 minutes and the large ones for 15 minutes, or until cooked through.
Folded roll
Divide the dough into 6 pieces and flatten or roll each piece out to a diameter of about 12.5 cm/5 in. Fold in half, then fold again so that you have a quarter circle. Fanlike spokes can be made by pressing a pattern into the dough with a chopstick or fork. Arrange on squares of greaseproof paper and proceed as above.
Lotus leaves
Divide the dough into 6 or 12 pieces, depending on the size you prefer. Flatten or roll each piece to a diameter of about 12.5 cm/5 in (half that for smaller ones) and pinch to make a small protrusion somewhere at the edge of the circle. Consider this the stem of the leaf and use a chopstick or fork to make a veined pattern in the leaf. Arrange on squares of greaseproof paper and proceed as above.
Flower rolls
Divide the dough into 6 pieces and roll each piece out to a thin, narrow rectangle. Size is not really important. What is important is that the dough is thin so that it will create a many-petalled effect. Roll up the rectangle from one narrow end to form a squat cylinder. Press a chopstick or the handle of a wooden spoon down the middle of the cylinder so that the spiralled sides tilt slightly upwards. Arrange on squares of greaseproof paper and proceed as above.
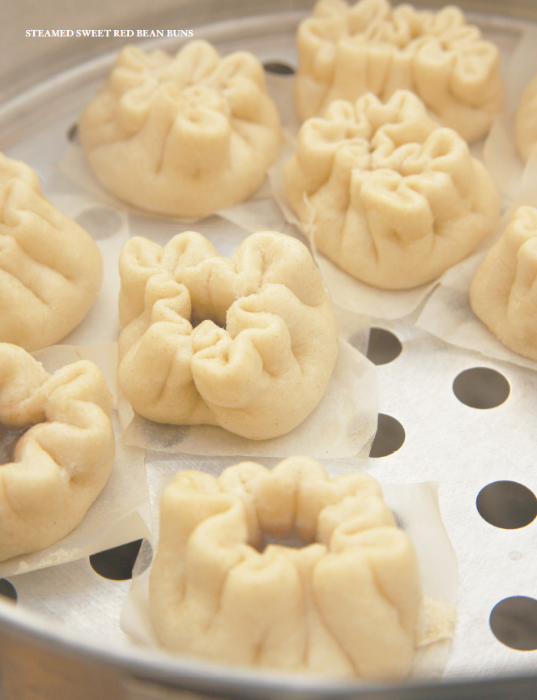
The same basic dough for Plain Steamed Buns can be used to make Sweet Red Bean Buns. Many Asian supermarkets sell good-quality, canned, sweetened red bean paste. One quantity of basic dough and one 450 g/16 oz can of paste will make 16 buns, but this can easily be halved. Sweet buns often have a red dot to distinguish them from savoury ones, but that is optional and necessary only if you plan to serve several kinds at once. Eat warm, accompanied by small cups of fragrant tea.
1 quantity dough for Plain Steamed Buns (p. 246)
1 x 450 g/16 oz can sweetened red bean paste
Knead the dough well, then shape into a ball. Put in a bowl and cover with a tea towel (dish towel), then leave in a warm, draught-free place until doubled in size.
Cut 16 small squares from greaseproof (waxed) paper.
Knock back the risen dough and knead again very briefly, then divide into 16 portions. Take one portion and shape it into a rough ball, then roll it out to a 10-cm/4-in circle. Moisten around the circumference with a finger dipped in water. Put a dessertspoonful of filling in the centre and pleat the dough around this, pinching to seal. Place it on a square of greaseproof paper in the steamer basket with the seal at the bottom. Alternatively, press the pleats together, without pinching to seal, and arrange in the steamer with the pleats upwards. Repeat to make the remaining buns.
Leave to rest for about 20 minutes in a warm, draught-free place. They should be puffed up but not yet quite doubled in size. If you don’t have enough steamer capacity to steam all at the same time, leave some in a slightly cooler (but draught-free) place to delay the rising process.
Steam for 10 minutes, or until the dough has set and is cooked through.
Sweet and savoury buns and dumplings, served with endless steaming cups of tea, form the popular Chinese dim sum lunch or snack meal. Chinese chefs are artists, and their deft fingers fly back and forth, transforming basic ingredients into magnificent works of art that you almost hesitate to spoil by eating. It is a skill that needs lots of practice to master, but any home cook can produce delicious, if more modest, buns with this simple recipe. If you vary the composition of the filling, you can even create an assortment with very little extra effort. Prawns (shrimp) or minced pork can be used instead of the chicken in this recipe and the seasoning can be adapted, or slices of vegetables such as Chinese mushrooms, bamboo shoots or water chestnuts can be added. They can be dipped in a simple uncooked sauce of soy sauce, rice vinegar, spring onion and chilli with a pinch of brown sugar added.
1 quantity dough for Plain Steamed Buns (p. 246)
300 g/10½ oz raw boneless chicken
1 spring onion (scallion)
2.5 cm/1 in piece fresh root ginger (gingerroot)
1 garlic clove
1 green chilli (optional)
2 tsp sesame oil
2 tsp oyster sauce
2 tsp soy sauce
2 tsp Shaoxing or other rice wine
salt, if liked
Knead the dough well, then shape into a ball. Put in a bowl and cover with a tea towel (dish towel), then leave in a warm, draught-free place until doubled in size.
For the filling, chop the chicken into small pieces. Slice the spring onion, ginger, garlic and green chilli and put them into a food processor. Pulse until fine. Add the chicken pieces and the remaining ingredients and pulse until finely ground. Divide the mixture into 12 portions and set aside until needed. (This filling can be made several hours ahead of time and stored in an airtight container in the refrigerator. Remove from the refrigerator about 30 minutes before needed.)
Cut 12 small squares of greaseproof (waxed) paper.
Knock back the risen dough and knead again very briefly, then divide it into 12 portions. Take one portion and shape it into a rough ball, then roll it out to a 10-cm/4-in circle. Moisten around the circumference with a finger dipped in water. Put one portion of filling in the centre and pleat the dough around this, pinching to seal. Place it on a square of greaseproof paper in the steamer basket with the seal at the bottom. Repeat to make the remaining buns.
Leave to rest for about 20 minutes in a warm, draught-free place. They should be puffed up but not yet quite doubled in size. If you don’t have enough steamer capacity to steam all at the same time, leave some in a slightly cooler (but draught-free) place to delay the rising process.
Steam for 15 minutes, or until the dough has set and the filling is cooked through.
These tiny biscuits are whipped up in next to no time and tend to disappear from the plate just as quickly. The dough can be made in advance and chilled until you’re ready to bake the biscuits. The recipe is easily halved.
250 g/9 oz/1⅔ cups plain (all-purpose) flour
pinch of ground cayenne or chilli pepper
salt to taste, if needed
150 g/5½ oz/scant 1½ sticks butter, softened
250 g/9 oz very mature (sharp) cheese (Gouda, Edam, Cheddar), finely grated
1 tbsp cold water, or as needed
Mix the flour, cayenne and salt together in a bowl. Add the remaining ingredients and knead to form a dough. Add more water if necessary.
Preheat the oven to 180˚C/350˚F/Gas Mark 4. Line 3 baking sheets with baking parchment.
Make hazelnut-sized balls from the mixture and arrange on the baking sheet.
Bake the first baking sheet for 12 –15 minutes, or until pale golden brown. Don’t overbake, or the cheese will become bitter. Remove from the oven. (If you have only one baking sheet, prepare the second and third batches while the first batch is cooking, placing them on 2 sheets of baking paper. When the first batch is done, pick up the paper to lift off the first batch, then replace with the second sheet.)
Enjoy fresh with your favourite drink.
For a Guyanese living abroad, a ‘cheese roll’ is not a bread roll with a slice of cheese but an elongated pastry rich in nostalgia. These savouries are made with the same pastry as Pine Tarts (p. 234), and I often make a double batch of pastry and whip up both at one go. Some people make a paste of the filling ingredients and then spread them onto the pastry. My way is quicker and less prone to leakage and torn pastry.
250 g/9 oz/1⅔ cups plain (all-purpose) flour
¼ tsp salt
125 g/4½ oz/1 stick butter, chilled and cubed
about 4 tbsp cold water
about 1 tbsp sharp mustard
75 g/2¾ oz mature (sharp) cheese (Cheddar, Edam or Gouda), grated
ground cayenne pepper
beaten egg, for glazing
For the pastry, put the flour and salt in a large bowl. Rub in the butter until the mixture resembles fine breadcrumbs. This can be done in a food processor: pulse until well blended, then transfer to a bowl. Now add enough water to make the pastry come together. Do this with your fingertips and don’t overwork the pastry. Shape into a ball, then wrap it in clingfilm (plastic wrap) and let it rest in a cool place for about 30 minutes.
Divide the pastry into 12 pieces and shape them into balls. Roll each ball out to a 12-cm/4½- in circle. Don’t worry if the edges are rough.
Preheat the oven to 200˚C/400˚F/Gas Mark 6. Grease a baking sheet.
Brush around the circumference of the pastry with water and smear a dab of mustard over the pastry. Sprinkle one-twelfth of the cheese and a pinch of cayenne pepper over this. Fold the top 1.5 cm/¾ in of the pastry downwards and continue to fold so that you get a flattened log shape. Pinch the seam to seal and place seam-side down on the baking sheet. Crimp the ends with a fork and brush with beaten egg. Prick three rows of holes in the pastry with a fork.
Bake for 20 minutes, or until the tops are golden brown. Cool on a wire rack.
Eat within a day or freeze, well wrapped.
Hungary was one of the ports of call of the rampaging Turks and both countries have a small round roll called pogáca and pogaça respectively. At the same time, the Albanians have pogaçe; the Bulgarians and Macedonians pogacha; Romanians pogacea; the Serbs, Croatians and Slovenians pogaça; the French fougasse; and the Italians focaccia. The name appears to derive from the Latin panis focacius, ‘hearth bread’. With the exception of the Turkish and Hungarian rolls, all other variants are flatbreads and the Balkan versions were originally unleavened and baked in the embers of the hearth.
In her excellent book The Melting Pot: Balkan Food and Cookery, Maria Kaneva-Johnson suggests that both the Hungarians and Turks borrowed the breads from the Balkans. She sees the original Balkan breads as a pre-Christian product that was used in pagan rituals, which is one of the reasons why they were never taken to church to be blessed nor were they cut with knives. This last piece of information is particularly interesting, because it explains why the Hungarian pogáca has a deeply-cut cross-hatched pattern on its surface. If a bread could not be cut, it had to be broken, and the cuts would help. Although the roll now resembles a scone more than anything else, the tradition seems to have stayed.
In Hungary, you will find these in the humblest bakery as well as the most sophisticated pastry shop. They vary in size, from a walnut to an orange. The larger ones are eaten as snacks or as an accompaniment to stews, while the dainty little ones are often enjoyed with a glass of wine or palinka brandy. They can be plain or enriched with a number of ingredients including potato, cheese (particularly sheep’s cheese) and pork or goose cracklings. Fond of their pork, many Hungarians like their pogáca to be made with lard, and connoisseurs will tell you that it adds to the flakiness.
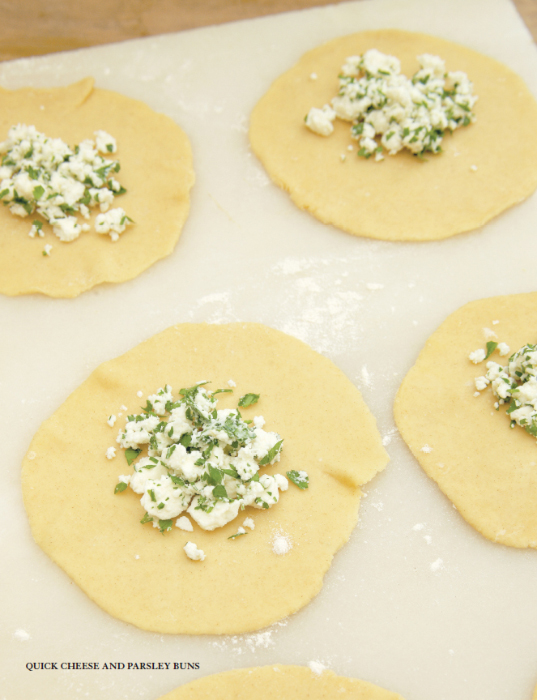
Pogaça are sold on practically every street corner in Turkish towns, enticingly stacked in glass-fronted handcarts. This recipe is for a quick homemade version that can be eaten warm or cold as a snack or even as an accompaniment to soup. The simple cheese filling is one that is used in many flatbreads, rolls and pastries in Turkey.
250 g/9 oz/1⅔ cups plain (all-purpose) flour
½ tsp bicarbonate of soda (baking soda)
¼ tsp salt
75 g/2¾ oz/scant ¾ stick butter, softened
100 g/3½ oz thick Greek-style (strained plain) yoghurt
1 egg, beaten (reserve 2 tbsp)
125 g/4½ oz feta cheese*
small handful flat-leaf parsley or coriander (cilantro), finely chopped
Knead together all of the ingredients for the dough and set aside while you make the filling.
For the filling, crumble the feta and mix it with the chopped herbs.
Divide the dough into 12 pieces and flatten or roll out one piece to a 10-cm/4-in circle. Try to get the edges thinner than the rest of the surface area.
Preheat the oven to 200˚C/400˚F/Gas Mark 6. Grease a baking sheet.
Put 1 tbsp of the filling in the centre and pleat and pinch the edges to seal into a ball. Place it on the baking sheet and flatten slightly with the palm of your hand. Repeat with the remaining 11 pieces of dough and the filling.
Brush twice with the reserved egg and bake for 12–15 minutes, or until golden brown.
* Feta cheese can be very salty. Soaking the whole piece in water for about 2 hours before use will help remove some of the salt. However, in this recipe, I find that the dough acts as good foil for the cheese, so no soaking should be necessary.

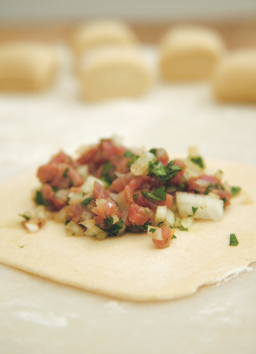
These mini chicken pies, a colonial legacy, make a delicious lunch, teatime or cocktail snack. Proper patty pans, the really shallow kind, have become something of a rarity and the patties offered here are very chunky compared with the authentic Guyanese versions, which are usually less than half the size. Those, of course, date from an age when hired help was always on hand to create a mouth-watering array of delicacies, without pausing to check the time or to complain of the effort. They take a bit of patience to put together, but the good news is that this can be done in easy stages. You can make the pastry in advance and chill it while you cook and cool the chicken, and then assemble the patties just before baking. Or you could opt for the simpler Jamaican method and make large turnovers instead.
Feel free to adjust the seasoning to your taste. In the Caribbean, a generous piece of chilli is used, usually Habanero, which is known as Scotch bonnet in Jamaica and Ball o’ fire (for obvious reasons) in Guyana. We always added a herb referred to locally as ‘thick-leaf thyme’, which has succulent, rather hairy leaves with toothed edges and a remarkable flavour. Its botanical name used to be Coleus aromaticus and has now been changed to Plectranthus amboinicus. It is sometimes called Spanish or Mexican thyme, and in the Philippines, where it grows in profusion, they refer to it as ‘native oregano’. Regular thyme, oregano, flat-leaf celery and coriander (cilantro) all make flavourful alternatives.
For a prawn (shrimp) version, substitute an equal amount of chopped raw prawns for the chicken.
350 g/12 oz/2⅓ cups plain (all-purpose) flour
generous ¼ tsp salt
175 g/6 oz/1½ sticks butter (or half butter and half vegetable shortening)
6–7 tbsp cold water, as needed
450 g/1 lb boneless raw chicken, mixed thigh and breast meat
2–4 tsp mild curry powder
¾ tsp salt, or to taste
a piece of (Habanero) chilli, finely chopped
1 tsp dried thyme or about 2 tbsp finely chopped flat-leaf celery, coriander (cilantro), or oregano
1 onion, finely chopped
1 tbsp corn or sunflower oil
egg for glazing
12-hole bun/muffin tin, greased
Make the pastry first. Put the flour in a large bowl and mix in the salt. Add the butter and use a pastry blender to cut the fat into the flour, or rub it between your fingertips until it looks like coarse breadcrumbs. This can also be done in a food processor: pulse until it looks like coarse breadcrumbs, then transfer to a bowl. Add the water and bring the pastry all together with a few swift strokes of your fingertips to form a large ball. Cover and chill until needed.
Chop the chicken into very small pieces, about the size of a grain of corn or a tiny pea. Put into a bowl and add the salt, curry powder, chilli and thyme or other herbs. Mix together and set aside.
Heat the oil in a wok or heavy skillet and add the chopped onion. Sauté the onion until softened, then add the chicken and stir-fry until cooked through. Set aside to cool, then use straight away or chill until needed.
Allow the chilled pastry to come to room temperature. Dust your work surface with flour and roll out to a thickness of about 3 mm/⅛ in. Do this in two batches if your work surface is small.
Preheat the oven to 190˚C/375°F/Gas Mark 5. Grease the muffin tin.
Cut 12 10-cm/4-in circles and the same number of 7.5-cm/3-in circles. Line the muffin tins with the larger circles. If you have a pastry tamper, use it – it makes life a lot simpler. If not, just use a small ball of pastry or your fingers. Press the pastry against the sides of the tin, bringing it up neatly to cover the entire cavity.
Fill with chicken mixture. Moisten the circumference of the smaller circles with water and press on top of the chicken. It should be resting on top of the larger pastry circle. Use a fork to crimp the edges. This is both a decorative and practical touch, as it seals the patties. Brush with beaten egg and make three rows of holes with the fork.
Bake for 25–30 minutes, or until the tops are light golden brown.
Eat warm from the oven or at room temperature. These are best eaten fresh.
TURNOVERS
Divide the pastry into 6 pieces and roll out to a saucer-sized circle. Put a sixth of the filling slightly off-centre, moisten the circumference with a finger dipped in water and fold over to form a semi-circle. Crimp the edge to seal, then brush with beaten egg and prick with a fork in a few places.
Indian samosas and Middle Eastern sambusik are related to the samsa that are a much-loved snack in Uzbekistan and neighbouring countries. As so often happens, each country claims to have invented the original version and to have dispersed it into world cuisine. Samsa are both street food and homemade delicacy, and the pastries can be slapped onto the side of a tandoor oven to bake in the fierce heat or simply baked in a domestic oven. In keeping with local tastes, these Uzbek pastries are mildly spiced. Lamb or mutton, often with extra mutton fat, form one of the most popular fillings, but they can also be stuffed with green herbs, pumpkin, potatoes or chickpeas.
Shapes are generally geometrically inclined – ovals, triangles and squares – but skilled bakers are able to produce four-petalled flowers and the like in the twinkling of an eye. The dough is usually very lean and in this version, leaf pastry is brushed with butter and layered, transforming it into something resembling puff pastry. However, the amount of fat used is minimal so these should be eaten warm, before the layers compact too much and harden.
250 g/9 oz/1⅔ cups plain (all-purpose) flour
1 tsp baking powder
¼ tsp salt
1 egg, well beaten
about 125 ml/4 fl oz/½ cup lukewarm water
20 g/¾ oz/scant ¼ stick butter, melted
250 g/9 oz lamb, very finely chopped
1 medium onion, very finely chopped (about 100 g/3½ oz)
½ tsp salt, or to taste
1 tsp ground cumin
black pepper or chilli flakes, to taste
small handful coriander (cilantro), finely chopped
For the pastry, sift the flour, baking powder and salt together in a bowl. Reserve 1 tbsp beaten egg, then add the remaining egg and enough water to make a fairly firm dough. Knead by hand until smooth and elastic. Shape into a ball, then return to the bowl and cover with clingfilm (plastic wrap). Leave to rest at room temperature for about 15 minutes.
Knead the rested dough again lightly; the texture will have improved. On a silicone mat or a surface lightly dusted with flour, roll the dough out with a rolling pin or dowel to a very thin sheet, about 35 x 35 cm/14 x 14 in. Brush with melted butter and roll up to form a cylinder. Wrap with clingfilm and chill for at least 30 minutes.
To make the filling, thoroughly combine all ingredients in a bowl, then cover and set aside. If you make this several hours in advance and need to keep it chilled, use a good airtight container, or the onion will make everything else in the refrigerator smell.
When you are ready to assemble the pastries, remove the chilled roll from the refrigerator and cut it into 8 equal pieces.
Preheat the oven to 180˚C/350˚F/Gas Mark 4. Grease a baking sheet.
Flatten a piece and roll it out to 13–14 cm/5–5½ in. It will be slightly square. Put one-eighth of the filling in the centre of the pastry, then bring two opposing sides together and pleat the edges, pinching to seal it in the middle. If you’re not very proficient, you may need to roll the pieces a little bigger to give you more pastry to work with. However, bear in mind that the smaller you keep the margin outside the meat, the less chance there is of getting a large, stodgy knob at the bottom. Place the pastry on the baking sheet and flatten it with the palm of your hand. Shape the other pastries in the same way.
Brush with the reserved egg and bake for 25–30 minutes, or until light brown and shiny.
Leave them to cool for a few minutes, then serve warm.