Chapter 3
Creating Your First C++ Application
IN THIS CHAPTER
 Organizing your applications into projects
Typing code into the code editor
Writing an application that writes to the screen
Doing basic math
Running your application
It’s your lucky day. You have decided to learn one of the most popular programming languages on the planet. (C++ is the fourth most popular language according to the TIOBE Index at the time of this writing, at https://www.tiobe.com/tiobe-index/.) From the biggest skyscrapers housing huge Fortune 500 companies all the way down to the garages with the self-starting kids grinding out the next generation of software, people are using C++. Yes, there are other languages, but more programmers use C++ than any other language for desktop application, game, animation, media access, compiler, and operating system development. In this chapter, you start right out writing a C++ application.
As mentioned in Chapter 1, this book relies on your use of Code::Blocks as the IDE and on GCC as the C++ compiler. The procedures are written for the most current version of Code::Blocks (version 17.12) at the time of writing, so you may need to make allowances if you use a different Code::Blocks version, and the procedures won’t work if you use another IDE. In addition, you may need to make minor changes to the code as the examples become more complex if you want to use other compilers.
 You don’t have to type the source code for this chapter manually. In fact, using the downloadable source is a lot easier. You can find the source for this chapter in the
 \CPP_AIO4\BookI\Chapter03 folder of the downloadable source. See the Introduction for details on how to find these source files.
Code::Blocks Creating a Project
Creating a computer application is usually a bigger job than you’d want to organize in your head. Application code is saved in files much like the documents in a word processor. But applications often have more than one source-code file. At big companies in big buildings in big cities, some applications are really big — hundreds of source-code files for just one application.
Understanding projects
Applications can contain a lot of source code. To keep all that source code together, programmers use a file that manages it all, called a project. A project has a few key elements:
- A set of source-code files
- (Optional) Resource information such as icons and sound files
- A description of how to compile (build) the application
- Integrated Development Environment (IDE) settings that tell how to set up the editor you use to write the application
- Some general descriptions of the application being built, such as its name and the type of application it is
The type of application doesn’t mean “word processor” or “really cool earth-shattering software,” even if that’s what your application is. This book uses type to mean your application’s overall relationship with other applications:
- Does this application run by itself?
- Does this application add to or extend the functionalities of another application (such as Firefox)?
- Does this application serve as a library (a bunch of code that you make available to another application)?
All this information, along with your source-code files, represents a project.
In the Code::Blocks IDE, you create a new project each time you start work on a new application. You provide a little information about the application you’re working on, and then you begin writing your code. All the code for your application is stored in one place — in the project.
Defining your first project
To create a new project in Code::Blocks, start Code::Blocks and choose File ⇒ New ⇒ Project, or click Create a New Project on the Start Here page that appears when you start the application. A dialog box appears, as shown in Figure 3-1.

FIGURE 3-1: The New from Template dialog box lets you select a new project type.
 You see what appear to be way too many project types, including some that have nothing to do with C++, such as Fortran Application and Matlab Project. You can reduce the number of choices by selecting a category in the Category field. The best option for the projects in this book is Console.
When you create a C++ project in Code::Blocks, you choose from a list of several types of applications. They’re shown as icons in the New from Template dialog box in alphabetical order. The following list shows some application types:
- GTK+ Project: This is a graphical application that includes, well, a window. You know the kind: It usually has a menu across the top and something inside it that you can either click or type into. It relies on the GNU Image Manipulation Program (GIMP) Toolkit (GTK), which provides an incredibly flexible interface that runs on a number of platforms including Linux, Mac, and Windows systems. Read more about GTK in the “What about all of those other projects?” sidebar.
- Console Application: This is an application that gets a paltry Console window instead of a graphical window. Console refers to a window with a command prompt. (Folks who recall the old days, before Windows, call it a DOS box, and you may know it as a terminal window when working with operating systems such as the Mac or Linux.)
- Static library: A static library is a set of C++ code that you use later in another project. It’s like making a really great marinade that you won’t use up today. You’ll use some of it tomorrow and some of it after that.
- Dynamic Link Library: A Dynamic Link Library (DLL) is kind of like a static library except it is separated from the main application and gets its own file with a
.DLLextension. -
Empty project: This blank project is as clean as a blank sheet of white typing paper, ready for you to fill ’er up.
Frankly, it’s kind of a pain to use an empty project, because you have to tweak and set a bunch of things. So we never use this option.
For the samples in this chapter, create a Console Application. Follow these steps:
-
In the New from Template dialog box, click the Console Application icon found on the Projects tab, and then click Go.
The wizard asks which language you want to use.
-
Highlight C++ and click Next.
You see a list of project-related questions, as shown in Figure 3-2. These questions define project basics, such as the project name.
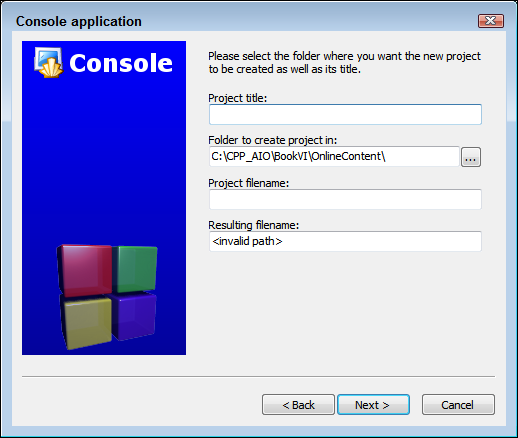
FIGURE 3-2: Provide the name of your project for Code::Blocks.
-
Type a name for your project in the Project Title field.
The example uses
SayHelloas the project title. Notice that the wizard automatically starts creating an entry for you in the Project Filename field. -
Type a location for your project in the Folder to Create Project In field.
The example uses
C:\CPP_AIO4\BookI\Chapter03as the folder name. You can also click the ellipsis button next to the Folder to Create Project In field to use the Browse for Folder dialog box to locate the folder you want to use. Notice that the wizard completes the entry in the Project Filename field. -
(Optional) Type a project filename in the Project Filename field.
Code::Blocks fills in this field for you automatically based on the Project Title field entry, and there isn’t a good reason to change it in most cases; however, in special circumstances, you may choose to do so. For example, if you have a project with multiple elements, you may want the project file to match the name of an overall project rather than the name of a particular entity within the project.
-
Click Next.
You see the compiler settings shown in Figure 3-3. Most of the projects in this book use the default compiler settings, which include the GNU GCC Compiler shown in the figure. However, if you look at the Compiler drop-down list, you see that Code::Blocks supports a number of compilers and you can add more to it. The other settings control the creation and location of a Debug version of the application (the version you use for finding problems in your code) and a Release version (the version that you send to a customer).
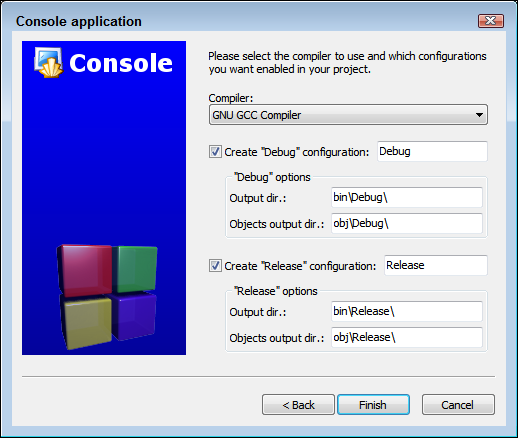
FIGURE 3-3: Tell Code::Blocks where to place the Debug and Release versions of your application.
-
(Optional) Change any required compiler settings.
There generally isn’t any good reason to change the compiler settings unless your project has a specific need, such as placing the output and object files in the same folder.
-
Click Finish.
The wizard creates the application for you. It then displays the Code::Blocks IDE with the project loaded. However, the source code file isn’t loaded yet.
-
Drill down into the SayHello workspace entries on the Projects tab of the Management window and double-click
main.cpp.You see the source code file loaded so that you can edit it, as shown in Figure 3-4.
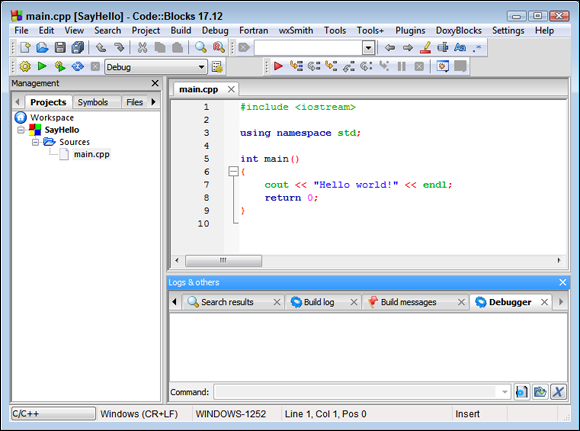
FIGURE 3-4: Use the Code::Blocks IDE to interact with your project.
The project window is organized side by side:
- The left side is an Explorer view (called a tree view), which represents your project. At the top of the tree view is a workspace — the essential unit of a project. Below the workspace is the name of your project. Underneath that are the components of your project. In this case, only one component exists so far: the source-code file whose filename is
main.cpp. Remember that, in order to program in C++, you enter code into a source-code file; this file, calledmain.cpp, is such a file for yourSayHelloproject. -
The right side (which actually takes up about three-quarters of the screen) is the source-code file itself.
This part works much like a word processor or an email editor, and you can type the code into the window. You notice that you already have some code there — a sort of starter code that came into being when you chose Console Application and created the project.
- At the bottom of the display are a number of status windows. The Code::Blocks window tells you how the wizard created your application. Don’t worry about these windows right now. You see them in action as the book progresses.
Note that Figure 3-4 also shows some additional elements: a menu, several toolbars, and a status bar. You can right-click the toolbar area to show or hide toolbars as needed. Figure 3-4 shows the default toolbars when you first start a project. The status bar shows the language highlighting in use, some configuration settings, and your current position within the source file. You can change the highlighting used in the editor window by choosing a new language option in the drop-down menu on the left side of the status bar that currently shows C/C++.
Building and executing your first application
Okay, it’s time to work with your first application. Use the following steps to save the file, build the application (make it into an executable that your operating system can use), and execute the application:
-
Save the code file by choosing File ⇒ Save Everything or press Ctrl+Shift+S.
Saving the files ensures that you have a good copy on disk should something go wrong. For example, you could completely crash the IDE if your application does the wrong thing.
-
Choose Build ⇒ Build or press Ctrl+F9.
This action creates the executable file. Building the code converts words you understand into code that your operating system understands. Notice that Code::Blocks automatically selects the Build Log window for you and you see the steps that Code::Blocks takes to create your application. At the end of the process, you should see something like
0 errors, 0 warnings (0 minutes, 1 seconds)as the output (the precise amount of time may vary, but it should be short). -
Choose Build ⇒ Run or press Ctrl+F10.
An output window like the one shown in Figure 3-5 opens, and you see your first application execute.
-
Press Enter to stop application execution.
The application window disappears and you see the Code::Blocks IDE again.
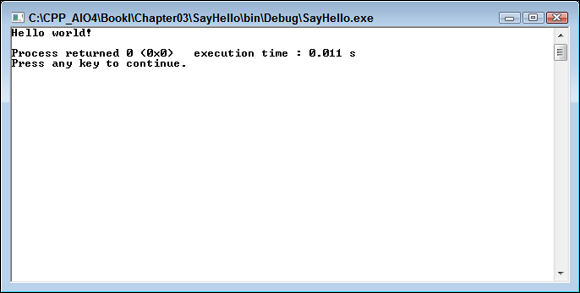
FIGURE 3-5: Execute your first application.
Well, that wasn’t interesting, was it? But that’s okay! The application starts out in a basic situation: You have a console window, and then when the application is finished doing whatever it must do, it shows the message Press any key to continue. — and when you do so, the application ends.
Typing the Code
The rightmost 75 percent or so of the Code::Blocks window is the code editor; it’s where you type and change your code. Of all the tasks we just mentioned in the first part of this chapter, the nearest equivalent to using the Code::Blocks code editor is composing an email message.
 Word movement and selection actions look a bit strange on the screen. They ignore certain characters, such as braces — the curly characters { and }.
The code editor works like the editor in an email message. You can
- Type code.
- Move the cursor with the arrow keys (up, down, left, right) to the position where you want to type. The cursor is the little blinking vertical bar that shows where your text goes when you type. Some folks call it a caret or an insertion point.
- Click where you want to type. Use the mouse to point where you want to type, and then click the mouse button. The cursor jumps to the spot where you click.
- Select text to delete or change. You can select text in either of two ways:
- Point with the mouse at the first or last character you want to select; then hold down the mouse button while you drag the mouse.
- Move the cursor to the first or last character you want to select; then hold down the Shift key while you press the arrow keys.
- Scroll the text up and down (vertically) or left and right (horizontally) with the scroll bars. The scroll bars work only when there is more text than you can see in the window, just like most other places in the Windows, Linux, and Mac worlds. You can scroll up and down (if there’s enough text in the editor) by using Ctrl+↑ and Ctrl+↓ key combinations or the mouse wheel (assuming you have one).
-
Scrolling changes only what you see. You must use the mouse or the arrow keys to select what you see.
After you play around a bit with the editor, you can use Table 3-1 to do a few of your favorite tasks. (Of course, if you’re new to programming, you may not know yet whether these are your favorites — but they will be soon. Trust me.)
TABLE 3-1 Navigation and Edit Commands
|
Command |
Keystroke or Action |
|---|---|
|
Move the cursor |
↑, ↓, ←, or →, Home, End |
|
Move from word to word |
Ctrl+← or Ctrl+→ |
|
Select with the mouse |
Click the mouse in the text, and while the mouse button is down, drag the mouse |
|
Select with the cursor |
Shift+↑, Shift+↓, Shift+←, or Shift+→ |
|
Select the next word |
Shift+Ctrl+→ |
|
Select the previous word |
Shift+Ctrl+← |
|
Select everything |
Ctrl+A |
|
Go to the top |
Ctrl+Home |
|
Go to the bottom |
Ctrl+End |
Starting with Main
When a computer runs code, it does so in a step-by-step, line-by-line manner. But your code is organized into pieces, and one of these pieces is the main function, or simply main(), which is the part that runs first. main() tells the computer which other parts of the application you want to use. main() is the head honcho, the big boss.
How does the computer know what is main()? You type lines of code between the brace characters, { and }. Here is the default application that Code::Blocks produces when you create a Console Application project:
#include <iostream>

using namespace std;

int main()
{
    cout << "Hello world!" << endl;
    return 0;
}
The word main is required, and it tells the computer where main() is. You might also see main() shown as
int main(int argc, char *argv[])
Don’t worry about the words around main() for now. You discover what these words mean later in the chapter. For now, all you need to know is that every C++ application has a main() function.
The computer performs the code line by line. If a line is blank, the computer just goes to the next line. When you write lines of code, you are instructing the computer to do something (which is why some people refer to lines of code as instructions).
Showing Information
Ready to type some code and try it out? Go for it! This code will open the famous console window and write some words to it.
First, make sure that you still have the Code::Blocks IDE open and the SayHello project open, as in this chapter’s preceding examples. If not, follow these steps:
-
Start Code::Blocks if it’s not already running.
You see the Start page for the Code::Blocks IDE.
-
Click the
SayHello.cbpproject found in the Recent Projects list.Code::Blocks opens the project for you.
If the main.cpp code isn’t showing in the rightmost 75 percent of the window, double-click main.cpp in the tree view on the left. It immediately opens. (If you don’t see the tree view, click the little tab at the top that says Projects; it’s next to a tab that says Symbols.)
Follow these steps carefully. Make sure that you type everything exactly as given here:
-
Position the cursor on the line with the opening brace.
In this case, that’s Line 6. You can see the line number on the left side of the code editor.
-
Press the Enter key.
The cursor should be in the fifth column. If it isn’t — if it stays in the first column — press the spacebar four times.
-
Type the following line of code exactly as it appears here.
Put no spaces between the two less-than (<) symbols. Make sure that you remember the final semicolon at the end. Here’s the line:cout << "Hello, I am your computer talking." << endl; - Delete the line of code that looks like this:
cout << "Hello world!" << endl;
In the end, your code will look like the following example (the new line that you typed is shown here in bold):
#include <iostream>

using namespace std;

int main()
{
    cout << "Hello, I am your computer talking." << endl;
    return 0;
}
If you don’t type your code correctly, the computer can tell you. This step compiles the application: The computer makes sure that what you wrote is okay and then translates it into a runnable application. (Don’t worry too much about what that means. For now, just think of it as making sure that your application is okay.)
To find out whether your application is good to go, choose Build ⇒ Build.
If all is well, you see a window in the lower-left of the main Code::Blocks window with the really happy message, 0 errors, 0 warnings (0 minutes, 1 seconds) (the precise time you see may vary). A message like Yourock! might be nicer, but 0 errors, 0 warnings (0 minutes, 1 seconds) ain’t all that bad.
If you didn’t type the line correctly, all is not lost, because the computer will tell you what you did wrong. For example, you might type couts instead of cout. In this case, you will see something like what is shown in Figure 3-6. A list with columns appears at the bottom of your screen.

FIGURE 3-6: Code::Blocks tells you about errors in your application.
- The leftmost column shows the name of the file where the error was. In this case, the error was in
main.cpp, the only file you were working on. - The middle column shows the line number of the problem (in this case, 7).
- The rightmost column of the list makes a basic attempt to tell you what you did wrong, like this:
error: 'couts' was not declared in this scopeWhen the compiler doesn’t recognize a word, it says that the word is
not declared. In other words, the compiler doesn’t know whatcoutsis. (The word should becout.)
If you want to see the problem, you can point at the error report line and double-click. The bad line appears in the code editor, with a little red box next to the line. The line is also highlighted normally. As soon as you press an arrow key, the highlight vanishes.
Thus, if you press the → key a few times and get to the word couts and then delete the letter s, you can try again. If you choose Build ⇒ Build, this time you see the happy message 0 errors, 0 warnings (0 minutes, 1 seconds). Excellent!
No errors means that the application is good enough to run. So run it!
Choose Build ⇒ Run. A console appears with text that looks like this:
Hello I am your computer talking.

Process returned 0 (0x0)   execution time : 0.030 s
Press any key to continue.
See what happened? There is now a message that says, Hello, I am your computer talking. Apparently, the thing you typed caused that message to appear. (Go ahead and press Enter to close the console.)
And in fact, that’s exactly what happened. That’s how you make a message appear on the console screen. The steps look like this:
-
Type cout.
Although
coutlooks like it’s pronounced “cowt,” most programmers say “see-out.” Think of it as shorthand for console output. (But don’t type console output in its place, because the compiler won’t accept that.) -
After the word
cout, type a space and then type two less-than signs (make sure to leave that single space before them).These less-than signs just mean that the data that follows will be sent to
coutfor display on the console. The data that follows, some text, is in double quotes. That’s the way the computer knows where it starts and ends. The words and stuff inside these double quotes is called a string because it’s a bunch of letters strung together. The computer knows where the string starts because there’s a double quote, and it knows where the string ends because there’s a double quote. The computer doesn’t display these two sets of double quotes when the application runs.Then some weirdness follows. There’s another set of less-than signs, which means you want to write more to the console. But what follows? It’s
endl. Notice this is not in quotes. Therefore, you aren’t saying that you want the strange barely pronounceable word “endl” to appear on the screen. Instead, you’re using a special notation that tells the computer that you want to end the current line and start fresh on the next line. And if you look at the output, you notice that the words that follow (the message about pressing the any key) are, indeed, on the next line. Note thatendlis pronounced “end-el.”
So that’s not so bad after all. Here’s a recap:
- The word
coutmeans you want to write to the console. - The
<<symbols together (with no space between them!) mean the thing that follows is what you want to write. - After the
<<symbol, you tell the computer what you want to write. It can either be a string of letters, symbols, and other characters (all inside quotes), or it can be the wordendl. - You can put multiple items in a row and have them appear on the console that way, provided you start the line with
coutand precede each item with the<<symbols.
Oh, and if you have a sharp eye, you may notice one more thing not mentioned yet; a semicolon appears at the end of the line. In C++, every line must end with a semicolon. That’s just the way it’s done.
Statements in C++ end with a semicolon.
 Saying that every line must end with a semicolon is not quite accurate. You can break any line of code into multiple lines. The computer doesn’t mind. You could just as easily have written your code as the following two lines:
cout << "Hello, I am your computer talking."
<< endl;
This is fine, provided that you don’t split any individual word (such as cout and endl) or the << symbols or the string. In effect, any place you have a space occurring “naturally” in the code, you can start a new line, if you want.
Strings, the text in this example, must stay together on a single line between double quotes as shown, unless you break it into two strings, each with its own set of double quotes like this:
cout << "Hello, I am your" <<
" computer talking."
<< endl;
Notice that you must also add << between each string segment. Then, when the whole statement is finished, you end with a semicolon. Think of the semicolon as a signal to the computer that the old statement is finished.
Doing some math
You can get the computer to do some math for you; you can use the same cout approach described in the preceding section; and you can throw in some numbers and arithmetic symbols.
Although addition uses the familiar plus sign (+) and subtraction uses the familiar minus sign (–), multiplication and division use symbols you might not be familiar with. To multiply, you use the asterisk (*); to divide, you use the forward slash (/).
Table 3-2 shows the four common math symbols.
TABLE 3-2 Math Symbols
|
Symbol |
Function |
|---|---|
|
+ |
Addition (plus) |
|
– |
Subtraction (minus) |
|
* |
Multiplication (times) |
|
/ |
Division (divided by) |
Yep, it’s now math-with-weird-symbols time. Continue with the source code you already have. Click somewhere on the line you typed — you know, the one that looks like this:
cout << "Hello, I am your computer talking." << endl;
Press End so that the cursor moves to the end of the line. Then press Enter so that you can start a new line between the cout line and the line that starts with the word return.
Whenever you want to insert a line between two other lines, the easiest way to get it right is to go to the first of those two lines, press End, and then press Enter. Doing so inserts a new, blank line in the right place.
After you press Enter, you notice that something happened: The cursor is not at the start of the newly inserted line; instead, it has four spaces and it’s indented flush with the other lines. That’s not a mistake. Believe it or not, it’s a serious lifesaver. Well, okay, maybe not a lifesaver, but it’s almost as good as those little candies that everybody loves. The reason is that often you indent your code (this particular code is indented four spaces); if you’re typing lots of code, it’s a bummer to have to type four spaces (or press the Tab key) every time you start a new line. So Code::Blocks considerately (and automatically) does the indentation for you.
If, for some reason, your code didn’t automatically indent and the cursor is loitering at the beginning of the line, the auto-indent feature is not turned on. It should be on by default, but if it isn’t, here’s how to turn it on:
-
Choose Settings ⇒ Editor.
The Configure Editor dialog box, shown in Figure 3-7, appears. It should automatically show the General Settings/Editor Settings tab, but you can select this tab if needed.

FIGURE 3-7: Configure the editor to use automatic indents.
- Make sure that the Tab Indents check box is selected and then click OK.
-
When you’re back in the code, press Backspace to delete your new line and then try pressing Enter again.
Behold! The code automatically indents.
- After your new, blank line appears and indents itself, type the following:
cout << 5 + 10 << endl;The beginning and the end of this line are just like those of the line you typed earlier. The difference is the middle — instead of typing a string, you type a math problem: 5 plus 10. Note that you put spaces around the
5, around the+, and around the10— but not between the10coutis broken to fit in the book):#include <iostream>
using namespace std;
int main()
{
cout << "Hello, I am your computer talking." <<
endl;
cout << 5 + 10 << endl;
return 0;
} - Save your work by choosing File ⇒ Save Everything.
Instead of choosing File ⇒ Save Everything, you can recognize that the only thing that changed is the source-code file you’re currently working on. If you see the blinking cursor in the code editor, you know that the code editor is active. If not, click somewhere in your code to activate the editor. When you see the blinking cursor, press Ctrl+S. This saves your file.
The computer world uses an adage that goes something like this: “Save early, save often.” Get in the habit of pressing Ctrl+S every so often. You won’t wear out your hard drive, and the keyboard is pretty durable. Every time you type a few lines of code, press Ctrl+S. Before you compile, press Ctrl+S. When you feel paranoid that the last Ctrl+S didn’t stick, you can press Ctrl+S. When you’re stuck at a traffic light, you press Ctrl+S.
Now you can tell the computer to compile your code. If you haven’t saved it, do so now by pressing Ctrl+S. Then choose Build ⇒ Build. If you typed everything correctly, you should see the magical message 0 errors, 0 warnings (0 minutes, 1 seconds appear in the Build Log window. But if not, don’t worry; you can easily fix it. Look at your code and find the difference between the line we wrote earlier and your code. Here it is again, just for safe measure: )
cout << 5 + 10 << endl;
There is a space after cout, a space after <<, a space after 5, a space after +, a space after 10, and a space after <<. And there is a semicolon at the end. Make sure that these are all correct.
Then when you successfully compile and see the happy message 0 errors, 0 warnings
A console window opens, and you should see the following:
Hello I am your computer talking.
15

Process returned 0 (0x0)   execution time : 0.015 s
Press any key to continue.
Notice that the second line is the answer to the math problem 10 + 5. That means the computer knows how to do math, more or less correctly.
Ordering the operations
If you want, you can play around with some more complicated problems. For example, you can try something like this:
cout << 5 + 10 / 2 * 3 + 25 << endl;
What do you think the answer will be? The answer depends on computer rules for the order in which it performs math problems. These are called orders of operation. Multiplication and division take precedence over addition and subtraction. Therefore, the computer does all the multiplication and division first from left to right; then it does the addition and subtraction from left to right. Figure 3-8 shows the order in which the computer does this particular math problem.
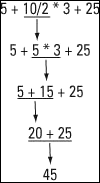
FIGURE 3-8: The computer likes to use orders of operation.
Going overboard
The computer actually has various limits, including when it comes to math. If you try something like this:
cout << 12345678 * 100 / 2 * 3 * 3 << endl;
a warning message shows up in the error window when you try to compile:
warning: integer overflow in expression [-Woverflow]
This message is bad. It means that you can’t rely on the answer, which is 1,260,587,804 in this case, when it should be 5,555,555,100. You can use a programming calculator to see why this problem occurs. When you input 12345678, the resulting value takes up to bit 23 of the 32-bit integer, as shown in Figure 3-9.
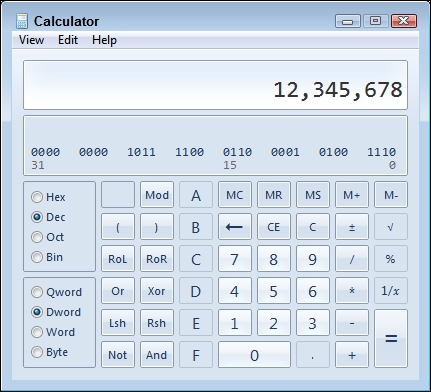
FIGURE 3-9: A programmer calculator comes in handy when working with numbers.
When you multiply the initial value by 100, the bits now extend up to bit 30 of the 32-bit integer, as shown in Figure 3-10. At this point, the value is in jeopardy of running out of bits to use. Only the topmost bit is left.
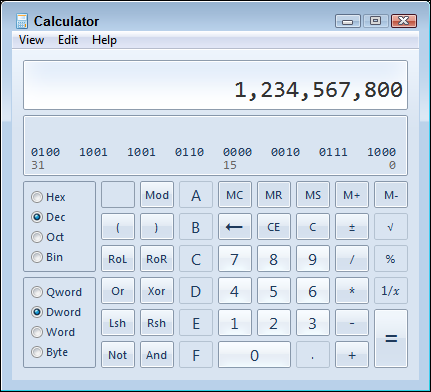
FIGURE 3-10: You can see how overruns occur by doing the math.
Dividing by 2 buys you some room — the value is back down to bit 29. Multiplying by 3 produces a correct output value of 1,851,851,700. However, multiplying by 3 the second time causes an overflow. The value actually decreases, which is not what you’d expect from a multiplication. The value from the programmer calculator matches the value output by the application. In both cases, you see the result as an overflow of the number of available bits. Using the programmer calculator helps you see what is happening in a visual way.
The greatest positive number you can use is 2,147,483,647. The greatest negative number is –2,147,483,647. However, if you’re willing to stick to only positive numbers and 0, the computer can make some adjustments inside and handle a higher positive number. In that case, your numbers can range from 0 to 4,294,967,295.
Pairing the parentheses
If you want to get around the order in which the computer does its math, you can add parentheses. For example, if you use the following line, the computer does the final operation (+) before it does the others:
cout << 5 + 10 / 2 * (3 + 25) << endl;
Whereas previously, without the parentheses, this thing came out to be 45, now it comes out to be 145. First the computer does the 3 + 25 to get 28. Then it begins with the multiplication and division, from left to right. So it takes 10 / 2 to get 5, and then multiplies that by (3 + 25), or 28, to get 140. Then it starts with the addition and subtraction from left to right. So it adds 5 to this to get the final number, 145.
Tabbing your output
Just as you can write a string of letters and numbers to the console, you can also write a tab. For example, change the following line from your application
cout << "Hello, I am your computer talking." << endl;
to:
cout << "Hello\tI am your computer talking." << endl;
In the preceding code, you replaced the comma and space with a backslash and then a lowercase t
Hello I am your computer talking.
The extra space in the displayed line is a tab space, just as if you had pressed the Tab key while typing this. (Is that slick, or what?)
There’s a complication to using the backslash: You can’t just type a backslash (or a double quote, for that matter) and expect to see it on the screen. A couple of workarounds will show the actual characters:
-
Really want to display a backslash, not a special character? Use a backslash followed by another backslash. (Yes, it’s bizarre.) The compiler treats only the first backslash as special. When a string has two backslashes in a row, the compiler treats the second backslash as, well, a backslash.
For example, the following line of code has two backslashes:
cout << "\\tabc" << endl;The following text shows up at the console:
\tabc - If a string starts with a double quote and ends with a double quote, how in the world would you actually print a double quote? Type a backslash and then a double quote, as in the following code:
cout << "Backslash and double quote are \"." << endl;When that code runs in an application, you see this on the screen:
Backslash and double quote are ".
C++ programmers use the term escape-sequence to refer to any special character in a string that starts with a backslash. This is an outdated bit of vocabulary — maybe not as old as “methinks,” but it does date back to the original C language of the 1970s. Back then, you made special characters appear on console screens by first pressing the Esc key.
Let Your Application Run Away
The word execute refers to running your application, but you need to compile (or build, using the Code::Blocks terminology) the application before you run it. The compilation process transforms your application into an executable file. An executable file is a special type of file that contains an application you can run on your computer. When you run your word processor application, you run an executable file containing the word processor application.
After the computer compiles (builds) your application, it performs a step called linking. People often refer to these two steps together as simply compiling. Indeed, this book often uses the term to mean both steps together. If you’re curious about what goes on here, take a look at Appendix A. It has a section devoted to the compiling and linking processes.
Whenever you want to run your application, you first compile it and then run it. If you make more changes to your application, you must compile it again before running it. Otherwise, the executable file won’t have your changes.
Because you almost always use Build and Run in sequence, the kind people who built Code::Blocks included a special menu item called Build and Run on the Build menu. The computer first compiles your code, and then it immediately runs the application if there are no errors. If there are errors, the compiler doesn’t run the application, and the errors are reported as usual. (You can also perform a build and run by pressing F9.)
Table 3-3 lists keyboard shortcuts for compiling.
TABLE 3-3 Keyboard Shortcuts for Compiling and Running
|
Action |
Keyboard Shortcut |
|---|---|
|
Build |
Ctrl+F9 |
|
Run |
Ctrl+F10 |
|
Build and run |
F9 |