Chapter 1
Configuring Your Desktop System
IN THIS CHAPTER
 Getting your own copy of C++ 20
Getting a copy of Code::Blocks
Creating a Code::Blocks work environment on your system
Seeing how Code::Blocks helps you perform tasks
Working with other IDEs
This chapter is for those of you who have a desktop system and want to use it to create your application code. Chapter 2 discusses how to perform the same task using a mobile device (and provides you with some trade-offs between the two environments). Whether you use the desktop or the mobile solution, you need a copy of a compiler that supports C++ 20 features or some book examples won’t work at all. This book relies on the GNU Compiler Collection (GCC) version 8.3 compiler because it provides great C++ 20 support (see https://en.cppreference.com/w/cpp/compiler_support). The best way to obtain the version 8.3 compiler for your desktop system is to follow the steps in this chapter.
Before you can do anything interesting at all with C++, you need a copy of it installed on your system. Of course, this means going online, finding the location of the software that’s appropriate for your platform, and then downloading it as necessary. If you use an Integrated Development Environment (IDE) such as Code::Blocks (the IDE used throughout this book), you get a copy of C++ with your installation, so you don’t need to worry about reading the first section of this chapter. This book relies on your having a compiler capable of compiling C++ 20 code, which is the latest version of the language available at the time of this writing.
 Even though this book focuses on working with C++ on the Mac, Windows, and Linux platforms, you can actually use the techniques it provides on a great many other desktop systems. With this in mind, you’ll find an overview of using C++ with other IDEs. As your platform becomes more esoteric, you’ll find that fewer of the book examples work because your platform may require special programming techniques. The best option for working with this book is using a copy of Code::Blocks 17.12 with C++ 20 support installed on the Linux, Mac, or Windows platform.
Obtaining a Copy of C++ 20
There is no product available named C++ 20. The C++ 20 standard simply says what the language contains and how someone should implement it. In other words, you can’t just go online and get a copy of C++ 20; what you need to do instead is get a compiler vendor’s implementation of the C++ 20 standard. For example, you can download the GNU Compiler Collection (GCC) version of C++ 20 from https://gcc.gnu.org/releases.html.
 Every vendor will have a slightly different interpretation of this standard and could provide additions to the standard. In short, every compiler provides a unique version of C++. However, you also have the choice of not using the special features that the vendor provides, which means your source code is less susceptible to problems that occur when you use multiple compilers. The examples in this book are strictly written to the C++ 20 standard, so you shouldn’t have a problem using them anywhere you want.
It’s important that you also understand that a compiler is not the same as an Integrated Development Environment (IDE). The compiler is separate from the IDE in many cases and maintained by two separate parties. For example, the Code::Blocks IDE supports multiple compilers, and the GCC compiler works within multiple IDEs. The compiler is the important piece of software that turns your source code into an executable file that the operating system can run to produce the output you want.
The compiler you choose has to support the platforms you want to work with. For example, GCC supports Mac, Windows, and Linux development as well as some Acorn or (later) Advanced RISC Machine (ARM) processors (ARM doesn’t officially stand for anything today). In fact, it may support other platforms by the time you read this chapter. Because it works in so many places, this book focuses on GCC, even though the examples will work with other compilers with some modification to overcome compiler differences.
Obtaining Code::Blocks
The Code::Blocks IDE provides an environment in which you can write source code, compile it, test it, and debug it as needed. The IDE doesn’t actually compile the source code, but it does provide support for a compiler that does so. (It just so happens that it does its job in such a way that makes it appear that the compiler is part of the IDE.) You can choose from a number of compilers in Code::Blocks, but this book focuses on using GCC to ensure that the examples will run on as many platforms as possible. GCC comes with your copy of Code::Blocks when working with Windows, so you don’t have to do anything special to work with it except select it during the installation process. (When working on a Mac or Linux system, you must install GCC separately — the compiler doesn’t come with Code::Blocks.)
This book is written using Code::Blocks version 17.12. That doesn’t mean you can’t use it with earlier or later versions of Code::Blocks. However, when working with other versions of Code::Blocks, you may find that you need to modify the code slightly. The modification is required in order to support the compiler that comes with that version of Code::Blocks. The IDE itself won’t affect your ability to work with C++ 20.
Code::Blocks comes in both binary form and source code form. You can download either form of version 17.12 from http://www.codeblocks.org/downloads/5. The link leads you to SourceForge, where you select the platform you want to use: Mac, Linux, or Windows. Click the folder link and you see a list of downloadable archive files for that platform. (Linux users will also have to choose their particular version of Linux.) Choosing the correct archive is important because different archives have different features.
When working with a Windows installation, make sure you use the codeblocks-17.12mingw-setup.exe installer to obtain a copy of GCC with Code::Blocks. Make absolutely certain that you don’t install it to the Program Files folder on your system, because the application won’t work there. Code::Blocks writes data to its host directory, and Windows won’t allow applications to perform this task in the Program Files folder. Create a folder to which you have write privileges and install Code::Blocks there instead.
Now that you have an appropriate archive to use, it’s time to install Code::Blocks on your machine. The “Installing Code::Blocks” section of this chapter tells you more about getting Code::Blocks installed on your particular system.
Installing Code::Blocks
Before you can use Code::Blocks as your IDE, you need to install it. The following sections describe how to install Code::Blocks on each of the main platforms supported by this book. The instructions in these sections assume that you’ve downloaded the binary version of Code::Blocks and that you aren’t using a custom compiled version of the product.
 If you have an older version of Code::Blocks installed on your system, be sure to uninstall it before installing the new version. Also make sure that you tell the uninstaller to delete any old custom files in the folder so that you start with a fresh folder. Old files can cause errors to appear when you start Code::Blocks or perform common tasks.
Working with Windows
Code::Blocks comes with a Windows installer that will make the task of installing the IDE easier. The following steps help you work with the codeblocks-17.12mingw-setup.exe installer:
-
Double-click the file you downloaded from the Code::Blocks site.
You see the CodeBlocks Setup Wizard start. If you see a User Account Control dialog box, give the application permission to proceed by clicking Yes.
-
Click Next.
The licensing agreement appears. Read the licensing agreement so that you know the terms of usage for Code::Blocks.
-
Click I Agree.
The wizard displays a series of configuration options, as shown in Figure 1-1. This book assumes that you’ve performed the default, full installation.
-
Click Next.
The installation program asks where to install Code::Blocks on your system. Unlike many other applications, Code::Blocks will actually write data to this folder from time to time. The best idea is to use a folder to which you have write access. To ensure maximum compatibility, the book uses the
C:\CodeBlocksfolder for installation purposes. To keep from seeing any error messages, make sure that the path doesn’t have any spaces in it (see the blog post athttp://blog.johnmuellerbooks.com/2016/04/20/spaces-in-paths/for details).
FIGURE 1-1: The wizard asks you to select the configuration options to use.
-
Type C:\CodeBlocks in the Destination Folder field. Click Install.
The installation program automatically creates the
C:\CodeBlocksfolder for you when it doesn’t already exist. If the folder already exists because you previously installed an older version of Code::Blocks, you see a dialog box appear. Click Yes to allow installation to continue. You see all the files installed into theC:\CodeBlocksfolder on your system.The setup wizard may display a dialog box asking whether you want to start Code::Blocks. Click No if you see this dialog box.
-
Click Next.
You see a completion dialog box.
-
Click Finish.
The setup wizard ends.
If you find that the wizard has somehow managed not to select a compiler and/or debugger for you, you can perform this task manually. The “Selecting a compiler” section will help in this regard. In addition, the blog posts at http://blog.johnmuellerbooks.com/2011/04/06/checking-your-compiler-in-codeblocks/ and http://blog.johnmuellerbooks.com/2013/04/12/resetting-your-codeblocks-configuration/ tell how to perform the additional setup. However, in most cases, the wizard will perform the required setup for you.
Working with Mac OS X
Installing Code::Blocks on a Mac requires a little extra work than it does in Windows. Code::Blocks requires Mac OS X 10.6 or later to install. You can get the version 17.12 file, codeblocks-17.12_OSX64.dmg, from https://sourceforge.net/projects/codeblocks/files/Binaries/17.12/Mac/. If you experience a Mac Gatekeeper error during installation, please check out the blog post at http://blog.johnmuellerbooks.com/2016/03/21/mac-gatekeeper-error/.
The following steps tell you how to get a functional Code::Blocks installation on your Mac system.
-
Download and install Xcode from the App Store to obtain a copy of GCC, if necessary.
You can verify that you have the GNU GCC compiler installed by opening a terminal, typing gcc -v, and pressing Enter. If GCC is installed, you should see some version information along with some compiler instructions.
-
Extract the Code::Blocks files into a folder.
You see a number of files, including the Code::Blocks application, a readme file containing the latest update information, and a PDF file containing documentation.
-
Open the
Applicationsfolder.You see the applications installed on your system.
-
Drag the
CodeBlocks.appfile from the folder you used for extraction purposes to theApplicationsfolder.The operating system adds Code::Blocks to the list of usable applications.
-
Navigate to
https://developer.apple.com/downloads/.This site requires that you sign up for a free developer ID. Simply follow the prompts onscreen to obtain your Apple ID. The sign-up process is free.
-
Click the Command Line Tools for Xcode link.
The operating system downloads the file and displays a package folder for you.
-
Double-click the Command Line Tools package.
The operating system installs the package for you, which enables access to GCC from Code::Blocks.
Using the standard Linux installation
There isn’t a single set of steps for installing Code::Blocks on Linux, because each flavor of Linux has its own requirements. Code::Blocks directly supports:
- Blag
- Debian
- Fedora
- Gentoo
- Platypux
- Red Hat Package Manager (RPM)-based distributions (such as SUSE, Red Hat, Yellow Dog, Fedora Core, and CentOS)
- Ubuntu
Each distribution type has its own set of instructions that you can find at http://wiki.codeblocks.org/index.php?title=Installing_Code::Blocks. Make sure you download and install the compiler, debugger, and IDE as needed by carefully following the instructions (typed at the terminal). The file that you download from http://www.codeblocks.org/downloads/26 contains the packages for a Code::Blocks installation, so you don’t need to download each package separately as part of the installation process.
 Some Linux installations have special requirements or experience limitations when working with Code::Blocks. The only apparent limitation that affects this book is the lack of Boost support for Red Hat and CentOS. Because of this limitation, you can’t use the examples found in Book 7, Chapters 4 and 5. However, if you experience other limitations, please let me know about them at
 John@JohnMuellerBooks.com and I’ll address them as part of a blog post for this book.
Using the graphical Linux installation
All versions of Linux support the standard installation discussed in the “Using the standard Linux installation” section of this chapter. However, a few versions of Debian-based Linux distributions, such as Ubuntu 12.x and above, provide a graphical installation technique as well. You’ll need the administrator group (sudo) password to use this procedure, so having it handy will save you time. The following steps outline the graphical installation technique for Ubuntu, but the technique is similar for other Linux installations.
-
Open the
Ubuntu Software Centerfolder (the folder may be named Synaptics on other platforms).You see a listing of the most popular software available for download and installation, as shown in Figure 1-2. Your list will probably vary from the one shown in the screenshot.
-
Select Developer Tools (or Development) from the All Software drop-down list box.
You see a listing of developer tools, including Code::Blocks, as shown in Figure 1-3.
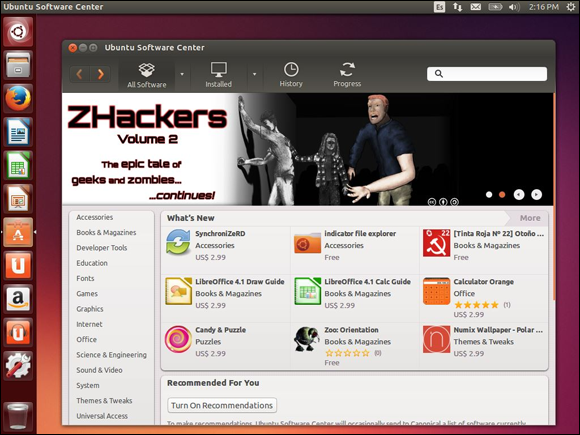
FIGURE 1-2: The Ubuntu Software Center contains a list of the most popular software when you open it.
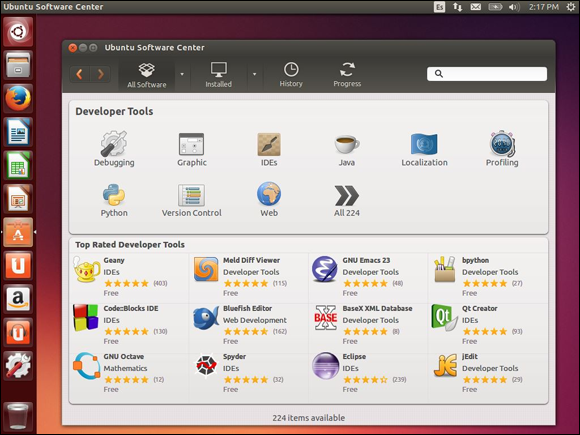
FIGURE 1-3: The Developer Tools category contains an entry for Code::Blocks.
-
Double click the Code::Blocks entry.
The
Ubuntu Software Centerprovides details about the Code::Blocks entry and offers to install it for you, as shown in Figure 1-4.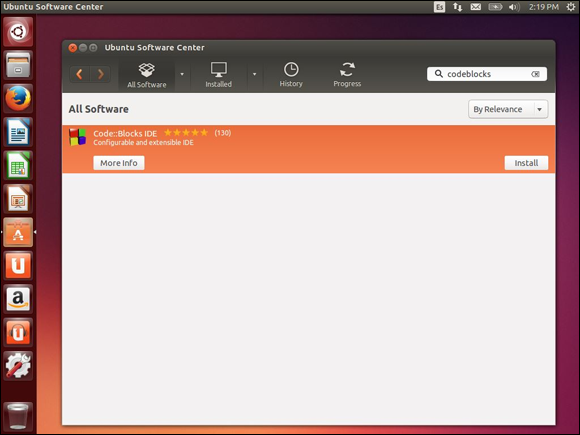
FIGURE 1-4: It’s possible to obtain additional information about Code::Blocks if necessary.
-
Click Install.
Ubuntu begins the process of installing Code::Blocks. A progress bar shows the download and installation status. When the installation is complete, the Install button changes to a Remove button.
-
Close the Ubuntu Software Center folder.
You see a Code::Blocks icon added to the Desktop. The IDE is ready for use.
Touring the Essential Code::Blocks Features
No matter how you install Code::Blocks for your platform, you eventually end up with an IDE with standardized characteristics. This is one of the best reasons to use an IDE such as Code::Blocks — you can use the same IDE no matter which platform you use.
Your screenshots may look different from the ones shown in this book. Even though this book uses screenshots from the Windows version of Code::Blocks, the same features are provided for Code::Blocks installations on other platforms, though the IDE may not look precisely the same on those other platforms. The following sections describe the essential features you need to know about when working with Code::Blocks.
Starting Code::Blocks for the first time
Open the Code::Blocks executable program using the technique your platform usually requires. For example, when working with Windows or the Mac, you double-click the CodeBlocks icon. The first time you start Code::Blocks, you may see a Compilers Auto-detection dialog box. Select the GNU GCC Compiler entry (it may be the only available entry and selected by default), click Set as Default, and then click OK.
At this point, Code::Blocks displays a File Associations dialog box, similar to the one shown in Figure 1-5. It’s a good idea to associate the IDE with your C++ files so that opening the file also opens the IDE — making it much easier to write applications and modify them later.
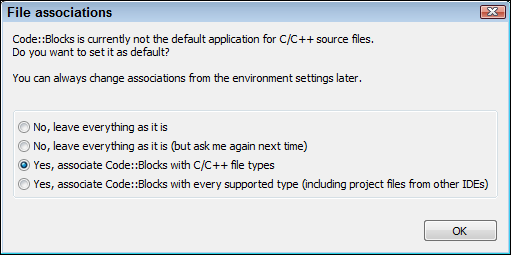
FIGURE 1-5: Associate Code::Blocks with your C++ files to make it easier to manage them.
Select either of the Yes options in this list. You can associate Code::Blocks with other source code types, but for the purposes of this book, you only need to associate it with C++ files. Click OK to complete the action. At this point, you see the IDE.
After you set the file associations, Code::Blocks usually begins by opening the IDE and placing a tip dialog box in it, as shown in Figure 1-6. You can turn these tips off by clearing the Show Tips at Startup check box. The Tip of the Day link on the Start Here page (which you can display by choosing View ⇒ Start Page) also displays a tip when clicked. The tip is a random bit of information about using Code::Blocks more efficiently. You can see the next tip in the series by clicking Next Tip or disable the display of tips by clearing Show Tips at Startup. After you read the tip, click Close.
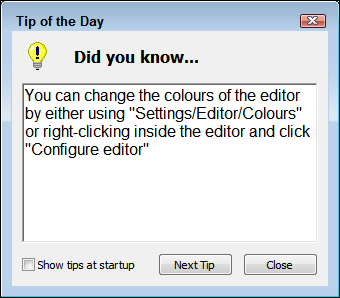
FIGURE 1-6: Code::Blocks provides a tips dialog box that contains helpful information.
In some cases, the IDE will display a message similar to the one shown in Figure 1-7. What this message is saying is that you’ve made changes to the Code::Blocks configuration. Click Yes to save the changes.
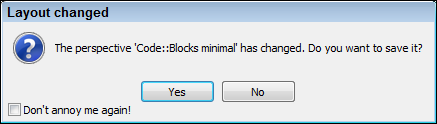
FIGURE 1-7: Save your changes to disk.
Windows users may experience a problem at this point. If you install Code::Blocks in the C:\Program Files folder and don’t have Administrator access (or if you simply opened the application as a regular user), you may find that you can’t save any Code::Blocks settings, making using Code::Blocks an annoying experience. To use Code::Blocks without problems, make sure you have write access to the folder in which you installed it. The best policy is to install Code::Blocks to the C:\CodeBlocks folder on your system. As an alternative, you can right click the Code::Blocks icon and choose Run As Administrator from the context menu to run Code::Blocks with the required permissions.
Opening the sample projects
You obtain the source code for this book from the publisher site described in the Introduction. After you download the .zip file containing the source, you simply extract it to your hard drive. Don’t attempt to run the source code inside the .zip file; doing so will display confusing messages in Code::Blocks and won’t allow you to run the code.
The source code for this book is divided into books, chapters within books, and examples within chapters. To open the first example found in Chapter 3 of this book, for example, start by locating the \CPP_AIO\BookI\Chapter03\SayHello folder (or the equivalent on your platform). Within this folder is SayHello.cbp. The Code Blocks Project (.cbp) file extension contains everything that Code::Blocks needs to open the project and present it to you. When you get to this first project, you double-click SayHello.cbp and Code::Blocks automatically opens the project for you, as shown in Figure 1-8.
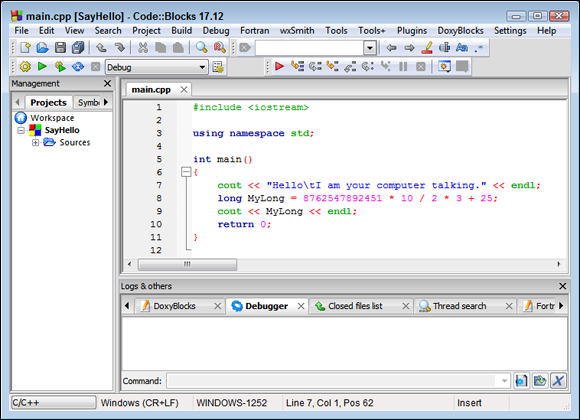
FIGURE 1-8: Each example has a .cbp file associated with it that opens the example in Code::Blocks for you.
If you have chosen to allow tips, you’ll actually see a Tip of the Day dialog box first, like the one shown earlier, in Figure 1-6. Click Close after you read the tip to see the project. Don’t worry about the contents of this example for now. You’ll discover how it works in Chapter 3. The only thing you need to know for now is how to open a project example so that you can follow along with the examples in the book.
When working with IDEs other than Code::Blocks, you can open the C++ (.cpp) file instead of the .cbp file. Opening the .cpp file will still display the code example for you. C++ stores source code in .cpp files, not as part of the .cbp files.
Viewing the essential windows
There are some windows that you use with every example in the book. As the book progresses, you’ll be introduced to other windows, but the ones covered in the following sections are the windows that you need to know about in order to get started with Code::Blocks.
Using the Start Here window
The Start Here window, shown in Figure 1-9, does precisely as its name indicates — it gets you started with Code::Blocks. This window is automatically displayed when you open Code::Blocks directly, without opening a project first. It appears immediately after you clear the Tip of the Day dialog box.
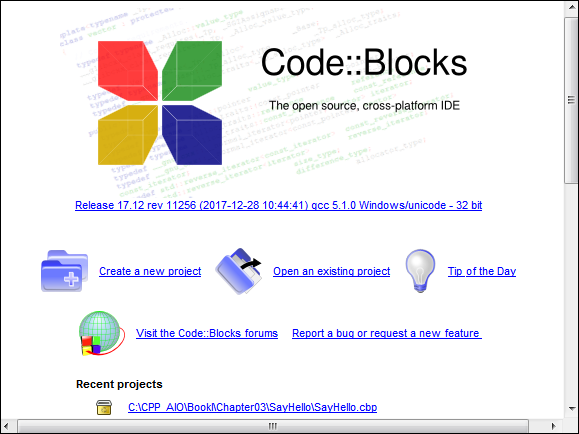
FIGURE 1-9: Use the Start Here window to start a new session.
This window is important because it also provides you with access to various Code::Blocks features and makes it possible for you to request changes. Here are the options you can access using this window:
- Create a New Project: Before you can use Code::Blocks effectively, you need to create a project. A project acts as a container to hold the files used to create the application. It also stores settings used to configure the development environment and present that environment to you in a specific manner.
- Open an Existing Project: Any time you want to re-create the environment you used during a previous coding session, you open an existing project. The project will automatically open any source code files that you had open and perform other tasks to make it easy for you to start right back up where you left off the previous day.
- Tip of the Day: If you missed the Tip of the Day or you simply want to reactivate the feature, click this link. Code::Blocks displays the Tip of the Day dialog box, shown in Figure 1-6.
- Visit the Code::Blocks forums: You can’t communicate directly with the makers of Code::Blocks. However, you can communicate directly with other users and get peer support. The makers of Code::Blocks also monitor the forums, and you’ll see them actively addressing issues that aren’t handled with peer support.
-
Report a Bug or Request a New Feature: Every application on the planet has bugs (programming errors), including the Code::Blocks IDE. It’s important to report bugs when you find them so that they can be fixed.
Anyone who uses an application long enough will likely come up with a spectacular idea for making it better. The makers of Code::Blocks want to hear your phenomenal idea, so contact them sooner than later.
- Recent Projects: As you work with Code::Blocks, you’ll create more than one project. Rather than look all over your hard drive for the project you need, you can use this feature to find it immediately. To open the project, just click on its link in the Recent Projects list.
Even if you can’t see the Start Here window after you open a project, you can always view it by selecting View ⇒ Start Page. Keeping the Start Here window handy makes it easy to access commonly used Code::Blocks features. However, you can also access these features using menus. For example, to create a new project, you choose File ⇒ New ⇒ Project.
Using the Management window
The purpose of an IDE is to help you manage your coding projects in various ways, so it’s not surprising that Code::Blocks comes with a Management window, as shown in Figure 1-10. The Management window normally resides on the left side of the IDE’s main window, but you can move it where you want by using the title bar to drag the window.
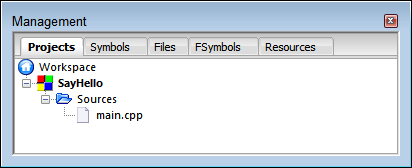
FIGURE 1-10: The Management window helps you manage your Code::Blocks projects.
The Management window contains four tabs. (The Fortran Symbols, FSymbols, tab is never used in this book.) The following list describes the purpose of each tab:
- Projects: Grouping in one place all of the files needed to create an application is a helpful method for managing it. A grouping of applications files is called a project, and helping you create and maintain projects is just one way in which Code::Blocks makes application development easier.
- Symbols: Applications contain a number of symbols, such as the names of functions (named blocks of code). You use the Symbols tab to find specific symbols you need within an application. Don’t worry too much about symbols now, but eventually you’ll find that this tab helps save time and effort by making it easier to locate specific pieces of your application.
- Files: Locating code and resources you need to add to the current project can be time consuming. The Files tab provides a method for navigating the file system. You can then right-click on files you need and use the context menu entries to perform tasks such as adding the file to your current project.
-
Resources: Graphical applications require the addition of dialog boxes and other visual elements that C++ treats as resources. The Resources tab contains a list of these resources so that you can find them easily and manage them in various ways.
The Resources tab is a feature, used by advanced developers, which you generally don’t need to worry about unless you decide to create graphical applications using a combination of C++ and the wxWidgets plug-in (installed automatically for Windows developers, but separately for both Mac and Linux developers). An explanation of how to create such applications is outside the scope of this book, but you can see a simple example of such a project at http://wiki.codeblocks.org/index.php?title=WxSmith_tutorial:_Hello_world.
Using the Logs & Others window
Code::Blocks helps you track all sorts of activities. For example, when you create a new application from source code you write (a process called building), you see messages that tell you how the process went, as shown in Figure 1-11 (your messages may vary slightly). The examples in this book will help you understand when to use the various log tabs and other tabs (such as the Debugger tab) to better determine how your application works.
The tabs you see in this window depend on which options you have enabled in Code::Blocks and what task you’re doing. Code::Blocks will usually select the tab you need automatically. If you want to close a particular tab, click the X next to its entry on the tab. To display a tab that you don’t see, right-click any tab in the list and choose an entry from the Toggle option on the context menu.
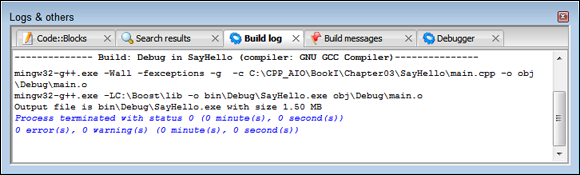
FIGURE 1-11: Using the Logs & Others window to understand how your application works.
Selecting a compiler
Code::Blocks supports a host of compilers. This book uses GCC because it works on all of the target platforms and it provides great C++ 20 support. Most Code::Blocks installations also select this particular compiler automatically. So there are all kinds of great reasons to use GCC as a compiler. However, you might not have GCC selected on your system, and that could cause problems when running the examples. Not every compiler vendor provides great C++ 20 support, or your compiler vendor might implement a particular detail differently than GCC does. The following steps help you verify that GCC is the compiler selected for your system, and they help you change your configuration if it isn’t:
-
Open Code::Blocks.
It doesn’t matter if you select a project or not. Configuring the compiler will be the same whether you have a project loaded or not.
-
Choose Settings ⇒ Compiler.
You see the Compiler Settings dialog box, as shown in Figure 1-12.
- Click Global Compiler Settings in the left pane to display the global compiler settings.
-
Verify that the GNU GCC compiler (or an equivalent for your platform) is actually selected in the Selected Compiler list.
The list could contain a number of GCC compiler entries. The best option is the GNU GCC Compiler setting because it offers maximum compatibility with the book examples. If the GNU GCC Compiler option (or an equivalent for your particular platform) is selected, proceed to Step 7.
-
Select the GNU GCC Compiler option (or the equivalent for your platform) in the Select Compiler list.
The Set As Default button becomes enabled after you make your selection.
-
Click Set As Default.
This step ensures that the GNU GCC compiler is used for all of your projects, even if you only want to open the downloaded source code.

FIGURE 1-12: Set Code::Blocks to use the GCC compiler to run the examples in this book.
- Click OK.
-
Close Code::Blocks.
You see a Layout Changed dialog box.
-
Click Yes.
Your changes become permanent, and Code::Blocks closes.
Using Other IDEs
Even though this book will focus on the Code::Blocks IDE and the GCC compiler combination, the knowledge you gain can be used with any IDE and compiler combination. In fact, all you really need is the compiler. Most developers use an IDE, just because it makes things easy (and we all like things easy). You may find, though, that Code::Blocks simply doesn’t provide the functionality you want or that it’s too hard to use.
The selection of an IDE is a personal thing, and most developers have specific reasons for choosing a particular IDE. In fact, I use several different IDEs and make my choice based on the needs of a particular project. So it’s not even necessary to use the same IDE all the time. IDEs provide management features, while compilers control how the source code is interpreted and turned into an executable file. The two applications perform completely different tasks.
GCC is a great choice for a compiler because a number of IDEs support it. If you decide to use a different IDE from the one found in this book, that’s fine with us. In fact, we congratulate you on your desire to take a different path! Here are some alternative IDEs that you might want to consider:
- CodeLite:
https://codelite.org/ - Dev-C++:
https://dev-c.soft32.com/free-download/?dm=2 - Eclipse:
https://www.eclipse.org/downloads/when used with C/C++ Development Tooling (CDT) (https://www.eclipse.org/cdt/) - Emacs:
https://www.gnu.org/software/emacs/) when used with the Emacs Code Browser (ECB) (http://ecb.sourceforge.net/) - Netbeans:
https://netbeans.apache.org/download/index.html - Qt Creator:
https://www.qt.io/developers/