
Details are what take a photo from good to great. It is absolutely vital to think about the whole picture when you are exploring with your camera. Let’s take some time to think about backdrops and props. We are going to show examples and talk about finding the best natural backdrops and props, along with how to create your own using inexpensive and easy-to-find materials. You don’t need a fancy studio or a lot of money to take your photos to the next level. Homemade backdrops and props can be the perfect solution!
We have taken photos all over our little hometown! We are constantly on the lookout for new and different background options. The first thing you need to keep in mind when scouting outdoor locations is lighting. We’ll talk more about lighting in Chapter 3, but for now the important thing to know is that if it’s a sunny day and you’re taking a photo outside, you always want to look for shade. So if you find a pretty wall that you want to use as a background but it’s in direct sunlight, what can you do? Walk around the building and see if any sections of the wall are in shade. If not, make a mental note and come back to the same wall later, when the sun is lower in the sky, or on a cloudy day. If you’re feeling adventurous, you can try a few photos in bright sunlight, but it’s best to find shade if at all possible.
When you’re looking for backgrounds, pay attention to color, patterns, natural tones, and textures. You might spy the coolest backdrop in bright yellow, but if your subject is already wearing yellow, this may not be the best choice for your photo. The background should complement, not compete with, the subject. You want a backdrop that makes your photos pop but doesn’t distract from the focal point. Textures and patterns can add interest to an otherwise boring picture, but be careful of overloading your photos with too many patterns.
Finally, keep in mind that you don’t necessarily need a huge backdrop for every photo. Maybe you want to snap a few face shots of your cousin for her senior portraits. Even a small patch of pretty wall among a huge tangle of urban mess can be a great backdrop; just use your cropping skills and take care to center your subject exactly where you want her to be.
always keep an eye out!
Look for a variety of colors and textures when scouting outdoor backgrounds.
![]()
If it’s a bright sunny day, interesting walls like these not only create great backgrounds, but can also keep your subjects in the shade, which is always more flattering than harsh sun.
![]()
So what happens when it’s too cold or rainy to take pictures outdoors? Don’t worry, because you still have all sorts of options! You can create an indoor backdrop out of all sorts of materials. Paper, for example, is an ideal material for photo backdrops: it’s lightweight, inexpensive, disposable, and it comes in a variety of textures and colors. Try making a backdrop from vintage wallpaper, large panels of brown kraft paper, or old newspapers. Use whatever you have on hand or seek out pretty papers at your local craft or paper store.
If your papers are inexpensive or you don’t mind throwing them away after the photo shoot, why not draw on them? Create thought bubbles to show what your subjects are “thinking,” or draw a fun design to go with the theme or feel of your shoot, such as a treasure map for a kid’s party. With a disposable paper backdrop, the only limit is your own creativity.

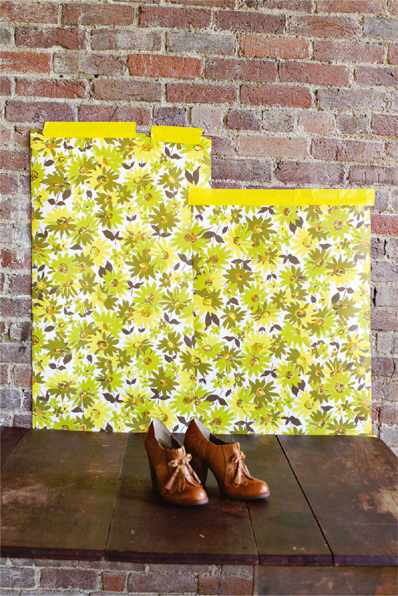
duct tape + vintage wallpaper
Here we created a simple backdrop using vintage wallpaper and tape. It’s that simple, folks!
![]()
This idea requires investing a little time and money, but you will be creating a backdrop that you can use over and over again in a variety of ways.
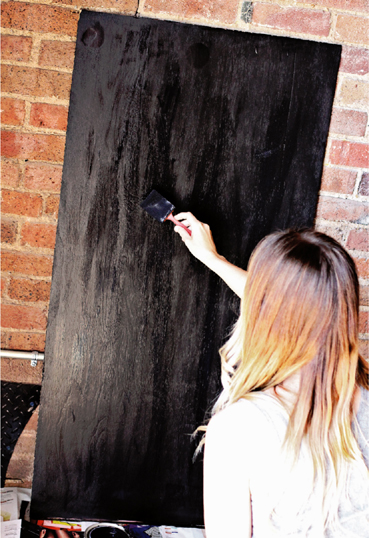
To make the backdrop, all you need is a large, thin piece of wood (this can be any size, but since you’ll probably want to move the board to different locations, it should be lightweight and fit in your vehicle), chalkboard paint (available at most home improvement stores), paintbrushes, and chalk. Cover your work area in newspaper and lay out your board. Paint a thick layer of chalkboard paint onto your board. You will probably need a few coats; we used three. Consult your paint can for drying times. Be sure to allow each coat to dry in between, and do not use your board until it is fully dry.

Emma painted this chalkboard backdrop in one afternoon. Easy!
![]()
Before using it for the first time, be sure to “slate” the surface of your new chalkboard.
![]()

Use your backdrop to add to the look of your next party. What a delicious photo moment!
![]()
Before you use your chalkboard for the first time, it is vital that you “slate” the surface. To do this, use the side of a piece of chalk to gently rub the entire surface of the chalkboard, then gently wipe off the chalk. Now you’re ready to begin. If you ever have trouble erasing messages on your board, use a little water or glass cleaner to remove excess chalk.
Now it’s time to get creative. Just like drawing on a paper backdrop, chalkboard backdrops offer nearly endless options. One of our favorites is to create labels for dessert table setups for parties. It looks cute, alerts guests to the selection of desserts being served, and translates into memorable photos for your party.
For this type of backdrop, you’ll need a piece of fabric large enough to cover the area behind whatever picture you want to take. If you are doing a food photo shoot, you only need enough fabric to cover the negative space behind your food. If you plan to photograph a large family, you will need a much larger piece.
We created our first fabric backdrops from old quilts when we were teenagers. We simply hung them over our parents’ clothesline in the backyard to snap a few photos of ourselves. Back then, we didn’t have any technical knowledge about photo backdrops; we were just having fun!
You can use a clothesline or just tape your fabric to a wall. If your fabric is lightweight, it will be easy to tape up. You may need to drape heavier fabrics over a chair or clothesline. Experiment and see what works with the material you plan to use.
When choosing your fabric, think outside the box. Try using found fabrics such as thin quilts or bedsheets, fabrics with retro or country-looking floral patterns, or fabrics with extreme textures, such as burlap or lace. Each option will give your photo a different feel, so choose one that matches the vibe you want in your pictures.

let the fabric reach the floor
It may look messy, but with a little cropping, this fabric will make an excellent backdrop.
![]()
The main problems you may encounter when creating a fabric backdrop are not having enough fabric or not wanting to purchase enough, as it can get expensive (most cotton fabrics are inexpensive, but other materials can be pricey). When faced with either of these, our favorite solution is to create a fabric strip backdrop.
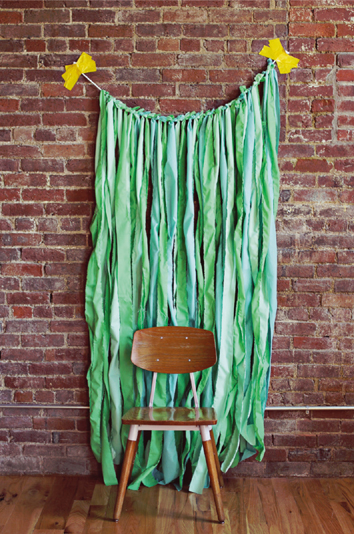
To do this, you will need to use a clothesline as your base (you can use thin rope, sturdy yarn, or whatever else you have on hand). Cut your fabric into long strips and tie the end of each strip to the clothesline. Continue until you have covered the entire background. You can use multiple fabrics to fill out the backdrop, mixing colors, textures, or patterns.

We created this fabric strip background using different shades of mint.
![]()


Another way to add variety and personality to your pictures is through props. You may already have the perfect photo props right under your nose! Here are five tips for identifying and using props from your home.
![]() KEEP IT NATURAL. Think about activities and items that mean something to you and your family and use props tied to those things, such as books, a special collection (Elsie has a massive shoe collection!), lawn ornaments or chairs, lamps, maps or other posters, or whatever is special to you.
KEEP IT NATURAL. Think about activities and items that mean something to you and your family and use props tied to those things, such as books, a special collection (Elsie has a massive shoe collection!), lawn ornaments or chairs, lamps, maps or other posters, or whatever is special to you.
![]() USE A FAMILY HEIRLOOM. Old (vintage) items, such as quilts or old trunks, can have so much personality. Plus, using an heirloom in a photo is a great way to remember your heritage.
USE A FAMILY HEIRLOOM. Old (vintage) items, such as quilts or old trunks, can have so much personality. Plus, using an heirloom in a photo is a great way to remember your heritage.
![]() USE PROPS THAT REQUIRE SOME ACTION. Having a bit of action during a photo shoot can make things feel more natural. This can be a big help when posing kiddos, too. Try snapping photos during a family game of horseshoes, or while roasting marshmallows, playing in the sprinkler, or snuggling on the couch with popcorn for movie night.
USE PROPS THAT REQUIRE SOME ACTION. Having a bit of action during a photo shoot can make things feel more natural. This can be a big help when posing kiddos, too. Try snapping photos during a family game of horseshoes, or while roasting marshmallows, playing in the sprinkler, or snuggling on the couch with popcorn for movie night.
![]() USE ARCHITECTURAL ELEMENTS IN YOUR ENVIRONMENT. Pose with your family by a cute gate or doorway. Look for textures, such as old wooden fences or plastered walls, which can add interest to your photos.
USE ARCHITECTURAL ELEMENTS IN YOUR ENVIRONMENT. Pose with your family by a cute gate or doorway. Look for textures, such as old wooden fences or plastered walls, which can add interest to your photos.
![]() KEEP IT SIMPLE. Whatever you decide to use, keep it to a minimum. You don’t want your photos to end up looking cluttered, too busy, or overproduced.
KEEP IT SIMPLE. Whatever you decide to use, keep it to a minimum. You don’t want your photos to end up looking cluttered, too busy, or overproduced.
Props such as old family blankets add a personal touch to your photos.
![]()
Making your own props ahead of time allows you to control the colors and textures in your photos. Maybe you are planning a little boy’s birthday party and decide to paint all the props blue because that’s his favorite color. Or you could do double duty and make props that you then display around your home or office. We had so much fun creating these ABM letters just by adding yarn to premade cardboard letters. A Beautiful Mess not only is the name of our website but also perfectly describes our studio most of the time—ha! So we liked the idea of creating these initials for a photo and then displaying them in the studio afterward.
Try creating props that give your subjects ideas about how to use them, such as a silly pair of oversized glasses made from cardboard and yarn, an empty painted frame, tissue paper flowers or pom-poms, a cake (bonus: you can eat it afterward!), party hats or crowns made from pipe cleaners, or a mini chalkboard for folks to write on. Props can be as silly or pretty as you want when you’re the one creating them.


We covered premade letters with yarn for a prop that does double duty as a studio display.
![]()
Look around your life this week and notice things that could add to a photo-worthy moment! It’s great to include seasonal touches when you can. Here are ten ideas to get you going:
1. Books: a current read or vintage books that you own.
2. Vintage artwork: old needlepoints or paint-by-numbers.
3. Umbrellas: perfect for an early spring photo.
4. Cameras: we already know you love photography, so, like, show off your gear.
5. Flowers or fall leaves: whatever is growing in your neck of the woods.
6. Instruments: so many loved ones in our lives play music, it’s hard not to highlight them.
7. A feather crown (or other hair accessory): get fancy!
8. Vintage suitcases: these can add a lovely pop of color.
9. Bike: you don’t have to be riding—just show off your pretty wheels.
10. Quilts, blankets, scarves: these can make photos feel warm and cozy.
find cute props anywhere and everywhere!
You probably have a ton of great photo props in your home right now!
![]()