CHAPTER 1
Ten Japanese Classics
To start things off, this chapter contains ten popular, traditional dishes that the Japanese eat at home. All you have to do is follow my simple step-by-step instructions, and you’ll end up with the most delicious results!
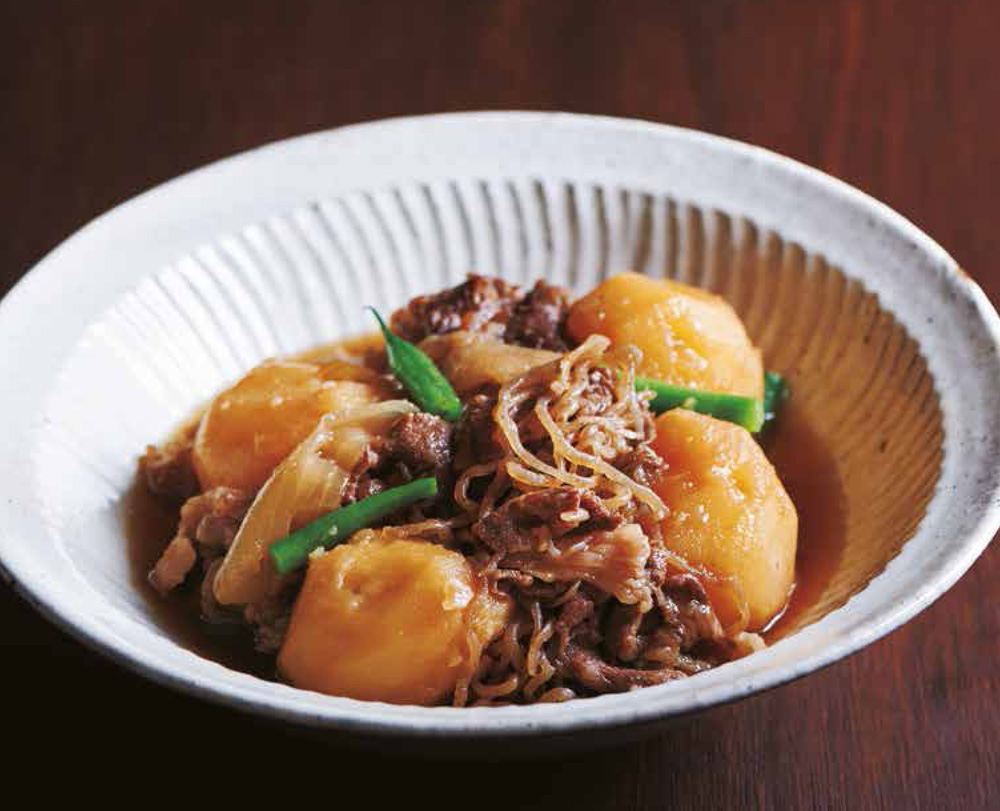
Meat and Potato Hot Pot
Called nikujaga in Japan, this is the dish that most says “mom’s cooking” to the Japanese. My recipe is designed to make sure the savory-sweet flavors permeate this homey, comforting dish, that is sure to become a favorite.
By pre-soaking the potatoes in water, parboiling the shirataki noodles, and prepping all the individual elements carefully before they come together, the final results will be that much tastier. I recommend that you don’t stir-fry the beef beforehand, but simply simmer it instead, for more tender, juicy results.
Serves 2
3–4 medium potatoes, peeled
1 medium onion
6–8 fresh green beans
5 oz (125 g) shirataki noodles packed in water, or dried bean thread noodles
1 tablespoon vegetable oil
8 oz (250 g) thinly sliced beef
For the simmering liquid
2 cups (500 ml) dashi stock (see pages 6–7)
4 tablespoons mirin
4 tablespoons soy sauce
1½ tablespoons raw sugar
Note: Shirataki noodles, made from konjac roots or glucomannan are sometimes sold as “tofu shirataki.” If you can’t find them, use dried bean thread noodles instead.
1 Cut the ingredients
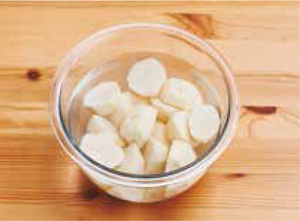
Cut the potatoes in half, then cut each half into 2 or 3 pieces. Put the cut potato pieces into a bowl of cold water, and soak for about 10 minutes. This will eliminate surface starch and give the finished dish a clean taste. Cut the onion into 8 wedges. Quickly cook the green beans in boiling water, and cut into 1¼ in (3 cm) long pieces.
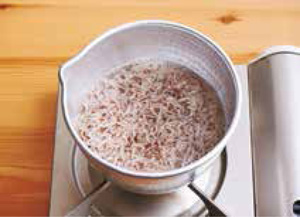
2 Parboil the noodles
Shirataki noodles need to be parboiled to remove any odor. Bring a pan of water to a boil, put in the noodles, and boil for 1 minute. Drain into a colander. Cut the noodles into 2 to 3 pieces if they are long.
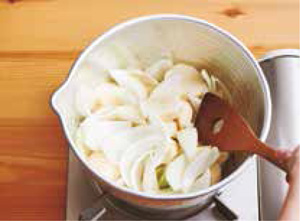
3 Stir-fry
Heat the vegetable oil in a pan over medium heat. Add the potatoes and onion, and stir-fry for a couple of minutes until all the pieces are coated with the oil.
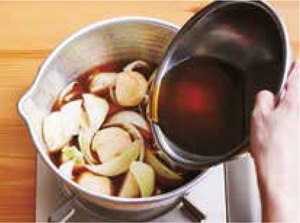
4 Add the simmering liquid ingredients
Combine the simmering liquid ingredients in a bowl, and add to the pan.
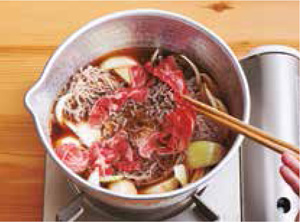
5 Add the noodles and beef
When the liquid comes to a boil, add the shirataki or bean thread noodles and the beef (cut into bite-size pieces if needed) and mix quickly. When the liquid comes back to a boil, turn the heat down to low.
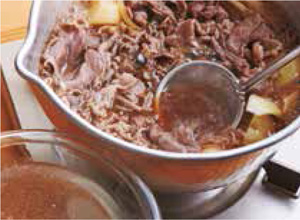
6 Simmer
Skim off any scum that rises to the surface. Simmer until a bamboo skewer goes easily through a piece of potato. Arrange on a serving plate, and scatter with the green beans.
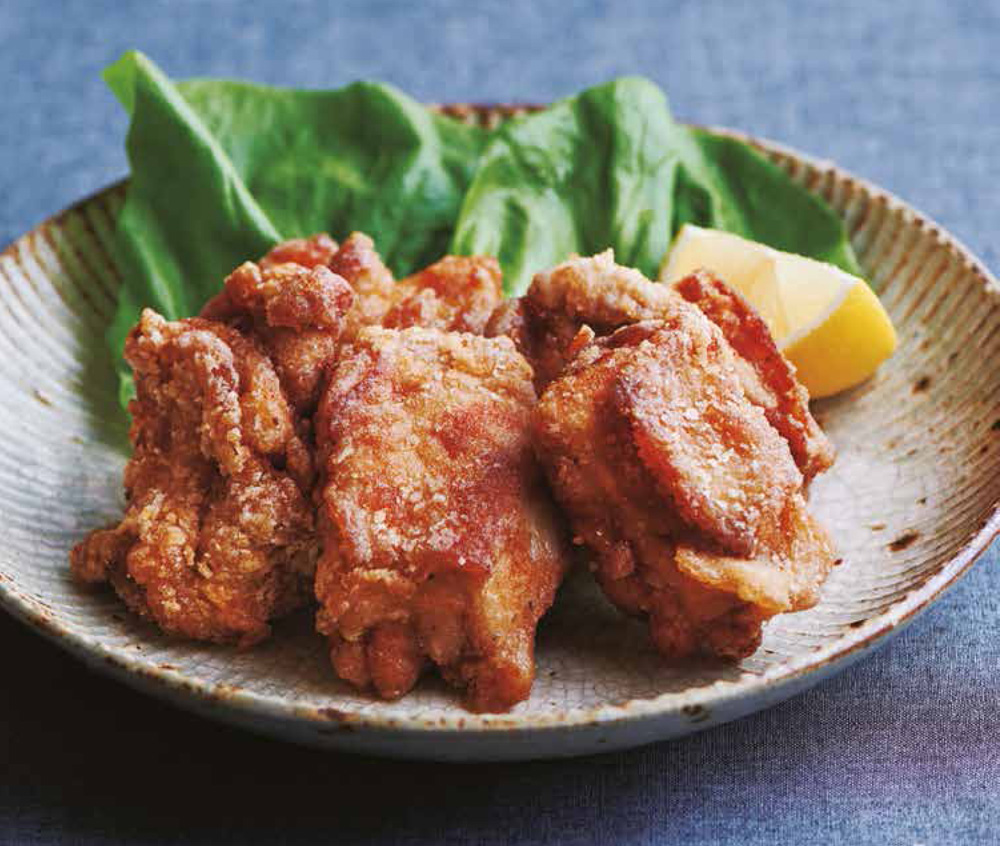
Deep-fried Crunchy Chicken
This classic dish is called karaage in Japan. By following these three key points, your chicken is sure to turn out perfectly crisp and crunchy!
• The first key to success is to make sure the chicken is completely coated with the cornstarch mixture. Otherwise moisture will escape from any uncoated spots and the surface will not be properly crispy.
• The second key is to be patient and not move the chicken pieces around after you have put them into the hot oil. Wait until the surface has firmed up.
• The third key is to fry the chicken twice. After the first frying, rest the pieces. This will ensure a juicy result. Finish by frying again in very hot oil.
2 boneless chicken thighs, about 8 oz (250 g) total
1 beaten egg
Cornstarch, for coating
Oil, for deep-frying
Lettuce leaves, to garnish
Lemon wedges, to garnish
For the marinade
1 tablespoon ginger juice (grate fresh ginger and squeeze it to extract the juice)
1½ tablespoons soy sauce
1½ tablespoons sake
Black pepper, to taste

1 Prepare the chicken
Remove any excess fat (mainly the yellow parts), the edges of the skin that go beyond the meat, any hard parts or sinew. (I recommend working with a small knife.) Cut into large bite-size pieces, since the meat will shrink when it’s cooked.

2 Marinate the chicken
Combine the marinade ingredients in a bowl, add the chicken from Step 1 and squeeze it around in the marinade with your hands. Leave for about 15 minutes.

3 Add the egg
Drain the marinade from the chicken. Add the beaten egg and rub it in well, using your hands.

4 Coat with the cornstarch
Pat the marinated and egged chicken lightly with paper towels. Coat completely and evenly with the cornstarch.

5 Deep-fry
Put the oil in a pan or frying pan, and heat it to 340°F (170°C). Add the coated chicken from Step 4, and do not move around until the surface has firmed up. When the surface is firm, turn occasionally and fry until the pieces are a light golden brown. Take the chicken pieces out of the oil and rest for 4 to 5 minutes.

6 Rest and deep-fry again
Heat the oil to 355°F (180°C). Add the rested chicken pieces from Step 5 and fry until crispy on the surface. Drain off the oil and arrange on a plate with lettuce leaves and lemon wedges.
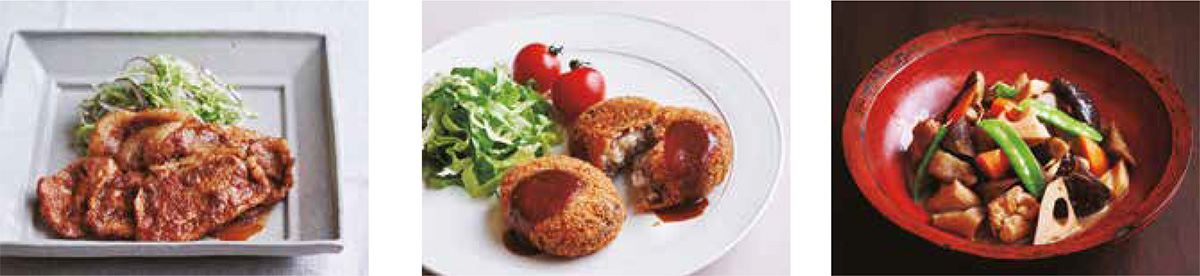
Pan-fried Pork with Ginger
With the spicy zing of ginger and a savory-sweet sauce, ginger pork is a perfect accompaniment to plain steamed rice.
The key to this dish is to sever the sinews of the pork beforehand, to prevent it from shrinking and turning tough when it’s cooked. The meat is then sautéed quickly over high heat so that it doesn’t overcook. The result is a nutty, flavorful surface and meat that’s tender and juicy when you bite into it.

Serves 2
6–8 slices boneless pork loin, ¼ in (6 mm) thick, about 8 oz (250g) total
2 teaspoons dark sesame oil
For the marinade
1 tablespoon ginger juice (grate fresh ginger and squeeze to extract the juice)
2 tablespoons soy sauce
2 tablespoons sake
2 tablespoons mirin
Garnishes
Finely shredded cabbage
Thinly sliced red onion
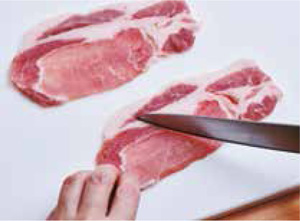
1 Cut the pork sinews
Make 3 small cuts on the border of the meat and the fat, to prevent the meat from curling when cooked. You only need to do this on one side.

2 Marinate
Combine the marinade ingredients in a bowl, and pour into a shallow tray. Put the prepped pork from Step 1 into the tray in a single layer, and turn once.
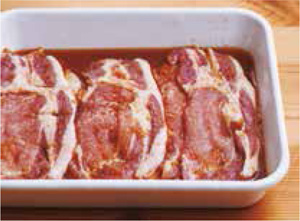
3 Leave for 5 minutes
Leave the pork to marinate for about 5 minutes. Do not marinate for too long or the meat will become tough.

4 Pan-fry the pork
Heat the sesame oil in a frying pan. Remove the pork from the marinade (reserving the marinade) and fry in a frying pan over medium-high heat in a single layer. Quickly fry both sides.

5 Add the marinade
Pour the reserved marinade into the frying pan, and turn the pork several times to coat it with the sauce on both sides. Arrange on serving plates with shredded cabbage and sliced onion on the side.
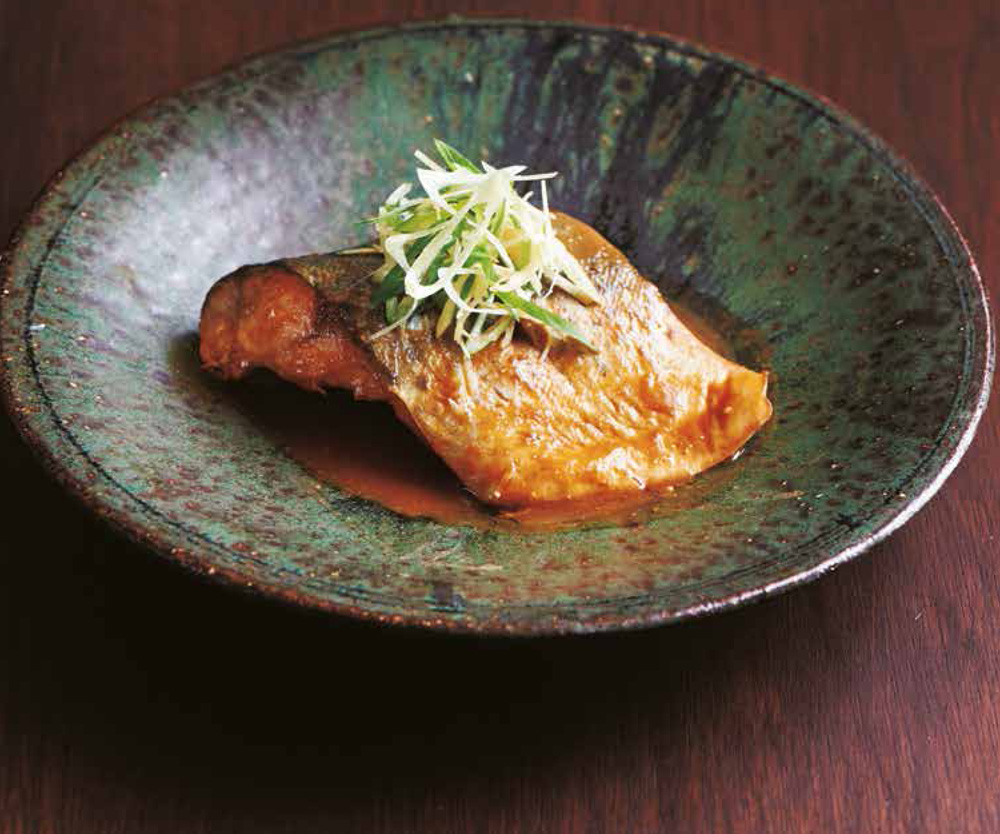
Mackerel in Miso Sauce
Although simmered dishes have a reputation for taking a long time to make, fish only takes a short time to cook through, so simmered fish dishes like this one don’t take long.
Oily blue fish like mackerel need to be pre-treated by pouring boiling water over them quickly (this is called “frosting” in Japanese since the surface turns white). This is an extra step, but by doing this you barely need to remove any scum from the surface of the cooking liquid as the fish simmers, and any fishy odor will also be eliminated.
Serves 4
Cold water, for rinsing
4 pieces fresh mackerel, 4–5 oz (100–125 g) each
Boiling water, for pre-treating
⅔ cup (160 ml) water
⅔ cup (160 ml) sake
4 thin slices ginger
3 tablespoons red miso
1½ tablespoons white miso
1 tablespoon raw sugar
Garnishes
1 piece ginger, peeled and finely shredded
Green part of 2–3 green onions (scallions), sliced thinly diagonally
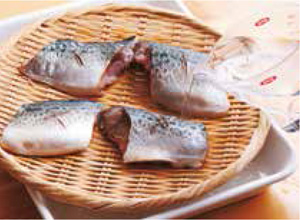
1 Pour on boiling water on the mackerel
Prepare a bowl of cold water ready for Step 2. Make a crisscross cut into each mackerel piece. Place in a large colander or on a large sieve, and pour boiling water over them. Turn the mackerel and pour boiling water over the other side. Make sure you don’t miss any spots with the boiling water.
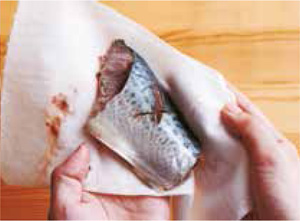
2 Wipe the mackerel
Immediately plunge the mackerel in the bowl of cold water. Rinse quickly, and wipe with paper towels to remove any surface sliminess or blood.
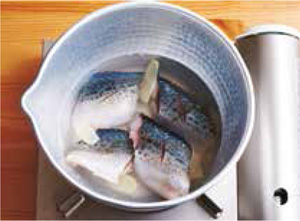
3 Start heating
Put the cleaned mackerel pieces in a pan and add the ⅔ cup of water, the sake and the ginger slices. Mix quickly, then turn the heat to high.
4 Simmer
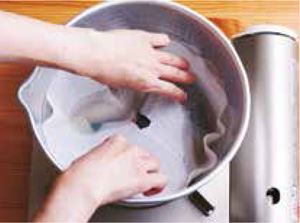
When the liquid comes to a boil, turn the heat to medium low and skim off any scum. Place a small lid directly on top of the contents of the pan (this is called a drop lid), or use a piece of kitchen parchment paper with a slit cut in the middle. Simmer for about 10 minutes until the mackerel is cooked through.
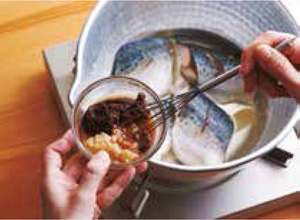
5 Add the miso
Put the red miso and white miso in a small bowl, add a little of the cooking liquid, and mix to form a smooth paste. Add this paste with the sugar to the pan, put the drop lid or kitchen parchment paper back on, and simmer for about 5 minutes until the sauce has thickened slightly. Transfer to serving plates and serve with the shredded ginger and thinly sliced green onion on top.
Potato Croquettes
Creamy on the inside, crispy on the outside, with the sweetness of onions and the umami of ground meat, these traditional Japanese-style potato croquettes are sure to become a favorite!
The most important point is to boil the potatoes in their skins to ensure they stay fluffy. Chop the onions very finely, and sauté them well to draw out their sweetness. Make sure the onions and ground meat are evenly distributed in the mashed potato.

Makes 8
3 medium potatoes
½ tablespoon olive oil
½ medium onion, finely chopped
4 oz (100 g) ground beef
A little salt and pepper
A little ground nutmeg
Flour, for dusting
1 beaten egg
Breadcrumbs, for coating
Oil, for deep-frying steak sauce
For the sauce
1 tablespoon ketchup
1 tablespoon Japanese-style Worcestershire sauce
1 tablespoon Chuunoh sauce, or steak sauce
Garnishes
Shredded lettuce
Cherry tomatoes
Note: Japanese-style Worcestershire sauce and Chuunoh are very similar to each other, but Chuunoh sauce is a bit thicker and sweeter. Both are available at Japanese grocery stores. You can try steak sauce instead. Potato croquettes are also delicious without any sauce.

1 Boil the potatoes
Wash the potatoes but don’t peel them. Put them into a pot with plenty of cold water over high heat. When the water comes to a boil, turn the heat to low and simmer the potatoes for 15 to 20 minutes until a wooden skewer goes through them easily. Drain.
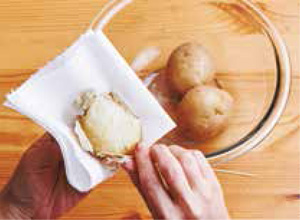
2 Peel and mash the potatoes
Peel the potatoes while they are still hot using a fork or a skewer (protect your hands by holding the potatoes with a kitchen towel). Put the peeled potatoes in a bowl and mash.
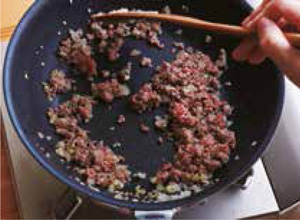
3 Sauté the ground beef
Heat the olive oil in a frying pan over medium heat. Add the onion and sauté until transparent and lightly browned. Add the ground beef, and sauté until it changes color. Add the salt, pepper and nutmeg, and mix.

4 Form the patties
Add the cooked ground beef to the mashed potatoes and mix well. Divide into 8 portions, and form each into an oval patty.
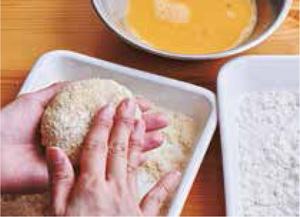
5 Bread the patties
Coat the patties with flour, beaten egg and breadcrumbs, in that order. Make sure to coat each patty completely and evenly with a light coating of flour, gently shaking off any excess.

6 Deep-fry
Put the frying oil into a pot or deep frying pan and heat to 340°F (170°C), then add the breaded croquettes. Do not try to move them around until the surface has firmed up. Turn when one side is a light golden brown, then turn the heat up. Turn the croquettes several times until they are browned and crispy. Drain off the oil and serve with the lettuce and cherry tomatoes. Combine the sauce ingredients and serve on the side—each diner can put on as much as they like.
Japanese Rolled Omelet
This classic egg dish, called tamagoyaki in Japanese, is made using a square tamagoyaki pan, which you can find at Japanese kitchen-supply stores or online. The omelet has a reputation for being hard to make, but it’s actually easy to master with a little practice and by paying attention to the key points below.
• Don’t worry if the first one or two layers are too thin or fall apart a bit.
• If you think the egg is cooking too fast, take it off the heat and take a little break.
• Try lifting up the far end of the tamagoyaki pan and shaking the pan while rolling the egg.
• If your final egg roll is a bit ragged, you can tidy it up by wrapping it in a sushi mat.

Makes 1 roll
3 large eggs
4 tablespoons dashi stock (see pages 6–7)
½ teaspoon light soy sauce
Oil, for cooking
A little grated daikon radish, for garnish
Note: For this recipe, you will need a square or rectangular tamagoyaki pan. The best tamagoyaki pans are made of copper, but are pricey. A second best choice is an aluminum one with a non-stick coating. If you can master using cooking chopsticks you’ll find that helpful for this recipe. A sushi rolling mat is also useful. All 3 items are available at Japanese grocery stores or online.
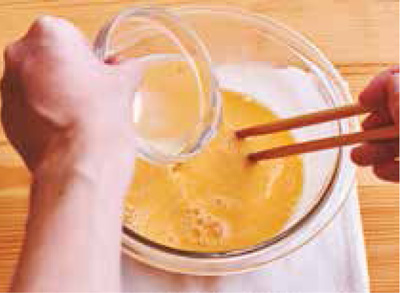
1 Beat the egg, add the stock
Break the eggs into a bowl and beat with a fork or cooking chopsticks. If using chopsticks, keep the points in contact with the bottom of the bowl at all times and quickly move them from left to right. This way the egg will not get foamy (which leads to bubbles forming in the omelet) and the egg white will break apart better. Add the dashi and soy sauce, and mix quickly.

2 Strain the egg
Strain the egg mixture through a fine mesh sieve.
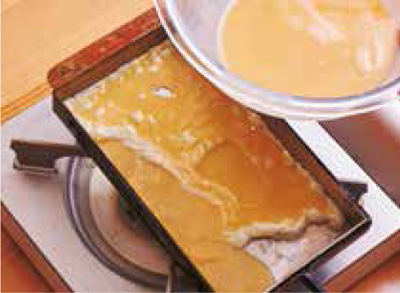
3 Transfer to the pan
Heat a tamagoyaki pan over medium heat. Soak a wadded up piece of paper towel in oil, and spread a generous amount of oil around the bottom and sides of the pan. When the pan has heated up, pour about a quarter of the egg mixture into the pan and cook.
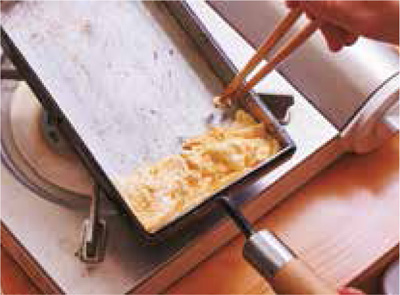
4 Roll the egg
When the edges of the egg in the pan start to firm up, burst any bubbles that have formed with your fork or chopsticks, and roll the egg from the far side towards you (or vice versa, whichever is easier for you) using a spatula or chopsticks.

5 Pour and roll again
Push the rolled up egg to the far side of the pan. Spread a generous amount of oil in the pan again using the wadded up paper towel, then add another quarter of the egg liquid to the pan. Immediately lift up the rolled cooked egg so that the egg liquid can flow below it (see photo). Roll the egg in the same way as in Step 4. Repeat these steps twice more until all the egg liquid has been used up.

6 Roll the egg in a sushi mat
Put the cooked rolled egg onto a sushi mat. Roll the sushi mat around the egg and squeeze gently to tidy up the shape of the roll. Let the roll rest in the sushi mat for 3 to 4 minutes, unroll, and slice the egg into thick pieces. Garnish with grated daikon radish on the side, if you like.
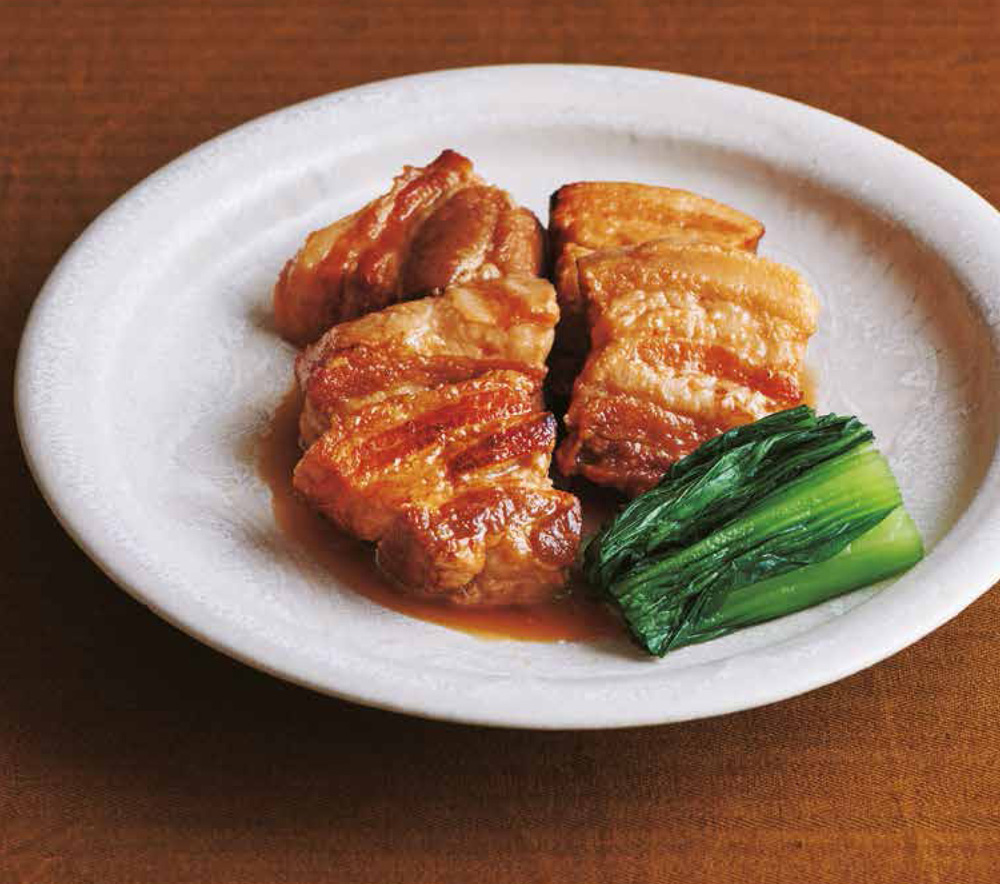
Sweet and Savory Pork Belly
In this recipe, pork belly is simmered gently until it falls apart under your fork. My cooking method ensures that the pork becomes tender without getting greasy—just let the pork cool down completely in its cooking liquid before serving so that any excess fat that gathers on the surface can be removed easily. That way you’ll have a melt-in-your-mouth dish that will have your family clamoring for more!
Serves 2
14 oz (400 g) pork belly block
Green part of 1 baby leek or 2 fat green onions
2 slices unpeeled ginger
2½ cups (625 ml) water
2 blanched bok choy leaves, for garnish
The flavorings
4 tablespoons soy sauce
½ cup (125 ml) sake
2 tablespoons raw sugar

1 Cut the pork
Cut the pork belly into 1½ in (4 cm) cubes.
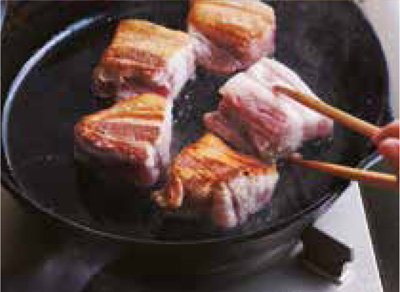
2 Brown the pork
Heat a frying pan (preferably a cast-iron one), put in the pork, and brown over medium-high heat while turning frequently. Wipe out the fat that is exuded from the meat with wadded up paper towels.
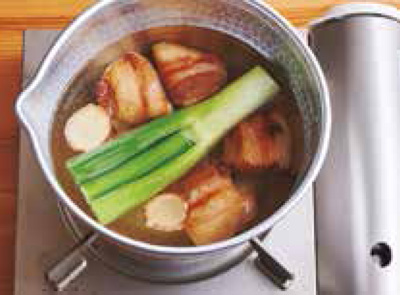
3 Simmer
Put the browned pork, leek or green onion, ginger and water in a pan. Bring to a boil, skim off any scum, turn the heat down to low and simmer for about 90 minutes.
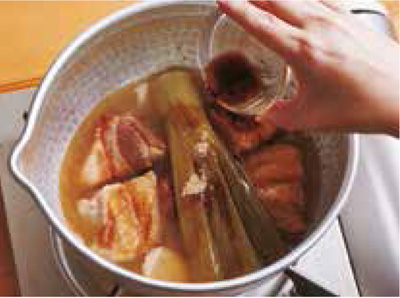
4 Add the flavorings
Add the flavorings to the pan and simmer for another 30 minutes. Turn off the heat and cool for a while, then transfer to a storage container and refrigerate for at least 2 hours or overnight.
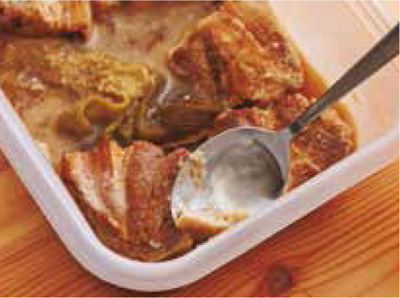
5 Remove the fat
Remove any hardened fat from the surface. Return the pork and liquid to a pan and heat through before serving. Serve with pieces of blanched bok choy on the side. (See page 28 for how to blanch.)
Crispy Fried Mackerel
This mouthwatering dish is a Japanese standard, and the perfect accompaniment to plain rice and miso soup. It’s great simply served with a sprinkle of salt, but here I have served a slightly sweet tartar sauce on the side.
Traditionally this recipe uses butterflied fish. You can butterfly the fish yourself following my step-by-step instructions, or ask a fishmonger to do this for you. You may be able to find horse mackerel that’s been butterflied for making this dish at well-stocked Japanese grocery stores.

Serves 2
4 small horse mackerel, or other small, whole oily fish, about 3 oz (75 g) each
Salt and pepper, to taste
Flour, for coating
Beaten egg, for coating
Breadcrumbs, for coating
Oil, for deep-frying
For the tartar sauce
1 hard-boiled egg
4 green shiso or basil leaves
6 small pickled onions
1 teaspoon pickling liquid
2 tablespoons mayonnaise
Garnishes
Shredded cabbage
Parsley
Note: If you can’t find mackerel, this cooking method can be used for any similar small oily fish. Thin fillets may also be used, like sardines.

1 Prep the fish
Cut off the bony strips on both sides of the fish and remove the scales. Cut off the heads, remove the intestines and rinse under running water. Pat dry.
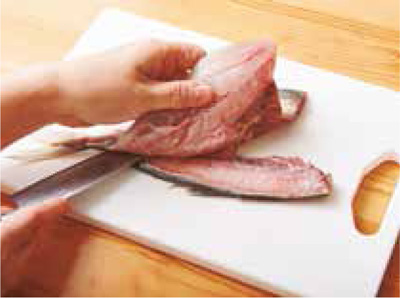
2 Butterfly the fish
Insert your knife into the back of the fish towards the spine. Push the knife between the flesh and the bone, and slowly open up the fish while moving the knife, taking care not to cut through the skin of the belly. Repeat on the other side of the fish. Chop off the spine, leaving the tail attached, and remove any small bones that may remain.

3 Add salt and pepper
Put the butterflied fish in a single layer in a shallow tray with the skin sides down. Salt and pepper the fish on the side facing up only.

4 Bread the fish
Coat the fish with flour, beaten egg and breadcrumbs, in that order. Make sure to coat each fish completely and evenly with a light coating of flour, brushing off any excess.
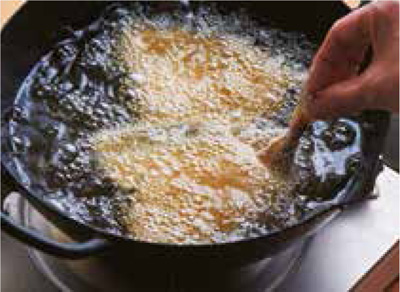
5 Deep-fry
Put the oil into a pot or deep frying pan and heat to 340°F (170°C), then put in the breaded fish. Do not try to move them around until the surface has firmed up. Turn once one side is a light golden brown, then turn the heat up. Turn the fish several times until they are browned and crispy. Drain off the oil.

6 Make the tartar sauce
Finely chop the hard-boiled egg. Chop up the shiso leaves and pickled onions roughly. Put all three in a bowl, add the rest of the tartar sauce ingredients and mix well. Arrange the fried fish on plates with shredded cabbage, parsley and the tartar sauce on the side.
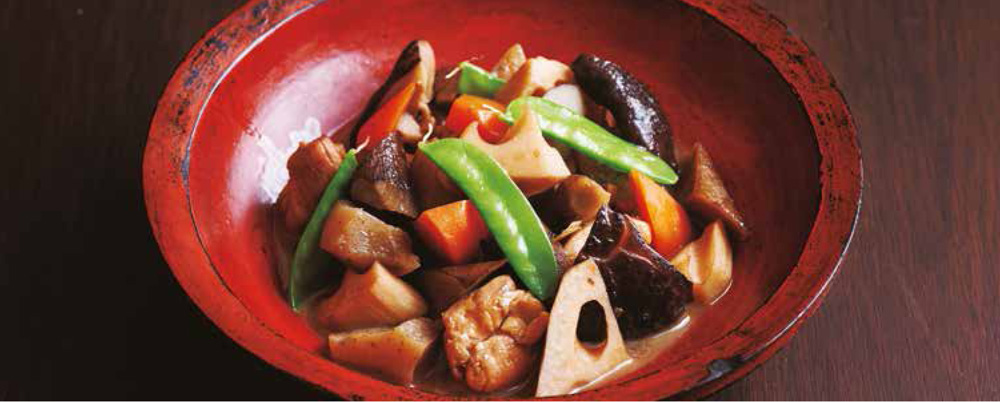
Braised Chicken and Vegetables
The rich flavor of this dish is achieved by stir-frying the ingredients in sesame oil. You can make this a vegan dish by omitting the chicken—the results will still taste great.
Serves 2
5 oz (125 g) boneless chicken thigh meat
½ tablespoon sake
⅓ burdock root (optional)
½ carrot, peeled
2 in (5 cm) piece lotus root, peeled
2 dried shiitake mushrooms
6–8 snow peas
1 piece konnyaku (optional), about 3 oz (75 g)
½ tablespoon dark sesame oil
For the braising liquid
1¾ cups (425 ml) dashi stock (see pages 6–7)
2 tablespoons sake
1 tablespoon raw sugar
1 tablespoon mirin
2 tablespoons soy sauce
The key is to stir-fry everything well so that all the ingredients are coated with the oil, and the vegetables are shiny.
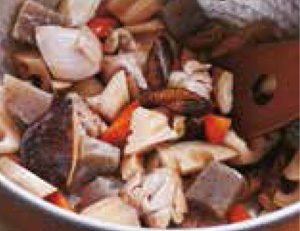
1 Chop and prep the ingredients
Remove excess fat or sinew from the chicken, cut into bite-size pieces and sprinkle with the sake. Shave the burdock root, if using, following the instructions on page 28, then roughly chop. Roughly chop the carrot and lotus root. Put the burdock root and lotus root in two separate bowls of cold water for a few minutes, then drain in a colander. Soak the dried shiitake for 20 minutes in hot water to rehydrate them, cut off and discard the stems and cut the caps into quarters. Remove the strings from the snow peas and blanch in boiling water (see page 28 for how to blanch). Take out the snow peas. If using konnyaku, cut into bite-size pieces and boil for 2 to 3 minutes in the same water.
2 Stir-fry
Heat the sesame oil in a pan over medium heat, add the chicken and stir-fry briefly. When the chicken changes color, add the burdock root, carrot, shiitake and konnyaku. Stir-fry until everything is well coated with the oil.
3 Simmer
Add all the braising liquid ingredients except the soy sauce and turn the heat to high. When the liquid comes to a boil skim off any scum, and cover with a small lid that fits inside the pan or place a piece of kitchen parchment paper with several holes in it right on top of the contents of the pan. Simmer for about 12 minutes over low heat.
4 Add the soy sauce
Add the soy sauce, and simmer for another 8 minutes while occasionally mixing the contents of the pan from the bottom up. Serve with the snow peas on top.
Winter Hot Pot
This traditional winter hot pot is called oden in Japan. If you live near a well-stocked Japanese supermarket, have a go at using some of the more unfamiliar ingredients—they may become favorites! Or simply use the broth to make a warming hot pot with other ingredients of your choice.
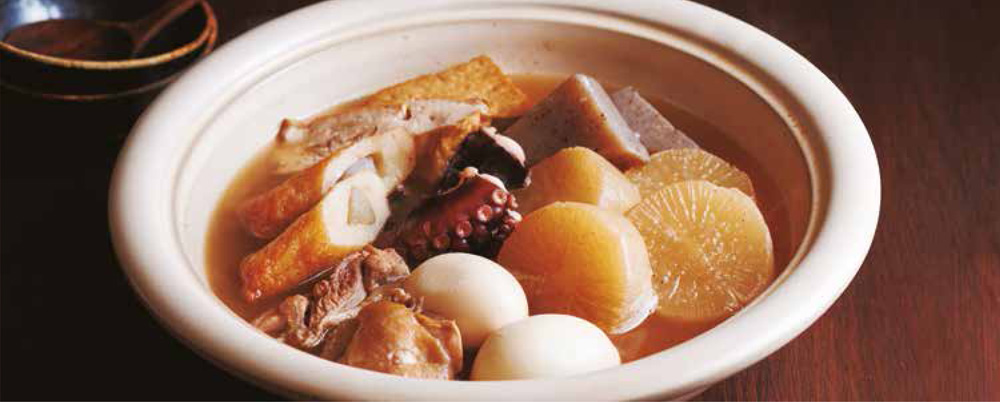
Serves 2
6 oz (175 g) daikon radish
1 piece konnyaku (optional), about 6 oz (175 g)
1 boneless chicken thigh, about 4 oz (100 g)
2 boiled baby octopus legs, about 4 oz (100 g)
2 hard-boiled eggs
1 fried fish cake stuffed with burdock root (gobo-ten), or other Asian fish cake
2 blocks thick, fried tofu (atsuage) cut in half or quarters
For the broth
2½ cups (625 ml) dashi stock, (see pages 6–7)
3 tablespoons sake
2 tablespoons mirin
1½ tablespoons light soy sauce
1 tablespoon dark soy sauce
¼ teaspoon salt

Since there are many ingredients in this hot pot, add the ones that take longer to cook first, and add the ones that take less time later.
Note: The boiled octopus legs, gobo-ten and atsuage are available in the refrigerated section of Japanese grocery stores. The octopus legs may be found in the sashimi section. You can also use other types of fried tofu, pressed tofu, Asian fish cakes, squid and root vegetables that are available in your local supermarket. The important thing is the broth!
1 Parboil the daikon and konnyaku
Peel and cut the daikon radish into ¾ in (2 cm) thick slices. Put into a pot with cold water, bring to a boil and simmer for 20 minutes until tender. If using konnyaku, cut it into triangles, put into a pan of boiling water, boil for about 3 minutes then drain.
2 Begin with ingredients that take longest
Put the broth ingredients in a pot (an earthenware one is ideal, but any heavy pot will do) over medium heat. Remove any excess fat or sinew from the chicken thigh, cut into bite-size pieces and add to the pot once the soup has come to a boil. Simmer until it is cooked through. Add the daikon radish, konnyaku and octopus, and simmer over low heat for about 1 hour.
3 Add the other ingredients
Cut up the gobo-ten and add to the soup with the boiled eggs and atsuage. Simmer over low heat for another 30 minutes.
4 Cool down
Turn the heat off and let the pot cool down while the ingredients absorb the flavors of the soup. Heat up just before serving.
Measuring, Cutting and Prepping
How to Measure Powders and Liquids

When using a measuring spoon, use the handle of another spoon or a similar implement to level out the ingredient in the spoon. 1 teaspoon ½ teaspoon ⅔ teaspoon
1 teaspoon

½ teaspoon

2/3 teaspoon

A little salt

The amount of salt you can hold between your thumb and forefinger.
A pinch of salt

The amount of salt you can hold between your thumb, forefinger and middle finger.
Measuring cups

When measuring ingredients in cups, check the amount with the cup held up to your line of sight.
How to Cut Vegetables

Roughly cut eggplants
Cut the off the calyx, and slice the eggplant diagonally. Rotate the eggplant as you continue to cut so the pieces are roughly triangular. This maximizes the cut surface of the eggplant.

How to shave burdock
Wash the burdock root, and make a deep crisscross cut in one end. Working over a bowl filled with water, shave thin strips off it (as if you are sharpening a pencil) while turning the burdock root from time to time.
Finely chopped onion
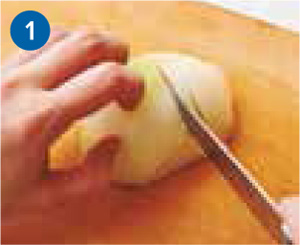
1 Halve the onion. Leaving the part around the root end intact, make several thin cuts going with the grain.
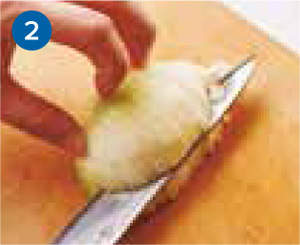
2 Hold your knife parallel to the cutting board, and make 3–4 horizontal cuts.
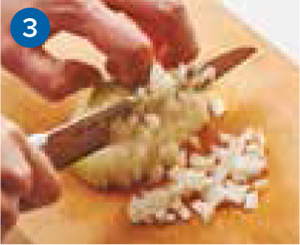
3 Chop vertically from the end opposite the root. Discard the hard root.

4 Chop to even up the size of the pieces.

How to Prepare Other Vegetables

Rubbing with salt
Put the cut-up vegetable in a bowl and add salt (for one small cucumber, add about 2 pinches). Rub and squeeze in the salt, mix, and leave for 5–10 minutes. Squeeze out the excess moisture.
Rolling on a board
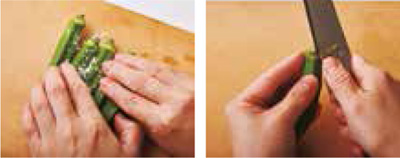
Put the vegetables on a cutting board, sprinkle with salt and roll the vegetables firmly on the board. For okra, cut off the calyx after rolling, and peel any tough bits left.

Blanching
Bring a pan of water to a boil and add 2 pinches of salt. Add the vegetables, and boil until bright green and plump. Drain into a sieve or colander, and leave to cool.