Chapter 4: Maintaining Your System
In This Chapter
![]() Understanding Refresh, Restart, and restore points, and older names
Understanding Refresh, Restart, and restore points, and older names
![]() Creating a Password Reset Disk
Creating a Password Reset Disk
![]() Maintaining hard drives and SSDs
Maintaining hard drives and SSDs
![]() Scheduling tasks
Scheduling tasks
![]() Zipping and compressing
Zipping and compressing
Windows is a computer program, not a Cracker Jack toy, and it will have problems. The trick lies in making sure that you don’t have problems, too.
Windows is notorious for crashing and freezing, making it impossible to start the computer or garbling things so badly that you’d think the screen went through a garbage disposal. Microsoft has poured a lot of time, effort, and money into teaching Windows how to heal itself. You can take advantage of all that work — if you know where to find it.
All of Book VIII is devoted to the topic of how to keep Windows alive and well. In this chapter, I introduce you to the basic ideas and get you started with some of the parts of Windows that you can use in many different ways. If you log on to Windows with a local account (as opposed to a Microsoft account, which is always an e-mail address), I also want to cajole you into creating a Password Reset Disk, which may well save your tail some day.
You’re welcome.
What’s the Difference Between Restore, System Repair, Recovery Mode, Refresh, and Restart?
The terminology stinks. Bear with me.
Windows 8.1 has three very different technologies for pulling you out of a tough spot. I liken them to the Wayback Machine, a brain transplant, and global thermonuclear war.
 Like Rocky and Bullwinkle’s WABAC Machine (thank you, Mr. Peabody), setting and using restore points provide a relatively simple way to switch your PC’s internal settings to an earlier, and presumably happier state, should something go awry.
 Restore points aren’t intended to restore earlier versions of files that you work with — that’s the function of File History (sometimes called “the Windows version of the Mac’s Time Machine). I talk about File History extensively in Book VIII, Chapter 1.
Sometimes, the problem doesn’t lie with the settings. Sometimes Windows system files get messed up (the technical term is “borked”). In those cases, Microsoft has a program called Refresh that scans and fixes all the system files, without changing your settings, removing any installed programs, or blasting your data.
 In previous versions of Windows, you may’ve used a System Repair disk, or booted into Safe Mode and hacked away at a cmd.exe command line, or used Recovery Mode from an installation DVD, or tried a dozen different incantations to bring Windows back from the dead. Having lived through many a late night with them, I can certainly sympathize. Those methods still work, by and large, but Microsoft has made it difficult to get them going and doesn’t recommend using them.
 In my experience, Windows 8.1 Refresh works almost all the time. It’s light years ahead of System Repair, Safe Mode, and Recovery Mode, and should be your fixit method of first resort. If Refresh doesn’t work, you’re in a world of hurt. Search online for instructions on manually booting into Safe Mode and running a recovery. Good luck.
If a Refresh doesn’t work and you don’t mind losing all your data and installed programs, or if you want to wipe your computer clean before you sell it or give it away, the program you want to run is Reset.
 Most of the time, you run a Restore when your computer starts acting flakey. You run a Reset to wipe the whole system when you’re going to sell your PC. But either or both — or using restore points — may be offered as options when your computer won’t boot right. I go into detail on restore points, Refresh, and Reset in Book VIII, Chapter 2.
Using a Password Reset Disk
If someone forgets his or her password, a Password Reset Disk is what saves the day by enabling you to reset a password you otherwise wouldn’t be able to access.
If you have a local account (not a Microsoft account) and that account has a password (any kind of password), it doesn’t matter if you set the password, or somebody else set it up for you. You should take a moment right now to create a Password Reset Disk. If you have multiple Local accounts on one PC (for example, a Regular account and an Administrator account), create a Password Reset Disk for each account. (If you need a refresher on the different types of accounts, flip to Book II, Chapter 4.)
If you have a Microsoft account, the only way to reset the password is online. Go to www.http://account.live.com/ResetPassword.aspx and follow the instructions.
 I can’t emphasize enough how important a Password Reset Disk is, particularly if there’s only one Administrator account on your PC, and it’s a local account. I get mail practically every day from people who have forgotten their passwords and can’t get in. This one simple trick, which takes all of a couple of minutes, will save you untold grief should you forget that lousy password!
“Password Reset Disk” is a misnomer. The part that saves your bacon is a very simple, small file, called userkey.psw, which you can copy and move around just like any other file. If you create more than one Password Reset Disk, which is to say, you create more than one userkey.psw file, make sure you keep track of which file goes with which user ID.
Here’s the basic idea: You log on to Windows, using any kind of password — typed, PIN, or picture. Crank up the Forgotten Password Wizard. It will ask you for your typed password, which you must provide. The Wizard then creates this file, userkey.psw, on a removable drive. You keep that file someplace handy. If the time ever comes that you forget your password (typed, PIN, or picture), put that file on a removable drive, stick the drive in your computer, say the magic words, and click your heels three times. Bingo, you’re in!
It doesn’t matter if somebody has changed your password without your knowing. The Password Reset Disk resets your password, no matter what the password may be. As long as you have a Local account, you’re in like Flynn.
Creating a Password Reset Disk
If you have a password-protected Local account, follow these steps to create a Password Reset Disk (that is, a userkey.psw file):
1. Log on to the account.
It doesn’t matter what kind of password you use.
2. Make sure you have a USB flash drive handy or another type of removable media, such as an SD card, or even an external hard drive.
The wizard won’t write anything to a local disk (think about it — d’oh!), and it won’t write to a network attached location.
3. On the desktop, bring up the Control Panel by tapping and holding (or right-clicking) the Start screen and choosing Control Panel. Click the User Accounts and Family Safety link and then the User Accounts link.
Windows shows you the User Accounts dialog box, shown in Figure 4-1.
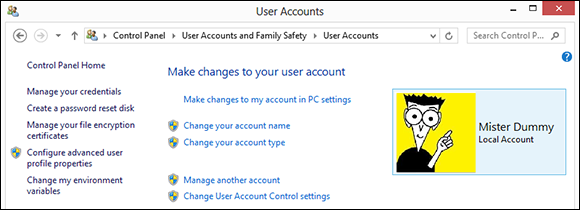
Figure 4-1: The User Accounts dialog box, with Create a Password Reset Disk on the left.
4. On the left, click the link that says Create a Password Reset Disk.
If you can’t see a line on the left that says Create a Password Reset Disk, either you don’t have a Local account (see the first part of this section) or your account doesn’t have a password.
This step launches the Forgotten Password Wizard, which creates a Password Reset Disk. This nifty little program creates a file that you can use to unlock your password and get into your account, even if your precocious seven-year-old daughter changes it to MXYPLFTFFT.
5. Follow the Wizard and at the final step, click Finish.
Store that userkey.psw file someplace safe. If you ever forget your password, or if someone else changes it for you, follow the steps in the next section to log on to your account.
Guard that file! Anybody who has that userkey.psw file can log on in your stead, even if he doesn’t know your password.
Using a Password Reset Disk
So you followed the steps in the preceding section and created a Password Reset Disk, which is, in fact, a little file called userkey.psw. And the time comes when you forget your password. Here’s how to use the file and reset your password:
1. Copy the file onto some sort of removable drive that your computer can read.
It’ll probably be a USB flash drive, but it could also be an SD card or even a USB-attached hard drive. Make sure it isn’t sitting in a folder somewhere; the file has to be in the root directory.
2. Go through the motions to log on using a typed password.
If you’re accustomed to logging on with a picture password, click the box marked Switch to Password on the logon screen and try there.
I know you don’t know the password. Relax. Just type something and press Enter.
3. When Windows comes back and tells you that The Password is Incorrect, read about how you can reset the password online, smile because you have the magic Open Sesame Disk (er, file), and click OK.
That brings up the alternative logon screen shown in Figure 4-2.
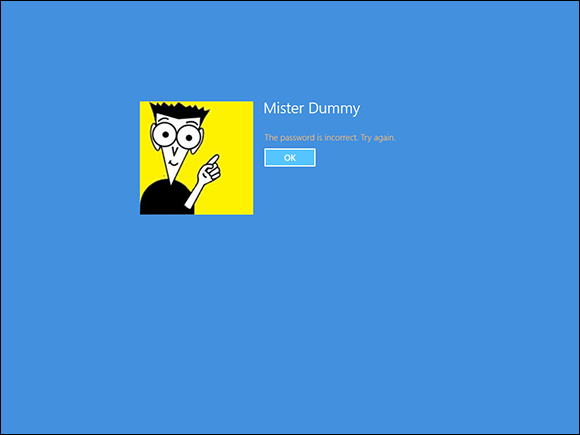
Figure 4-2: If you can’t remember your password, type in a bad one. You see this screen.
4. Click Reset Password.
Windows brings up the Welcome to the Password Reset Wizard. Glad that you found it, eh?
5. Make sure your Password Reset Disk — any disk with the userkey.psw file on it — is attached to the PC and then tap or click Next.
6. Follow the steps in the wizard. The last step in the wizard asks you to type in a new password, as in Figure 4-3.

Figure 4-3: The wizard forces you to create a new password and hint.
Remember that this is the new password for this account on this computer. It doesn’t affect the Password Reset Disk or the userkey.psw file at all.
7. Type in a new password and hint. Tap or click Next and then click Finish. Windows brings you back to the logon screen, where you can log on with the new password.
Don’t lose that userkey.psw file, okay?
To reiterate: As long as you have a Local account, the userkey.psw file will log you on to the PC, no matter what password is in effect, no matter who changed the password, when or how.
Maintaining Drives
Drives (hard drives, USB flash drives, CDs, DVDs, even those ancient floppies if you can still find one, and other types of storage media) seem to cause more computer problems than all other infuriating PC parts combined. Why? They move. And, unlike other parts of computers that are designed to move (printer rollers and keyboard springs and mouse balls, for example), they move quickly and with ultrafine precision, day in and day out.
“E pur, si muove”
That’s what Galileo said in 1633, after being forced during the Inquisition to recant his beliefs about the earth moving around the sun. “And yet it moves” — and that’s the crux of the problem.
As with any other moving mechanical contraption, an ounce of drive prevention is worth ten tons of cure. Unlike other moving mechanical contraptions, a good shot of WD-40 usually doesn’t cure the problem.
Solid State Drives are a whole different kettle of fish. SSD manufacturers typically offer diagnostic and health maintenance tools to keep their products in top shape, but they contain no moving parts, and thus aren’t subject to the vagaries associated with moving drives. I talk about SSDs later in this chapter.
If you’re looking for help installing a new hard drive, you’re in the wrong place. I talk about adding new drives and getting Windows 7 to recognize them in Book VIII, Chapter 5.
What is formatting?
Drives try to pack a lot of data into a small space, and because of that, they need to be calibrated. That’s where formatting comes in.
When you format a drive, you calibrate it: You mark it with guideposts that tell the PC where to store data and how to retrieve it. Every hard drive (and floppy disk, for that matter) has to be formatted before it can be used. CDs and DVDs have to be formatted, too, if you use the “Live File System” method for storing files. The manufacturer probably formatted your drive before you got it. That’s comforting because every time a drive is reformatted, everything on the drive is tossed out, completely and (almost) irretrievably. Everything.
You can format or reformat any hard drive other than the one that contains Windows by starting File Explorer, either from the tile on the Windows Start screen or from the icon on the desktop taskbar. Then right-click the hard drive and choose Format. You can also “format” rewritable CDs, DVDs, USB (key) flash drives, and SD or other removable memory cards — delete all the data on them — by following the same approach. To reformat the drive that contains Windows, you have to reinstall Windows. See the instructions for a clean Windows install in Book I, Chapter 4.
Introducing hard-drive–maintenance tools
Hard drives die at the worst possible moments. A hard drive that’s starting to act flaky can display all sorts of strange symptoms: everything from long, long pauses when you’re trying to open a file to completely inexplicable crashes and other errors in Windows itself.
Windows comes with a grab bag of utilities designed to help you keep your hard drives in top shape.
Storage Spaces: The best, most comprehensive of the bunch is Storage Spaces (see Book VIII, Chapter 4), which keeps duplicate copies of every file in hot standby, should a hard drive break down. But to use Storage Spaces effectively, you need at least three hard drives and twice as much hard drive space as you have data. Not everyone can afford that. Not everyone wants to dig in to the nitty-gritty.
Basic utilities: Three simple utilities stand out as effective ways to care for your hard drives, and one of them runs automatically once a week. You should get to know Check Disk, Disk Cleanup, and Disk Defragmenter because they all come in handy at the right times.
You have to be a designated administrator (see the section on using account types in Book II, Chapter 4) to get these utilities to work. I explain how to use Check Disk and Disk Defragmenter in the following two sections.
Task Scheduler: If you’re really short on disk space, you can use the Windows Task Scheduler to periodically remove temporary files that you don’t need by scheduling runs of the Disk Cleanup utility. Task Scheduler has a few other uses, but most Windows users never really need it.
Running an error check
If a drive starts acting weird (for example, you see error messages when trying to open a file, or Windows crashes in unpredictable ways, or a simple file copy takes hours instead of minutes), run the Windows error-checking routines.
If you’re an old hand at Windows (or an even older hand at DOS), you probably recognize the following steps as the venerable CHKDSK routine, in somewhat fancier clothing.
Follow these steps to run Check Disk:
1. Bring up the drive you want to check in File Explorer. From the tiled Start screen, tap or click the Desktop tile. From the desktop, click the icon that looks like a file folder, down in the taskbar.
2. On the left, right-click the drive that’s giving you problems and choose Properties.
You see the Local Disk Properties dialog box.
3. On the Tools tab, click the Check button, as shown in Figure 4-4.
Windows may tell you that you don’t need to scan the drive, as Windows hasn’t found any errors on the drive. If you’re skeptical, though, go right ahead.
4. Tap or click Scan Drive.
Windows tells you about any problems it encounters and asks for your permission to fix them.
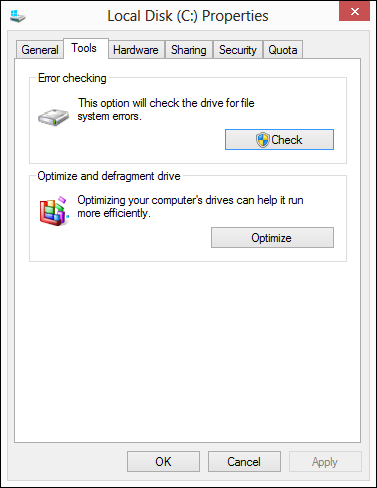
Figure 4-4: Run a Check Disk.
Defragmenting a drive
Once upon a time, defragmenting your hard drive — instructing Windows to rearrange files on a hard drive so that the various parts of a file all sit next to one another — rated as a Real Big Deal. Windows didn’t help automate running defrags, so few people bothered. As a result, drives started to look like patchwork quilts with pieces of files stored higgledy-piggledy. On the rare occasion that a Windows user ran the defragmenter, bringing all the pieces together could take hours — and the resulting system speed-up rarely raised any eyebrows, much less rocketed Windows fans into hyperthreaded bliss.
Windows 7 changed that by simply and quietly scheduling a disk defragmentation to run every week. Windows 8.1 continues in that proud tradition. To get defragmented, you don’t need to touch a thing.
Windows doesn’t run automatic defrags on SSDs, which is to say, flash memory drives that don’t have any moving parts. SSDs don’t need defragmentation. They also have a finite lifespan, so there’s no need to overwork the drives with a senseless exercise in futility.
If you’re curious about how your computer’s doing in the defrag department, you can see the Defragmenter report this way:
1. Bring up the Control Panel by tapping and holding (or right-clicking) in the bottom-left corner of the desktop and choosing Control Panel.
2. Tap or click the link to System and Security. Then, under Administrative Tools, tap or click the link to Defragment and Optimize Your Drives.
Windows shows you the Optimize Drives report, as shown in Figure 4-5.

Figure 4-5: A full report of defragment-ing activities.
3. For a real-time analysis run, showing the fragmentation as of this moment, tap or click Analyze. To move files around into a more optimum ordering, click Optimize.
4. If you want to permanently change the schedule for automatic defragging, click Change Settings. When you’re done, click Close.
Defrags run automatically once a week unless you change the settings.
Maintaining Solid State Drives
Solid State Drives (SSDs) are a completely different breed of cat. You don’t want to run a Checkdisk on them, even if you can, because the results aren’t conclusive and you’d end up over-working the SSDs. You certainly don’t want to run a defrag because the drives are (depending on how you look at it) already defragmented and/or horrendously fragmented and there’s no reason to change.
Most SSDs these days are made from NAND Flash memory, which is memory that doesn’t lose its settings when the power’s turned off. Although an SSD may fit into a hard drive slot and behave much like a regular hard drive, the technology’s completely different.
While the jury’s still out on whether SSDs are much more reliable than hard disk drives (HDDs), just about everyone agrees they are more reliable. And there’s absolutely no doubt that they’re enormously faster. Change your C: drive over from a spinning platter to an SSD and strap on your seat belt, Nelly.
SSDs have controllers that handle everything. Data isn't stored on SSDs the same way it's stored on HDDs, and many purpose-built hard-drive tools don't work at all on SSDs. The controller has to take on all the housekeeping that just comes naturally with HDDs. For example, if you want to erase an HDD, you can format it or just delete all the files on it. If you want to erase an SSD, you should use the manufacturer's utilities, or data can be left behind. See the Computerworld article at www.computerworld.com/s/article/9211519/Can_data_stored_on_an_SSD_be_secured_ for details.
Windows disables the Windows utilities known as Defrag, Superfetch, and ReadyBoost on SSDs — you should never see Windows offer to run a Defrag on an SSD, for example — and Windows startup works directly with the hardware during boot. That simultaneously makes the boot go faster and reduces unnecessary wear on the SSD.
If you have an SSD or get an SSD, you should drop by the manufacturer's website and pick up any utilities it may have for the care and feeding of the furious little buggers. Windows actually does a very good job of looking after them, but the manufacturer may have a few tricks up its sleeve. Intel's SSD Toolbox at www.intel.com/support/go/ssdtoolbox/index.htm is one of the better-known utility packs, but you should only use it on Intel SSDs.
Zipping and Compressing
Windows supports two very different kinds of file compression. The distinction is confusing but important, so bear with me.
File compression reduces the size of a file by cleverly taking out parts of the contents of the file that aren’t needed, storing only the minimum amount of information necessary to reconstitute the file — extract it — into its full original form. A certain amount of overhead is involved because the computer has to take the time to squeeze extraneous information out of a file before storing it, and then the computer takes more time to restore the file to its original state when someone needs the file. But compression can reduce file sizes enormously. A compressed file often takes up half its original space — even less, in many cases.
How does compression work? That depends on the compression method you use. In one kind of compression, known as Huffman encoding, letters that occur frequently in a file (say, the letter e in a word-processing document) are massaged so that they take up only a little bit of room in the file, whereas letters that occur less frequently (say, x) are allowed to occupy lots of space. Rather than allocate eight 1s and 0s for every letter in a document, for example, some letters may take up only two 1s and 0s, and others can take up 15. The net result, overall, is a big reduction in file size. It’s complicated, and the mathematics involved get quite interesting.
The two Windows file compression techniques are:
Files can be compressed and placed in a Compressed (zipped) Folder. The icon for a zipped folder, appropriately, has a zipper on it.
Folders or even entire drives can be compressed by using the built-in compression capabilities of the Windows file system (NTFS).
Here’s where things get complicated.
NT File System (NTFS) compression is built in to the file system: You can use it only on NTFS drives, and the compression doesn’t persist when you move (or copy) the file off the drive. Think of NTFS compression as a capability inherent to the hard drive itself. That isn’t really the case — Windows does all the sleight-of-hand behind the scenes — but the concept can help you remember the limitations and quirks of NTFS compression.
Although Microsoft would have you believe that Compressed (zipped) Folder compression is based on folders, it isn't. A Compressed (zipped) Folder is really a file — not a folder — but it's a special kind of file, called a Zip file. If you ever encountered Zip files on the Internet (they have a .zip filename extension and are frequently manipulated by using programs such as my favorite, 7-Zip, (www.7zip.com), you know exactly what I'm talking about. Zip files contain one or more compressed files, and they use the most common kind of compression found on the Internet. Think of Compressed (zipped) Folders as being Zip files, and if you have even a nodding acquaintance with Zips, you'll immediately understand the limitations and quirks of Compressed (zipped) Folders. Microsoft calls them Folders because that's supposed to be easier for users to understand. You be the judge.
If you have Windows show you filename extensions (see my rant about that topic in the section on showing filename extensions in Book VI, Chapter 1), you see immediately that Compressed (zipped) Folders are, in fact, simple Zip files.
Zipping is very common, particularly because it reduces the amount of data that needs to be transported from here to there. NTFS compression isn’t nearly as common. It’s more difficult, and hard drives have become so cheap there’s rarely any need for most people to use it.
Table 4-1 shows a quick comparison of NTFS compression and Zip compression.
Table 4-1 NTFS Compression versus Compressed (Zipped) Folders Compression
|
NTFS |
Zip |
|
Think of NTFS compression as a feature of the hard drive itself. |
Zip technology works on any file, regardless of where it is stored. |
|
The minute you move an NTFS-compressed file off an NTFS drive (by, say, sending a file as an e-mail attachment), the file is uncompressed, automatically, and you can’t do anything about it: You’ll send a big, uncompressed file. |
You can move a Compressed (zipped) Folder (it’s a Zip file, with a .zip filename extension) anywhere, and it stays compressed. If you send a Zip file as an e-mail attachment, it goes over the Internet as a compressed file. The person who receives the file can view it directly in Windows or use a product such as WinZip to see it. |
|
A lot of overhead is associated with NTFS compression. Windows has to compress and decompress those files on the fly, and that sucks up processing power. |
Very little overhead is associated with Zip files. Many programs (for example, antivirus programs) read Zip files directly. |
|
NTFS compression is helpful if you’re running out of room on an NTFS-formatted drive. |
Compressed (zipped) Folders (that is to say, Zip files) are in a near-universal form that can be used just about anywhere. |
|
You have to be using an Administrator account to use NTFS compression. |
You can create, copy, or move Zip files just like any other files, with the same security restrictions. |
|
You can use NTFS compression on entire drives, folders, or single files. They cannot be password-protected. |
You can zip files, folders, or (rarely) drives, and they can be password protected. |
If you try to compress the drive that contains Windows itself (normally your C: drive), you can’t compress the files that are in use by Windows.
Compressing with NTFS
To use NTFS compression on an entire drive, follow these steps:
1. Make sure you’re using an Administrator account.
See Book II, Chapter 4.
2. Bring up File Explorer. From the tiled Start screen, tap or click the Desktop tile. From the desktop, tap or click the icon on the desktop taskbar.
3. On the left, tap and hold (or right-click) the drive you want to compress. Choose Properties and then click the General tab.
4. Select the Compress This Drive to Save Disk Space check box. Then click the OK button.
Windows asks you to confirm that you want to compress the entire drive. Windows takes some time to compress the drive; in some cases, the estimated time is measured in days. Good luck.
To use NTFS compression on a folder, follow these steps:
1. Make sure you’re using an Administrator account.
See Book II, Chapter 4.
2. Bring up File Explorer. From the tiled Start screen, tap or click the Desktop tile. From the desktop, tap or click the File Explorer icon on the desktop taskbar.
3. On the left, tap and hold (or right-click) the folder you want to compress. Choose Properties and then click the Advanced button.
4. Select the Compress Contents to Save Disk Space check box. Then click the OK button.
Windows asks you to confirm that you want to compress the folder. Unless the folder’s enormous, it should compress in a few minutes.
To uncompress a folder, reopen the Advanced Properties dialog box (right-click the file or folder, choose Properties, and then click the Advanced button) and deselect the Compress Contents to Save Disk Space check box.
Zipping the easy way with Compressed (zipped) Folders
The easiest way to create a Zip file, er, a Compressed (zipped) Folder, is with a simple tap and hold (or right-click). Here’s how:
1. Navigate to the files you want to zip.
If you’re on the tiled Start screen, tap or click the Desktop tile. From the desktop, tap or click the File Explorer icon on the taskbar. Then move to wherever the files may be.
2. Select the file or files that you want to zip together.
You can tap and hold, or Ctrl+click to select individual files or Shift+click to select a bunch.
3. Tap and hold (or right-click) any of the selected files and choose Send To⇒Compressed (Zipped) Folder.
Windows responds by creating a new Zip file with a .zip filename extension and placing copies of the selected files inside the new Zip folder. File Explorer selects the file and shows a context tab for Compressed Folder Tools, as shown in Figure 4-6.
The new file is just like any other file: You can rename it, copy it, move it, delete it, send it as an e-mail attachment, save it on the Internet, or do anything else to it that you can do to a file. That’s because it is a file.
4. To add another file to your Compressed (zipped) Folder, simply drag it onto the zipped folder icon.
5. To copy a file from your Zip file (uh, folder), double-click the zipped folder icon and treat the file the same way you would treat any “regular” file.
6. To copy all files out of your Zip file (folder), click the Extract tab on the File Explorer Ribbon.
From there you can choose the location or click the Extract All icon to choose a location other than the ones offered.
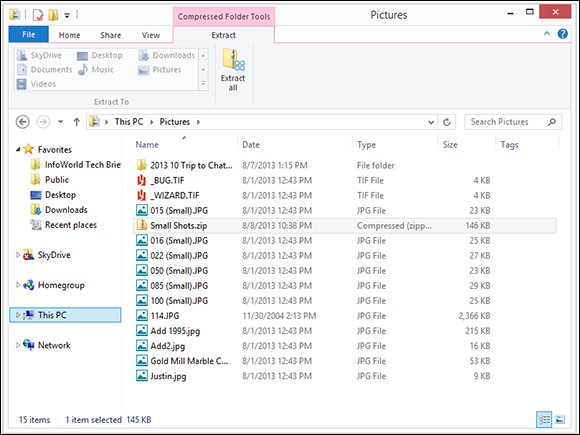
Figure 4-6: Click a zip, and you get a context tab for Compressed Folder Tools.
By default, the Extract All icon recommends that you extract all the compressed files into a new folder with the same name as the Zip file, which confuses the living bewilickers out of everybody. Unless you give the extracted folder a different name from the original Compressed (zipped) Folder, you end up with two folders with precisely the same name sitting on your desktop. Do yourself a huge favor and feed the wizard a different folder name while you’re extracting the files.