Chapter 2: Troubleshooting and Getting Help
In This Chapter
![]() Stepping through the Metro Help + Tips app
Stepping through the Metro Help + Tips app
![]() Using the Windows troubleshooting tools
Using the Windows troubleshooting tools
![]() Checking your system’s stability
Checking your system’s stability
![]() Working with Windows Help and Support
Working with Windows Help and Support
![]() Snapping your problems
Snapping your problems
![]() Getting help from other folks without losing the farm
Getting help from other folks without losing the farm
![]() Getting help on the web — effectively
Getting help on the web — effectively
Your PC ran into a problem that it couldn’t handle, and now it needs to restart. You can search for the error online: There’s an error message that goes by so fast, you can’t possibly read it.
 Wish I had a nickel for every time I’ve seen that “blue screen” message. People write to me all the time and ask what caused the message, or one like it, to appear on their computers. My answer? Could be anything. Hey, don’t feel too bad: Windows couldn’t figure it out either, and Microsoft spent hundreds of millions of dollars trying to avoid it.
Think of this chapter as help on Help. When you need help, start here.
Windows arrives festooned with automated tools to help you pull yourself out of the sticky parts. The troubleshooters really do shoot trouble, frequently, if you find the right one. The error logs, event trackers, and stability graphs can keep you going for years — even the experts scratch their heads. Windows abounds with acres and acres — and layers and layers — of Help. Some of it works well. Some of it would work well, if you could figure out how to get to the right help at the right time.
This chapter tells you when and where to look for help. It also tells you when to give up and what to do after you give up. Yes, destroying your PC is an option. But you may have alternatives. No guarantees, of course.
The chapter steps you lightly through the new Metro Help & Tips app. It’s really a mini-tutorial, but if you’re new to Windows, it’s worth a quick glance.
This chapter also includes detailed, simple, step-by-step instructions for inviting a friend to take over your computer, via the Internet, to see what is going on and lend you a hand while you watch. I believe that this Remote Assistance capability is the most powerful and useful feature ever built in to any version of Windows.
Starting with the Help + Tips tile
Every time you bump into the Metro Start screen (I know, many of you hope it’s later rather than sooner), the oddly boxy, small Help + Tips tile stares at you from the middle of the screen.
Tap on the tile, and you won’t be much closer to enlightenment. As Figure 2-1 shows, you really just have a small handful of tutorials.

Figure 2-1: Help + Tips won’t answer any hard questions, but it’s a start.
Here are the kinds of tutorials Help + Tips has on offer:
 Start and apps explains the Metro Start screen (adhering to the Microsoft Party Line, of course), the Windows Store, the All Apps view, and the old-fashioned desktop (with groovy instructions to click the Start button to get back to the Start screen).
Get around shows you how to go to the Start screen (sound familiar?), how to use the app slide-out pane on the left, and how to shut down a Metro app.
Basic actions introduces the Charms bar, explains how to bring up the app bars, and describes Metro snap to show two or more Metro windows side-by-side.
Your account and files gives a very Microsoft-centric pep talk on using Microsoft accounts and on using SkyDrive.
Settings explains how to get to the Metro Settings charm and the Change PC Settings window.
 What’s new is just a long list of new features in Windows 8.1. Top on the list: Get Results from Your PC and from the Web with Bing — extolling the virtues of Smart Search, a privacy-busting intrusion which I think you should turn off immediately (see Book III, Chapter 2).
Each of the tutorials has a list of topics at the end that link to simple www.windows.com pages. Click on a link, and Metro IE appears on the right side of the screen, open to the appropriate page.
The tutorials are boxy and not terribly enlightening, and they’re definitely at a very introductory level. Navigation can be a finger-twiddling exercise because the topics scroll from left to right, but each individual topic scrolls from top to bottom. But there are a few videos, and they do cover the basics.
 If you or someone you know is at the beginner stage, do both of you a favor and get Andy Rathbone’s Windows 8.1 For Dummies (published by John Wiley & Sons, Inc.). The book/DVD combination, in particular, runs rings around the Metro Help + Tips app.
Troubleshooting in the Action Center
If something goes bump in the night and you can’t find a discussion of the problem and its solution in this book, your first stop should be the Action Center. They don’t call it Action fer nuthin’.
 Windows ships with a handful of troubleshooters. Troubleshooters, as the name implies, take you by the hand and help you figure out what’s causing problems — and, just maybe, solve them.
If you run into a problem and you’re stumped, see whether Microsoft has released a pertinent troubleshooter by following these easy steps:
1. Go to the Metro tiled Start screen and type trouble. On the right, tap or click Troubleshooting.
The Troubleshooting dialog box appears, as shown in Figure 2-2.
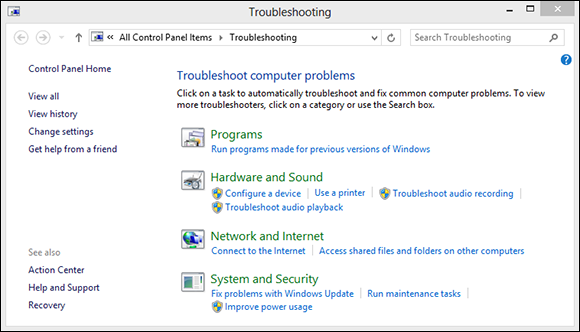
Figure 2-2: Trouble-shooting wizards can cut to the heart of a problem, if you can find one.
You can also get to the Troubleshooting dialog box the old-fashioned way by bringing up the Control Panel (right-click the lower-left corner of the screen and choose Control Panel) and choosing Find and Fix Problems under System and Security.
2a. If you see a troubleshooter that seems to address your problem, tap or click it.
The selection is limited, but if you’re lucky, the Troubleshooting Wizard steps you through the entire process of fixing the problem.
2b. If you don’t see a troubleshooter that seems to address your problem, type a keyword or two in the Search Troubleshooting box and see whether Windows can find one for you.
Microsoft has dozens of troubleshooters online. You can search for them by using the Search box in the upper-right corner of the Troubleshooting dialog box. For example, there are troubleshooters for power settings, searching and indexing, system maintenance, Windows Update, Internet Explorer, and many others.
Frequently, troubleshooters just can’t shoot the trouble, and they end up with an error message dialog box that says something like, This Error Cannot Be Automatically Repaired. You can tap or click Next and end up with informative messages such as The Error ‘5’ Was Encountered. (I don’t make this stuff up — that’s exactly the error message I once received while running the connection troubleshooter.)
 If you can’t find a worthy troubleshooter, you may be able to unearth worthwhile content from your systems log using the Event Viewer, a topic that I tackle in Book VIII, Chapter 4.
System Stability and the Reliability Monitor
The Reliability Monitor’s a useful tool that can help pinpoint problems that you can only vaguely identify. Say your computer suddenly starts getting those blue screen messages saying, Your PC Ran into a Problem that It Couldn’t Handle, and now It Needs to Restart. You know for sure that your PC didn’t have those problems last week. But something happened in the past few days, and now, suddenly, Windows encounters more problems than Walter White hits in a season of Breaking Bad.
Windows watches all, knows all, sees all — and keeps notes. Windows events, as they’re called, get stored in a giant database, and you can look into that database with the Event Viewer, which I describe in Book VIII, Chapter 4.
One specific subset of the events get collected into a report — a Reliability Monitor report — that you can see in a nonce.
If you’re looking at the Reliability Monitor because somebody on the phone told you that he’s trying to help you fix your computer, be very, very suspicious. The Reliability Monitor will show that your computer has problems. Everybody’s Reliability Monitor, sooner or later, shows problems. Scammers often use that fact to talk people into paying for services they don’t need or allowing them to connect to your computer for nefarious reasons. Don’t be conned! It’s not unusual to have a string of problems showing in the Reliability Monitor.
Here’s the easy way to bring up the Reliability Monitor:
1. On the Start screen, type reliability. On the right, tap or click View Reliability History.
The Reliability Monitor report appears, as shown in Figure 2-3.
2. Tap or click any item in the list at the bottom of the report to bring up details.
You can also tap or click an event and coalesce reports by days or weeks by choosing the appropriate option at the top.
The Reliability Monitor calculates an aggregate score, based on how many problems appear in this graph, taken as a rolling (or in some cases, roiling) average.
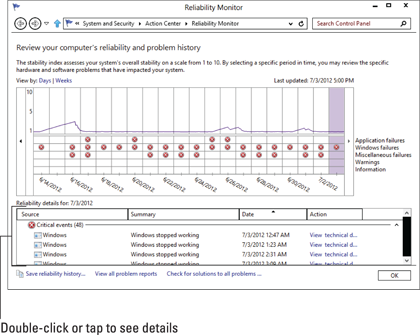
Figure 2-3: The Reliability Monitor report.
If you take the Stability score with a small grain of salt, you may be able to glean some useful information from the graph. For example, if you install a new driver and your system goes from ten to five that day, you can bet that the driver had something to do with the decline. The Reliability Monitor shows you significant events for each day and leaves it to you to draw inferences.
Tricks to Using Windows Help
The kind of Windows help you’re offered depends on where you start:
If you start at the Metro tiled Start screen, swipe from the right (or hover your mouse in the upper-right corner), choose the Settings charm and then choose Help, you get shunted off to a web page that displays the very abbreviated list shown in Figure 2-4.
If you start on the desktop and perform the same actions, you’re dropped into a very different Microsoft Internet-based Windows Help and Support, as shown in Figure 2-5.
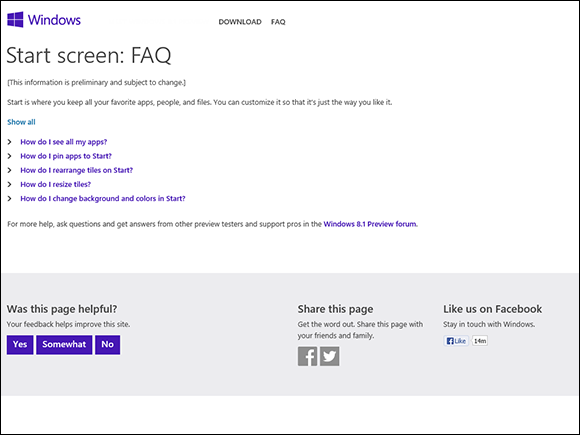
Figure 2-4: The very reduced Help Lite available from the Metro tiled Start screen.

Figure 2-5: Go at it from the desktop, and you get access to all the support options.
Microsoft hopes to make finding what you need easier for you, even if you don’t know the answer to your question in advance — a common problem in all versions of Windows Help.
The problem(s) with Windows Help
Windows Help offers only the Microsoft party line. If a big problem crops up with Windows, you find only a milquetoast report in Windows Help. If a product from a different manufacturer offers a better way to solve a problem, you won’t find that information in Windows Help. Want searing insight or unbiased evaluations? That’s why you have this book, eh?
Windows Help exists primarily to reduce Microsoft support costs, which is both good and bad. Microsoft has tried hard to enable you to solve your own problems and to help you connect with other people who may be willing to volunteer. That’s good. At the same time, Microsoft has made it difficult to figure out how to pick up the phone and chat with somebody in Product Support Services. That’s bad. I spill the beans — and give you some much better alternatives — in a later section of this chapter, “How to Really Get Help.”
Windows Help puts a happy face on an otherwise sobering (and bewildering!) topic. After you click past the sugarcoating, you find the following gotchas that you should know about:
You can’t configure the Help search engine. The Windows Help engine already looks in all the places it can. Your only option is to cut off online searches — which makes about as much sense as cutting off your clicking finger. You don’t have anywhere near as many choices as with, say, a standard Google search (see “Getting Help Online,” later in this chapter).
Live, one-on-one support from Microsoft is notoriously uneven. One day you reach a support rep (who probably doesn’t actually work for Microsoft) who can solve your problem in the blink of an eye. The next day, you spend hours on hold, only to be told that you need to reformat your hard drive and reinstall Windows. If you get bumped up to Level 2 live support, you’re more likely to find someone who knows what she’s doing, but you have to persist to Level 3 before you get to talk to a real, live, breathing guru. Few customers have the patience or the savvy to convince Microsoft product support droids to escalate their problems to Level 3.
Using different kinds of help
Windows Help has been set up for you to jump in, find an answer to your problem, resolve the problem, and get back to work.
Unfortunately, life is rarely so simple. So too, with Help. You probably won’t dive in to Help until you’re feeling lost. And when you’re there, well, it’s like the old saying, “When you’re up to your <insert favorite expletive here> in alligators, it’s hard to remember that you need to drain the swamp.”
Windows Help morsels fall into the following categories:
Overviews, articles, and tutorials: Explanatory pieces aimed at giving you an idea of what’s going on, as opposed to solving a specific problem.
Tasks: Step-by-step procedures for solving a single problem or changing a single setting.
Walk-throughs and guided tours: Marketing demos . . . uh, multimedia demonstrations of capabilities that tend to be, uh, light on details and heavy on splash.
Troubleshooters: Walks you through a series of (frequently complex) steps to help you identify and resolve problems. I talk about troubleshooters earlier in this chapter.
Staying online
If you aren’t connected to the Internet when you open Windows Help and Support, Windows falls back to a stunted version of the Help system. If you really need help with almost anything that’s fairly complex, you have to be online.
The Windows Help system has few options that you can set, but you should check the one key setting that keeps Help talking to the mother ship. Follow these steps:
1. On the Start screen, type help, and then choose Help and Support.
You can bring up Help and Support in other ways, but that’s the easiest. The Windows Help and Support main page appears (refer to Figure 2-5).
2. In the upper-right corner, tap or click the gear icon.
Windows Help has just two settings, but one of them is vital.
3. Ensure that the Get Online Help (Recommended) check box is selected. Tap or click OK, and then tap or click the X button to close Windows Help.
When Help is connected to the Internet, you see the Online Help icon in the lower-left corner of every Help screen.
Choosing the index versus search
Just as this book has an index, so too does Windows Help. To find the index, tap or click the Browse Help link.
The Windows Help index is quite thorough but, like any index, it relies heavily on the terminology being used in the Help articles themselves. That leads to frequent chicken-and-egg situations: You can find the answer to your question quite readily if you, uh, know the answer to the question — or if you know the terminology involved (which is nearly the same thing, eh?).
Generally, typing keywords in the Search text box is the best way to approach a problem, but the index comes in handy from time to time. Don’t hesitate to use it.
How to Really Get Help
You use Windows Help when you need help, right? Well, yes. Sorta.
In my experience, Windows Help works best in the following situations:
When you want to understand what functions the big pieces of Windows perform, and you aren’t overly concerned about solving a specific problem (for example, Windows Media Player)
When you have a problem that’s easy to define (for example, my printer doesn’t print)
When you have a good idea of what you want to do but you need a little prodding on the mechanics to get the job done (for example, touch gestures)
Help doesn’t do much for you if you have only a vague idea of what’s ailing your machine, if you want to understand enough details to think your way through a problem, if you’re trying to decide which hardware or software to buy for your computer, or if you want to know where the Windows bodies are buried.
For example, if you type how much memory do I need?, the 60 answers you see talk about all sorts of things, but they don’t tell you how much memory you need.
For all that, and much more, you need an independent source of information — this book, for example.
My website, AskWoody.com (www.askwoody.com), can come in handy, especially if you're trying to decide whether you should install the latest Microsoft security patch of a patch of a patch. AskWoody.com links to the (absolutely free) Windows Secrets Newsletter Lounge, where hundreds of volunteers help thousands of bewildered Windows victims! You find more than 850,000 searchable posts, absolutely free. Drop by from time to time to see what's happening.
If you can’t find the help you need in Windows Help and Support or at AskWoody.com, expand your search for enlightenment in this order:
1. Use simple bribery, which is far and away the best way to get help.
Buttonhole a friend who knows about this stuff, and get her to lend you a virtual hand. Promise her a beer, a pizza, a night on the town — whatever it takes. If your friend knows her stuff, it’s cheaper and faster than the alternatives — and you’ll probably get better advice.
If you can cajole your machine into connecting to the Internet — and get your friend to also connect to the Internet — Windows makes it easy for a friend to take over your computer while you watch with the Remote Assistance feature, which I discuss a little later in this chapter.
2. If your friend is off getting a tan at Patong Beach, you may be able to find help elsewhere on the Internet.
See the section “Getting Help Online,” later in this chapter.
3. If you have a problem with a security patch — and can prove it — you may qualify for free support.
Microsoft used to have a website where you could request a free support ticket, but it has withdrawn the old site. Now, apparently you have to call (see the next step) and convince the person on the other end of the phone that you’re having a problem with a security patch, and that your tech support call should be free.
For the life of me, I can’t find any e-mail address — or pointer to an e-mail address — for tech support at Microsoft. Even the chat lines appear to be blocked off.
4. As a last resort, you can try to contact Microsoft by telephone.
Heaven help ya.
Microsoft offers support by phone — you know, an old-fashioned voice call — but some pundits (including yours truly) have observed that you’ll probably have more luck with a psychic hotline. Be that as it may, the telephone number for tech support in the United States is (800) 642-7676, and you may have to press 0 three or more times to get a live person, or (425) 635-3311. In Canada, it’s (905) 568-4494. Have your computer handy. Be prepared to pay.
Snapping and Recording Your Problems
Raise your hand if you’ve heard the following conversation:
Overworked Geek (answering the phone): “Hi, honey. How’s it going?”
Geek’s Clueless Husband: “Sorry to call you at work, but I’m having trouble with my computer.”
OG: “What kind of trouble?”
GCH: “I clicked the picture, and it went into Microsoft, you know, and I tried to look at this report my boss sent me, but the computer said it couldn’t.”
OG: “Huh?”
GCH: “I’m sure you’ve seen this a hundred times. I clicked the picture, but the computer said it couldn’t. How do I look at the report?”
OG: “Spfffft!”
GCH: “What’s wrong? Why don’t you say anything? You have time to help the other people in your office. Why can’t you make time for me?”
OG wonders, for the tenth time that day, how she ever got into this bloody business.
At one time or another, you may have been on the sending or receiving end of a similar conversation — probably both, come to think of it. In the final analysis, one thing’s clear: When you’re trying to solve a computer problem, being able to look at the screen is worth 10,000 words. Or more.
Taking snaps that snap
Since the dawn of WinTime, you could take a snapshot of your desktop and put it on the Windows Clipboard by simply pressing the PrtScr or Print Screen key on your keyboard. Similarly, hold down the Alt key and press PrtScr, and Windows puts a screen shot of the currently active window on the Windows Clipboard. From there, you can open Paint (or any of a hundred other picture-savvy programs, including Word), paste, and do what you will with the shot. That approach still works in Windows — even on the Start screen, and in the Metro tiled apps — and in some circumstances, it’s exactly the right tool for the job.
Windows Vista introduced the Snipping Tool, which is a more advanced tune on the same theme. With the Snipping Tool (see Figure 2-6), you tap or click New, then drag and draw a rectangle around the area you wish to capture. You can also capture a free-form area anywhere on the screen, or automatically capture the current window or the full screen.
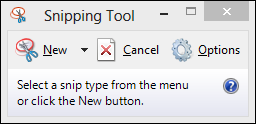
Figure 2-6: The Snipping Tool can take screen shots in a couple of steps.
The Snipping Tool has rudimentary tools for drawing on the captured screen, and the result can be copied to the Clipboard and/or saved as a PNG, GIF, JPG, or HTML file, or automatically attached to a newly generated e-mail message.
To bring up the Snipping Tool, go to the Metro Start screen, type snip, and choose Snipping Tool. The Snipping Tool runs immediately, but it will capture only desktop screens.
Now Windows has a third screen capture option, and in many circumstances, it’s much handier than its two older brethren. If you hold down the Windows key and press PrtScr or Print Screen on your keyboard, Windows takes a screen shot of the entire screen, converts it to a PNG file, and stores it in your Pictures library. The file is given the name Screenshot (x).png, where the number x is increased by one with each shot.
Unlike the Snipping Tool, the new screen capture tool does work on the Start screen or in any Metro tiled app. Unlike the Snipping Tool, you can’t select a part of the screen — you get the whole thing. Also unlike the Snipping Tool, you can’t pick a format for the shot or a destination location. Still, for quick screens, it works well.
Recording live
If a screen shot’s worth a thousand words, a video of the screen in action must be worth a thousand and one at least, right?
Windows includes the magical Problem Steps Recorder (PSR), recently renamed the Steps Recorder, which lets you take a movie of your screen. To a first approximation, anyway, it’s actually a series of snapshots, more like an annotated slide show. You end up with a file that you can e-mail to a friend, a beleaguered spouse, or an innocent bystander, who can then see which steps you’ve taken and try to sort things out. To read the file, your guru has to run Internet Explorer.
Steps Recorder creates a slide show of your screen with automatically generated detailed annotations, good, bad, ugly, problem-infested, or rosy-cheeked. If you have a rosy-cheeked background, anyway.
Steps Recorder’s fast and easy, and it works like a champ.
Here’s how to record your problems, er, screen:
1. Make sure you remember which steps you have to take to make the problem (or rosy cheeks) appear.
Practice, if need be, until you figure out just how to move the whatsis to the flooberjoober and click the thingy to get to the sorry state that you want to show to your guru friend.
Realize that anything appearing on the screen, even fleetingly, may be recorded, and your friend may be able to see it. So don’t send your salary information, okay?
2. Go to the Start screen, type steps, and tap or click Steps Recorder.
You can start the Steps Recorder from the Control Panel, but this method is a whole lot easier.
The Steps Recorder, which resembles a full-screen camcorder, springs to life (see Figure 2-7). It isn’t recording yet.

Figure 2-7: The unassuming Steps Recorder.
3. Tap or click Start Record.
The recorder starts. You know it’s going because the title flashes Steps Recorder — Recording Now.
Note that the recorded slide show will include the Steps Recorder window, so you may have to move it out of the way in order to show what you want to show.
4. (Optional) If you want to type a description of what you’re doing or why or anything else you want your guru friend to see while she’s looking at your home movie:
a. Tap or click the Add Comment button.
The recording pauses, and the screen grays out a bit. A Highlight Problem and Comment box appears at the bottom of the screen.
b. Tap or click the screen wherever your problem may be occurring and drag the mouse to highlight the problematic location.
c. Type your edifying text in the box and tap or click OK.
Recording continues.
5. When you’re done with the demo, tap or click Stop Record.
Steps Recorder responds with the Recorded Steps dialog box, as shown in Figure 2-8.
Take a good look at the file because what you see in the Save As box is precisely what gets saved — each of the screen shots, in a slide show, precisely as presented. Remember, this isn’t a video. It’s an annotated slide show.
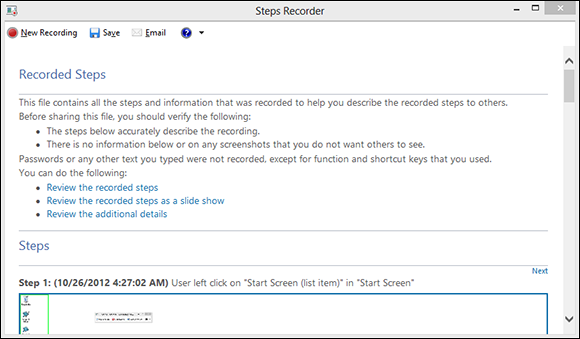
Figure 2-8: Save the recording as soon as you finish it.
6. Type a name for the file (it’s a regular Zip file) and tap or click Save.
The Zip file contains an MHT file, which can be reliably read only by Internet Explorer — although you may have some luck reading the file in Firefox, if it’s running the MAFF or UnMHT add-ons.
7. Send the file to your guru friend.
Sneakernet — the old-fashioned way of sticking the file on a USB drive and hand-delivering it — works.
8. Tell your friend to double-click the Zip file when she receives it and then double-click the MHT file inside.
Internet Explorer appears and shows the MHT file. You have several options; my favorite is to show the file as a slide show (see Figure 2-9).
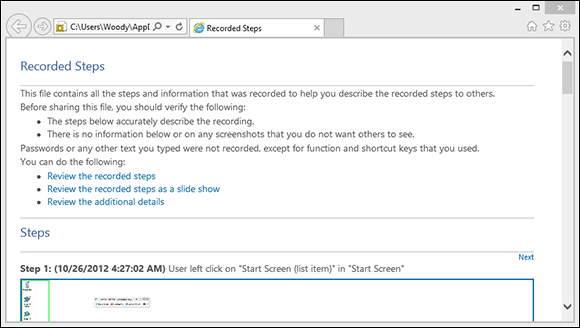
Figure 2-9: The recording appears as a series of snapshots, with detailed accounts of what has been clicked and where.
9. When you’re done, click the red X button to close the Steps Recorder.
Magical. Okay, Snagit (http://techsmith.com/snagit.html) does the screen recording shtick better, but still.
Connecting to Remote Assistance
Windows has long boasted the Remote Assistance feature, which lets a person on one computer control a second computer, long distance, while both watch what’s on the screen. It’s a great puppet/puppet master capability that allows someone to solve your problems remotely while you watch. (Or, if you’re the guru, Remote Assistance allows you to solve others’ problems while they watch.)
If you’re looking at these instructions because someone you don’t know wants to get into your computer, stop. Right now. Seriously. Stop. Ask yourself how much you know about the person who’s trying to look at your PC. Do you trust her to take control of your PC — is it possible she’ll pull a fast one on you, even drop an infected file? If you have any qualms at all, DON’T DO IT. Scammers love to talk people into using Remote Assistance because they get full control over the PC, and if they work fast enough (or talk fast enough to convince you that what they’re doing is legitimate), they can easily plant anything they want on your computer.
Understanding the interaction
Windows includes the Remote Assistance feature, which lets you call on a friend (or friendly guru) to take over your PC.
The basic interaction goes something like this:
1. You create an invitation file for your guru friend, asking him to look at your computer. Windows creates a password for the invitation and shows it on your screen.
2. You send or give the file to the guru. Separately, you send your guru the password.
The file can go any way you can imagine: Attach it to an e-mail message, send it via an instant messaging program that allows you to transfer files, put it on a network shared drive, post it on your company’s intranet, copy it to a shared folder on SkyDrive, stick it on a USB key drive, burn it on a CD, or strap it to a carrier pigeon. It’s just a text file. Nothing fancy.
Similarly you can send the password if you like, but it’s smarter to call your guru and repeat it over the phone, just in case somebody’s scraping your e-mail.
3. Your guru friend receives the message or file and responds by clicking it and then typing the password.
4. Your PC displays a message saying that your guru friend wants to look at your computer.
5. If you give the go-ahead, your guru friend can see what you’re doing — look, but not touch.
6. Your guru friend may ask whether he can take over your computer. If you give your permission, he takes complete control of your machine.
He can switch between the Start screen and the desktop, bring up the charms, go into Control Panel, run programs . . . the whole nine yards. You watch as your friend types and clicks, just as you would if you knew what the heck you were doing. Your friend solves the problem as you watch.
7. Either of you can break the connection at any time.
The thought of handing your machine over to somebody on an Internet connection probably gives you the willies. I’m not real keen on it either, but Microsoft has built some industrial-strength controls into Remote Assistance. Your guru friend must supply the password that you specify before he can connect to your computer. He can take control of your computer only if he requests it and you specifically allow it. And you can put a time limit on the invitation: If your friend doesn’t respond within an hour, say, the invitation is canceled.
Making the connection
When you’re ready to set up the connection for Remote Assistance, the following is what you need to do. (I’m writing this from the point of view of the Dummy requesting assistance from a guru. If you’re the guru in the interaction, you have to kind of stand on your head and read backward, but, hey, you’re the guru and no doubt you knew that already, huh?)
1. Make sure that your guru friend is ready.
Call him or shoot him an e-mail and make sure that he will have his PC on, connected to the Internet, and running Windows 8.1, 8, 7, Vista, XP, Windows Server 2003, Windows Server 2008, or Windows Server 2012. Also, make sure that he has his instant messenger program cranked up, will check e-mail frequently, or will wait for you to hand him a file or make one available on your network.
Make sure that you can contact your guru friend using your selected method: If you’re using e-mail, make sure that he’s in your address book and send him a test message to make sure that you have his e-mail address down pat; if you’re going to send a floppy disk by carrier pigeon, make sure that the pigeon knows the route and has had plenty of sleep.
2. Start your machine (the PC that your Remote Assistance friend, the guru, will take over) and make sure that it’s connected to the Internet.
Make sure you aren’t running any programs that you don’t want the guru to see. Yes, that includes the Sudoku with the lousy score.
3. Flip over to the Metro Start screen and type invite. On the right, choose Invite Someone to Connect to Your PC and Help You or Offer to Help Someone Else.
The Windows Remote Assistance dialog box appears, as shown in Figure 2-10.
4. Tap or click Invite Someone You Trust to Help You.
You don’t actually have to trust him but, well, you get the idea.
Remote Assistance responds with the dialog box shown in Figure 2-11.
Easy Connect is an advanced version of Remote Assistance. It works for some people, if they’re connecting with another person who’s running Windows 7 or Windows 8 or 8.1. Unfortunately, sometimes network routers get in the way. The big gain with Easy Connect is that you set it up once, and then you can reuse the same connection any time you like, without going through the invitation/password routine.
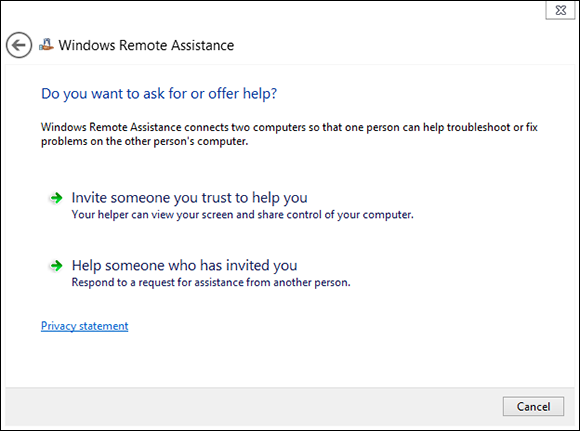
Figure 2-10: Windows Remote Assistance wants to know whether you’re giving or getting advice.
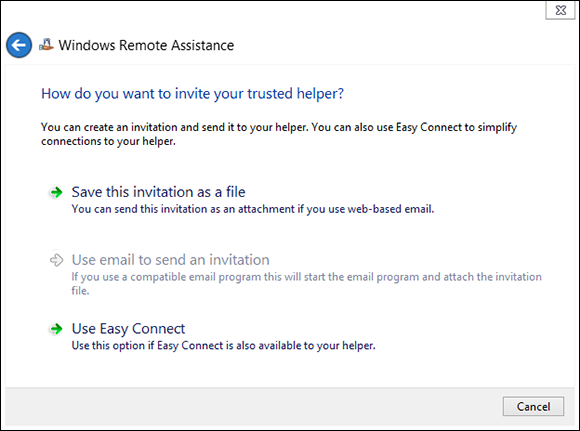
Figure 2-11: The surest way is to save the invitation as a file.
The method I describe in the following steps works whether your router likes it or not. If you want to try Easy Connect, by all means, choose that option in Figure 2-11 and see whether your guru can connect. If it works, it’s, uh, easy.
5. Choose Save This Invitation as a File.
Even if you’re going to e-mail the file, it’s easier to save the file first and then attach it to an e-mail message.
Remote Assistance opens the Save As dialog box and prompts you to save the file Invitation.msrcIncident. You can change the name, if you like, but it’s easier for your guru friend if you keep the filename extension msrcIncident.
6. Save the file in a convenient place.
Remote Assistance responds with an odd-looking dialog box, the Windows Remote Assistance control bar, as shown in Figure 2-12. It advises you to provide your helper (that’s your guru friend) with the invitation file and the automatically generated 12-character password.
Windows waits for your guru friend to contact you. You can continue to work, swear, play Minesweeper, or do whatever it takes to keep you sane until your friend can connect.
7. Send the invitation file to your guru friend via e-mail, in a shared SkyDrive folder, or a USB slipped into his hamburger at lunch.
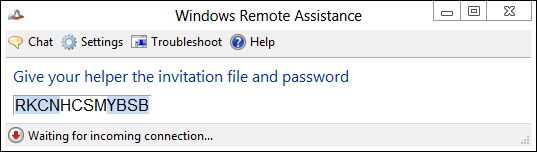
Figure 2-12: The Windows Remote Assistance control bar.
8. Tell your friend to double-click the invitation file to initiate the Remote Assistance session.
Your friend’s computer asks for the password that’s in your Windows Remote Assistance control bar. He types it in the indicated box on his computer and clicks OK.
Windows Remote Assistance then asks whether it’s okay to allow your guru friend to connect to your computer (see Figure 2-13).
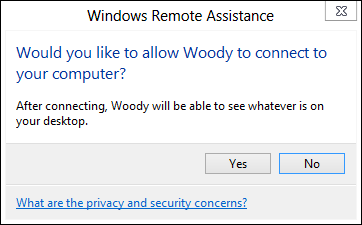
Figure 2-13: Remote Assistance requires your explicit permission.
9. Tap or click the Yes button.
Two things happen simultaneously:
• Your computer’s Remote Assistance bar shows that you’re connected, as shown in Figure 2-14.
• Your guru friend’s computer sets up a window that shows him everything on your computer, as shown in Figure 2-15.

Figure 2-14: Your computer gets this Remote Assistance bar.
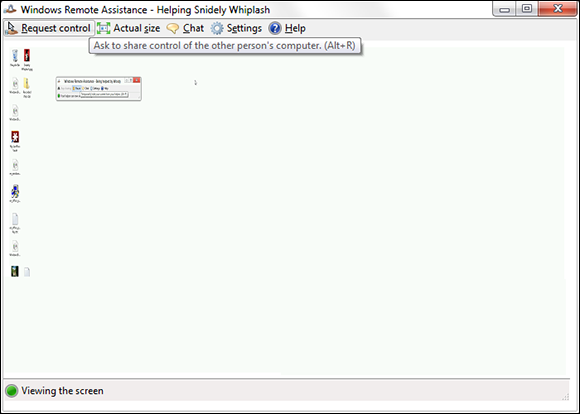
Figure 2-15: Your guru friend sees your entire desktop in a special Remote Assistance window.
If your guru friend wants to take control of your PC, he needs to click the Request Control icon on his Remote Assistance bar.
If he does that, your machine warns you that your guru friend is trying to take control, as shown in Figure 2-16.

Figure 2-16: Allow your guru friend to take over.
10. On your machine, tap or click Yes to allow your guru friend to take control of your PC.
Your guru friend can now control your computer, move the mouse, and type on the keyboard while you watch.
11. Anytime either of you wants to sever the connection, tap or click the Disconnect icon on the Remote Assistance bar.
In addition, you — the person who requested the session — can cancel the session at any time by pressing Esc.
After a Remote Assistance session is underway and you release control to your friend, your friend can do anything to your computer that you can do — anything at all, except change users. (If either logs off, the Remote Assistance connection is canceled.) Both of you have simultaneous control over the mouse pointer. If either or both of you type on the keyboard, the letters appear onscreen. You can stop your friend’s control of your computer by pressing Esc.
Your friend can rest assured that this is a one-way connection. He can take control of your computer, but you can’t do anything on his computer. He can see everything that you can see on your desktop, but you aren’t allowed to look at his desktop. Whoever said life was fair?
Limiting an invitation
Unless you change things, an invitation that you send requesting Remote Assistance expires after six hours. To change the expiration time, follow these steps:
1. Bring up the Control Panel (right-click the lower-left corner of the screen and choose Control Panel) and on the left, tap or click the System and Security link.
2. Under the System link, tap or click the Allow Remote Access link.
3. Make sure that the Remote tab displays, and in the Remote Assistance box, tap or click the Advanced button.
4. In the Invitations box, choose the amount of time you want invitations to remain open.
5. Tap or click OK twice, and then tap or click the X to close the Control Panel.
Troubleshooting Remote Assistance
Plenty of pitfalls lurk around the edges of Remote Assistance, but it mostly rates as an amazingly useful, powerful tool. The following are among the potential problems:
You and your guru friend have to be connected to the Internet or to the same local network. If you can’t connect to the Internet — especially if that’s the problem you’re trying to solve — you’re outta luck.
Both of you have to be running Windows 8.1, 8, 7, Vista, XP, Windows Server 2003, Windows Server 2008, Windows Server 2012, or another operating system that supports Remote Assistance. Sorry, your iPad doesn’t qualify.
You have to be able to give (or send) your guru friend a file so that he can use the invitation to connect to your PC.
If a firewall sits between either of you and the Internet, it may interfere with Remote Assistance. Windows Firewall (the firewall that’s included in Windows 8.1, 8, 7, and Windows Vista, as well as Windows XP Service Pack 2 and later) doesn’t intentionally block Remote Assistance, but other firewalls may. If you can’t get through, contact your system administrator or dig in to the firewall’s documentation and unblock Port 3389 — the communication channel that Remote Assistance uses.
You — the person with the PC that will be taken over — must initiate the Remote Assistance session. Your guru friend can’t tap you on the shoulder, electronically, and say something like this (with apologies to Dire Straits): “You an’ me, babe, how ’bout it?”
Getting Help Online
Once upon a time, Microsoft made it fairly easy to call for tech support or send e-mail to the tech support staff. Now, it’s almost impossible to find a living human being who will respond to your requests for help.
It just isn’t efficient. You may have the same question that a hundred other people have, and it doesn’t make sense to answer your one question, without making that answer available to anybody else who takes the time to look.
That’s one of the reasons why Microsoft encourages you to use the support forums. The other big reason? Lots of people join in on the forums to help. Many of them are MVPs — Microsoft Most Valued Professionals — who work without pay, just for the joy of knowing that they’re helping people. Microsoft gives the MVPs recognition and thanks, and some occasional benefits such as being able to talk with some people on the development teams. In exchange, the MVPs give generally good — sometimes excellent — support to anyone who asks.
My personal bias, of course, is to direct you to the free online help forum that a bunch of friends and I started almost 20 years ago. It's at www.windowssecrets.com/forums. I mention it earlier in this chapter.
If you want to keep up on what's new in the industry, by all means subscribe to my free early-morning email, TechBrief (www.infoworld.com/techbrief). It gives you everything you need to know about the latest industry changes, over your morning cup of coffee.
And for ongoing reams of Windows help and advice, subscribe to the weekly Windows Secrets Newsletter, www.windowssecrets.com/. I helped found that newsletter and contribute quite regularly.
Microsoft has a massive support complex known as the Microsoft Answers forum. If you specifically want help with Windows 8.1 questions, go to the Win8.1 section: www.answers.microsoft.com/en-us/windows/forum/windows_8_1.
Search for an answer before you post a question. Chances are very good that somebody else has already hit the same problem.