
SPECIAL SECTION: Garden Bridges

Whether incorporated as a decorative feature, a functional asset, or a combination, a garden bridge is an alluring landscape addition. Depending on the design, a small footbridge can be an easy project; but no matter how much work you put into it, a garden bridge usually has big visual impact. That’s because these structures call to us like no other element in a landscape. A bridge beckons to be crossed. Our curiosity naturally wants to know what’s on the other side, and the view from the bridge itself is a tempting draw. But that subtle magic aside, you’ll want a bridge that appeals to your sense of design so that you get the most bang for your lumberyard buck.
Next to the design, the secret to any garden bridge is placement. It might actually cross a barrier such as a waterway, or it may just be placed to connect a patch of grass with a pathway; regardless, the bridge embodies a sense of mystery and an invitation to explore further. The pages that follow describe several ways to use and place garden bridges—including how to create the appearance of an obstacle that needs bridging.
The style of the bridge you choose should relate to the style of your home, the landscape aesthetic you’ve chosen, and your own personal tastes. In designing the bridge, size it appropriately for the space you have and to keep it in proportion to other garden structures. But no matter what style or design you choose, this much is true—the garden bridge is one of the most unique and appealing structures you can add to your yard.
DESIGNING THE BRIDGE
The terrain and contours of your yard can dictate the characteristics and scale of your bridge. But rough standards exist: Typical garden bridge sizes range from 28 to 60" wide and from 4 to 12 feet long. If you are unrestricted by terrain, consider building a garden bridge that’s 36 to 48" wide and 8 to 12 feet long. A structure of this size has adequate mass for a strong presence but is still portable and inexpensive to construct. Peak deck elevation seldom exceeds 18 to 24".
The appearance of a bridge should be based on aesthetic preferences and the overall style of your house and yard. Most bridge designs conform to one of these styles: Oriental, Victorian, contemporary, or rustic.
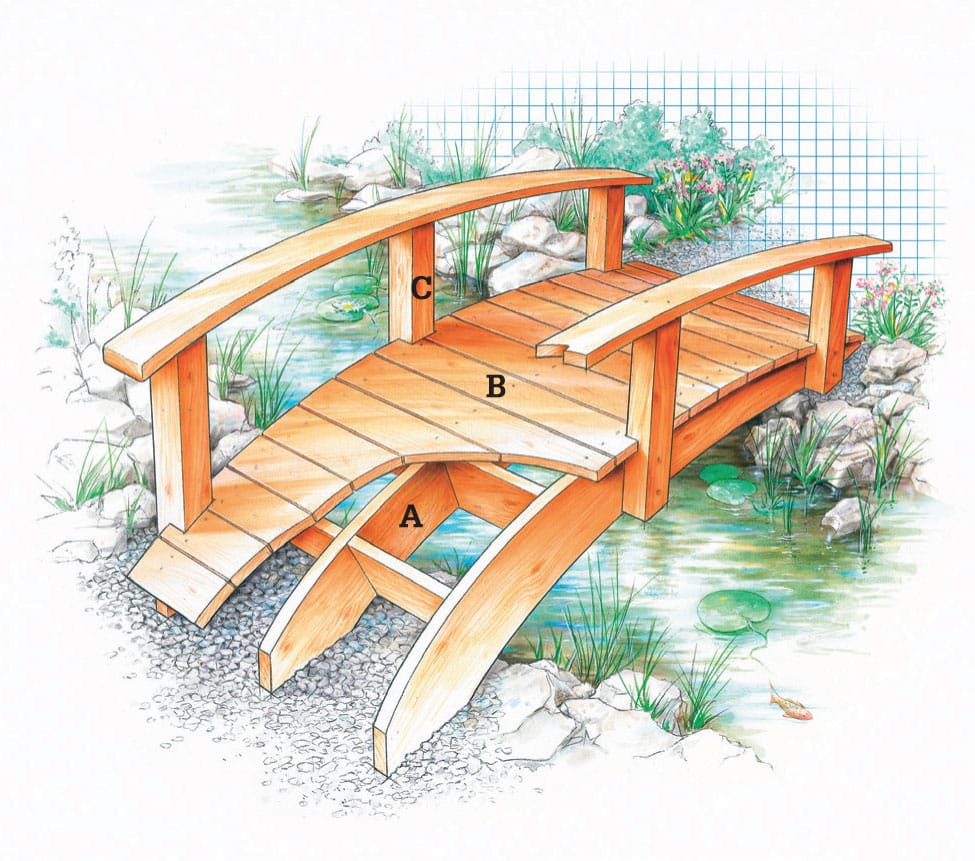
Garden bridges can be broken down into three structural systems: (A) The undercarriage—beams, spreaders, and sometimes deck-support ledges; (B) the decking; and (C) the posts and rails.
• Oriental is the most traditional bridge style, mainly because the basic form of the decorative garden bridge (called the “Edo” bridge) originated in ancient Japan. Bridges styled in this manner tend to be spare and elegant.
• Victorian bridges are fancy, with lavish fretwork and gingerbread. Often painted, they succeed best in country-style settings or where the home itself is from the Victorian era.
• Contemporary bridges tend to extol a prominent engineering feature. Metal and other non-wood materials are most likely to be used for contemporary garden bridges. Informal in appearance, they command attention by making a design statement.
• Rustic bridges are made from timbers, rough-sawn lumber and even tree trunks or limbs. They are of heavier proportions and do not feature sophisticated joinery or detailing.
Along with the design style, consider the type of bridge that suits your situation: flat, arched, low-arched, or angled-platform (see next page “Garden Bridge Types”).
Flat bridges are created to span two points of comparable elevation separated by a narrow area of lower elevation. These bridges are the easiest to design and build — they can be as simple as a pair of timbers topped with deck boards or 2 × 4s. A basic flat bridge will offer rustic charm when its function trumps its form.

Rustic garden bridges often are made with found logs and timbers that are native to the building site. Because these materials are not structurally rated, try to reserve them for decking and decorative functions and use pressure-treated lumber for the undercarriage.
Arched bridges have unique structural and aesthetic properties. They can span greater distances than other bridge types because of their ability to transfer load, and they exude an elegance and grace that set them apart from bridges with more geometric configurations. But these advantages come at a price: An arched bridge is considerably more difficult to design and build than flat or angled bridges. Full-size arched garden bridges typically feature handrails that echo the curve of the undercarriage.
Low-arched bridges are simpler, scaled-down versions of full-size arched bridges. They are subtle and can virtually disappear along a winding pathway or in a casual garden. Railings on this type of bridge are typically low and mostly decorative—you can omit them altogether if you prefer. The shallow incline and short length of a low-arched bridge enable you to cut each undercarriage support out of a single piece of dimensional lumber.
Angled-platform bridges can provide the lift of an arched bridge but with less demanding construction. On this bridge type, ramps beginning at each end meet in a central landing point, simplifying the undercarriage. The flat planes of the ramps and the landing make fastening deck boards and installing posts and rails easier.
Because of the flat landing, an angled-platform bridge is an excellent choice if you plan to spend time standing or sitting on the bridge deck, gazing across your landscape.
CHOOSING A SITE
A garden bridge can be sited practically anywhere you wish. You don’t need a stream, a gulch, or even a berm. In fact, few yards contain natural obstacles requiring bridging. Many garden bridges are simply plopped down in the middle of a flat lawn. Sheer decorative appeal is a fine reason to build a bridge. However, if you are a pragmatist who can’t abide the thought of a bridge that leads to nowhere or spans no obstacle, you can justify the presence of the bridge by creating a dry rock bed (sometimes called an arroyo), a planting bed, a landscape berm, or a drainage swale for it to cross.
Above all, a garden bridge is a decorative landscape feature. Its primary purpose is to beautify and create a visual focal point in your yard or garden. But a garden bridge also performs a function. To be effective and safe to cross, it must be sturdy and have a manageable incline. With a few exceptions, a bridge should be equipped with posts and grippable handrails. The access points to the bridge should be stable and well-drained and provide solid footing. The height of the decking should be no more than a couple of inches above the ground at the ends of the bridge.
A garden bridge is not intended to support vehicles. (A typical garden bridge can be picked up intact and moved fairly easily.) Bridges designed for vehicle traffic or to span a public waterway, culvert, or ditch are considered permanent structures. They must meet specific load, safety, and environmental impact standards. They require professional engineering and special permits. Building this type of bridge is not a do-it-yourself project.

When siting a garden bridge, the best results often come when the site is custom-landscaped for the bridge. This plain front yard was not a good candidate for a bridge until the dry creek “arroyo” was added.
BUILDING BRIDGES
Bridges are composed of three elements: the undercarriage, the decking, and a post-and-rail system. Because they are freestanding structures, garden bridges are not normally attached to piers, pilings, or footings.
The success of a garden bridge depends on the integrity of the undercarriage—the matrix of supports and spreaders that bear the decking and posts. Where possible, design your bridge so each support can be cut from a single piece of dimensional lumber.
To increase the maximum lift generated by a single board, graft the arched cutout from the bottom edge of the board onto the top edge.
The bigger and higher your bridge is, the more complex the geometry of the supports. If you want more than 1 foot of rise, make the undercarriage from multiple segments (see sidebar, below) or bent laminations. The large bridge in the photo shown here has three undercarriage support beams. Each beam is made from 10 segments glued and bolted together in a double layer. The joints between segments are staggered so they do not align.
If your bridge will be wider than 30", include a central support beam along with the outer beams. Single-layer beams are adequate for smaller bridges that have less rise. But if you are creating segmented beams, you should use double layers, with each layer functioning as a gusset for the opposing layer. Pressure-treated pine is the best wood to use for the undercarriage. The beams should be connected with spreaders to set the bridge width and prevent racking.
DECKING
Use 5/4 deck boards or 2× dimensional lumber for the bridge decking. On flat or angled-platform bridges you can attach 6"-wide decking, but for arched bridges 4"-wide stock is better. The curved tops of the arched bridge beams greatly reduce the amount of bearing surface for the decking, causing wider deck boards to rock.
In most cases, the deck boards should be screwed to—not nailed to the supports. Snap a chalkline first to align the screws. If you want to avoid exposed fasteners (or use wider decking on an arched bridge), hidden fasteners, such as stair angles, may be used.
WOOD DECKING
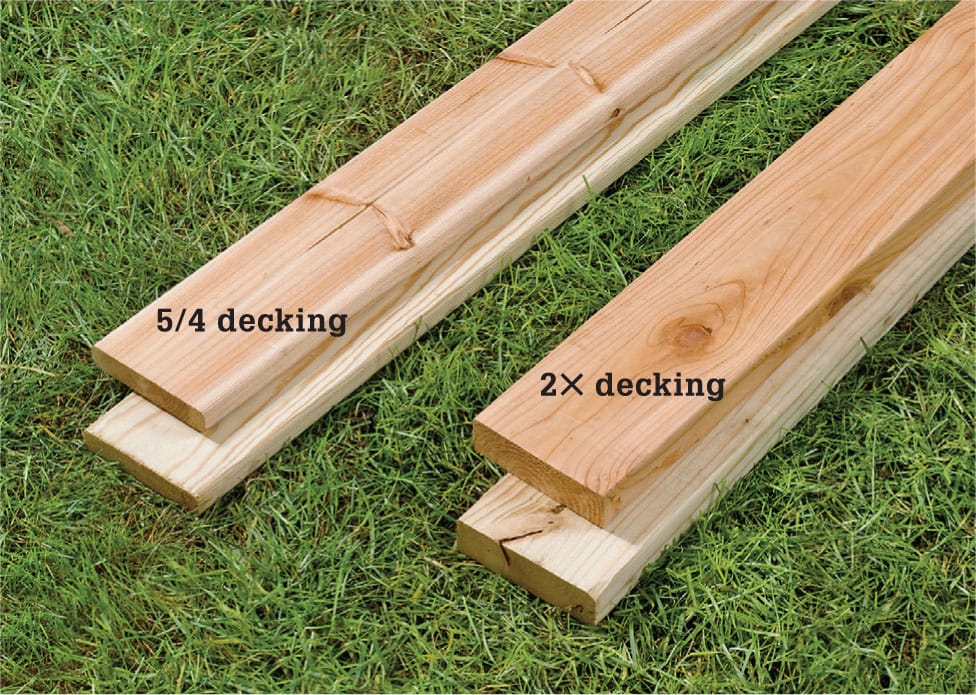
Both 2x and 5/4 lumber are suitable for use as decking. However, 5/4 will generally be of higher quality, and the radiused edges prevent splintering—an important consideration for bare feet or if you have young children.

If you hand-select each of your deck boards, look for pieces with vertical grain pattern (left in photo). They’ll be less inclined to cup and warp than flat-grain lumber (right), but the wood tends to be significantly heavier.
POSTS AND HANDRAILS
Posts and handrails are not always required, but they can enhance safety and appearance. If the bridge is more than 12" high or spans a dangerous or delicate obstacle, such as a creek or flowerbed, you should include railings. Ideally, railings should be grippable and about 36" above the decking. If you choose to include balusters in your railing system, make sure they conform to your local building codes.
Posts can be connected with lag screws, carriage bolts, or deck-post connectors (see sidebar, below).
Some low-arched bridges include railings that are only 12 to 24" above the bridge decking. Obviously, these are not intended as handrails. Their function is almost exclusively visual, relating to matters of scale, mass, balance, and ornamentation. If you incorporate low railings into your design, make them stand out visually or they could be a tripping hazard.
Examining various bridge designs reveals little consistency in how to orient the posts that support the handrails. In some cases, the posts are perpendicular to the ground; in others, they’re perpendicular to the deck boards. Use whichever method you find more visually appealing, unless your bridge deck rises at a steep incline. If your bridge has a slope greater than 1" per foot, install the posts perpendicular to the ground, not the bridge deck.
TIPS FOR BUILDING BRIDGES
Build as much of the bridge as possible in the workshop, then transport the parts to the installation site for assembly. Before you assemble the bridge, excavate and backfill the site as needed to make the contact points for the bridge ends as level as possible. It’s always a good idea to add a thick layer of compactable gravel at these points for drainage. Flat stones at each end of the site create stable landings for entering and exiting the structure. Pay attention to these transition areas, especially if the bridge is incorporated into a raised walkway or boardwalk. Transitions should be as seamless and level as possible.
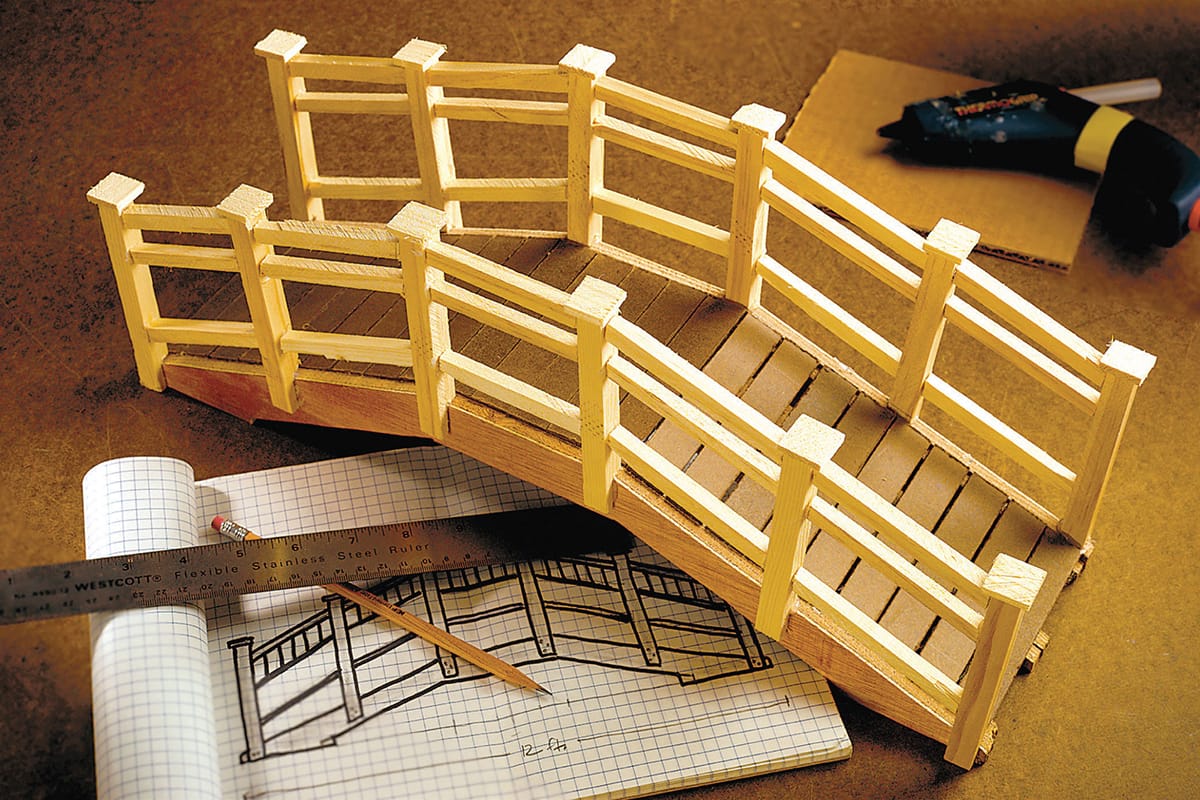
Building a scale model is a good idea when designing any construction or woodworking project. But when you're designing a bridge, a model is a virtual necessity to help you make decisions about proportion and scale.
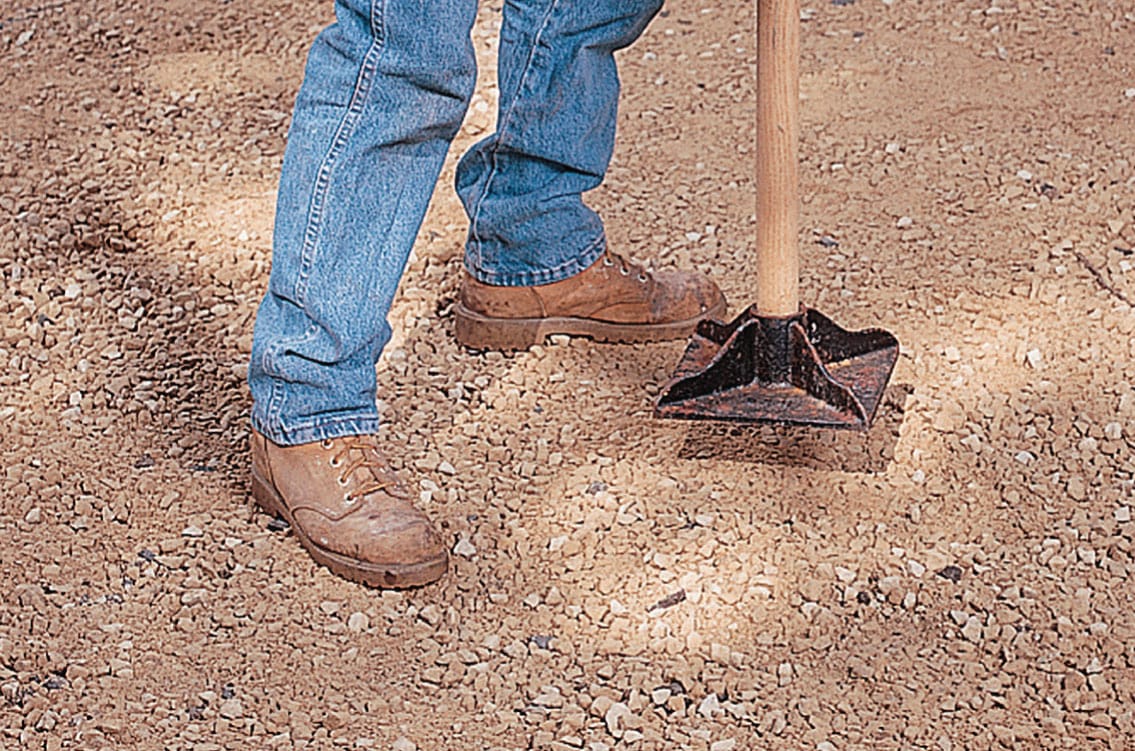
Prepare the site. The ends of the bridge should rest on flat, well-drained ground. Compactable gravel can provide both attributes.
 Simple Garden Bridge
An elegant garden bridge invites you into a landscape by suggesting you stop and spend some time there. Cross a peaceful pond, traverse an arroyo of striking natural stone, or move from one garden space to the next and explore. While a bridge is practical and functions as a way to get from point A to point B, it does so much more. It adds dimension, a sense of romanticism, and the feeling of escaping to somewhere special.
The bridge you see here can be supported with handrails and trellis panels. But left simple as pictured, we think the sleek, modern design blends well in the landscape, providing a focal point without overwhelming a space.
Unlike many landscape and garden bridges that are large, ornate, and designed to be the center of attention, this low cedar bridge has a certain refined elegance that is a direct result of its simple design.
Preparing Bridge Pieces
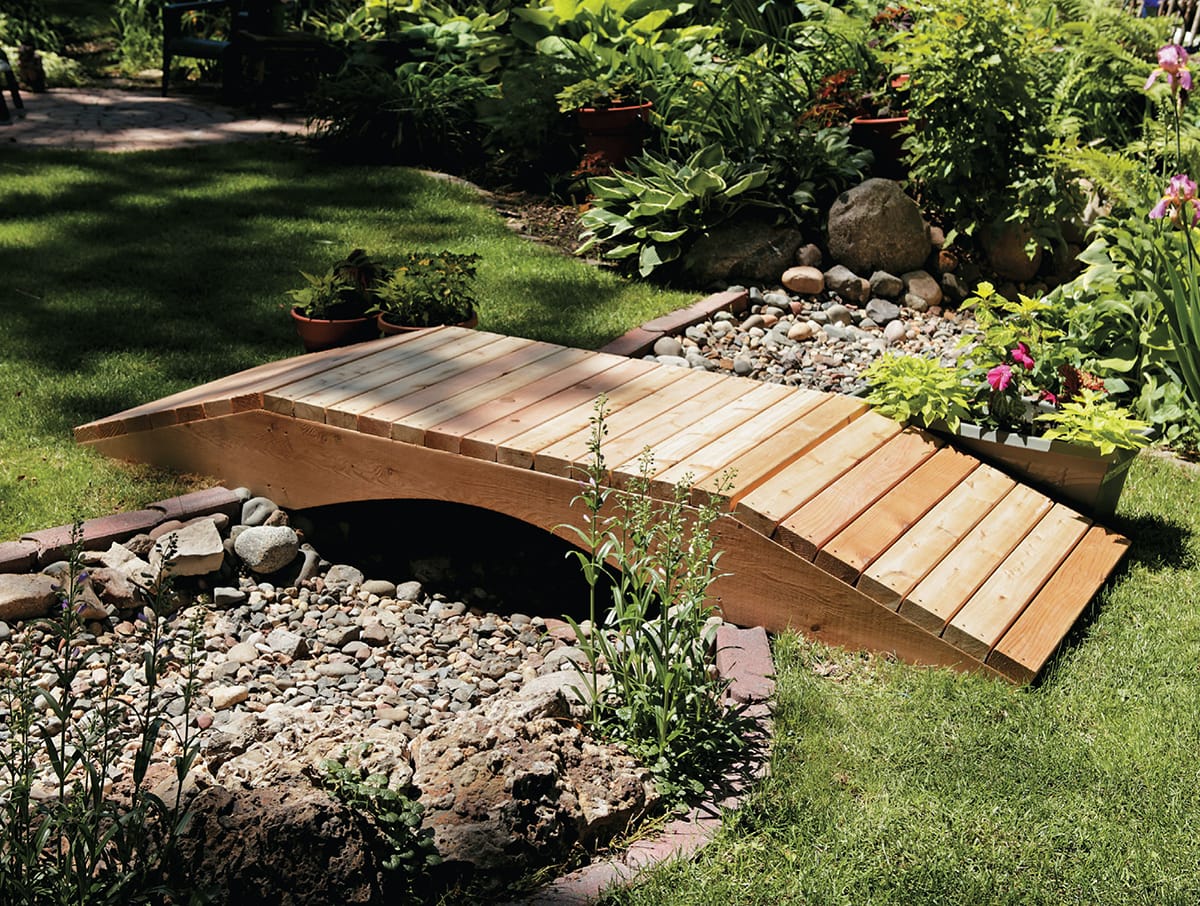
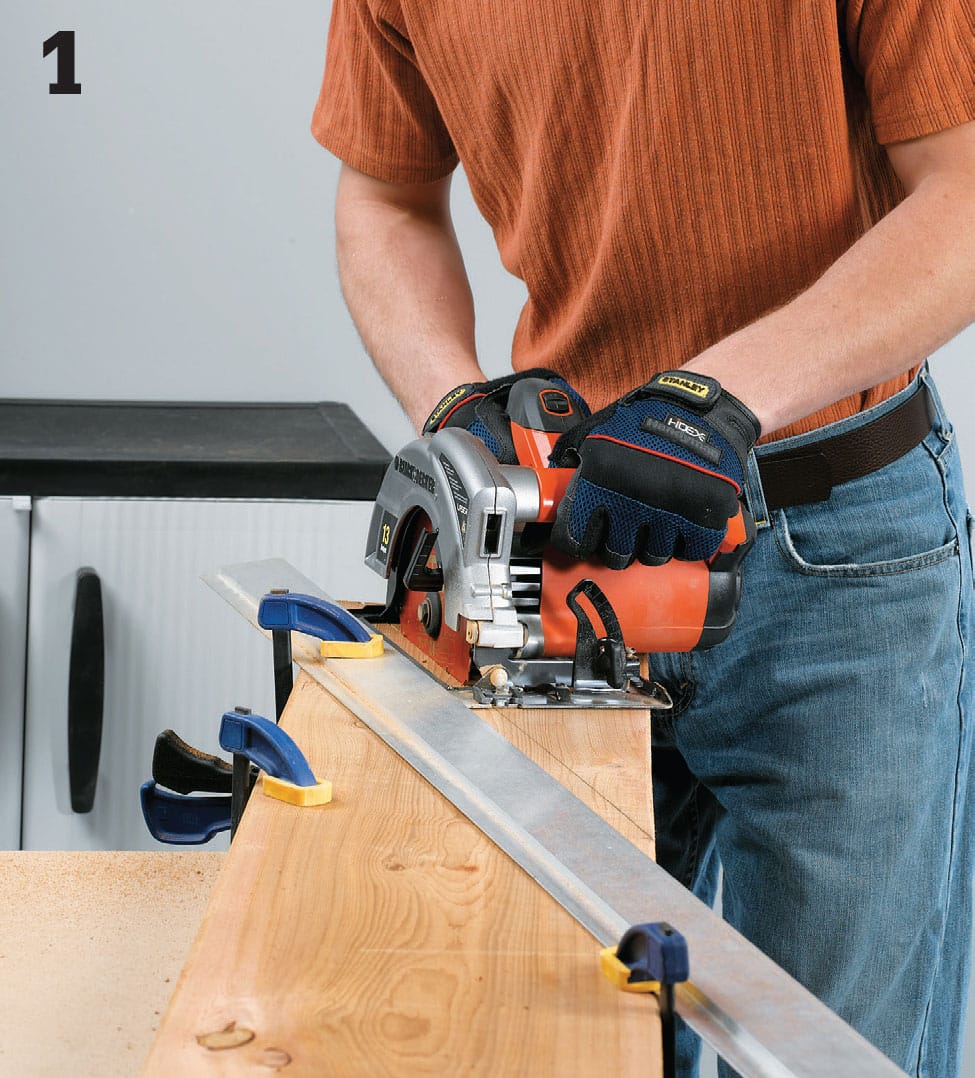
Study the cutting list carefully and take care when measuring for cuts. The building blocks of this bridge are: stringers, a base, and treads. Read these preliminary instructions carefully, then study the steps before you begin.
Stringers: This first step involves cutting the main structural pieces of the bridge. The stringers have arcs cut into their bottom edges, and the ends of stringers are cut at a slant to create a gradual tread incline. Before you cut stringers, carefully draw guidelines on the wood pieces:
• A centerline across the width of each stringer
• Two lines across the width of each stringer 24" to the left and right of the centerline
• Lines at the ends of each stringer, 1" up from one long edge
• Diagonal lines from these points to the top of each line to the left and right of the center
Base: Four straight boards called “stretchers” form the base that support the bridge. Before cutting these pieces, mark stretcher locations on the insides of the stringers, 11/2" from the top and bottom of the stringers. The outside edges of the stretchers should be 24" from the centers of the stringers so the inside edges are flush with the bottoms of the arcs. When working with the stretchers, the footboard may get quite heavy, so you will want to move the project to its final resting place and finish constructing the project there.
Treads: Cut the treads to size according to the cutting list. Once laid on the stringers, treads will be separated with 1/4" gaps. Before you install the treads, test-fit them to be sure they are the proper size.
Simple Garden Bridge
Use a circular saw to cut the ends of stringers along the diagonal lines, according to the markings described here.

Tack a nail on the centerline, 51/4" up from the same long edge. Also tack nails along the bottom edge, 201/2" to the left and right of the centerline.
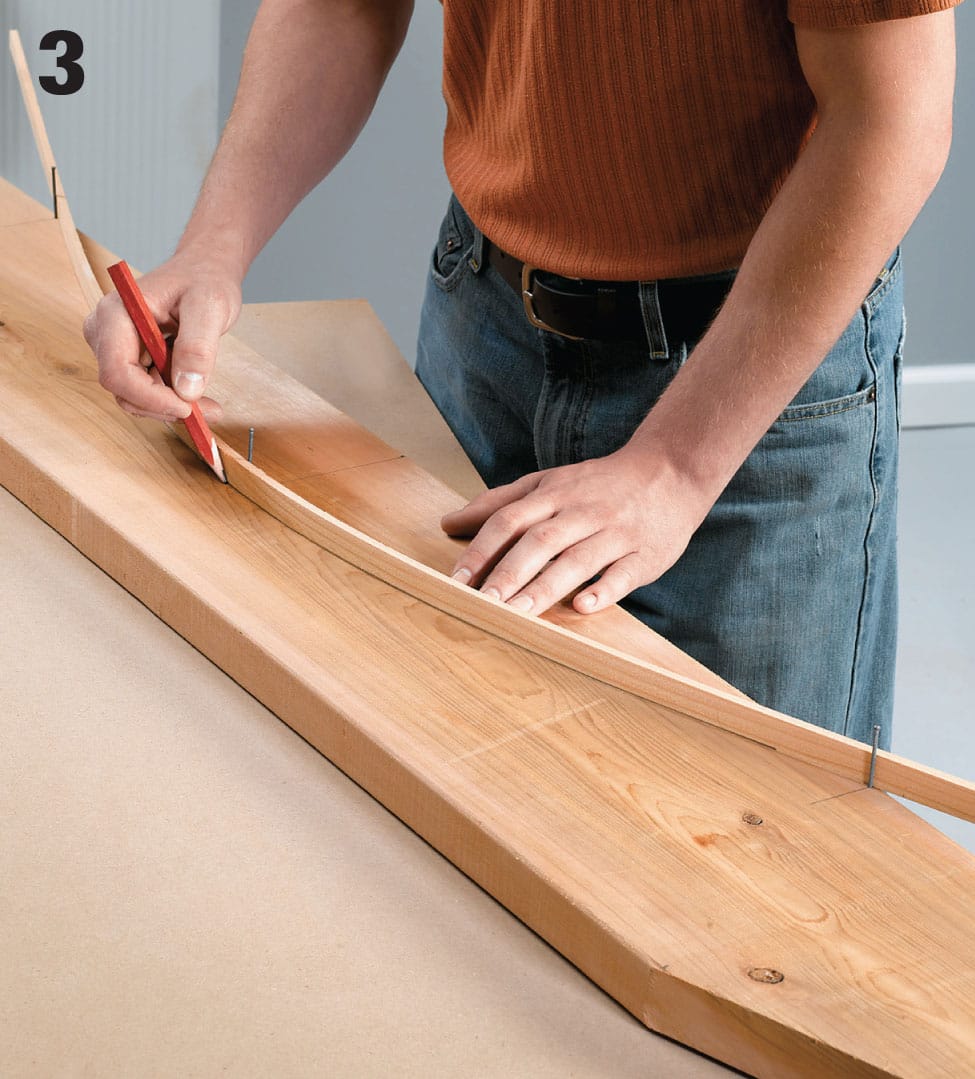
Make a marking guide from a thin, flexible strip of scrap wood or plastic, hook it over the center nail, and slide the ends under the outside nails to form a smooth curve. Trace along the guide with a pencil to make the arc cutting line.
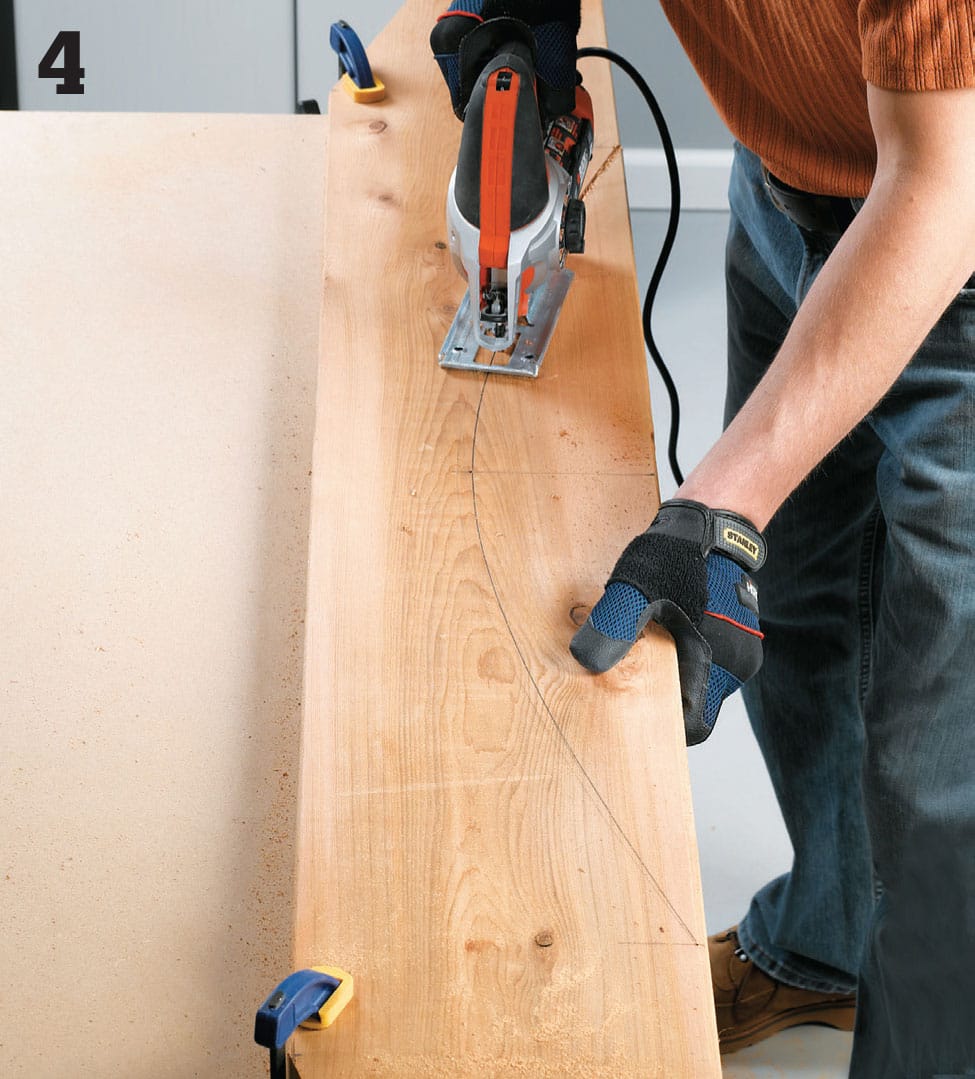
Use a jigsaw to make arched cut-outs in the bottoms of the 2 × 10 stringers after removing the nails and marking guide.
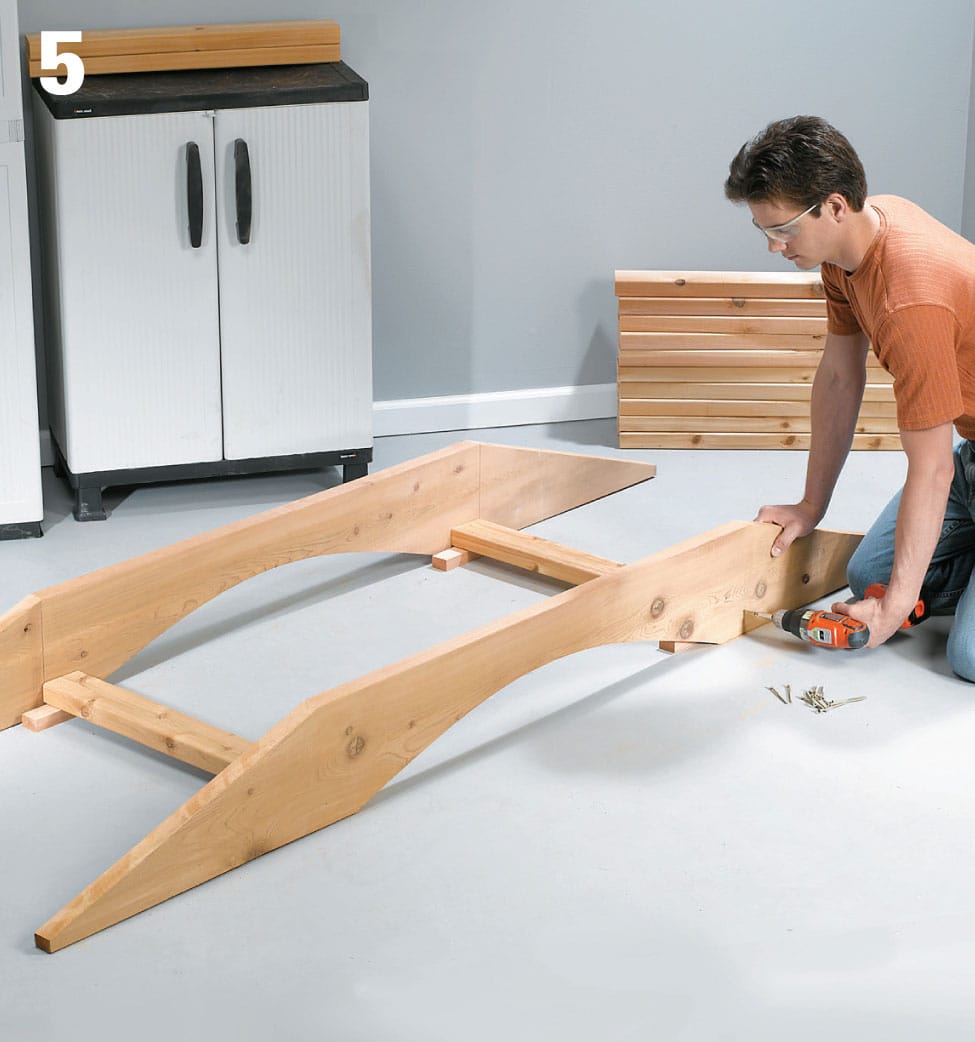
Assemble the base by preparing stringers and positioning the stretchers between them. Stand the stringers upright (curve at the bottom) and support the bottom stretchers with 11/2"-thick spacer blocks for correct spacing. Fasten the stretchers between the stringers with countersunk 3" deck screws, driven through the stringers and into the ends of the stretchers.
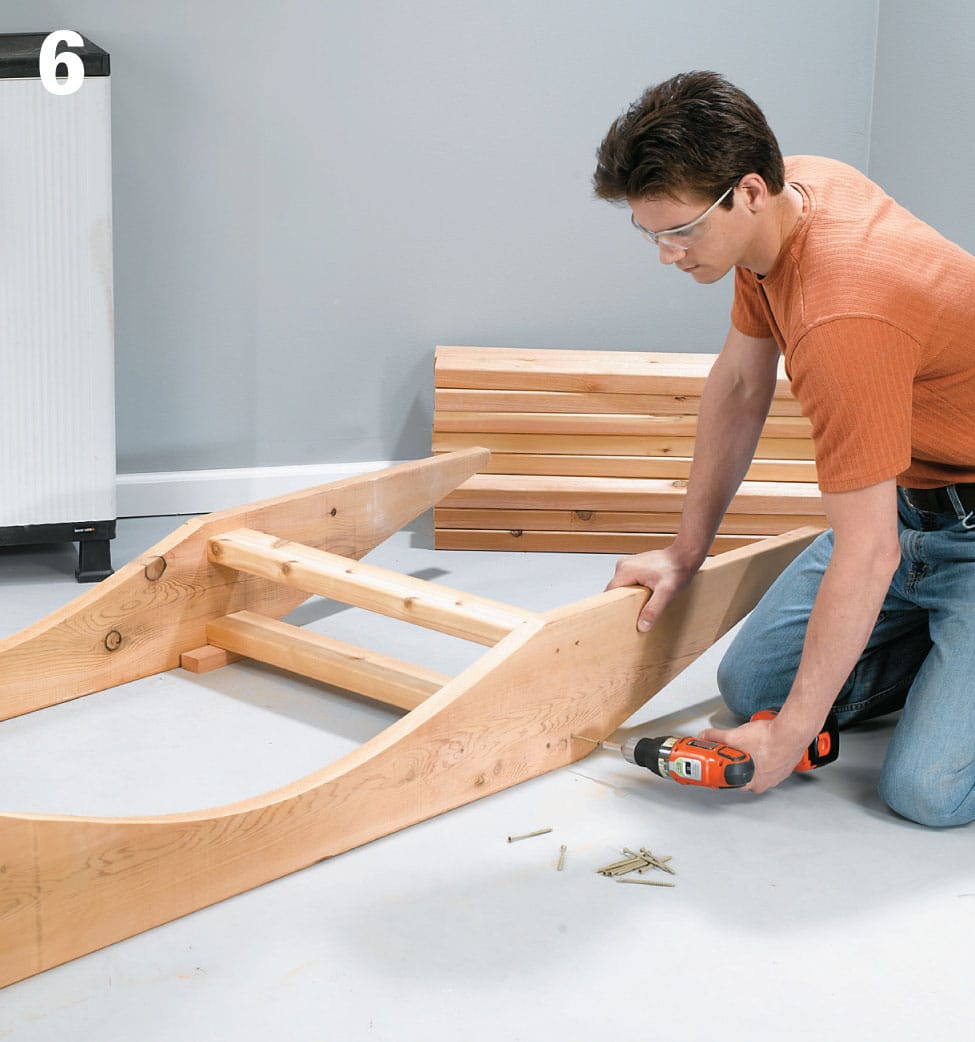
Turn the stringer assembly upside down and attach the top stretchers, securing them through the outside face of each stringer into the stretcher.
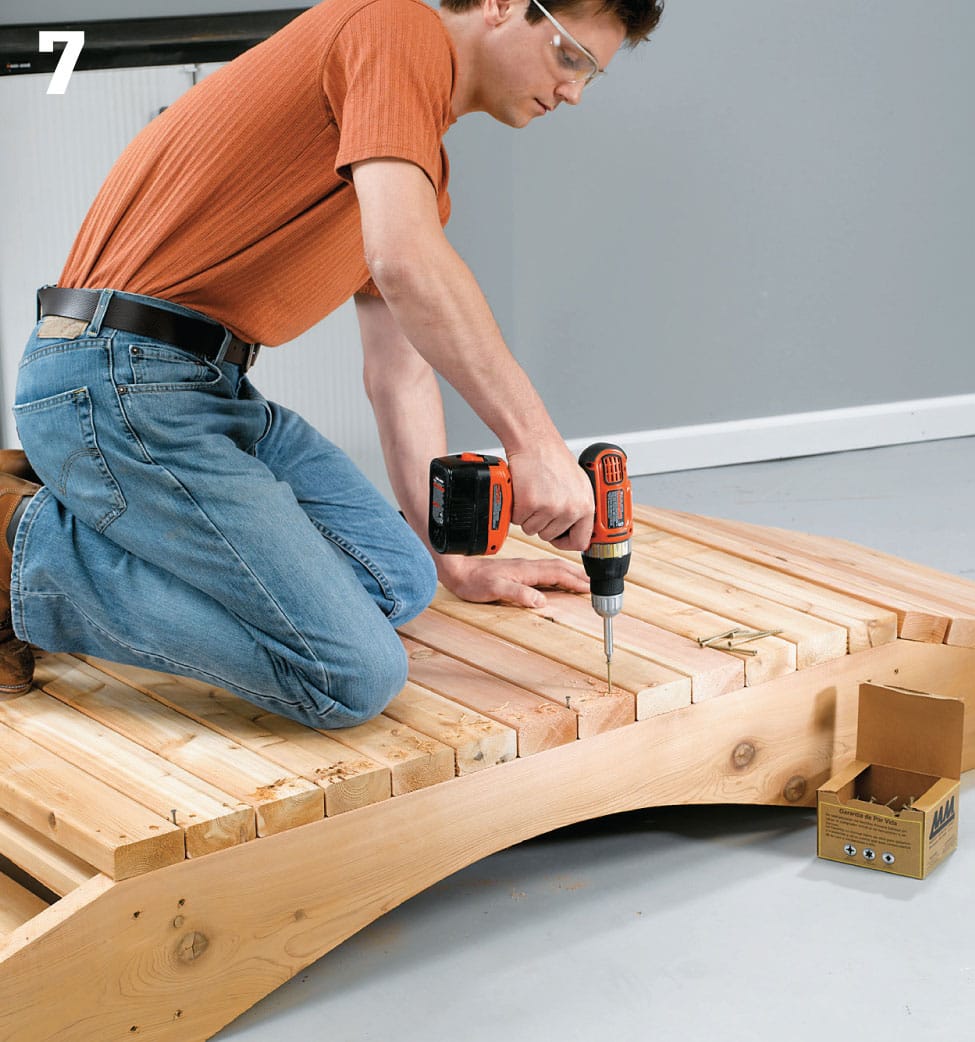
Attach the treads after test-fitting them. Leave a 1/4" gap between each tread. Secure them with 3"-long countersunk deck screws driven into the edge of the stringers.
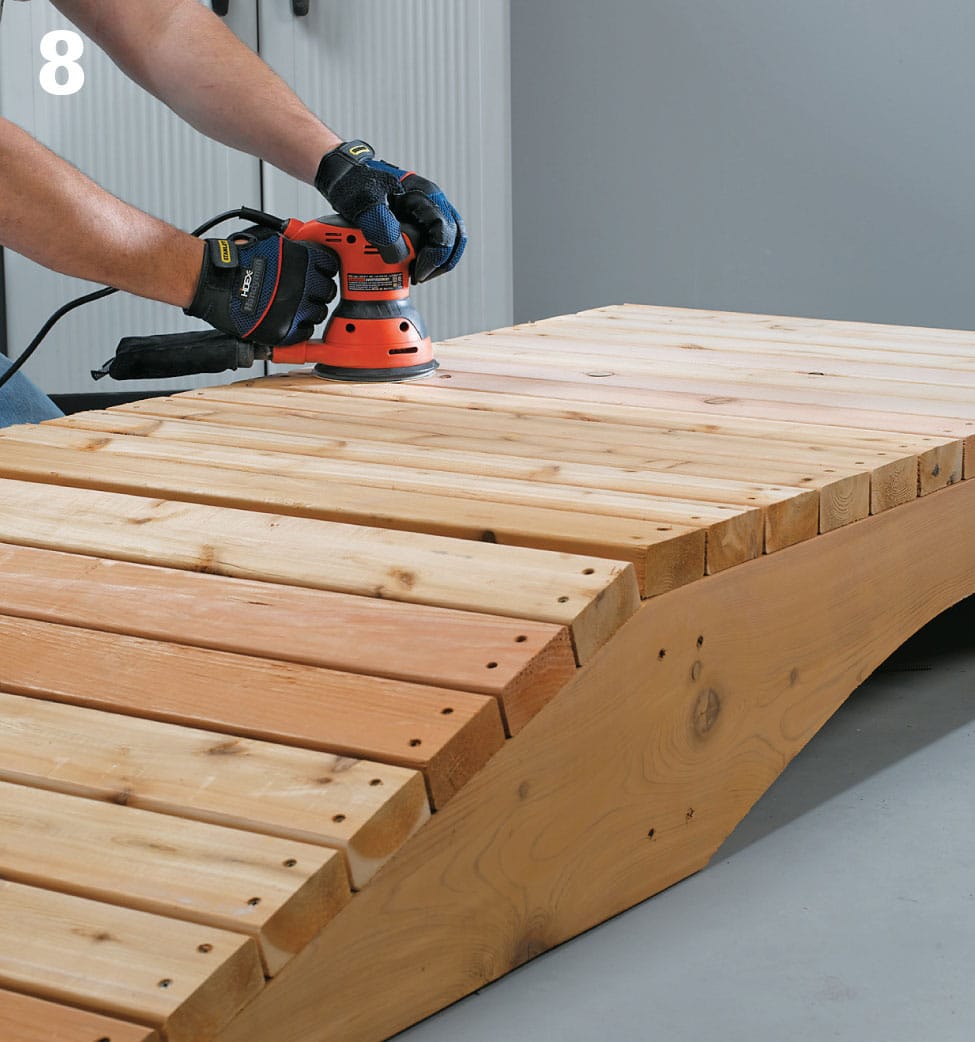
Sand all surfaces to smooth out any rough spots, and apply an exterior wood stain to protect the wood, if desired. You can leave the cedar untreated and it will turn gray, possibly blending even with other landscape features.