Mushroom & Potato Charlottes Topped with a Fried Egg
Three-Cheese Tarts with Pear & Fig Compote

APPLES AND CHICKEN SAUSAGE in cornmeal cake look so elegant. This mini meal resembles pineapple upside-down cake or apple tarte tatin, but the variety of tastes and textures make it something completely different. Everyone has a favorite apple, but I suggest using Granny Smith because of its firm texture, which is retained after it cooks. As alternatives, use Pink Lady or Honeycrisp apples. The recipe for Maple-Glazed Apples makes about twice as much as you need, so you can bathe the Cornmeal and Currant Cake in as much of it as you like. I also love to use the apples as a topping for waffles or oatmeal, on toast, mixed with yogurt, or even just as a yummy dessert.
1/3 cup (75 ml) pure maple syrup
1 tablespoon brandy
1/2 teaspoon cinnamon
1/8 teaspoon ground cloves
1/8 teaspoon freshly grated nutmeg
Pinch of kosher salt
8 large Granny Smith or other favorite tart apples, peeled, cored, and cut into 1/4-inch (6-mm) dice
FOR THE CORNMEAL AND CURRANT CAKE
1 cup (125 g) all-purpose flour
1/2 cup (80 g) yellow cornmeal
3 tablespoons sugar
2 teaspoons baking powder
1 teaspoon baking soda
1/8 teaspoon kosher salt
1/3 cup (50 g) dried currants
1 1/4 cups (300 ml) whole-milk yogurt
2 large eggs
1/2 cup (1 stick / 115 g) unsalted butter, melted and cooled
Nonstick cooking spray, for the pan
3 tablespoons unsalted butter, softened
1/4 cup (55 g) packed light brown sugar
12 ounces (340 g) fully cooked chicken apple sausage, cut into 1/4-inch (6-mm) dice
4 teaspoons maple sugar or brown sugar, plus more for serving
3/4 cup (180 ml) pure maple syrup, warmed, for serving
![]() This recipe can be assembled in the pan the night before, refrigerated, and then popped into the oven in the morning for a freshly baked, hassle-free breakfast.
This recipe can be assembled in the pan the night before, refrigerated, and then popped into the oven in the morning for a freshly baked, hassle-free breakfast.
> MAKE THE MAPLE-GLAZED APPLES
In a 12-quart (12-L) stockpot, combine 2 cups (480 ml) of water, the maple syrup, brandy, cinnamon, cloves, nutmeg, and salt, and bring to a boil. Boil for 3 minutes, then add the apples. Lower the heat to medium and simmer, stirring occasionally, until thickened, about 30 minutes. The mixture should be chunky and the apples should hold their shape. Transfer to a medium bowl and let cool slightly, about 20 minutes.
> MAKE THE CORNMEAL AND CURRANT CAKE
In a large bowl, whisk together the flour, cornmeal, sugar, baking powder, baking soda, salt, and currants.
In a separate bowl, stir together the yogurt and eggs. Add the yogurt mixture and the cooled, melted butter to the dry ingredients and mix until just incorporated.
Preheat the oven to 350°F (175°C). Spray a 12-well classic cupcake pan generously with nonstick cooking spray.
In a small bowl, mix the butter with the brown sugar. Spread the butter-sugar mixture evenly in the bottom of each well of the pan. Place 1 tablespoon of the glazed apples on top, then add a layer of sausage, distributing it evenly among the 12 wells. Mound 1/4 cup (60 ml) of the cornmeal batter in each well and sprinkle with 1/4 teaspoon of the maple sugar. Bake until cooked through and golden brown around the edges, 20 to 25 minutes.
Let the cakes cool in the pan for 10 minutes, then loosen the sides of each cake with a table knife and invert the cakes onto a sheet pan. Some of the apples may stick to the pan, but they are easily removed with a small spoon. Plate the cakes individually, drizzled with warm maple syrup and garnished with more maple sugar.
Store the cakes in an airtight container in the refrigerator for up to 5 days. Reheat, wrapped in tin foil, for 15 minutes at 350°F (175°C).
VARIATION For a muffinlike dish, mix 3/4 cup (170 g) of the maple-glazed apples and sausage into the batter. Pour the batter into each well of the pan, then top with 1/4 teaspoon of maple sugar. Bake at 350°F (175°C) until golden brown and a toothpick inserted in the top comes out with a few moist crumbs, 25 to 30 minutes. Serve with a dollop of maple butter: 1/4 cup (1/2 stick / 60 g) salted butter, softened, beaten with 1/4 cup (60 ml) of maple syrup.

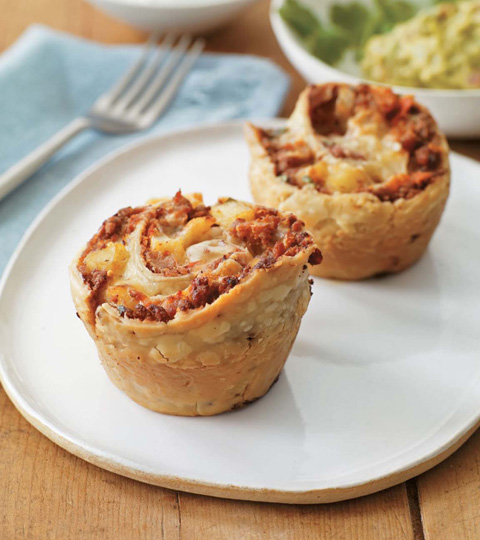
MY SAVORY BREAKFAST ROLLS evolved from a childhood love of making cinnamon rolls. My mother had her own special recipe for sweet rolls, and she almost always included me in the process. She’d let me help roll the yeast dough, then sprinkle it with cinnamon and sugar. I never have time to make yeast dough now, but I like how well savory ingredients rolled into dough works with the cupcake pan. At my home, this savory roll recipe is a child-friendly adventure in baking, especially since it calls for several store-bought items. Present the ingredients in individual bowls—or in the wells of an extra cupcake pan—to make layering fun and easy for your children.
1 pound (455 g) spicy pork sausage, or turkey sausage, casings removed
1 tablespoon extra-virgin olive oil
1 pound (455 g) frozen hash browns
1/2 teaspoon chili powder
Pinch each of kosher salt and freshly ground black pepper
1 (15-ounce / 430-g) package ready-made pie dough (2 rounds), at room temperature
1/4 cup (20 g) fresh cilantro leaves, chopped, or 1/4 cup (60 ml) cilantro from a tube
1 cup (225 g) refried beans
2/3 cup (150 ml) ready-made salsa
1 cup (225 g) grated pepper Jack cheese
Nonstick cooking spray, for the pan
VARIATIONS Filling and rolling up breakfast rolls is a great project for children. You and the children can try these filling variations or make your own signature rolls.
• SAGE BREAKFAST SAUSAGE, sautéed onion with diced apples, and cheddar
• CRISPY BACON, sautéed mushrooms and peppers, tomato sauce, and provolone
• THIN SLICES OF SERRANO HAM, pesto, mozzarella, and sun-dried tomatoes
• NUTELLA with a layer of your favorite granola, some raisins, and a sprinkling of cinnamon-sugar
![]() These rolls should not be prepared the night before and baked the next day—the liquid in the salsa will prevent the pie dough from baking correctly. They can, however, be baked the night before and reheated, wrapped in tin foil, for 15 minutes at 350°F (175°C).
These rolls should not be prepared the night before and baked the next day—the liquid in the salsa will prevent the pie dough from baking correctly. They can, however, be baked the night before and reheated, wrapped in tin foil, for 15 minutes at 350°F (175°C).
Cook the sausage in a 12-inch (30-cm) nonstick skillet over medium heat, using a wooden spoon to break up the sausage, until it is well browned and crumbled, about 15 minutes. Drain the meat in a fine-mesh colander over a bowl, continuing to break up the sausage in the colander to release additional grease. Transfer to a medium bowl. Wipe the skillet out with a paper towel when cool enough to handle.
Add the oil to the skillet, then add the hash browns in an even layer. Press down firmly with a heatproof spatula, then let the potatoes cook undisturbed over medium heat until they begin to brown on the bottom, about 8 minutes. Sprinkle the top of the hash browns with the chili powder and salt and pepper. Cook for about 15 minutes longer, using the spatula to occasionally scrape the bottom of the pan and turn over the hash browns, until they are browned on all sides. Transfer to another medium bowl.
Preheat the oven to 350°F (175°C). Spray a 12-well classic cupcake pan with nonstick cooking spray.
Unroll one of the rounds of pie dough onto a cutting board large enough to fit the entire round. Leaving a 1/2-inch (1-cm) border, sprinkle the dough with 2 tablespoons fresh cilantro, or using a table knife, evenly spread the cilantro paste onto the dough. Top with half of each of the following: refried beans, browned sausage, salsa, hash browns, and grated cheese.
Roll the pie dough into a log, starting on one side and rolling tightly to keep all the filling inside. With a serrated knife, gently slice the log into six 2-inch-thick (5-cm) pieces, making sure not to lose any of the filling as you cut.
Arrange the pieces of filled dough, cut-sides up, in the wells of the pan and press down gently to fill each hole. Repeat the process with the second round of dough and remaining ingredients.
Bake until cooked through and golden brown around the edges, 35 to 45 minutes. Let the rolls cool in the pan for 5 minutes, then loosen the sides of each roll with a table knife and pop them out of the pan. These breakfast rolls can be eaten out of hand, plated with a side of guacamole, sour cream, and additional salsa, or served as a brunch alongside your favorite morning eggs and sliced fruit or a yogurt parfait. My children enjoy them as a meal with a side of beans, guacamole, and a salad of fresh corn, tomatoes, and cucumbers.
Store the rolls in an airtight container in the refrigerator for up to 5 days. Reheat, wrapped in tin foil, for 15 minutes at 350°F (175°C).

LEGEND CLAIMS these traditional baked puddings were named for Queen Charlotte, an eighteenth-century British ruler famous for her love of apples. I love apple charlottes, too, but using savory ingredients instead of sweet is a fun way to update the traditional version. Whichever flavors you choose, it’s always a surprise to see the finished creations when they come out of the oven. In this savory rendition, I used fresh shiitake, oyster, and baby bello mushrooms, but a mixture of your favorites would work equally well.
FOR THE MUSHROOM AND POTATO HASH
3 tablespoons unsalted butter
2 leeks, washed, light green and white parts thinly sliced
2 medium russet potatoes, peeled and cut into 1/4-inch (6-mm) dice
14 ounces (400 g) mixed fresh mushrooms, such as portobello, shiitake, morel, porcini, oyster, baby bello, or button, roughly chopped
2 tablespoons snipped fresh Italian parsley or parsley from a tube
1 tablespoon snipped fresh tarragon
1/4 teaspoon kosher salt
1/4 teaspoon freshly ground black pepper
1 1/2 cups (360 ml) whole milk
3 large eggs, lightly beaten
1/2 cup (1 stick / 115 g) salted butter, softened
15 thin slices white bread, such as Pepperidge Farm’s Very Thin White Bread
Nonstick cooking spray, for the pan
3/4 teaspoon kosher salt
1 small shallot, chopped
1 large clove garlic, peeled, or 1 tablespoon garlic from a tube
2 tablespoons chopped fresh flat-leaf parsley
5 fresh basil leaves
1 tablespoon fresh thyme leaves
2 tablespoons unsalted butter
1 1/2 tablespoons all-purpose flour
1 cup (240 ml) whole milk
1 cup (240 ml) half-and-half
1 bay leaf
Pinch of white pepper
1 tablespoon dry sherry
1 teaspoon Worcestershire sauce
1/2 cup (60 g) grated cheddar
FOR THE PRESENTATION
12 eggs, cooked sunny-side up
![]() These charlottes should not be prepared the night before and baked the next day; the bread will get soggy. The mushroom and potato hash, however, can be prepared the night before, refrigerated, and used in the assembly the next day.
These charlottes should not be prepared the night before and baked the next day; the bread will get soggy. The mushroom and potato hash, however, can be prepared the night before, refrigerated, and used in the assembly the next day.
> MAKE THE MUSHROOM AND POTATO HASH
In a large skillet, melt 2 tablespoons of the butter over medium heat; add the leeks and cook until wilted, about 2 minutes. Add the potatoes and cook until tender, using a metal spatula to turn them over when they turn golden brown, about 30 minutes. Transfer to a large bowl.
Wipe out the skillet and melt the remaining 1 tablespoon of butter over medium heat. Add the mushrooms and cook until tender, stirring occasionally, about 20 minutes. Remove from the heat and stir in the parsley, tarragon, salt, and pepper. Mix well to combine. Add half of the mushroom mixture to the cooled potato mixture; reserve the remaining mushrooms in the skillet. Stir the milk and eggs into the mushroom and potato mixture in the bowl.
> ASSEMBLE AND BAKE THE CHARLOTTES
Preheat the oven to 350°F (175°C). Spray a 12-well classic cupcake pan with nonstick cooking spray.
Butter the bread slices on one side with the salted butter, using the entire stick. Cut 3 of the slices into quarters and place one quarter, buttered side down, in each well. Cut the 12 remaining slices in half lengthwise.
Line the sides of each well with 2 halves of bread in cross formation to form a shell. Tuck in the bread to fill the gaps between the bottom and sides of the wells. There may be small spaces where the pan shows through and the edges of the bread may peek over the top of the pan.
Divide the hash evenly among the wells. Place one of the reserved mushrooms on top of each charlotte as a garnish. Bake until cooked through and golden brown on the edges, about 25 minutes.
In the bowl of a small food processor, combine the salt, shallot, garlic, parsley, basil, and thyme; pulse until coarse. Set aside.
In a medium saucepan, melt the butter over medium heat, then add the flour and whisk until a thick paste forms, about 2 minutes. Add the milk, half-and-half, and bay leaf and continue whisking until the sauce thickens, about 10 minutes. Stir in the reserved shallot and herb mixture, white pepper, sherry, Worcestershire, and cheese, whisking until smooth. Remove and discard the bay leaf. Cover and keep warm.
Let the charlottes cool in the pan for 5 to 10 minutes, then loosen the sides of each charlotte with a table knife and insert the tines of a fork between the pan and each charlotte to lift it out. Gorgeous! Just before serving, fry the eggs and reheat the reserved mushrooms; set the mushrooms aside in a serving dish. Serve the charlottes individually, with Mornay sauce spooned over each. Top each savory bite with a fried egg and serve the mushrooms alongside.

I’VE ADDED SAVORY NOTES to these puddings by incorporating vegetables—onions, asparagus, and mushrooms—instead of fruit. One thing I love about creating savory meals in a cupcake pan is it offers you a beginning and end to the meal in one perfect bundle. At that last bite, you’ll be asking yourself when you can have another.
1 tablespoon unsalted butter
1 small onion, finely chopped
1 1/4 cups (125 g) fresh mushrooms, any type, chopped into medium pieces
1/2 bunch thin asparagus, ends trimmed, sliced crosswise into 1/2-inch (1-cm) pieces
1 teaspoon chopped fresh oregano
2 teaspoons fresh thyme leaves, or 3/4 teaspoon dried thyme, crumbled
1/2 teaspoon kosher salt
1/4 teaspoon freshly ground black pepper
1/4 cup (1/2 stick / 60 g) salted butter
12 thin slices white bread, such as Pepperidge Farm’s Very Thin White Bread
1/2 cup (50 g) grated Parmesan
2 cups (225 g) mixed grated cheese, such as any combination of provolone, Swiss, Jack, Parmesan, or Gouda
4 large eggs, beaten
1 cup (240 ml) half-and-half or whole milk
3 tablespoons snipped chives
Preheat the oven to 350°F (175°C). In a 10-inch (25-cm) sauté pan, melt the butter over low heat. Add the onion and mushrooms and sauté until the onions are softened and moisture has been released, about 10 minutes. Add the asparagus and sauté until bright green, about 3 minutes more. Stir in the oregano, thyme, salt, and pepper; turn off the heat.
Butter each of the bread slices on one side with the salted butter, using the entire 1/2 stick. Sprinkle the grated Parmesan onto the slices and gently press the cheese so it sticks to the butter. Line the wells of a 12-well classic cupcake pan with the slices of bread, buttered side down. Firmly press the bread into the wells and tuck in any edges that still poke up, so that when you fill the wells with the egg mixture, all of the bread will be soaked.
Top the bread in each well with 1 heaping tablespoon of the mixed cheese. Evenly distribute the vegetable mixture among the wells, and then add another heaping tablespoon of cheese. Whisk the half-and-half into the beaten eggs, then pour about 1/4 cup (60 ml) of the egg mixture into each well, pushing the bread down a bit as you go to make room. Sprinkle the tops of the charlottes with the chives.
Bake until puffed on the top and golden brown around the edges, 25 to 30 minutes.
Let the charlottes cool in the pan for 5 to 10 minutes, then loosen the sides of each charlotte with a table knife and insert the tines of a fork between the pan and each charlotte to lift it out. The bottoms will be soft like pudding and the tops will be golden and crispy.

THE GENIUS OF THESE MINI MEALS is in their simplicity. The classic French toast flavor survives, but the cupcake pan offers a twist: toasted bread on top with a custard center and caramel base. But that’s just the beginning! There are so many flavor options: Use cinnamon-raisin or whole wheat bread, or top the toasters with fresh fruit or another delicious topping, such as hazelnut-chocolate spread or flavored cream cheese. I like to prepare these toasters the night before and refrigerate them so my husband can toss them in the oven come morning, just in time for the children’s appearance at the breakfast table.
Nonstick cooking spray, for the pan
1 cup (220 g) packed light brown sugar
6 tablespoons (3/4 stick / 90 g) salted butter
1/2 teaspoon cinnamon, plus extra for dusting
9 thin slices white, wheat, or cinnamon-raisin bread, such as Pepperidge Farm’s Very Thin Bread
8 large eggs
1 1/2 cups (360 ml) whole milk
2 teaspoons pure vanilla extract
VARIATIONS Top the toasters with maple syrup or smother them with hazelnut-chocolate spread. Better yet, add these goodies to the layers before you bake! Or top the toasters with sliced bananas sautéed in butter until browned and omit the caramel sauce topping.
Preheat the oven to 325°F (165°C) if baking immediately. Spray a 12-well classic cupcake pan generously with nonstick cooking spray.
In a small saucepan, combine the brown sugar, 3 tablespoons of the butter, and the cinnamon. Cook over medium heat, stirring occasionally, until the mixture reaches a caramel-like consistency, about 8 minutes. Pour 1 tablespoon of the caramel sauce into each well of the prepared pan. Reserve the remaining caramel.
Butter the bread on one side only with the remaining 3 tablespoons of butter. Cut each slice of bread into quarters.
In a medium bowl, beat the eggs and milk with the vanilla. Working in batches, soak the bread in the egg and milk mixture until soft, making sure it is fully soaked but not to the point of falling apart. Layer 3 pieces of bread on top of the caramel in each well. Using a large spoon, evenly fill each well with the egg mixture remaining in the bowl.
Bake until golden brown, 35 minutes. Loosen the sides of each toaster with a table knife and pop them out of the pan. Place them on serving plates and drizzle about 1 tablespoon of the remaining caramel sauce on top, then dust with the cinnamon.
Store the French toasters in an airtight container in the refrigerator for up to 5 days. Reheat, wrapped in tin foil, for 15 minutes at 350°F (175°C).

THE MIXTURE OF FLAVORS in this breakfast—peppers, zucchini, mushrooms, potatoes, and basil—gives it a truly Spanish flair. While many Americans think of flatbread when they hear “tortilla,” in Spain, the word also refers to a potato-based omelet. My version, designed for the cupcake pan, is equally as delicious as the original, with the Parmesan forming a flavorful crusty topping. Olé!
Nonstick cooking spray, for the pan
6 frozen hash brown potato patties, from a 16-ounce (455-g) package
6 large eggs
1/4 cup (60 ml) ready-made pesto
Freshly ground black pepper
1 cup (100 g) button mushrooms, finely chopped
1 (6-ounce / 170-g) jar roasted red peppers, finely chopped, or 1 small red bell pepper, finely chopped and sautéed to soften
1 medium zucchini, cut into 1/4-inch (6-mm) dice
6 ounces (170 g) fontina, cut into 1/4-inch (6-mm) dice
10 fresh basil leaves, cut into ribbons
1 small bunch fresh chives, snipped into 1/8-inch (3-mm) pieces
3/4 cup (75 g) grated Parmesan
VARIATION For a beautiful presentation, serve each tortilla on top of creamy tomato sauce with a crostini on the side. To prepare the crostini, toast or grill 12 slices of Italian bread, rub with fresh garlic, drizzle with olive oil, and sprinkle with coarse salt.
![]() These tortillas can be assembled the night before, refrigerated, and baked the next day.
These tortillas can be assembled the night before, refrigerated, and baked the next day.
Preheat the oven to 350°F (175°C). Spray a 12-well classic cupcake pan with nonstick cooking spray.
Cut the hash brown patties in half and place 1 half in each well of the pan, trimming them to fit as needed.
In a medium bowl, beat the eggs with a fork and stir in the pesto along with a few grinds of black pepper. Add the mushrooms, roasted peppers, zucchini, and fontina to the eggs and mix well. Divide the egg mixture evenly among the wells of the pan.
Sprinkle the basil and chives over each well and top with the Parmesan. Bake until golden on top, 20 to 25 minutes. The eggs will be a bit jiggly when you remove them from the oven; don’t worry—they will continue to cook while they cool in the pan.
Let the tortillas cool in the pan for 5 minutes. (Do not let them rest longer that that, as the eggs will begin to sweat.) Then loosen the sides of each tortilla with a table knife and insert the tines of a fork between the pan and each tortilla to lift it out. Serve the tortillas with your favorite toast and preserves and a variety of sausages and crispy bacon alongside.
Store the tortillas in an airtight container in the refrigerator for up to 5 days. Reheat, wrapped in tin foil, for 15 minutes at 350°F (175°C).
![]() When I visited Spain, my hosts always made me a tortilla in the morning. We would all gather in the kitchen to watch as the cook flipped the tortillas: First, he gently—and then briskly—shook the pan to loosen the egg mixture. Then, he dramatically flipped the contents of the pan. The tortilla would shoot up into the air and he would catch it in the pan on its way back down. What was once the top became the bottom, so all of the tortilla was browned to a delicious finish.
When I visited Spain, my hosts always made me a tortilla in the morning. We would all gather in the kitchen to watch as the cook flipped the tortillas: First, he gently—and then briskly—shook the pan to loosen the egg mixture. Then, he dramatically flipped the contents of the pan. The tortilla would shoot up into the air and he would catch it in the pan on its way back down. What was once the top became the bottom, so all of the tortilla was browned to a delicious finish.

THIS IS A MULTIPURPOSE DISH: The custard makes it suitable for breakfast, while the tomato confit makes it a meal for any time of day. From the sweetness of the onions to the richness of the tomatoes, the flavors in these charlottes are outrageously good. They’re sure to become a family favorite.
When preparing these mini meals, make sure to use cow’s-milk mozzarella; buffalo mozzarella has too much moisture. As for the roasted tomatoes, you might find some already packed in oil at the better gourmet markets. If you do purchase them from a store, the tomatoes will be in quarter slices, so make sure to buy twenty-four pieces.
6 plum tomatoes, halved lengthwise
2 cloves garlic, sliced
1/2 cup (120 ml) extra-virgin olive oil
Kosher salt
3 sprigs fresh thyme
4 large eggs
1 cup (240 ml) whole milk
1/2 teaspoon kosher salt
1/4 teaspoon freshly ground black pepper
1 tablespoon unsalted butter
1 medium yellow onion, cut into 1/4-inch (6-mm) dice
Nonstick cooking spray, for the pan
1 tube (4 ounces / 115 g) basil, or 1/2 cup (120 ml) ready-made pesto
15 thin slices white bread, such as Pepperidge Farm’s Very Thin White Bread
1 1/2 cups (170 g) shredded mozzarella
1/4 cup (25 g) grated Parmesan
![]() The tomato confit can be prepared in advance and stored, covered in a layer of olive oil, in an airtight container in the refrigerator until needed. It will last for up to 2 weeks.
The tomato confit can be prepared in advance and stored, covered in a layer of olive oil, in an airtight container in the refrigerator until needed. It will last for up to 2 weeks.
Preheat the oven to 300°F (150°C). In a medium bowl, toss the tomatoes and garlic with the oil to coat and season with salt. Line a rimmed baking sheet with a Silpat mat or aluminum foil for easy cleanup. Transfer the tomato mixture to the lined baking sheet, spreading out the tomatoes so they do not overlap. Tuck the thyme sprigs underneath the tomatoes.
Roast the tomatoes until they have caramelized and are just beginning to dehydrate, about 1 1/2 hours. If they begin to caramelize too quickly, lower your oven temperature to 275°F (135°C). Remove the confit from the oven and set it aside.
Raise the oven temperature to 350°F (175°C). In a medium bowl, beat the eggs with the milk, salt, and pepper. Set aside.
> ASSEMBLE AND BAKE THE CHARLOTTES
In a medium skillet over medium heat, melt the butter. Add the onion and cook, stirring occasionally, until translucent, about 3 minutes. Remove from the heat.
Spray a 12-well classic cupcake pan with nonstick cooking spray. Spread 1 1/2 teaspoons basil paste or pesto on each slice of bread. Cut 3 of the slices into quarters and place one quarter, basil side up, in each well. Cut the 12 remaining slices in half lengthwise. Line the sides of each well with 2 halves of bread in cross formation to form a shell. Tuck in the bread to fill the gaps between the bottom and sides of the wells. There may be small spaces where the pan shows through, and the edges of the bread may peek over the top of the pan.
Divide the mozzarella evenly among the wells of the pan. Top the cheese in each well with 1 tablespoon of the sautéed onions. Divide the custard evenly among the wells. Top each charlotte with a tomato half from the confit and sprinkle each with 1 teaspoon of Parmesan. Bake until cooked through and golden brown on the edges, 25 to 30 minutes.
Let the charlottes cool in the pan for 10 minutes, then loosen the sides of each charlotte with a table knife and insert the tines of a fork between the pan and each charlotte to lift it out.

SAVORY, SLIGHTLY SWEET, and a little tangy, these tarts combine the best of fall’s bounty. They’re like a dream-come-true version of the classic American apple pie, but transformed into a savory tart that is baked in an all-American kitchen tool: the cupcake pan. Don’t worry if your tarts don’t look perfect; that’s one of the charms of these bites. We are not trying to create perfectly filled little pies here. The asymmetrical nature of the dough placement in this recipe gives a one-of-a-kind feel to each of the tarts. Invite your children to lend a hand with these: I let mine peel the apples and layer them in the wells of the pan.
4 Granny Smith apples, peeled, halved, and cored
2 tablespoons walnut oil (see Notes)
1/2 large shallot, finely chopped
Kosher salt and freshly ground black pepper
1/3 cup (75 g) packed light brown sugar
1/4 teaspoon freshly grated nutmeg
FOR THE CHEDDAR WALNUT TOPPING
1 1/2 cups (175 g) grated sharp white cheddar
1/4 cup (65 g) turbinado sugar (or substitute granulated or brown sugar)
1/2 cup (60 g) finely chopped walnuts (see Notes)
2 tablespoons unsalted butter
1/4 cup (30 g) whole wheat flour
Nonstick cooking spray, for the pan
1 (15-ounce / 430-g) package ready-made pie dough (2 rounds), at room temperature
2 tablespoons fresh rosemary, finely chopped, or 1 scant tablespoon dried rosemary, finely ground (but not powdered) in a spice mill
![]() Walnut oil adds a nutty flavor to the filling that complements the cheddar walnut topping. If you prefer, you can use another oil that you have on hand (I like using nut oils).
Walnut oil adds a nutty flavor to the filling that complements the cheddar walnut topping. If you prefer, you can use another oil that you have on hand (I like using nut oils).
Chop the walnuts by hand. When a fine texture is needed, it’s too easy to overprocess nuts in a food processor, turning finely chopped nuts into flour.
![]() The apple filling can be prepared up to 2 days in advance and stored in an airtight container in the refrigerator until needed. It will last for up to 1 week. The tarts can also be assembled 1 day in advance and baked the following day.
The apple filling can be prepared up to 2 days in advance and stored in an airtight container in the refrigerator until needed. It will last for up to 1 week. The tarts can also be assembled 1 day in advance and baked the following day.
Cut each apple half into 6 wedges, then cut crosswise into 1/2-inch (1-cm) pieces. Heat the walnut oil in a 10-inch (25-cm) skillet over medium heat. Add the apples and shallot and season with a pinch of salt and a few grinds of black pepper. Cook the apple mixture, stirring occasionally, until tender, about 5 minutes. Turn off the heat and add the brown sugar and nutmeg, stirring to coat. Let the mixture cool, allowing time for the juices in the pan to macerate the filling, about 20 minutes.
> MAKE THE CHEDDAR WALNUT TOPPING
In a small bowl, combine the cheddar, sugar, and walnuts. Mix in the butter, then incorporate the flour just until combined.
Preheat the oven to 350°F (175°C). Spray a 12-well classic cupcake pan with nonstick cooking spray.
Unroll the pie dough onto a flat work surface; no need to flour it first. Evenly sprinkle half of the rosemary onto each of the rounds, pressing the rosemary gently into the dough. Cut each round of dough in half, and then cut each half into even thirds for a total of 12 pieces. Working quickly, place one piece of dough, rosemary side down, in each well of the prepared pan, letting the edges of the dough overhang the pan.
Fill each well with a heaping 1/4 cup (55 g) of the apple mixture. If you have any left over, go back and add it to the wells. (Do not press down.) Top each tart with 1/4 cup (55 g) of the walnut topping, then gently fold in the excess dough; don’t press down to seal—just keep this loose. You will now see why the rosemary was sprinkled on the outside of the dough: It is revealed here on the fold over and will add another dimension—the scent of rosemary—when you unpan the tarts.
Bake until the crust is golden brown and the juices are bubbling, 40 to 45 minutes, then loosen the sides of each tart with a table knife and insert the tines of a fork between the pan and each tart to lift it out. Serve the tarts warm.
Store the tarts in an airtight container in the refrigerator for up to 5 days. Reheat, wrapped in tin foil, for 15 minutes at 350°F (175°C).
![]() Select your favorite apple-and-herb combination to create a one-of-a-kind taste your family will love. I like to use sharp white Grafton cheddar in the topping, as it reminds me of fall foliage in Vermont. Some of the flavors in this book are inspired by my experiences with food there.
Select your favorite apple-and-herb combination to create a one-of-a-kind taste your family will love. I like to use sharp white Grafton cheddar in the topping, as it reminds me of fall foliage in Vermont. Some of the flavors in this book are inspired by my experiences with food there.

THOUGH THESE TARTS ARE ELEGANT IN presentation and flavor, little ones still love them. My children have no idea they are made with goat cheese. (They like goats at the farm, not in their food.) The flavor of the cheeses blends perfectly with the sweetness of the honey-and-balsamic-glazed fruit. The firmness of Bosc pears means they stand on their own in this compote without becoming mushy. Step beyond breakfast and serve them at a luncheon with a salad of greens and fresh herbs.
5 ripe Bosc pears
2 tablespoons unsalted butter
12 pitted Kalamata or Niçoise olives, sliced lengthwise (optional)
2 tablespoons honey
2 tablespoons balsamic vinegar
8 fresh figs, cut into 1/4-inch (6-mm) dice, or 1/4 cup (60 ml) fig preserves
1 cup (225 g) fresh goat cheese
3/4 cup (115 g) mascarpone
1/2 cup (75 g) whole-milk ricotta
1/3 cup (75 ml) honey
Zest of 1 lemon (about 1 tablespoon)
2 large eggs
1 large egg white
3/4 cup (180 ml) heavy cream
1 (15-ounce / 430-g) package ready-made pie dough (2 rounds), at room temperature
Nonstick cooking spray, for the pan
![]() The pear & fig compote can be prepared up to 2 days in advance and stored in an airtight container in the refrigerator until needed. It will last for up to 2 weeks.
The pear & fig compote can be prepared up to 2 days in advance and stored in an airtight container in the refrigerator until needed. It will last for up to 2 weeks.
Leaving the skin on, cut the pears in half and core them, then cut them into 1/2-inch (1-cm) pieces. Melt the butter in a medium sauté pan over medium heat. Add the pears, turn the heat to high, and sauté until the pears are golden, about 3 minutes, making sure to toss them in the butter as they cook so they brown evenly. Add the olives, honey, and vinegar, stirring to coat. Cook until the vinegar and honey begin to thicken, about 5 minutes. Turn off the heat, add the figs, and toss to coat. Let the compote cool, then transfer it to a serving dish.
> MAKE THE THREE-CHEESE CUSTARD
In a large mixing bowl, whisk the three cheeses, honey, and lemon zest by hand until smooth. (Whisking with an electric mixer will incorporate too much air into the custard.) Add the eggs, egg white, and cream and whisk again, making sure to get all of the lumps out of the custard. Set aside.
Preheat the oven to 350°F (175°C). Spray a 12-well classic cupcake pan with nonstick cooking spray.
Unroll the pie dough onto a flat work surface (no need to flour it first). Cut each round of dough in half, and then cut each half into even thirds for a total of 12 pieces. Place one piece of dough in each well of the prepared pan, pulling the dough up to the top edge and manipulating it as needed for full coverage. Using kitchen scissors, trim any excess dough hanging over the edges of the wells. Using a 1/3-cup (75-ml) measure, fill each well with the custard, then top off each one until you have used all of the custard.
Bake until the tarts are golden brown around the edges and puffed, 30 to 35 minutes. (The custard will deflate slightly after the tarts come out of the oven.) Let the tarts cool in the pan for 3 minutes, then loosen the sides of each tart with a table knife and insert the tines of a fork between the pan and each tart to lift it out. Serve the tarts individually with a ramekin of the compote on the side, or arrange them on a serving platter with the compote in a bowl in the center.
Store the tarts in an airtight container in the refrigerator for up to 5 days. Reheat, wrapped in tin foil, for 15 minutes at 350°F (175°C).

MY SAVORY TAKE on this classic includes a salty element in the form of maple-glazed ham. Add the caramelized red onion, and you get a buttery meal overlaid with caramelly goodness.
1 pineapple, peeled, halved, and cored
2 tablespoons unsalted butter, softened
1/2 cup (110 g) packed light brown sugar
1/4 cup (45 g) packed dried cherries
2 teaspoons extra-virgin olive oil
10 ounces (280 g) ham steak, cut into 1/4-inch (6-mm) dice
2 tablespoons pure maple syrup
1/2 cup finely chopped red onion
1/2 cup (1 stick / 115 g) unsalted butter
3/4 cup (150 g) granulated sugar
1 teaspoon pure vanilla extract
3 large eggs
1/2 cup (120 ml) whole milk
2 cups (250 g) all-purpose flour
2 1/2 teaspoons baking powder
> MAKE THE PINEAPPLE AND GLAZE
Preheat the oven to 350°F (175°C). Cut one half of the pineapple into 4 long wedges, then cut each wedge into 1/4-inch (6-mm) slices to create 36 pieces. In a small bowl, mix the softened butter and brown sugar together to form a paste. Divide the mixture evenly among the wells of a 12-well classic cupcake pan. Top each well with 1 teaspoon of dried cherries and 3 slices of pineapple. Set aside.
In a medium skillet, heat 1 teaspoon of the oil over medium heat. Add the ham and cook, stirring occasionally, until browned, about 5 minutes. Stir in the maple syrup, then transfer to a small bowl.
Add the remaining oil to the skillet. Add the red onion and cook, stirring occasionally, until browned, about 8 minutes. Set aside to cool.
Place the butter and sugar in the bowl of an electric mixer fitted with a paddle and beat until fluffy, about 3 minutes. Add the vanilla, eggs, and milk, and beat until just combined. Sift the flour and baking powder together. Add the flour mixture to the wet ingredients and beat until smooth. Add half of the browned onions and beat until just combined. Using a large spatula, fold in half of the ham.
> ASSEMBLE AND BAKE THE CAKES
Divide the batter equally among the 12 wells, then dot the top of the batter with the remaining onion and ham. Bake until golden on top and cooked through, 20 to 25 minutes. Let the cakes cool in the pan for 2 minutes, then insert the tines of a fork between the pan and each cake to lift it out. Invert the cake so the pineapple is on top. Serve immediately.
Store the cakes in an airtight container in the refrigerator for up to 5 days. Reheat, wrapped in tin foil, for 15 minutes at 350°F (175°C).

THESE BREAKFAST STACKS are just plain goodness—and so easy to create! My children have fun layering them with their favorite breakfast combinations. Mini waffles are perfect for the cupcake pan as they fit inside the wells so nicely. Be adventurous in your choice of waffle. Why not try blueberry, whole grain, or chocolate chip? I also like to eat these for lunch with a salad of field greens, avocado, and red onion tossed with a citrus vinaigrette.
Nonstick cooking spray, for the pan
24 frozen mini waffles, from one 10.9-ounce (310-g) package
6 slices pepper Jack cheese, from one 8-ounce (225-g) package presliced cheese
8 ready-made turkey sausage patties from one 10-ounce (280-g) package, defrosted if frozen
1 (12-ounce / 340 g) jar roasted red peppers, drained and chopped
8 large eggs
Salt and freshly ground black pepper
1 teaspoon chili powder
VARIATIONS Use sun-dried tomatoes in place of the roasted red peppers. Or, for a nonspicy take, replace the roasted peppers, pepper Jack cheese, and chili powder with provolone cheese, an additional waffle, and a slice of ham or bacon and serve with your favorite preserves or pure maple syrup on the side.
Preheat the oven to 350°F (175°C). Spray a 12-well classic cupcake pan with nonstick cooking spray and place one mini waffle in the bottom of each well. Reserve the remaining 12 waffles.
Cut the 6 slices of cheese into quarters to make 24 slices total, then layer 1 slice on top of each waffle. Trim the 8 sausage patties, removing an even sliver around the edge of each patty to create 2-inch (5-cm) rounds. Reserve the trimmings.
Place the trimmed sausage patties in 8 wells. Evenly distribute the trimmings among the remaining 4 wells, gathering them together in each well to form a solid layer of sausage. Evenly distribute the peppers among the wells, followed by the remaining 12 slices of cheese.
In a medium bowl, beat the eggs until light and fluffy, then season with salt, a few grinds of black pepper, and the chili powder and mix well.
Drop the remaining 12 mini waffles into the egg mixture and let them soak for 3 minutes. Place one soaked waffle on top of each mini meal, then divide the remaining egg mixture between the wells, filling them almost to the top. Bake until cooked through and puffed, 20 to 25 minutes.
Let the wafflinis cool in the pan for 3 minutes, then loosen the sides of each wafflini with a table knife and pop them out of the pan. Get out your collection of hot sauces and serve. Yum!
Store the wafflinis in an airtight container in the refrigerator for up to 5 days. Reheat, wrapped in tin foil, for 15 minutes at 350°F (175°C).

SWEET CURRANTS SERVE as the perfect complement to the cornmeal spoon bread. My children love how the sweetness of the maple syrup mixes with the savory sausage. You can sprinkle some maple sugar crystals on top of the finished spoon bread to give it more texture. These are so yummy you’ll have a hard time not digging in with a spoon before the rest of the family gets to the table!
Nonstick cooking spray, for the pan
12 frozen mini breakfast pork or turkey sausage patties, from one 12-ounce (340-g) package
1 cup (125 g) all-purpose flour
1/2 cup (80 g) yellow cornmeal
3 tablespoons sugar
2 teaspoons baking powder
1 teaspoon baking soda
1/8 teaspoon kosher salt
1/3 cup (50 g) dried currants
1 1/4 cups (300 ml) plain whole-milk yogurt
2 large eggs
1/2 cup (1 stick / 115 g) unsalted butter, melted and cooled
Maple syrup, for serving
Thyme sprigs or fresh sage leaves, for serving (optional)
Preheat the oven to 350°F (175°C). Spray a 12-well classic cupcake pan with nonstick cooking spray. Place one sausage patty in each well of the pan.
In a large bowl, whisk together the flour, cornmeal, sugar, baking powder, baking soda, and salt. Stir in the currants.
In a medium bowl, whisk the yogurt and eggs until well combined. Add the yogurt mixture and the melted and cooled butter to the dry ingredients; mix until just incorporated.
Mound the cornmeal batter in each well; they will be filled up to the top. Bake for 25 to 30 minutes, until a wooden toothpick inserted in the center comes out clean.
Let the spoon breads cool in the pan for 10 minutes, then loosen the sides of each spoon bread with a table knife and insert the tines of a fork between the pan and each spoon bread to lift it out. Serve each of the spoon breads individually, sausage-side up, with a drizzle of maple syrup and, if desired, a sprig of thyme or a sage leaf.
Store the spoon breads in an airtight container in the refrigerator for up to 5 days. Reheat, wrapped in tin foil, for 15 minutes at 350°F (175°C).
THE CLASSIC FLAVORS of breakfast come to life when tucked together in this tasty little bite. I always have to tell my son to sit down when he eats, but this is one dish he can take with him on the go. Once you’ve tasted these scrumptious—and simple!—egg muffins, drive-through versions will leave you unsatisfied and longing for the ones you make at home.
Nonstick cooking spray, for the pan
1 pound (455 g) turkey or pork bacon, finely chopped
10 large eggs
2 cups (230 g) grated cheddar
12 thin slices white bread, such as Pepperidge Farms Very Thin White Bread
VARIATION If you prefer, these mini muffins can be made with biscuits instead of bread. Keep it simple! Buy ready-made biscuits from the grocery store and slice them in half crosswise, placing one half in the bottom of a cupcake well, topping it with the egg and cheese mixture, and then topping the whole thing off with the other biscuit half.
Preheat the oven to 350°F (175°C). Spray a 12-well classic cupcake pan with nonstick cooking spray.
In a 10-inch (25-cm) skillet, cook the bacon over medium-high heat, stirring occasionally, until crisp, 12 to 15 minutes. If using turkey bacon, turn off the heat and leave the bacon in the pan. If using pork bacon, drain it on paper towels.
In a medium bowl, beat the eggs until fluffy. Stir in the grated cheese, then add the cooked bacon and mix thoroughly.
Nestle a slice of bread in each of the wells, pressing down to make sure the bread fits snugly in the bottom of the pan. (The bread will not fill the entire well and it may even poke up above the lip of the pan.) Using a 1/2-cup (120-ml) measure, divide the egg mixture among the wells, filling them to the top.
Bake until cooked through, 18 to 20 minutes. For a creamy texture, remove these muffins from the oven when the eggs are still a bit jiggly. They will continue to cook after they come out. There’s no need to let them cool, though: Just loosen the sides of each muffin with a table knife and pop them out of the pan. Serve with a side of seasonal fruit or as part of a larger breakfast buffet.
HERE, I’VE ADAPTED a classic to accommodate your desire for a good Southern breakfast without the guilt associated with traditional Southern serving sizes. As the gravy melts into the biscuit while baking, it creates a portable item that is great for breakfast on the run. You can have it all in this mini meal. The drippings and browned tidbits left in the pan from cooking the sausage make the gravy so flavorful. (If you’re a true Southerner, use your own gravy recipe!)
Nonstick cooking spray, for the pan
1 pound (455 g) ground breakfast sausage or ground turkey sausage (see Note)
1 tablespoon unsalted butter
1 small yellow onion, finely chopped
1/4 cup (30 g) all-purpose flour
2 teaspoons concentrated chicken broth base, such as Better Than Bouillon brand
Freshly ground black pepper
1 cup (240 ml) whole milk
1 cup (240 ml) heavy cream
2 (12-ounce / 340-g) cans buttermilk biscuits (refrigerate until ready to use), or 12 (2-inch / 6-cm diameter) homemade biscuits
![]() I like to use classic breakfast sausage with sage seasoning in this recipe. It’s available in most supermarkets, but if you can’t locate it, stir 1 teaspoon finely chopped fresh sage or 1/2 teaspoon crumbled dried sage leaves into any type of sausage meat that you can purchase by the pound.
I like to use classic breakfast sausage with sage seasoning in this recipe. It’s available in most supermarkets, but if you can’t locate it, stir 1 teaspoon finely chopped fresh sage or 1/2 teaspoon crumbled dried sage leaves into any type of sausage meat that you can purchase by the pound.
There’s no need to add salt to the gravy, as the salt in the chicken broth base will suffice. In any case, it’s always better to use less salt, then add more later if needed, to keep from oversalting. Wait until you’ve added the sausage to the gravy, then taste and adjust the seasoning if necessary.
![]() You can assemble these savory cupcakes the night before, then pop them in a 350°F (175°C) oven for a quick breakfast before school.
You can assemble these savory cupcakes the night before, then pop them in a 350°F (175°C) oven for a quick breakfast before school.
Preheat the oven to 350°F (175°C). Spray a 12-well classic cupcake pan with nonstick cooking spray.
In a 10-inch (25-cm) nonstick skillet, cook the sausage over medium heat, breaking the meat up with a wooden spoon, until browned throughout, 10 to 12 minutes. Drain the sausage in a fine-mesh colander over a paper towel–lined plate. Continue to break up the sausage in the colander with the back of a wooded spoon until no large clumps of meat remain. Transfer the sausage to a medium bowl and set aside.
In the same nonstick skillet, melt the butter over medium heat, add the onion, and sauté until translucent, about 3 minutes. Add the flour and chicken base to the skillet, stirring until a paste forms, no longer than 1 minute. Add a few grinds of black pepper, then slowly pour in the milk and cream, whisking constantly until the gravy thickens, about 3 minutes. Turn off the heat and stir in the cooked sausage. Adjust the seasoning if necessary (see Notes).
Remove 12 biscuits from the cans (see “Savory Tidbits” for ideas on how to use extras). Using a serrated knife, slice each biscuit in half crosswise to create 24 halves. Place half a biscuit in each of the wells of the prepared cupcake pan and top with the sausage gravy, about 3 heaping tablespoons per well. Top with the remaining biscuit halves, pressing down firmly. Bake until the tops of the biscuits are golden, 18 to 22 minutes.
Let the biscuits cool in the pan for 3 minutes, then loosen the sides of each biscuit with a table knife and pop them out of the pan. Serve them hot.
Store the leftover biscuits in an airtight container in the refrigerator for up to 5 days. The gravy can be stored in a separate container in the refrigerator for up to 5 days. These leftovers taste great at room temperature, but, if you prefer, the biscuits can be reheated, wrapped in tin foil, for 15 minutes at 350°F (175°C), and the gravy can be warmed in a small saucepan on the stovetop.
![]() If you have any leftover canned biscuits, your children can simply dust the tops of the biscuits with cinnamon and sugar. Or, make jam biscuits by stretching the biscuit dough slightly and placing 1 tablespoon of jam in the middle of each. Fold the dough over like a taco and dust with cinnamon and sugar. Bake at 350°F (175°C) for 8 to 10 minutes.
If you have any leftover canned biscuits, your children can simply dust the tops of the biscuits with cinnamon and sugar. Or, make jam biscuits by stretching the biscuit dough slightly and placing 1 tablespoon of jam in the middle of each. Fold the dough over like a taco and dust with cinnamon and sugar. Bake at 350°F (175°C) for 8 to 10 minutes.
SOUTHERN
![]()
After years of living in southern California, I made my way east. When we arrived, in Raleigh, North Carolina, it was freezing cold and the house we’d bought had a crack in the foundation. It was too late to do anything but stay in North Carolina, so we got out of the bad purchase, rented a house, and tolerated the cold for four months.
While we were freezing there, we frequently visited a local diner in the morning. They always had sausage or fried chicken with biscuits and cream gravy on the breakfast menu. I died with pleasure at every sinful mouthful!
Breakfast down south is a sumptuous affair that includes a broad variety of foods not usually associated with breakfast in other parts of the country, such as fried apple rings, citrus marmalade, and creamy eggs with creamed corn, red peppers, and bacon. What a way to start the day! Despite the amazing diner fare, after enduring that cold North Carolina winter, I finally said, “Florida is close.” So we packed up our cars and drove straight to Orlando with our two babies.