Oven-Roasted Tomato & Gruyère Tarts
Welsh Rarebits with Apple Ketchup
Herb Goat Cheese & Honey Cakes
Buttermilk Cornbread Corn Puddings
Sausage, Cheddar & Poached Egg Wafflinis

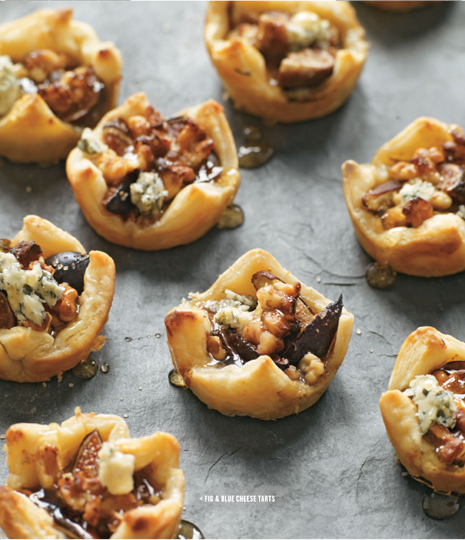
FRESH FIGS are heavenly, though it can sometimes be a problem finding them in season. Fig jam is available in most specialty shops, but if figs are in season in your area, I forbid you to use anything other than fresh figs. Even though I’ve lived in Florida for eight years now, I still miss the fig trees that grew in my garden in California. Once, while browsing the Middle Eastern foods section at the grocery store, I discovered the most amazing jar of fig jam: pure fig seasoned with sesame seeds and anise. I was blown away by the flavor! The addition of blue cheese to the figs keeps this tart from being too sweet. I adore Maytag, Gorgonzola, Danish blue … there are so many blues to choose from!
Nonstick cooking spray, for the pan
1 (17.3-ounce / 485-g) box puff pastry (2 sheets), at room temperature
4 ounces (115 g) blue cheese, crumbled
1 cup (240 ml) fig jam, or 16 fresh figs, stemmed and cut into 1/4-inch (6-mm) dice
5 tablespoons (75 ml) honey
3/4 cup (75 g) walnuts or black walnuts, finely chopped
6 tablespoons (95 g) turbinado sugar (if using fresh figs rather than jam; see Note)
![]() When I use fresh figs, I sprinkle them with some turbinado sugar before baking. The sugar keeps its texture, giving the figs a delightful crunch. If you want to expand your horizons, turbinado sugar is available infused with different flavors, including ginger, lemon, or cinnamon.
When I use fresh figs, I sprinkle them with some turbinado sugar before baking. The sugar keeps its texture, giving the figs a delightful crunch. If you want to expand your horizons, turbinado sugar is available infused with different flavors, including ginger, lemon, or cinnamon.
![]() With the extra puff pastry, why not make your children a little treat? Sprinkle cinnamon and sugar on top of each piece of pastry and bake at 400°F (205°C) for 15 minutes. Break up a bar of chocolate into small squares and serve one square on top of each warm, puffy treat.
With the extra puff pastry, why not make your children a little treat? Sprinkle cinnamon and sugar on top of each piece of pastry and bake at 400°F (205°C) for 15 minutes. Break up a bar of chocolate into small squares and serve one square on top of each warm, puffy treat.
Preheat the oven to 400°F (205°C). Spray a 12-well classic cupcake pan with nonstick cooking spray.
Cut each piece of puff pastry dough into thirds lengthwise, then crosswise, for a total of 18 pieces. (You will have 6 extra pieces of dough; see “Savory Tidbit” below, for ideas on how to use them.) Stretch 12 pieces of dough gently in both directions (do not use a rolling pin, as rolling will keep the dough from puffing properly during baking), then place one piece of dough in each well of the prepared cupcake pan.
Sprinkle the puff pastry with 1 tablespoon blue cheese crumbles per well. If using fresh figs, place them in a small bowl and stir in 2 tablespoons honey to coat. Divide the fig jam, or fresh figs mixed with honey, evenly among the 12 wells. In a small bowl, mix the walnuts with 3 tablespoons of honey to coat, then top the figs with 1 tablespoon of honeyed walnuts per well. If using fresh figs, sprinkle 1/2 tablespoon turbinado sugar on top of each tart.
Bake until the edges are golden brown and crispy and the filling is bubbling, 15 to 20 minutes. Do not let these tarts cool in the pan, as they will sweat and the pastry will get soggy: use your hands to lift them from the pan using the puff pastry wrappers as handles. Serve hot.
THIS IS A TERRINE I CREATED for some clients who (prior to their vegetarian days) used to love my duck liver terrine—and the creamy texture that only duck liver can create. While there isn’t any liver in these loaves, they’re just as enjoyable, which my clients discovered once I finally convinced them to try this vegetarian alternative.
2 cups (200 g) raw, unsalted mixed nuts
2 tablespoons salted butter
1 medium yellow onion, finely chopped
Pinch each of kosher salt and freshly ground black pepper
2 cloves garlic, finely chopped, or 1 tablespoon garlic from a tube
1/2 cup (50 g) white mushrooms, wiped clean and chopped
1 ounce (30 g) dried porcini or shiitake mushrooms, reconstituted (see this page), then finely chopped
2 tablespoons chopped fresh parsley or parsley from a tube
2 teaspoons fresh thyme leaves, or 1/2 teaspoon dried
1 tablespoon chopped fresh marjoram, or 1 teaspoon dried
1 teaspoon chopped fresh sage, or 1/2 teaspoon dried sage, crumbled
1 1/2 cups (300 g) cooked brown rice
4 large eggs, beaten
1 cup (250 g) whole-milk ricotta
1 1/2 cups (175 g) grated cheese, any type
Nonstick cooking spray, for the pan
![]() These loaves can be assembled up to 2 days in advance.
These loaves can be assembled up to 2 days in advance.
Preheat the oven to 350°F (175°C).
On a rimmed baking sheet, toast the nuts until golden, 10 to 12 minutes. Cool slightly, then finely chop by hand or in a food processor.
Melt the butter in a 10-inch (25-cm) skillet over medium heat. Add the onion and cook until translucent, about 4 minutes, then season with the salt and pepper. Stir in the garlic, fresh and dried mushrooms, and parsley, thyme, marjoram, and sage, then transfer the vegetable mixture to a large bowl. Add the cooked rice, chopped nuts, eggs, ricotta, and grated cheese and mix to combine thoroughly.
Spray a 12-well classic cupcake pan with nonstick cooking spray. Using an ice cream scoop, fill each of the wells with the cheese and nut mixture. Bake until golden and firm to the touch, 20 to 25 minutes. Do not overbake.
Let the loaves cool for 5 minutes in the pan, then loosen the sides of each loaf with a table knife and pop them out of the pan.
Serve the loaves paired with a mixed greens and herb salad or, for a more filling meal, a simple mélange of sautéed vegetables, roasted or mashed potatoes, and a vegetarian gravy.
Store the loaves in an airtight container in the refrigerator for up to 5 days. Reheat, wrapped in tin foil, for 15 minutes at 350°F (175°C).
VARIATIONS Personalization here is key. You can use any combination of nuts and cheeses you like, so have fun! Walnuts, almonds, and pecans are fairly standard, but don’t forget about cashews and pistachios. For the mixed cheese, consider fontina, Gruyère, Jack, Muenster, and Gouda.

THESE TARTS hit about every note on the savory scale: Rich, salty bacon and Gruyère are offset by the natural sweetness of caramelized tomato and roasted garlic. Bake that up in a creamy custard, and you have a handheld bite of bliss. When they’re in season, I like to use heirloom tomatoes to intensify the flavor.
1 pint (300 g) cherry tomatoes (red, yellow, or orange, preferably heirloom, if in season), cut in half lengthwise
6 cloves garlic
2 tablespoons extra-virgin olive oil
1/2 teaspoon kosher salt
1/4 teaspoon freshly ground black pepper
4 large eggs
1/4 teaspoon kosher salt
1/4 teaspoon freshly ground black pepper
2 tablespoons finely snipped fresh basil or basil from a tube
1/4 teaspoon freshly grated nutmeg
1/2 cup (120 ml) whole milk
1/2 cup (120 ml) half-and-half
FOR THE ASSEMBLY
Nonstick cooking spray, for the pan
1 (15-ounce / 430-g) package ready-made pie dough (2 rounds), at room temperature
1 cup (115 g) grated Gruyère
4 slices bacon, cooked until crispy then cut crosswise into 2-inch (5-cm) strips
![]() These tarts can be eaten as soon as they come out of the pan, but the custard is creamier the cooler they are: Try them at room temperature.
These tarts can be eaten as soon as they come out of the pan, but the custard is creamier the cooler they are: Try them at room temperature.
> MAKE THE TOMATOES AND GARLIC
Preheat the oven to 400°F (205°C). Line a rimmed baking sheet with foil or a Silpat mat for easy cleanup.
In a small bowl, combine the tomatoes, garlic, oil, salt, and pepper. Mix well and turn onto the prepared baking sheet. Roast until the tomatoes are dehydrated and golden, about 25 minutes. Set aside.
In a small bowl bowl, beat the eggs with the salt, pepper, basil, nutmeg, whole milk, and half-and-half until thoroughly combined.
> ASSEMBLE AND BAKE THE TARTS
Preheat the oven to 375°F (190°C). Spray a 12-well classic cupcake pan with nonstick cooking spray.
Unroll the pie dough onto a flat work surface; no need to flour it first. Cut each round of dough in half, and then cut each half into thirds for a total of 12 pieces. Place one piece of dough in each well of the prepared pan. (The fit will be asymmetrical.) Using kitchen scissors, trim any excess dough to 1/2 inch (1 cm) at most.
Finely chop the roasted garlic cloves, then distribute them in the bottom of each well. Top each with 1 heaping tablespoon cheese.
Fill each well three-quarters full with the custard. Evenly distribute the tomato halves among the wells. Top each tart with several strips of bacon. Bake until golden and puffed like a soufflé, about 25 minutes. Let cool in the pan for 5 minutes. (The custard will deflate slightly after the tarts come out of the oven.) Loosen the sides of each tart with a table knife and insert the tines of a fork between the pan and each tart to lift it out.
If you would like to make these ahead of time, refrigerate the tarts overnight (or for up to 5 days), then reheat, wrapped in tin foil, in a 350°F (175°C) oven for 15 minutes.

THIS DISH MIGHT SOUND FANCY, but it’s really just a grown-up version of a grilled cheese and tomato sandwich. In this gourmet treatment of a childhood favorite, the sandwich filling is lightened to a soufflé consistency and then toasted. My children love this served with a bowl of tomato soup. The apple ketchup acts as the perfect accompaniment to the richness of the rarebit. I love Honeycrisp apples for the ketchup, but any apple you have on hand will do.
Nonstick cooking spray, for the pan
12 thin slices white bread, such as Pepperidge Farm’s Very Thin White Bread
1/4 cup (1/2 stick / 60 g) butter, softened
2 tablespoons fresh thyme leaves or other fresh herb, chopped (optional)
2 tablespoons butter
2 tablespoons all-purpose flour
1/4 cup (60 ml) beer
3 cups (345 g) grated cheddar
1 teaspoon Worcestershire sauce
1 teaspoon dry mustard
1/8 teaspoon cayenne
1 large egg, beaten
2 tablespoons butter
1/4 cup (60 ml) ketchup
1/4 cup (60 ml) sherry vinegar (see Note)
1 large tomato, seeded and finely chopped
2 large tart apples, such as Honeycrisp, peeled, cored, and cut into 1/4-inch (6-mm) dice
![]() If you don’t have any sherry vinegar on hand, mix 2 tablespoons of white vinegar (or white wine, white balsamic, or seasoned rice wine vinegar) with 2 tablespoons of dry sherry borrowed from the liquor cabinet.
If you don’t have any sherry vinegar on hand, mix 2 tablespoons of white vinegar (or white wine, white balsamic, or seasoned rice wine vinegar) with 2 tablespoons of dry sherry borrowed from the liquor cabinet.
![]() The apple ketchup can be prepared up to 2 days in advance and stored in an airtight container in the refrigerator until needed. It will last for up to 1 week.
The apple ketchup can be prepared up to 2 days in advance and stored in an airtight container in the refrigerator until needed. It will last for up to 1 week.
Preheat the oven to 350°F (175°C). Spray a 12-well classic cupcake pan with nonstick cooking spray. Butter one side of each slice of bread. For added flavor, sprinkle the thyme on each buttered slice. Line the wells of the prepared cupcake pan with the slices of bread, buttered side down. Firmly press the bread into the pan and tuck in any edges that poke up, so that when you fill the wells with the cheese sauce, all of the bread will be soaked. Toast the bread wrappers in the oven for 20 minutes, then remove the pan and set aside.
In the top of a double boiler, whisk together the butter and flour. Let it cook for 2 to 3 minutes to form a paste, stirring occasionally. Add the beer slowly, whisking to make sure no lumps remain, then stir in the cheese, Worcestershire, mustard, and cayenne.
Continue to stir until the cheese mixture is melted and smooth, about 4 minutes. Remove the top pan from the double boiler and quickly whisk the beaten egg into the cheese mixture to create a very smooth, creamy sauce.
> ASSEMBLE AND BAKE THE RAREBITS
Working quickly, use an ice cream scoop to fill each of the bread wrappers with the cheese sauce, then top off each one until you have used all of the sauce. Bake until firm to the touch, about 20 minutes.
In a medium sauté pan over medium heat, brown the butter—it will sizzle—until golden brown, about 2 minutes. Reduce the heat to medium-low and stir in the ketchup and sherry vinegar, then add the tomato and apples. Cook, stirring occasionally, until the apples have softened, about 8 minutes. Place the ketchup in a serving bowl and set aside.
When the rarebits are done, remove the pan from the oven and use your hands to lift the rarebits from the pan using the toasted bread wrappers as handles. Eat these savory bites with the apple ketchup on the side as soon as your mouth will allow, but be careful—the cheese sauce is hot! Or serve them at room temperature—the flavor is still amazing.
Store the rarebits in an airtight container in the refrigerator for up to 1 week. Enjoy the leftovers at room temperature or reheat, wrapped in tin foil, for 15 minutes at 350°F (175°C).
VARIATIONS The cheese sauce in Welsh rarebit is traditionally topped with tomato slices and broiled in the oven. To make these mini meals more authentic, thinly slice 1 or 2 tomatoes to make 12 slices, place 1 slice on top of the cheese sauce in each well of the cupcake pan, and season with salt and pepper. Bake as directed in the recipe above.
For a fresh twist on a classic grilled cheese and tomato sandwich, macerate 2 cups (360 g) diced cherry tomatoes in their own juices for 20 minutes. Top the baked Welsh rarebit with the cherry tomatoes, sprinkle with fresh herbs and a pinch of salt, and serve with a simple green salad tossed with an olive oil and vinegar dressing on the side.
IT’S IMPOSSIBLE TO KEEP my mouth from watering at the delicious scents wafting from the oven as these cakes bake. The secret is a fresh herb leaf placed at the bottom of each well. I’m in love with edible flowering herbs—edible geranium is my favorite, but other herbs will do. Several varieties of thyme and edible scented geranium surround my garden, which is how they found their way into this recipe. I’ve been infusing oil and sugar with herbs, as well as baking them into cakes to create a range of delightful natural flavors, for as long as I have been baking. Top the cakes with a dollop of goat cheese–honey butter, and you’ll wonder why you never tried baking with flowers before.
Nonstick cooking spray, for the pan
12 edible leaves (scented geranium or other fresh herb, such as lavender, thyme, or rosemary; see Note)
3 cups (375 g) sifted all-purpose flour
2 teaspoons baking powder
3/4 cup (1 1/2 sticks / 175 g) salted butter, softened
1 cup (200 g) sugar
6 tablespoons (90 ml) honey
4 large eggs
1 tablespoon fresh lemon zest (from 1 lemon)
1 tablespoon fresh thyme leaves, finely chopped
FOR THE GOAT CHEESE–HONEY BUTTER
1/2 cup (1 stick / 115 g) unsalted butter, softened
1/3 cup (75 ml) honey
2 cups (225 g) goat cheese, at room temperature
Sprigs of fresh thyme, for serving
![]() There are twenty-one varieties of scented geranium, including apricot, rose, pineapple, lemon, cinnamon, mint, and ginger. The term “scented” is used for all edible geraniums. When developing this recipe, I used rose geranium. Please do not confuse edible geranium with the inedible type that you plant in your flower boxes!
There are twenty-one varieties of scented geranium, including apricot, rose, pineapple, lemon, cinnamon, mint, and ginger. The term “scented” is used for all edible geraniums. When developing this recipe, I used rose geranium. Please do not confuse edible geranium with the inedible type that you plant in your flower boxes!
In addition, there are many varieties of edible thyme, including silver, English, Pennsylvania Dutch, orange, Hi-Ho Silver, and lemon.
![]() The goat cheese–honey butter can be prepared up to 2 days in advance and stored in an airtight container in the refrigerator until needed. It will last for up to 1 week.
The goat cheese–honey butter can be prepared up to 2 days in advance and stored in an airtight container in the refrigerator until needed. It will last for up to 1 week.
Preheat the oven to 325°F (165°C).
Spray a 12-well classic cupcake pan with nonstick cooking spray and place 1 edible leaf in the bottom of each well.
In a medium bowl, combine the flour and baking powder. Set aside.
Place the butter, sugar, and honey in the bowl of a stand mixer fitted with a whisk attachment. Whisk on medium-high speed until creamy, about 3 minutes. Add the eggs, one at a time, and beat well after each addition. Adjust the speed to low and add the zest, thyme, and flour mixture and beat until just combined.
Using an ice cream scoop, fill each well with the batter. Bake until cooked through and a toothpick inserted in the center comes out clean, 18 to 25 minutes. Let the cakes rest in the pan for 5 minutes, then loosen the sides of each cake with a table knife and insert the tines of a fork between the pan and each cake to lift it out. Transfer the cakes to a wire rack to cool completely.
> MAKE THE GOAT CHEESE–HONEY BUTTER
In the bowl of a stand mixer fitted with a whisk attachment, beat the butter, honey, and goat cheese until fluffy, occasionally scraping the sides of the bowl.
To serve, invert the honey cakes so that the geranium is visible. Serve them individually with a dollop of the goat cheese–honey butter on the side, topped off with a flowering sprig of thyme.
Store the cakes in an airtight container in the refrigerator for up to 1 week.
EDIBLE
![]()
My love for herbs and edible flowers began when I was a little girl and my mother taught me about edible violets. My interest in them grew with my childhood garden. I learned from an early age that many items in our flower garden were edible. So many tastes and aromas await if you take a moment to ponder your garden and the limitless possibilities it offers for enhancing your meals.
THIS UNCONVENTIONAL “Real Man” quiche is a meal in itself that offers hearty, robust flavors. My husband doesn’t like quiche. As a matter of fact, none of my male clients ever really did—too much crust and not enough gusto! This recipe solves that problem because the wells of a cupcake pan are deeper than a pie pan, so you can really fill it to the brim with lots of good-tasting ingredients. Save time by prepping the ingredients the night before you plan to bake these.
5 large eggs
1/2 cup (120 ml) whole milk
1/2 cup (120 ml) half-and-half
Pinch of kosher salt and freshly ground black pepper
3 cups (300 g) button mushrooms, wiped clean and finely chopped
2 teaspoons extra-virgin olive oil
1 (8-ounce / 230-g) package turkey bacon or ham, chopped
Nonstick cooking spray, for the pan
1 1/2 cups (150 g) grated Parmesan
12 thin slices white bread, such as Pepperidge Farm’s Very Thin White Bread
1 cup (115 g) grated Gruyère, Swiss, provolone, or mozzarella
1 (10-ounce / 280-g) package frozen spinach, thawed and chopped
1 bunch chives, snipped with scissors
In a medium bowl, beat the eggs with the milk, half-and half, salt, and pepper until thoroughly combined. Set aside.
In a medium sauté pan over medium heat, sauté the mushrooms in 1 teaspoon oil until all the liquid has cooked down, about 5 minutes. Transfer the mushrooms to a medium bowl and set aside.
Using the same sauté pan, heat the remaining 1 teaspoon oil. Add the bacon and cook over medium heat until crispy, about 6 minutes. Set aside.
Preheat the oven to 350°F (175°C).
Spray a 12-well classic cupcake pan with nonstick cooking spray. Sprinkle 1 tablespoon Parmesan in the bottom of each well. Top with 1 slice of bread, pushing down to fill the well. Sprinkle each well with 1 heaping tablespoon Gruyère, then divide the mushrooms and bacon among the wells, using up all of each ingredient. Top with equal portions of spinach, then sprinkle with chives.
Using a 1/4-cup (60-ml) measure, fill each well with the egg mixture, then sprinkle with an additional tablespoon of Parmesan. Bake until the center is slightly jiggly, 20 to 25 minutes. Let the quiches rest in the pan for 5 minutes, then loosen the sides of each quiche with a table knife and insert the tines of a fork between the pan and each quiche to lift it out. Serve right away or at room temperature.
Store the quiches in an airtight container in the refrigerator for up to 5 days. Enjoy the leftovers at room temperature or reheat, wrapped in tin foil, for 15 minutes at 350°F (175°C).

THIS NEW TAKE ON A CLASSIC southern staple adds southwest flavors, creating a tender, moist mini meal with a touch of sweetness and bit of bite. The Anaheim and pasilla chiles aren’t very spicy, so feel free to use another chile of your choice if you’d like more heat.
Nonstick cooking spray, for the pan
1 cup (125 g) all-purpose flour
1 cup (160 g) cornmeal
1/4 cup (50 g) sugar
2 teaspoons baking powder
1 teaspoon baking soda
1 teaspoon kosher salt
1 cup (140 g) packed grated cheddar
1 cup (240 ml) buttermilk
2 large eggs
1/4 cup (1/2 stick / 60 g) salted butter, melted and cooled
Nonstick cooking spray, for the pan
2 cups fresh corn cut off the cob (about 4 ears), or 1 (16-ounce / 455-g) bag frozen corn, thawed
2 cups (230 g) grated cheddar, plus 1 cup (115 g) more for the top, if desired
1 red bell pepper, seeded and cut into 1/4-inch (6-mm) dice
1 dried Anaheim or pasilla chile, torn into small bits
1 bunch scallions, chopped
1 3/4 cups (420 ml) buttermilk
1 cup (240 ml) canned enchilada sauce
4 large eggs
1 teaspoon kosher salt
VARIATION For a simpler version without the corn-bread, spray a 12-well classic cupcake pan with nonstick cooking spray, then place 1 (6-inch / 16-cm) flour tortilla in each well. Make the corn pudding, but use only 1 cup (240 ml) buttermilk and omit the crumbled cornbread. Fill the tortillas with the corn pudding and top with 1 cup (115 g) shredded cheddar. Bake until golden on top and cooked through, 35 minutes. Let the puddings rest in the pan for 10 minutes before popping them out with a table knife. Makes 12 puddings.
> MAKE THE BUTTERMILK CORNBREAD
Preheat the oven to 350°F (175°C) degrees. Spray an 8-by-8-inch (20-by-20-cm) square baking pan with nonstick cooking spray.
In a large bowl, whisk together the flour, cornmeal, sugar, baking powder and soda, and salt, then stir in the cheese. In another bowl, combine the buttermilk, eggs, and melted butter. Add the wet ingredients to the dry; do not overmix. Pour into the prepared baking pan and bake until golden, about 25 minutes. Remove the cornbread from the oven and leave the oven on.
Spray two 12-well classic cupcake pans with nonstick cooking spray. In a medium bowl, mix together the corn, 2 cups (230 g) of the cheese, the bell pepper, dried chile, scallions, buttermilk, enchilada sauce, eggs, and salt. Break the cornbread into chunks and stir it in.
Fill each well with batter, then distribute the remaining 1 cup (115 g) cheese evenly over the tops, if desired. Bake in the upper and lower thirds of the oven, rotating the pans halfway through, until golden on top, 20 to 25 minutes. Let the puddings cool in the pan for 10 minutes, then loosen the sides of each pudding with a table knife and pop them out of the pan.
Store the puddings in an airtight container in the refrigerator for up to 5 days. Reheat, wrapped in tin foil, for 15 minutes at 350°F (175°C).

HAM ADDS just the right saltiness to this bread pudding–like dish. The bread base surrounds a custard center and the cheese melts beautifully on top. It tastes amazing drizzled with maple syrup. A great breakfast treat!
Nonstick cooking spray, for the pan
1 (12-ounce / 350-g) ham steak, cut into 1/4-inch (6-mm) dice
12 slices thin white bread, such as Pepperidge Farm’s Very Thin White Bread
2 cups (230 g) grated Gruyère, cheddar, Swiss, Muenster, provolone, or mozzarella
8 large eggs
1/4 teaspoon kosher salt
1/4 teaspoon freshly ground black pepper
2 tablespoons half-and-half
![]() These bread puddings can be assembled one day in advance and refrigerated wrapped in plastic wrap until baking. When ready to bake, preheat the oven to 350°F (175°C) and proceed as directed.
These bread puddings can be assembled one day in advance and refrigerated wrapped in plastic wrap until baking. When ready to bake, preheat the oven to 350°F (175°C) and proceed as directed.
Preheat the oven to 350°F (175°C).
Spray a medium sauté pan with nonstick cooking spray and sauté the ham steak over medium-high heat until browned, about 5 minutes. Set aside.
Spray a 12-well classic cupcake pan with nonstick cooking spray and line the wells with the slices of bread. Firmly press the bread into the wells but do not trim the bread; it will peek up above the pan’s edge and become crispy during baking. Top each slice of bread with about 2 1/2 tablespoons cheese, using all of it. Divide the sautéed ham among the wells.
In a medium bowl, beat the eggs, salt, pepper, and half-and-half. Using a 1/3-cup (75-ml) measure, top each well with the egg mixture. Let the first pour settle, and then go back and fill to the rim.
Bake until the egg is set and the bread is golden brown, 20 to 25 minutes. It’s okay if the tops are slightly jiggly, as the puddings will continue to bake after you’ve removed them from the oven. Use your hands to lift the puddings from the pan. Serve them immediately with a favorite breakfast side: fresh berries, sliced tomatoes, or ambrosia (supremes of grapefruit and orange with their juices, tossed with coconut).
Store the bread puddings in an airtight container in the refrigerator for up to 5 days. Reheat, wrapped in tin foil, for 15 minutes at 350°F (175°C).


I LEARNED TO PREPARE this bright green ricotta soufflé in a wood-burning oven in Florence. Running my fingers through the fields of herbs to get handfuls for this dish is only a memory now. Things have changed since then, as has this recipe, which I adapted for the cupcake pan. I would eat this for breakfast or lunch with a platter of vine-ripened tomatoes in all colors, shapes, and stages of perfection. There’s no need to add any salt—the Parmesan takes care of that.
12 thin slices white bread, such as Pepperidge Farm’s Very Thin White Bread
1 (6-ounce / 175-g) can tomato paste, or 1/2 cup (120 ml) tomato paste from a tube
Nonstick cooking spray, for the pan
1 1/4 cups (50 g) fresh basil leaves
3/4 cup (30 g) fresh mint leaves
3/4 cup (30 g) fresh parsley leaves
2 cups (500 g) whole-milk ricotta
1/2 cup (120 ml) heavy cream
2 large eggs
Freshly ground black pepper
1 1/4 cups (125 g) freshly grated Parmesan
12 mixed olives, such as Kalamata, Niçoise, or Gaeta, pitted and finely chopped
![]() Open cans of tomato paste always get lost in the back of my fridge, and I never use them up before they spoil. Tomato paste in a tube is a brilliant alternative because it lasts much longer—about 2 months—in the refrigerator.
Open cans of tomato paste always get lost in the back of my fridge, and I never use them up before they spoil. Tomato paste in a tube is a brilliant alternative because it lasts much longer—about 2 months—in the refrigerator.
Preheat the oven to 375°F (190°C).
Spread one side of each slice of bread with 2 teaspoons tomato paste. Spray a 12-well classic cupcake pan with nonstick cooking spray. Line the wells of the prepared pan with the slices of bread, tomato paste side up. Firmly press the bread into the wells but do not trim the bread; it will peek up above the pan’s edge and become crispy during baking.
In the bowl of a food processor fitted with the blade attachment, puree the basil, mint, and parsley with 1 cup (250 g) of the ricotta, and 1/4 cup (60 ml) of the cream until smooth. Add the remaining 1 cup (250 g) ricotta and 1/4 cup (60 ml) cream and the eggs, one at a time, and pulse to combine. Add a few grinds of black pepper.
Remove the bowl and blade from the food processor and, using a rubber spatula, fold in the Parmesan in batches. Divide the cheese and egg mixture evenly among the wells and sprinkle the olives on top. Bake until puffed up like a soufflé, 25 to 30 minutes.
Let the charlottes cool in the pan for about 5 minutes, then loosen the sides of each charlotte with a table knife and pop them out of the pan. Serve immediately.

THE FRENCH ARE MASTERS at creating simple dishes with extraordinary taste, and Croque Madames are no exception. The gooey yolk and melted cheese complement the crisp edges of the ham and golden brown toasted bread. Sometimes you just need a meal that feels extra special, and these Croque Madames make comfort food into something fabulous. They’re perfect served as part of a brunch or with a green salad at lunch.
Nonstick cooking spray, for the pan
3 tablespoons unsalted butter, softened
12 thin slices white bread, such as Pepperidge Farm’s Very Thin White Bread
2 tablespoons Dijon mustard
12 ounces (340 g) thinly sliced cooked ham, cut in half if too large to fit in the wells
1 cup (115 g) grated Gruyère
12 large eggs
Kosher salt and freshly ground black pepper
Preheat the oven to 350°F (175°C).
Butter one side of each slice of bread. Flip the bread over and spread mustard on the other side. Spray a 12-well classic cupcake pan with nonstick cooking spray. Line the wells of the prepared pan with the slices of bread, mustard side up. Firmly press the bread into the wells but do not trim the bread; it will peek up above the pan’s edge and become crispy during baking. Place 1 slice of ham in each well, pressing down to shape it to the well. Sprinkle each with about 1 tablespoon of cheese, using it all.
Crack an egg into each well and season with salt and pepper. Bake until the egg is set, 25 minutes for a soft yolk and 28 minutes for a firm yolk. Use your hands to lift the puddings from the pan. Serve them immediately.

YOU HAVE TO TRY THIS to believe it! That’s all I can say. The egg on top creates a creamy blanket for the melted pile of heaven beneath, while juices from the sausage seep into the sweetness of the multigrain-waffle base. What an amazing way to start the day! These wafflinis can be eaten with a fork and knife or, if you’re on the run, they’re a great replacement for the fast-food version. (If you plan to eat this out of hand, be sure to hard cook the egg so the yolk doesn’t make a mess.)
Nonstick cooking spray, for the pan
3 frozen multigrain waffles, from 1 (10-ounce / 290-g) box, or 12 frozen mini waffles
1 pound (455 g) mildly spicy ground Italian turkey or pork sausage, or 5 mildly spicy Italian sausages, casings removed (see Note)
1 1/2 cups (175 g) grated sharp cheddar
12 large eggs
![]() I prefer sausage links because, in most markets, you can get a variety of flavors from the deli: andouille, apple, pork, chicken, chorizo, duck, Italian, Polish, smoked Hungarian, and so on!
I prefer sausage links because, in most markets, you can get a variety of flavors from the deli: andouille, apple, pork, chicken, chorizo, duck, Italian, Polish, smoked Hungarian, and so on!
Preheat the oven to 350°F (175°C). Spray a 12-well classic cupcake pan and a large nonstick skillet with nonstick cooking spray.
If using regular-size waffles, cut them diagonally into quarters for a total of 12 triangles. (If using mini waffles, there is no need to cut them.) Place 1 piece of waffle (or 1 mini waffle) into each well of the pan. Sauté the sausage in the skillet over medium heat, breaking it up with a wooden spoon, until browned, about 10 minutes. Drain, if necessary, over a colander lined with a paper towel. Set aside.
Divide 1 cup (115 g) of the cheese among the wells. Evenly divide the sausage among the wells, pressing down on the sausage layer to make room for the eggs. Finally, crack 1 egg onto each mini meal and sprinkle with the remaining 1/2 cup (60 g) cheese.
For a perfectly poached egg with a runny yolk, bake for 13 minutes. For a hard-cooked egg, bake for 15 minutes. To unpan, loosen the sides of each wafflini with a table knife and insert the tines of a fork between the pan and each wafflini to lift it out. Serve them immediately.
VARIATIONS Try a blueberry waffle with provolone cheese or a cinnamon waffle with Muenster and serve them with a little maple syrup.

I LOVE HUEVOS RANCHEROS because all of my favorite flavors are wrapped up into one dapper little package. Dapper might not sound like the right word to describe these, but they look truly chic when served. The bean-and-meat filling is spectacular when it mixes with the creamy yolk of the egg. My children like scooping the filling out of the flour tortilla with corn chips. They think I’m crazy because I let them eat these for breakfast, but I say meals are more fun with a little craziness.
Nonstick cooking spray, for the pan
12 (6-inch / 15-cm) flour tortillas
1 teaspoon extra-virgin olive oil
1 pound (455 grams) ground turkey
1 (1.25-ounce) package taco seasoning, or 3 tablespoons homemade taco seasoning (see Notes)
1 (16-ounce / 455-g) can refried or black beans, drained (see Notes)
1 (16-ounce / 455-g) jar mild salsa, any flavor you prefer, plus more for serving if desired
2 cups (230 g) grated sharp cheddar, plus more for serving if desired
12 large eggs
OPTIONAL TOPPINGS
Guacamole
Jalapeños, sliced
Olives, black or California, pitted and sliced crosswise
Scallions, sliced
Green chiles, chopped
Queso fresco cheese
Crema or sour cream
![]() If you’d like to make your own taco seasoning, combine the following spices in a small bowl: 1 tablespoon chili powder, 1 1/2 teaspoons ground cumin, 1/4 teaspoon dried oregano, 1/4 teaspoon garlic powder, 1/4 teaspoon onion powder, 1/2 teaspoon paprika, 1/4 teaspoon crushed red pepper flakes, 2 teaspoons salt, and 1 teaspoon freshly ground black pepper. Store in an airtight container for up to 3 months.
If you’d like to make your own taco seasoning, combine the following spices in a small bowl: 1 tablespoon chili powder, 1 1/2 teaspoons ground cumin, 1/4 teaspoon dried oregano, 1/4 teaspoon garlic powder, 1/4 teaspoon onion powder, 1/2 teaspoon paprika, 1/4 teaspoon crushed red pepper flakes, 2 teaspoons salt, and 1 teaspoon freshly ground black pepper. Store in an airtight container for up to 3 months.
Using refried beans will give you a smooth texture; using whole black beans will give you a chunkier texture. If you prefer your black beans smashed, you can mash them against the side of the pan with a wooden spoon.
Preheat the oven to 350°F (175°C). Spray a 12-well classic cupcake pan with nonstick cooking spray. Line each well with a flour tortilla; the edges will peek over the top.
Heat the oil in a medium nonstick skillet over medium heat, then sauté the turkey, breaking it up with the back of a wooden spoon until the pieces are crumbled. Stir in the taco seasoning and continue cooking until the turkey is browned, about 12 minutes total. Add the refried beans and stir to combine. If the mixture is soupy, continue to cook until all of the liquid evaporates. Adjust the seasoning, if necessary, and remove from the heat.
Divide the meat and bean filling among the tortillas, then top each with 2 tablespoons salsa (you will use the whole jar), followed by 2 tablespoons cheese (you will use 1 cup / 115 g), pressing down firmly to make room for the eggs. Crack one egg into each well and sprinkle them with the remaining 1 cup (115 g) of cheese.
Bake until the eggs are cooked through and the tortillas are golden brown, 25 minutes for a soft yolk or 28 minutes for a firm yolk. Use a table knife to pop the huevos rancheros out of the pan. Serve them immediately with your choice of one or more of the suggested toppings. Garnish with additional salsa and cheese, if desired. Serve any leftover meat and bean filling on the side as a dip for tortilla chips.

AN OMELET CAN BE GOOD, great, or grandiose; this is the latter. Here, individual flavors are lovingly seasoned and then layered to create memories on your tongue. But keep it simple! Leave the order of layering ingredients as is; they are arranged that way for a reason. You’ll see why once you make these the first time and sample the perfect balance of rich and salty, tangy and creamy. And don’t mix all of the ingredients together and pour them into the shell. This little package packs a powerful punch when done right.
2 tablespoons olive oil
1 cup (150 g) chopped red or yellow onion
1 large clove garlic, finely chopped, or 1 tablespoon garlic from a tube
1 cup (150 g) chopped red, yellow, and/or orange peppers
10 large eggs
2 teaspoons hot sauce or chile paste
1/2 teaspoon kosher salt
Freshly ground black pepper
1 (9-ounce / 255-g) ham steak, cut into 1/4-inch (6-mm) dice
1 (16-ounce / 455-g) jar salsa
2 cups (230 g) grated extra-sharp cheddar
Nonstick cooking spray, for the pan
12 (6-inch / 15-cm) flour tortillas
In a medium skillet, heat the oil over medium heat. Add the onion and cook, stirring occasionally, until it begins to brown, about 5 minutes. Stir in the garlic and pepper and cook until softened, about 5 minutes. Set aside.
In a medium bowl, whisk together the eggs, hot sauce, salt, and a few grinds of black pepper.
In a medium nonstick skillet over medium heat, scramble the eggs until loosely scrambled, using a wooden spoon to stir and break up the pieces, about 8 minutes. Remove from the heat.
In a medium bowl, toss the ham with the reserved pepper and onion mixture. In another medium bowl, mix together the salsa and 1 1/2 cups (175 g) of the cheese. Set both bowls aside.
Preheat the oven to 350°F (175°C).
Spray a 12-well classic cupcake pan with nonstick cooking spray. Line each well with a flour tortilla (the edges will peek over the top). Fill each tortilla with 2 heaping tablespoons scrambled eggs. Evenly distribute the ham and pepper mixture among the wells, on top of the eggs, then evenly distribute the salsa and cheese mixture over the ham and peppers. Evenly divide the remaining 1/2 cup (60 g) cheese among the wells.
Bake until the egg mixture is cooked through and the cheese has melted, about 25 minutes. Loosen the sides of each omelet with a table knife and pop them out of the pan. Eat the omelets immediately on their own or as part of a breakfast buffet that includes spicy flank steak and home fries.

THESE HEARTY CORNBREAD hand pies could easily become a Super Bowl staple. They are a little sweet, but also salty and tangy. Even better, they can be eaten out of hand, cutting down on much of the mess, and make a fast and hearty meal for the crowd gathered around the TV. Serve with the same sides you would enjoy with chili, including sour cream, hot sauce, scallions, and chiles.
1 teaspoon olive oil
1/2 pound (225 g) ground beef or ground turkey
1 (12-ounce / 340-g) package frozen vegetarian chili (see Note), thawed
1 cup (115 g) grated Monterey Jack
1 cup (160 g) cornmeal
1 cup (125 g) all-purpose flour
1 tablespoon chili powder
1/2 teaspoon kosher salt
2 teaspoons baking powder
2 large eggs, lightly beaten
1/4 cup (1/2 stick / 60 g) butter, melted and cooled
1/3 cup (75 ml) honey
1 cup (240 ml) buttermilk
8 slices bacon
Nonstick cooking spray, for the pan
OPTIONAL TOPPINGS
Sour cream
Scallions, sliced
Hot sauce
Cheddar, grated
Black olives, sliced
Lettuce, shredded
Tomatoes, diced
![]() Very good vegetarian chili can be found in most supermarkets. Look for it in the refrigerated or frozen section. If using a can of vegetarian chili, add 1 teaspoon each of cumin and chili powder, and diced fire-roasted red peppers from a 3.5-ounce (100-g) jar.
Very good vegetarian chili can be found in most supermarkets. Look for it in the refrigerated or frozen section. If using a can of vegetarian chili, add 1 teaspoon each of cumin and chili powder, and diced fire-roasted red peppers from a 3.5-ounce (100-g) jar.
![]() The chili can be prepared up to 2 days in advance and stored in an airtight container in the refrigerator until needed. It will last for up to 1 week.
The chili can be prepared up to 2 days in advance and stored in an airtight container in the refrigerator until needed. It will last for up to 1 week.
Heat the oil in a medium nonstick skillet over medium heat, then add the ground meat and cook, breaking it up with a wooden spoon until browned, about 10 minutes. Drain the meat well in a colander, then place it in a large bowl and stir in the chili and the cheese. Set aside.
Preheat the oven to 350°F (175°C).
In the bowl of a stand mixer fitted with the paddle attachment, mix the cornmeal, flour, chili powder, salt, and baking powder. In a small bowl, mix the eggs, butter, honey, and buttermilk. Add the wet ingredients to the dry ingredients, mixing on low until combined. Set aside.
In a large skillet over medium heat, cook the bacon until crisp. Drain the bacon on paper towels, then break it into small pieces.
Spray a 12-well classic cupcake pan with nonstick cooking spray. Add 2 heaping tablespoons of cornbread batter to each well (you will have leftover batter). Divide the chili evenly among the wells, using it all. Add another layer of cornbread batter, evenly distributing all of the remaining batter, and then top with the bacon pieces.
Bake until golden on top, 18 to 20 minutes. Let the hand pies rest in the pan for 1 to 2 minutes, then loosen the sides of each mini meal with a table knife and pop them out of the pan. Serve them with the optional toppings on the side.
Store the hand pies in an airtight container in the refrigerator for up to 5 days. Reheat, wrapped in tin foil, for 15 minutes at 350°F (175°C).
VARIATION If you want to offer a vegetarian hand pie, omit the meat from the chili and add 1/2 cup (240 g) drained canned pinto, black, or kidney beans instead. Or create a salad: In a serving bowl, toss the suggested toppings (minus the sour cream) with buttermilk dressing, and serve the warm chili-cheese bake on top.


